2015 MERCEDES-BENZ E-CLASS ESTATE child restraint
[x] Cancel search: child restraintPage 75 of 497
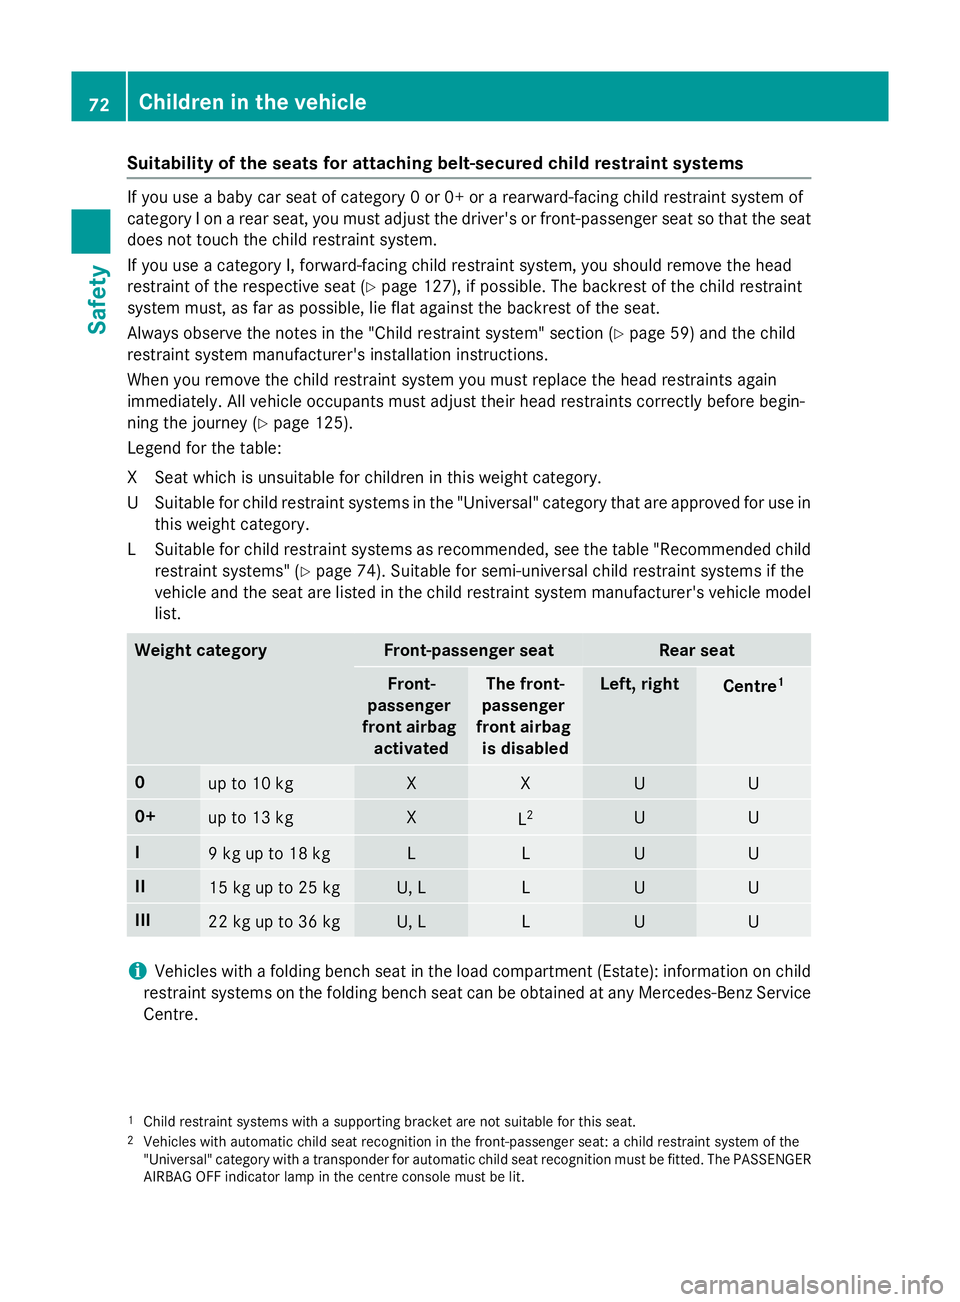
Suitability of the seats for attaching belt-secured child restraint systems
If you use
ababy car seat of category 0or0+orarearward-facing child restraint system of
category Ionarear seat, you must adjust the driver's or front-passenger seat so that the seat
does not touch the child restraint system.
If you use acategory I, forward-facing child restraint system, you should remove the head
restraint of the respective seat (Y page 127), if possible. The backrest of the child restraint
system must, as far as possible, lie flat against the backrest of the seat.
Always observe the notes in the "Childr estraint system" section (Ypage 59) and the child
restraint system manufacturer's installation instructions.
When you remove the child restraint system you must replace the head restraint sagain
immediately. All vehicle occupants must adjust their head restraint scorrectly before begin-
ning the journey (Y page 125).
Legend for the table:
XS eat which is unsuitable for children in this weight category.
US uitable for child restraint systems in th e"Universal" categor ytha tare approve dfor use in
this weigh tcategory.
LS uitable for child restraint systems as recommended, see th etable "Recommended child
restraint systems "(Ypage 74). Suitable for semi-universal child restraint systems if the
vehicl eand th eseat are listed in th echild restraint system manufacturer' svehicl emodel
list. Weight category Front-passenger seat Rea
rseat Front-
passenger
front airbag activated Th
ef ront-
passenger
front airbag is disabled Left
,right Centre
1 0
up to 10 kg X X U U
0+
up to 13 kg X
L
2 U U
I
9kgupt
o18kg L L U U
II
15 kg up to 25 kg U, L L U U
III
22 kg up to 36 kg U, L L U U
i
Vehicles wit
hafoldin gbench seat in th eload compartmen t(Estate): information on child
restraint systems on th efoldin gbench seat can be obtaine datany Mercedes-Ben zService
Centre.
1 Child restrain tsystems wit hasupporting bracke tare no tsuitable for this seat.
2 Vehicles wit hautomatic child seat recognition in th efront-pa ssenger seat :achild restrain tsystem of the
"Universal" categor ywithat ransponder for automatic child seat recognition mus tbefitted. The PASSENGER
AIRBA GOFFindicator lamp in th ecentr econsol emustbel it. 72
Children in th
evehicleSafety
Page 76 of 497
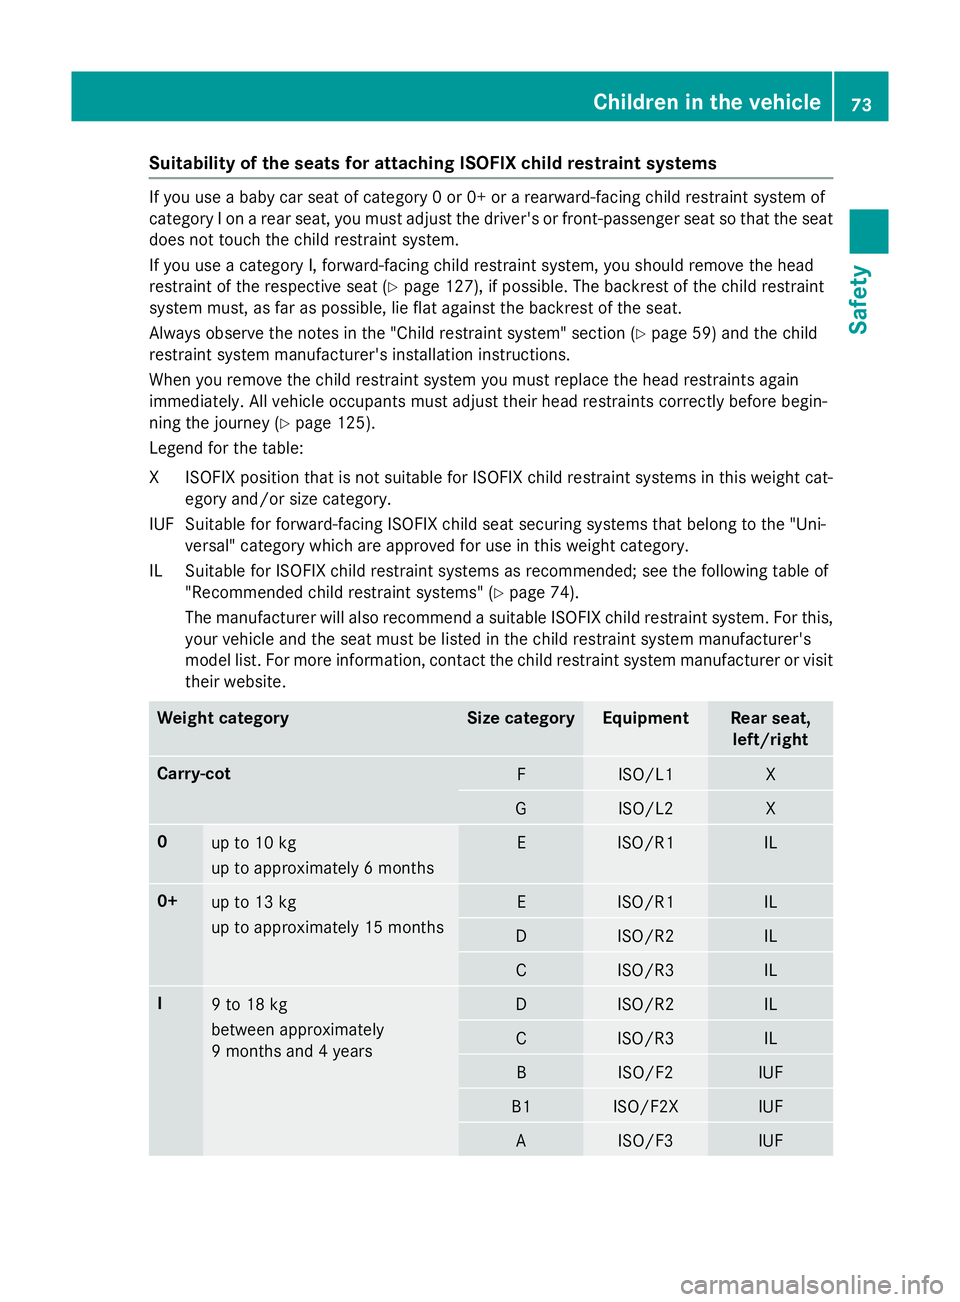
Suitability of the seats for attaching ISOFIXc
hild restraint systemsIf you use
ababy car seat of category 0or0+orarearward-facing child restraint system of
category Ionarear seat, you must adjust the driver's or front-passenger seat so that the seat
does not touch the child restraint system.
If you use acategory I, forward-facing child restraint system, you should remove the head
restraint of the respective seat (Y page 127), if possible. The backrest of the child restraint
system must, as far as possible, lie flat against the backrest of the seat.
Always observe the notes in the "Childr estraint system" section (Ypage 59) and the child
restraint system manufacturer's installation instructions.
When you remove the child restraint system you must replace the head restraint sagain
immediately. All vehicle occupants must adjust their head restraint scorrectly before begin-
ning the journey (Y page 125).
Legend for the table:
XI SOFIX position tha tisn ot suitabl efor ISOFIX child restraint systems in this weight cat-
egory and/or size category.
IUF Suitable for forward-facing ISOFIX child sea tsecuring systems tha tbelong to the "Uni-
versal "categor ywhich are approved for us einthis weight category.
IL Suitable for ISOFIX child restraint systems as recommended ;see the following table of
"Recommended child restraint systems "(Ypage 74).
The manufacturer will also recommend asuitabl eISOFIX child restraint system. For this,
your vehicl eand the sea tmustb elisted in the child restraint system manufacturer's
model list. For more information, contact the child restraint system manufacturer or visit
thei rwebsite. Weight category Siz
ec ategory Equipment Rear seat,
left/right Carry-cot
F ISO/L1 X
G ISO/L2 X
0
up to 10 kg
up to approximatel
y6months E ISO/R1 IL
0+
up to 13 kg
up to approximatel
y15m onths E ISO/R1 IL
D ISO/R2 IL
C ISO/R3 IL
I
9t
o18kg
between approximately
9m onths and 4years D ISO/R2 IL
C ISO/R3 IL
B ISO/F2 IUF
B1 ISO/F2X IUF
A ISO/F3 IUFChildre
ninthe vehicle
73Safety Z
Page 77 of 497
The child restraint system must not touch the roof or be put under strain by the head restraints.
Adjust the head restraint position accordingly. Also observe the child restraint system man-
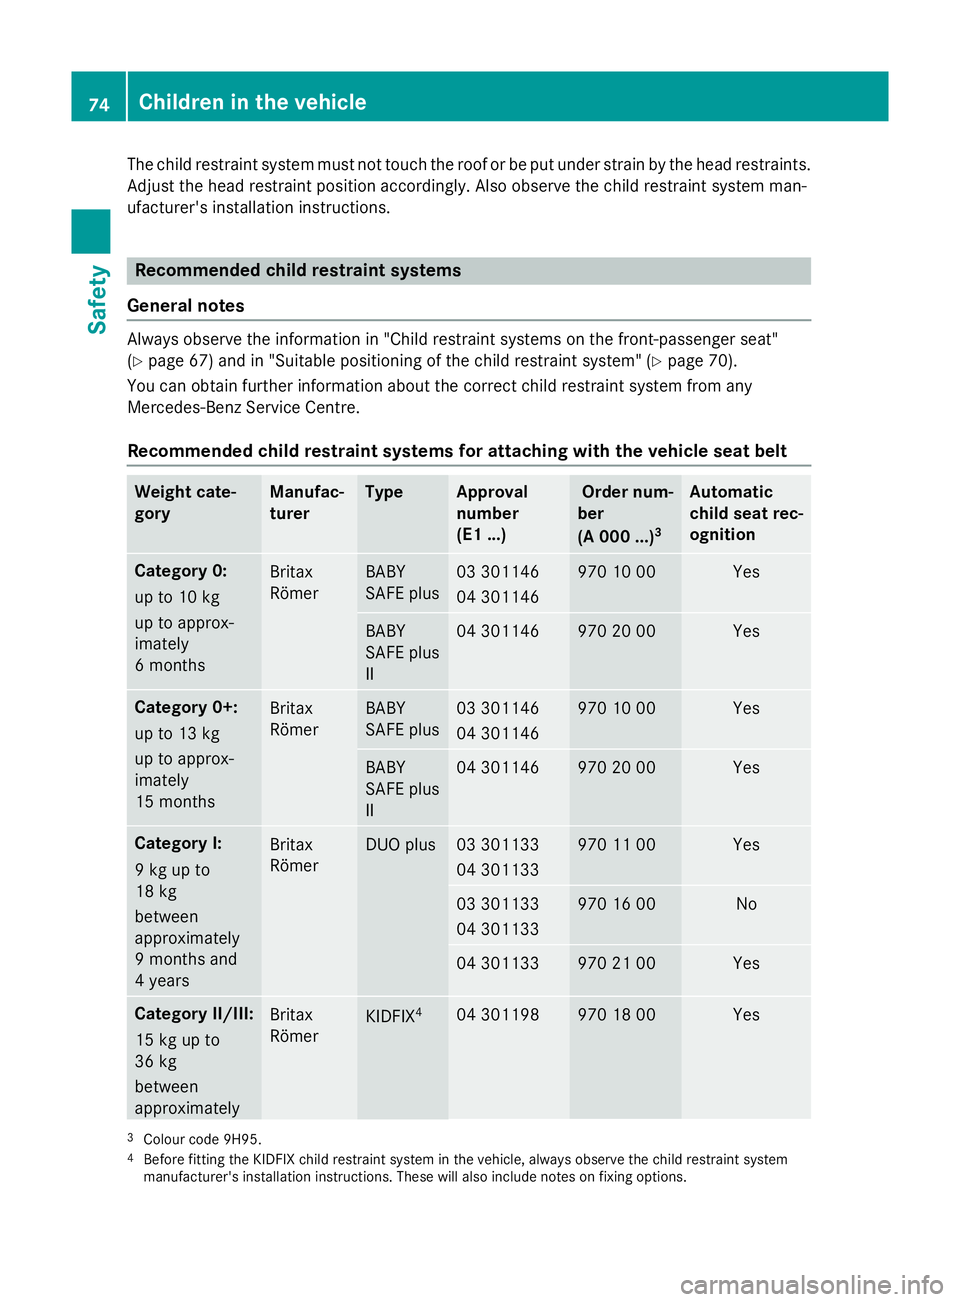
ufacturer's installation instructions. Recommended child restraint systems
General notes Always observe the information in "Child restraint systems on the front-passenger seat"
(Y
page 67) and in "Suitable positionin gofthe child restraint system" (Y page 70).
You can obtain further information about the correc tchild restraint system from any
Mercedes-Benz Servic eCentre.
Recommended child restraint systems for attaching with the vehicle seat belt Weight cate-
gory Manufac-
turer Type Approval
number
(E1 ...) Order num-
ber
(A 000 ...) 3 Automatic
child seat rec-
ognition
Category 0:
up to 10 kg
up to approx-
imately
6m
onths Britax
Römer BABY
SAFEp
lus 03 301146
04 301146 970 10 00 Yes
BABY
SAFEp
lus
II 04 301146 970 20 00 Yes
Category 0+:
up to 13 kg
up to approx-
imately
15 months
Britax
Römer BABY
SAFEp
lus 03 301146
04 301146 970 10 00 Yes
BABY
SAFEp
lus
II 04 301146 970 20 00 Yes
Category I:
9kgupto
18 kg
between
approximately
9m
onths and
4y ears Britax
Römer DUO plus 03 301133
04 301133 970 11 00 Yes
03 301133
04 301133 970 16 00 No
04 301133 970 21 00 Yes
Category II/III:
15 kg up to
36 kg
between
approximately
Britax
Römer
KIDFIX
4 04 301198 970 18 00 Yes
3
Colour code 9H95.
4 Before fitting the KIDFIX child restraint system in the vehicle, alway sobserve the child restraint system
manufacturer's installation instructions .These will also include notes on fixing options. 74
Children in the vehicleSafety
Page 79 of 497
G
WARNING
If you leave children unattended in the vehi-
cle, they may be abletos et the vehiclein
motion if, for example, they:
R release the parking brake
R shift the automatic transmission out of park
position Por shift manua ltransmission into
neutral
R start the engine
In addition, they may operate vehicl eequip-
ment and become trapped. There is arisk of
an accident and injury.
When leaving the vehicle, alwayst ake the key
with you and lock the vehicle. Never leave
children unattended in the vehicle. G
WARNING
If persons (particularly children) are exposed
to heatorc old foraprolonged period, there is
ar isk of serious or even fatal injuries. Never
leave persons (particularly children) unatten-
ded in the vehicle. G
WARNING
If the child restraint system is placed in direct sunlight, the parts coul dbecome very hot.
Childre ncouldbes uffer burns by touching
these parts, in particular on the metallic parts
of the child restraint system. There is arisk of
injury.
If you and yourc hild leave the vehicle, always
make sure that the child restraint system is
not in direct sunlight. Cove ritwithablanket,
for example. If the child restraint system has
been expose dtodirect sunlight, leave it to
cool downb efore securing the child in it.
Never leave children unattended in the vehi-
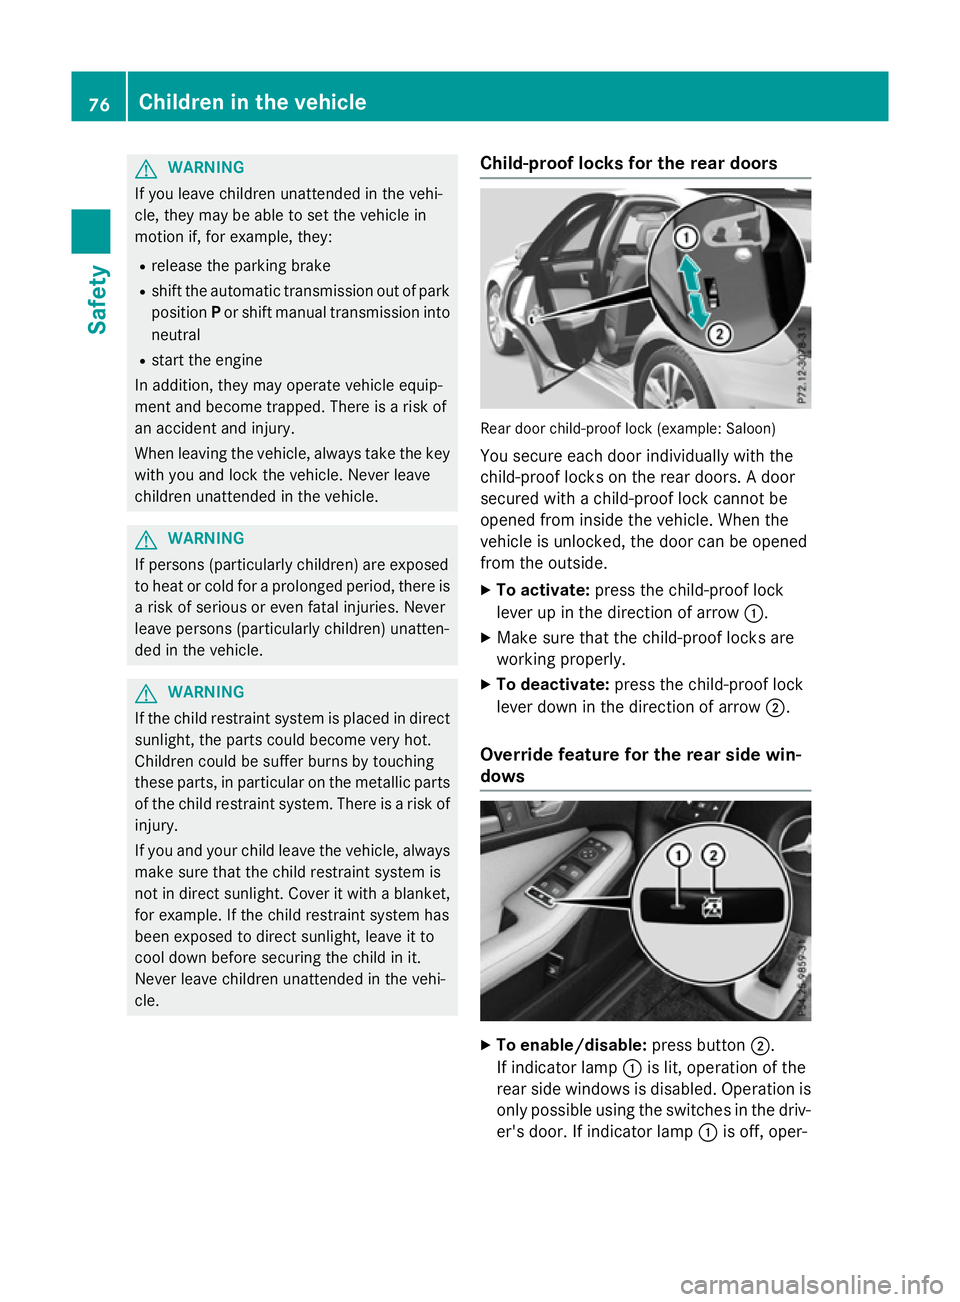
cle. Child-proof locks for the rear doors Rea
rdoor child-proof lock (example: Saloon)
You secure each door individually with the
child-proof locks on the rear doors. Adoor
secure dwithachild-proof lock cannot be
opened from insid ethe vehicle. When the
vehicl eisunlocked ,the door can be opened
from the outside.
X To activate: press the child-proof lock
leve rupint he direction of arrow :.
X Make sure that the child-proof locks are
working properly.
X To deactivate: press the child-proof lock
leve rdow nint he direction of arrow ;.
Override feature for the rear side win-
dows X
To enable/disable: press button;.
If indicator lamp :is lit, operation of the
rear side windows is disabled. Operation is
only possible using the switches in the driv- er's door. If indicator lamp :is off, oper- 76
Children in the vehicleSafety
Page 126 of 497
The seat belt should:
R fit snugly across your body
R be routed across the middle of your shoul-
der
R be routed across your hips in the pelvic
area
X Before starting off, adjust the rear-view mir-
ror and the exterior mirrors so that you
have agood view of road and traffic condi-
tions (Y page 136).
X Vehicles with amemor yfunction: save
the seat, steerin gwheel and exterior mirror
settings with the memory function
(Y page 139). Seats
Important safety notes
G
WARNING
If children adjust the seats, they could
become trapped, especially if they are unat-
tended. There is arisk of injury.
When leaving the vehicle, alway stake the key
with you and lock the vehicle. Never leave
children unattended in the vehicle.
The seats can still be adjusted when there is
no key in the ignition lock. G
WARNING
The head restraints cannot provide the inten-
ded protection unless they are fitted and
adjusted correctly. There is an increased risk of injury to the head and neck in the event of
an accident or sudden braking, for example.
Always drive with the head restraints fitted.
Ensure that the centre of the head restraints
support the back of each vehicle occupant's
head at eye level before driving off.
Observe the safety notes on "Airbags"
(Y page 50) and "Children in the vehicle"
(Y page 58). G
WARNING
You could lose control of the vehicle while
driving if you:
R adjust the driver's seat, steerin gwheel or
mirrors
R fasten the seat belt
There is arisk of an accident.
Adjust the driver's seat, head restraint, steer-
ing wheel and mirrors and fasten your seat
belt before starting the engine. G
WARNING
If you adjust the seat height carelessly, you or other vehicle occupant scould be trapped and
thereby injured. Children in particular could
accidentally press the electrical seat adjust-
ment button sand become trapped. There is a
risk of injury.
While moving the seats, make sure that your
hands or other body parts do not get under the
lever assembly of the seat adjustmen tsys-
tem. G
WARNING
When adjusting aseat, you or another vehicle
occupant could become trapped by the guide rail of the seat, for instance. There is arisk of
injury.
Make sure that no one has any part of their
body within the sweep of the seat when
adjusting it.
! To avoid damage to the seats and the seat
heating, observe the following information:
R do not spill any liquids on the seats. If
liquid is spilled on the seats, dry them as
soon as possible.
R if the seat covers are damp or wet, do not
switch on the seat heating. The seat
heating should also not be used to dry
the seats.
R clean the seat covers as recommended;
see "Interior care".
R do not transport heavy loads on the
seats. Do not place sharp object sonthe Seats
123Seats, steering wheel and mirrors Z
Page 127 of 497
seat cushions, e.g. knives, nails or tools.
The seats should only be occupied by
passengers, if possible.
R when the seat heating is in operation, do
not cover the seats with insulating mate-
rials, e.g. blankets, coats, bags, seat cov- ers, child seats or booster seats.
! Make sure that there are no objects in the
footwell under or behind the seats when
moving the seats back. There is arisk that
the seats and/or the objects could be dam- aged.
i The head restraints in the front seats are
fitted with the NECK-PRO system
(Y page 55). For this reason, it is not pos-
sible to remove the head restraints from
the front seats.
Vehicles without the through-loading fea-
ture: the head restraints cannot be
removed from the rear-compartment
seats.
For more information, contact aqualified
specialist workshop.
i Further related subjects:
R Through-loading facility in the rear bench
seat (Saloon)
R EASY-PACK through-loading facility in
the rear bench seat (Estate)
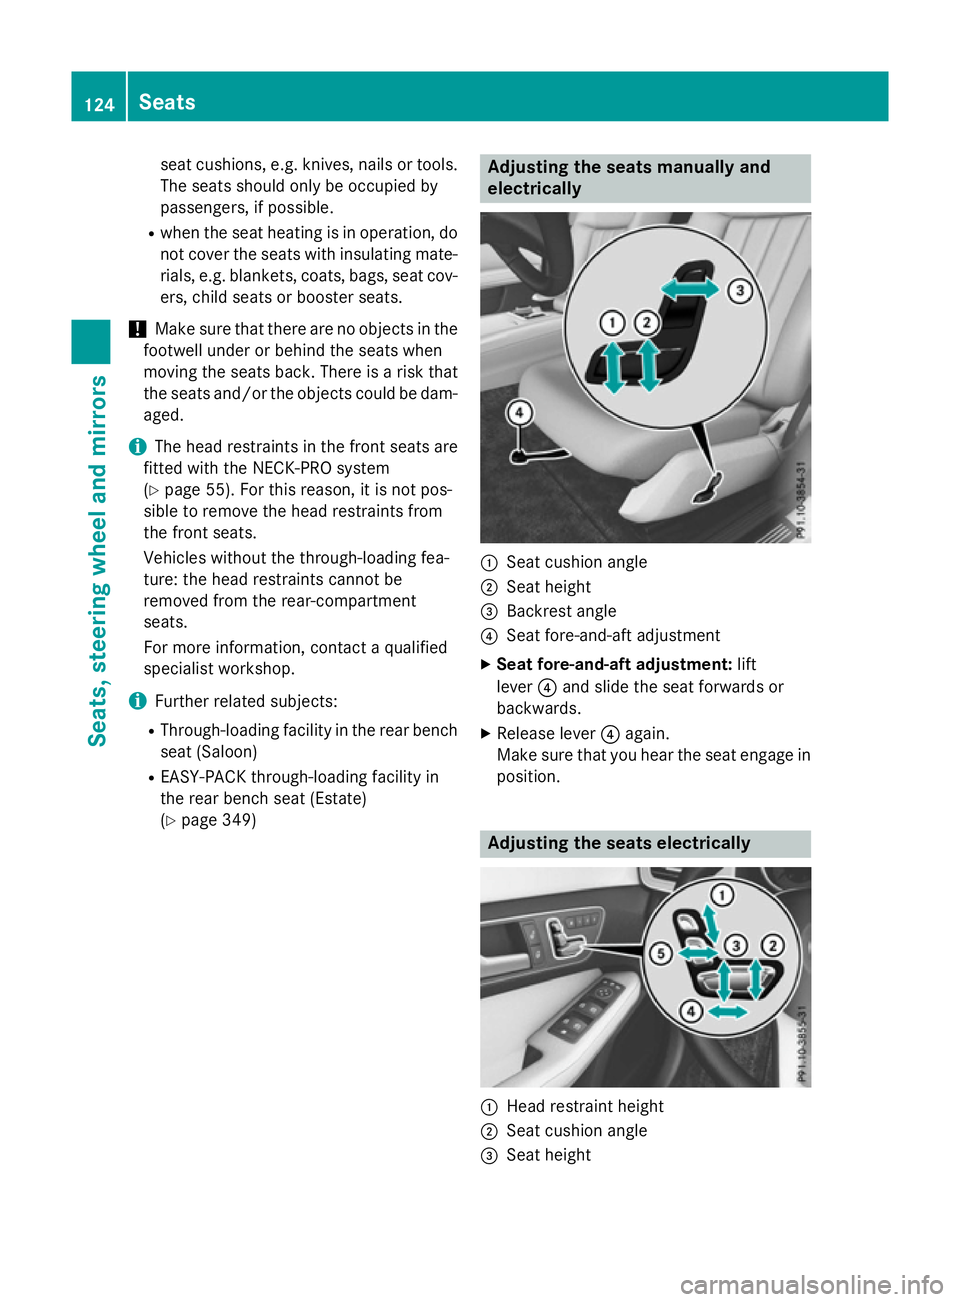
(Y page 349) Adjusting the seats manually and
electrically
:
Seat cushion angle
; Seat height
= Backrest angle
? Seat fore-and-aft adjustment
X Seat fore-and-aft adjustment: lift
lever ?and slide the seat forwards or
backwards.
X Release lever ?again.
Make sure that you hear the seat engage in
position. Adjusting the seats electrically
:
Head restraint height
; Seat cushion angle
= Seat height 124
SeatsSeats, steering wheela
nd mirrors
Page 136 of 497
Problems with the seat ventilation
Problem
Possible causes/consequences and
M
MSolutions The seat ventilation has
switched off prema-
turely or cannot be
switched on. The on-board voltage is too low because too many electrical con-
sumers are switched on.
X Switch off electrical consumers that you do not need, such as
the rear window heating or interior lighting.
Once the battery is sufficiently charged, the seat ventilation will
switch back on automatically. Steering wheel
Important safety notes
G
WARNING
You could lose control of the vehicle while
driving if you:
R adjust the driver's seat, steering wheel or
mirrors
R fasten the seat belt
There is arisk of an accident.
Adjust the driver's seat, head restraint ,steer-
ing wheel and mirrors and fasten your seat
belt before startingt he engine. G
WARNING
Children could become trapped by the steer-
ing wheel if they adjust it. There is arisk of
injury.
When leaving the vehicle, always take the key with you and lock the vehicle. Never leave
children unattended in the vehicle.
The electrically adjustable steering wheel can
still be adjusted when there is no key in the
ignition lock. Adjusting the steering wheel man-
ually
G
WARNING
The steering wheel may move unexpectedly if you adjust it while driving. This could cause you to lose control of the vehicle. There is a
risk of an accident.
Make sure that the steering wheel is locked
before driving off. Never unlock the steering
wheel when the vehicle is in motion.
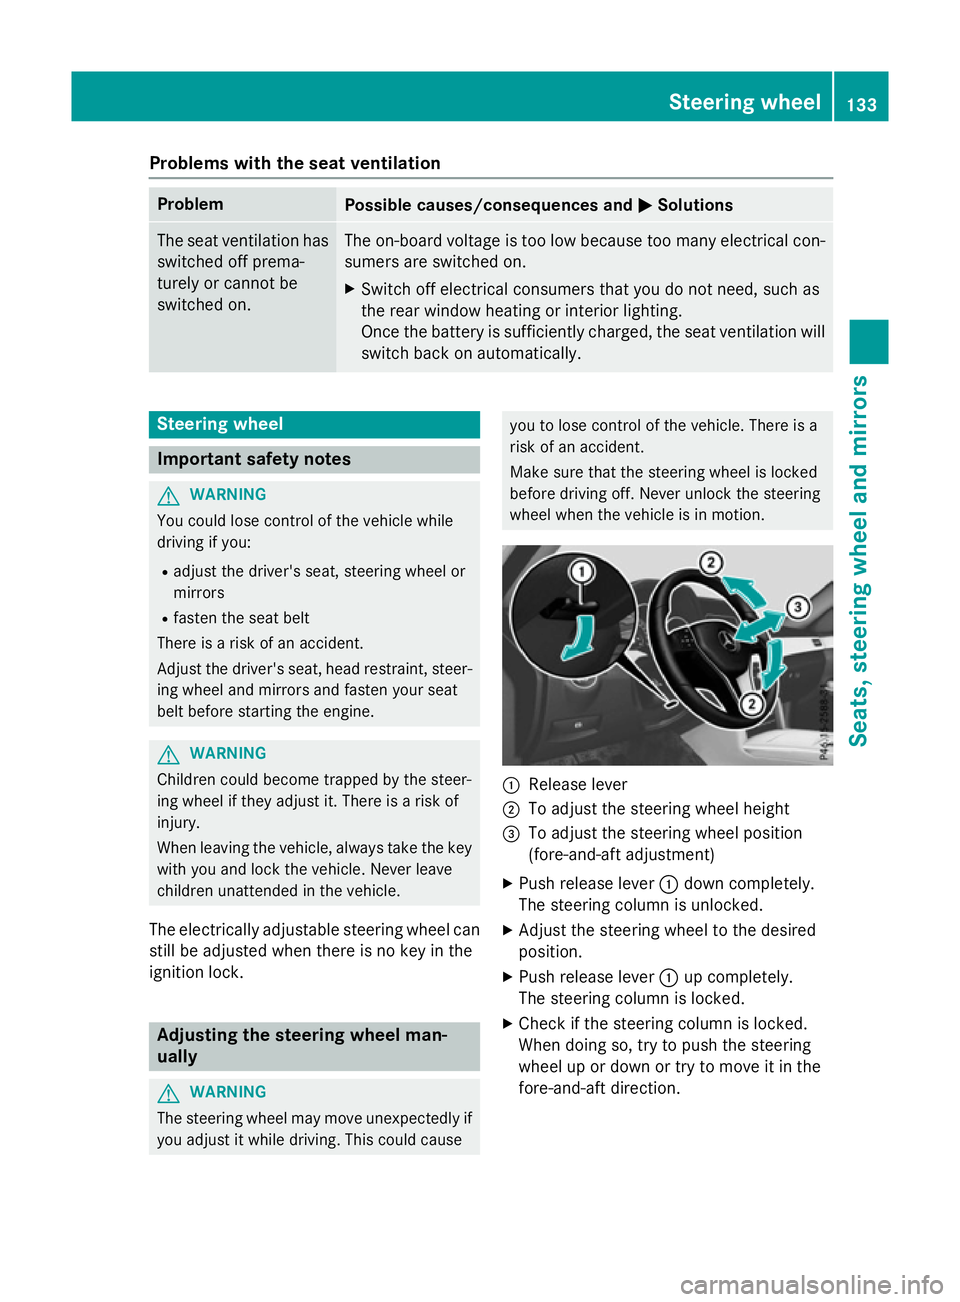
:
Release lever
; To adjust the steering wheel height
= To adjust the steering wheel position
(fore-and-aft adjustment)
X Push release lever :down completely.
The steering column is unlocked.
X Adjust the steering wheel to the desired
position.
X Push release lever :up completely.
The steering column is locked.
X Check if the steering column is locked.
When doing so, try to push the steering
wheel up or down or try to move it in the
fore-and-aft direction. Steering wheel
133Seats, steering wheela nd mirrors Z
Page 142 of 497
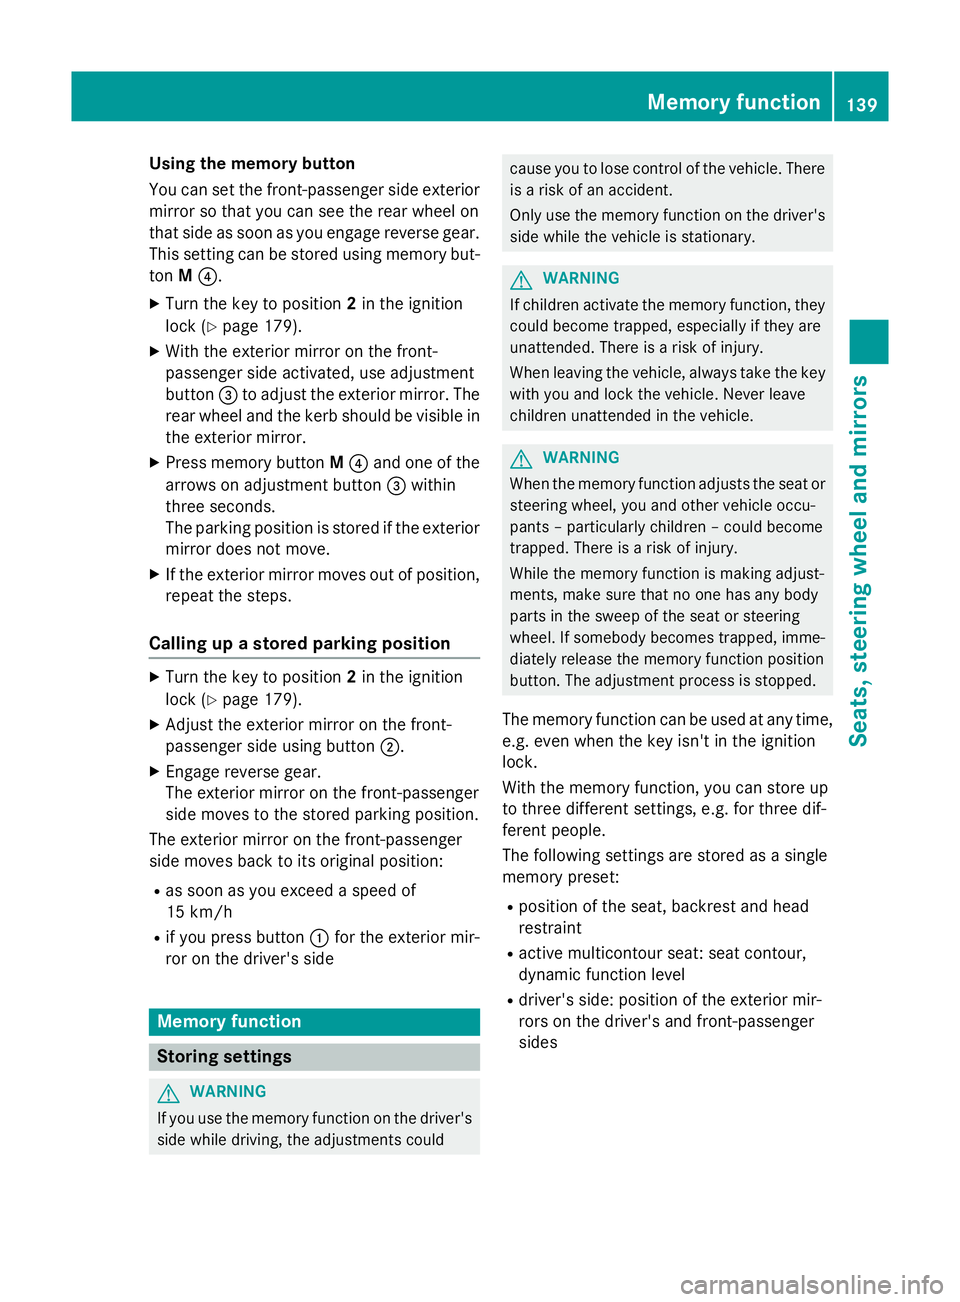
Using the memory button
You can set the front-passenger side exterior
mirror so that you can see the rear wheel on
that side as soon as you engage reverse gear.
This setting can be stored using memor ybut-
ton M?.
X Turn the key to position 2in the ignition
lock (Y page 179).
X With the exterior mirror on the front-
passenger side activated, use adjustment
button =to adjust the exterior mirror .The
rear wheel and the kerb should be visible in
the exterior mirror.
X Press memor ybutton M? and one of the
arrows on adjustment button =within
three seconds.
The parkin gposition is stored if the exterior
mirror does not move.
X If the exterior mirror moves out of position,
repeat the steps.
Calling up astored parking position X
Turn the key to position 2in the ignition
lock (Y page 179).
X Adjust the exterior mirror on the front-
passenger side using button ;.
X Engage reverse gear.
The exterior mirror on the front-passenger
side moves to the stored parkin gposition.
The exterior mirror on the front-passenger
side moves back to its original position:
R as soon as you exceed aspeed of
15 km/h
R if you press button :for the exterior mir-
ror on the driver' sside Memor
yfunction Storing settings
G
WARNING
If you use the memor yfunction on the driver's
side while driving, the adjustment scould cause you to lose contro
lofthe vehicle. There
is ar isk of an accident.
Only use the memor yfunction on the driver's
side while the vehicle is stationary. G
WARNING
If children activate the memor yfunction ,they
could become trapped, especially if they are
unattended. There is arisk of injury.
When leaving the vehicle, always tak ethe key
with you and lock the vehicle. Never leave
children unattended in the vehicle. G
WARNING
When the memor yfunction adjust sthe seat or
steering wheel, you and other vehicle occu-
pant s–p articularly children –could become
trapped. There is arisk of injury.
While the memor yfunction is makin gadjust-
ments, make sure that no one has any body
parts in the sweep of the seat or steering
wheel. If somebody becomes trapped, imme-
diately release the memor yfunction position
button. The adjustment proces sisstopped.
The memor yfunction can be used at any time,
e.g. even when the key isn't in the ignition
lock.
With the memor yfunction ,you can stor eup
to three different settings, e.g. for three dif-
feren tpeople.
The following settings are stored as asingle
memor ypreset:
R position of the seat, backrest and head
restraint
R activ emulticontour seat: seat contour,
dynamic function level
R driver' sside: position of the exterior mir-
rors on the driver' sand front-passenger
sides Memor
yfunction
139Seats, steering wheel and mirrors Z