2015 MERCEDES-BENZ E-CLASS ESTATE ECO mode
[x] Cancel search: ECO modePage 237 of 497
If indicator lamps
=and ?are off:
X Press button :twice.
Indicator lamps =and ?lightu p. You
have selected Sport +mode.
The AMG
AMG Ride
Ride Control
Control SPORT +
SPORT +message
appears in the multifunction display.
If indicator lamp ?lights up:
X Press button :once.
Second indicator lamp =lights up. You
have selected Sport +mode.
The AMG
AMG Ride
Ride Control
Control SPORT +
SPORT +message
appears in the multifunction display.
Comfort mode
When Comfort mode is selected, the handling
characteristics of yourv ehicle are more com-
fortable .Select this mode if you prefer amore
comfortable driving style. Select Comfort
mode also when driving fast on straight roads, e.g. on straight stretches of motorway.
X Press button :repeatedly until indicator
lamps =and ?go out.
You have selected Comfort mode.
The AMG Ride Control COMFORT
AMG Ride Control COMFORT mes-
sage appears in the multifunction display.
Storing and calling up settings
Once the suspension setting and drive pro-
gram have been selected, you can store and
call up yours ettings using AMG button ;.
X To store: press and hold AMG button ;
until you hear atone.
X To call up: press AMG button ;.
The stored suspension setting and drive
program are selected.
X To display: brieflypress AMG button ;.
Yours election appears in the multifunction
display. Vehicl
elevel Important safety notes
G
WARNING
People's limbs may become trapped if they
are located underneath the vehicle or
betwee nthe vehicle body and the tyres when
the vehicle is lowering. There is adanger of
injury.
When lowering the vehicle ,make sure no one
is underneath the vehicle or in the immediate vicinity of the wheela rches.
The vehicle may be lowered if you press the
suspension setting selector button or the
AMG button. The vehicle is lowered even if the
vehicle is at astandstill.
! If Sport or Sport
+suspension tuning has
been selected, the vehicle's ground clear-
ance decreases. Make sure that no objects
become trapped or that the vehicle has not
been damaged, for example, on the kerb.
i The vehicle level at the rear axle may
change visibly if you park the vehicle and
the outsid etemperature changes. If the
temperature drops, the vehicle level low-
ers; with an increase in temperature ,the
vehicle level rises.
Changing the rear axle level
This function is only available for the E63
AMG 4MATIC.
The vehicle level at the rear axle depends on
the selected suspension mode and the vehi-
cle speed.
The vehicle level at the rear axle changes
whiled riving depending on which suspension
mode is selected:
R Comfort: +10 mm
R Sport +and Sport: -15 mm
When changing from Comfort to Sport or
Sport +, the axle is lowered approximately
25 mm. When changing from Sport or Sport +
to Comfort, the axle is raiseda pproximately234
Driving systemsDriving and parking
Page 253 of 497
Distance
smeasured by PARKTRONI Cwill
also be opticall ydisplayed:
R as red or yellow brackets around the vehi-
cle symbo lintop view in split-screen mode
or
R at the bottom righ tasred or yellow brack-
ets around the vehicl esym bolinf ull-s creen
mode
Th elinet hicknes sand colou rofthe brackets
sho whow fart he vehicl eisfromano bject.
R yellow brackets with thi nlines:
PARKTRONI Cisactive
R yellow brackets with normal lines :an
object is present in close range of the vehi-
cle
R red line: an object is present in the imme-
diate close range of the vehicle
Important safety notes Th
e3 60° camera is onl yanaidand ma yshow
ad istorted view of obstacles, sho wthem
incorrectly or not at all. Th e360° camera is
not asubst itute for attentiv edriving.
Th er esponsibility for safe manoeuvring and
parking remains with you. Make sure that
there ar enopersons, animals or objects in
range whil emanoeuvring and parking.
Yo ua realways responsibl efor safety ,and
must always pa yattentio ntoyours urround-
ing sw henp arking and manoeuvring. This
applie stothe area sbehin d, in front of and
beside the vehicle. Yo ucould otherwise
endanger yourself and others.
Th e3 60° camera will not functio norwill
functio nonlyinal imited manner:
R if the doors ar eopen
R if the exterior mirrors ar efolde din
R if the boot lid/tailgate is open
R in heav yrain, sno worfog
R at night or in ver ydarkp laces
R if the camera sareexpose dtoveryb right
light
R if the area is li tbyfluorescent bulb sorLED
lighting (th edisplay mayflicker) R
if there is asudde nchange in temperature,
e.g .whend riving into aheatedg arag ein
winter
R if the camera lense saredirty or covered
R if the vehicl ecomponents in which the
camera sarefitte daredamaged. In this
event, have the camera positio nand setting
checked at aquali fied specialis tworkshop.
Do not us ethe 360° under such circumstan-
ces .You could otherwis einjure others or
damage objects when parking the vehicle.
Guid elines ar ealway sshown at roa dlevel.In
trailer mode, the guid elines ar eshown at the
level of the trailer coupling.
On vehicles with height-adjustabl echassis,
depending on technica lconditions ,leavi ng
the standard height can resul tin:
R inaccuracie sinthe guid elines
R inaccuracie sinthe displa yofgenerated
images (to pview)
Activatio nconditions Th
e3 60° camera imag ecan be displaye dif:
R your vehicl eisequippe dwitha3 60° cam-
era
R the key is in position 2in the ignition lock
R COMAND Online/Audi o20isswitched on
R the 360°camera
360 °camera functio niss witched on
Activatin gthe 360° camera X
Press the Øbutton in the centr econ-
sol efor longe rtha nt wo seconds.
Th ef ollowing appear sdepen ding on
whether transmission position Dor Ris
selected:
R as plit- screen with top view and the
imag efromt he front camera or
R as plit- screen with top view and the
imag efromt he reversing camera
or 250
Driving systemsDriving an
dparking
Page 270 of 497
To avoid hazardous situations:
R make sure to check the noseweight before
each journey
R use adrawbar noseweight as close as pos-
sible to the maximum noseweight
R do not exceed the maximum permissible
noseweight
R do not use anoseweight lower than the
minimum noseweight
When reversin gthe vehicle towards the
trailer, make sure there is nobody between
the trailer and the vehicle.
Couple and uncouple the trailer carefully. If
you do not couple the trailer to the towing
vehicle correctly, the trailer could become
detached.
Make sure that the following values are not
exceeded:
R the permissible trailer drawbar noseweight
R the permissible trailer load
R the permissible rear axle load of the towing
vehicle
R the maximum permissible gross vehicle
weight of both the towing vehicle and the
trailer
You will find the applicable permissible val-
ues, which must not be exceeded, in the vehi-
cle documents.
You will find the values approved by the man- ufacturer on the vehicle identification plates
and those for the towing vehicle under "Tech-
nical data" (Y page 484).
When towing atrailer, your vehicle's handling
characteristics will be different in comparison to when driving without atrailer.
The vehicle/trailer combination:
R is heavier
R is restricted in its acceleration and gradi-
ent-climbin gcapability
R has an increased braking distance
R is affected more by stron gcrosswinds
R demands more sensitive steering
R has alarger turnin gcircle This can impair the vehicle's handling char-
acteristics. Adapt your driving style accord-
ingly. Maintain
asafe distance. Drive care-
fully.
When towing atrailer, alway sadjust your
speed to the curren troad and weather con-
ditions. Do not exceed the maximum permis- sible speed for your vehicle/trailer combina-
tion. Notes on towing
atrailer
General notes Trailer towing is not permissible on the fol-
lowing models:
R E2 20 BlueTEC BlueEFFICIENCY Edition
R E1 80
R E63A MG
R E63A MG S-MODEL
R E63A MG 4MATIC
R E63A MG S-MODEL4 MATIC
i When towing
atrailer, set the tyre pres-
sure on the rear axle of the towing vehicle
for am aximum load; see the tyre pressure
table in the fuel filler flap (Y page 420).
Please notet hat when towing atrailer,
PARKTRONIC (Y page 235), Active Parking
Assist (Y page 239) and Blind Spot Assist
(Y page 257) are only available with limita-
tions, or not at all.
i On vehicles without level control, the
height of the ball coupling will alter accord-
ing to the load placed on the vehicle. If nec- essary, use atrailer with aheight-adjusta-
ble drawbar.
You will find fitting dimensions and loads
under "Technical data" (Y page 482).
Driving tips i
Observe the notes on ESP ®
trailer stabi-
lisation (Y page 86). Towing
atrailer
267Driving and parking Z
Page 286 of 497
An
ew route is calculated.
R Roa dnot mapped
Roa dnot mapped
The vehicl eposit ioni sinsid ethe area of the
digital ma pbutthe roa disnot recognised,
e.g .new roads ,car parks or private land.
R No route
No route
No route could be calculate dtothe selec-
ted destination.
R O:y ouhave reache dthe destination or an
intermediate destination. Audio menu
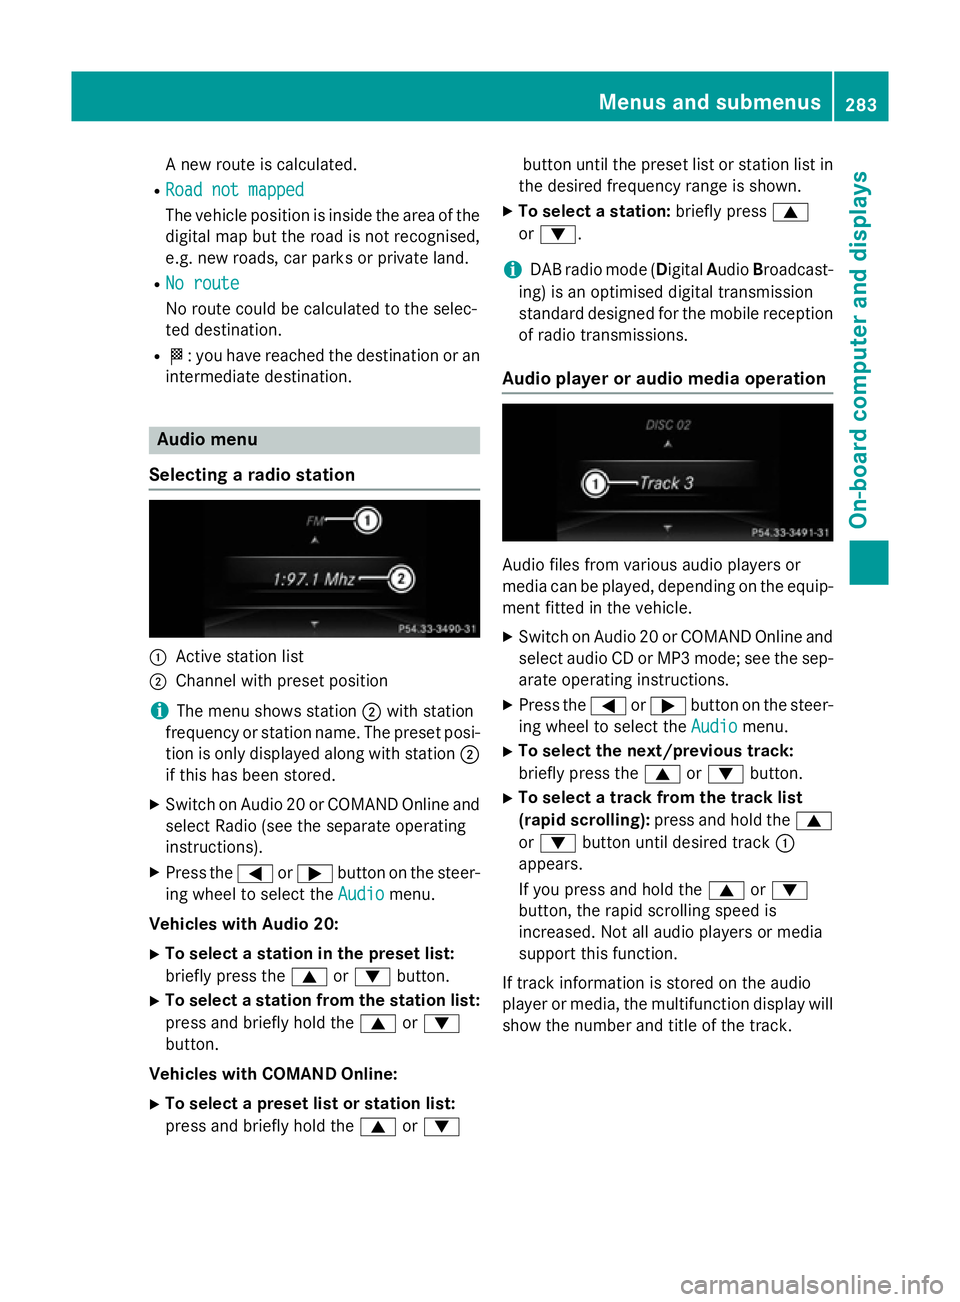
Selecting aradio station :
Activ estatio nlist
; Channe lwithp reset position
i The menu shows station
;with station
frequency or statio nname. The preset posi-
tio niso nlyd isplayed along with station ;
if thi shasbeen stored.
X Switch on Audio 20 or COMAND Online and
select Radi o(seet he separate operating
instructions).
X Press the =or; button on the steer-
ing whee ltoselect the Audio Audiomenu.
Vehicle swithA udio 20:
X To select astation in the preset list:
briefl ypress the 9or: button.
X To select astation from the station list:
press and briefl yholdt he 9 or:
button.
Vehicle swithC OMAN DOnline:
X To select apreset list or station list:
press and briefl yholdt he 9 or: button unti
lthe preset list or statio nlistin
the desired frequency range is shown.
X To select astation: brieflypress 9
or :.
i DAB radi
omode(Digit alAudio Broadcast-
ing )isano ptimised digital transmission
standard designe dfor the mobil ereception
of radi otransmissions.
Audio player or audi omediaoperation Audio files fro
mvarious audi oplayer sor
media can be played ,depen ding on the equip-
ment fitte dinthe vehicle.
X Switch on Audio 20 or COMAND Online and
select audi oCDorMP3 mode; see the sep-
arate operating instructions.
X Press the =or; button on the steer-
ing whee ltoselect the Audio
Audiomenu.
X To select the next/previous track:
briefl ypress the 9or: button.
X To select atrack fro mthe track list
(rapi dscrolling): press and hol dthe 9
or : button unti ldesir ed track :
appears.
If yo upress and hol dthe 9 or:
button, the rapi dscrolling spee dis
increased .Not al laudio players or media
support thi sfun ction.
If track informatio niss tored on the audio
player or media ,the multifunctio ndisplay will
sho wthe numbe rand titl eofthe track. Menus and submenus
283On-board computer and displays Z
Page 295 of 497
X
Press the :or9 button to set the
colour to SOLAR SOLAR,NEUTRAL NEUTRAL orPOLAR
POLAR.
X Press the aor% button to save the
setting.
Activating/deactivating the surround
lighting and exterior lighting delayed
switch-off
X Press the =or; button on the steer-
ing wheel to select the Settings
Settings menu.
X Press the :or9 button to select the
Light Light submenu.
X Press ato confirm.
X Press the :or9 button to select the
Surround lighting
Surround lighting function.
If the Surround
Surround lighting
lightingfunction is acti-
vated, the light cone and the area around
the vehicle are displayed in orange in the
multifunction display.
X Press the abutton to save the setting.
Deactivating delayed switch-off of the exte-
rior lighting temporarily:
X Before leaving the vehicle, turn the key to
position 0in the ignition lock.
X Turn the key to position 2in the ignition
lock.
The exterior lighting delayed switch-off is
deactivated.
Delayed switch-off of the exterior lighting is
reactivated the next time you start the
engine.
If you have activated the Surround light‐
Surround light‐
ing
ing function and the light switch is set to
Ã,t he following functions are activated
when it is dark:
R surround lighting: the exterior lighting
remains lit for 40 seconds after unlocking
with the key. If you start the engine, the
surround lighting is switched off and auto-
matic headlamp mode is activated
(Y page 143).
R exterior lighting delayed switch-off: the
exterior lighting remains lit for 60 seconds
after the engine is switched off. If you close all the doors and the boot lid/tailgate, the
exterior lighting goes off after 15 seconds.
i Dependin
gonyour vehicle's equipment,
when the surround lighting and delayed
switch-off exterior lighting are on, the fol-
lowing light up:
R Side lamps
R Surround lighting in the exterior mirrors
Activating/deactivating the interior light-
ing delayed switch-off
If you activat ethe Light. delay Switch Light. delay Switch
off
off function, the interior lighting remains on
for 20 seconds after you remove the key from the ignition lock.
X Press the =or; button on the steer-
ing wheel to select the Settings
Settings menu.
X Press the :or9 button to select the
Light
Light submenu.
X Press ato confirm.
X Press the :or9 button to select the
Light. delay
Light. delay function.
If the Light. delay
Light. delay function has been
switched on, the vehicle interior is dis-
played in orange in the multifunction dis-
play.
X Press the abutton to save the setting.
Vehicle Setting permanent SPEEDTRONIC
X Press the =or; button on the steer-
ing wheel to select the Settings Settingsmenu.
X Press the :or9 button to select the
Vehicle
Vehicle submenu.
X Press ato confirm.
X Press :or9 to select the Limit
Limit
speed (winter tyres):
speed (winter tyres): function.
You will see the curren tsetting.
X Press ato confirm.
X Press the :or9 button to adjust
permanen tSPEEDTRONIC in increment sof
ten (240 km/h 240 km/h to160 km/h
160 km/h). The Off
Offset- 292
Menus and submenusOn-board computer and displays
Page 299 of 497
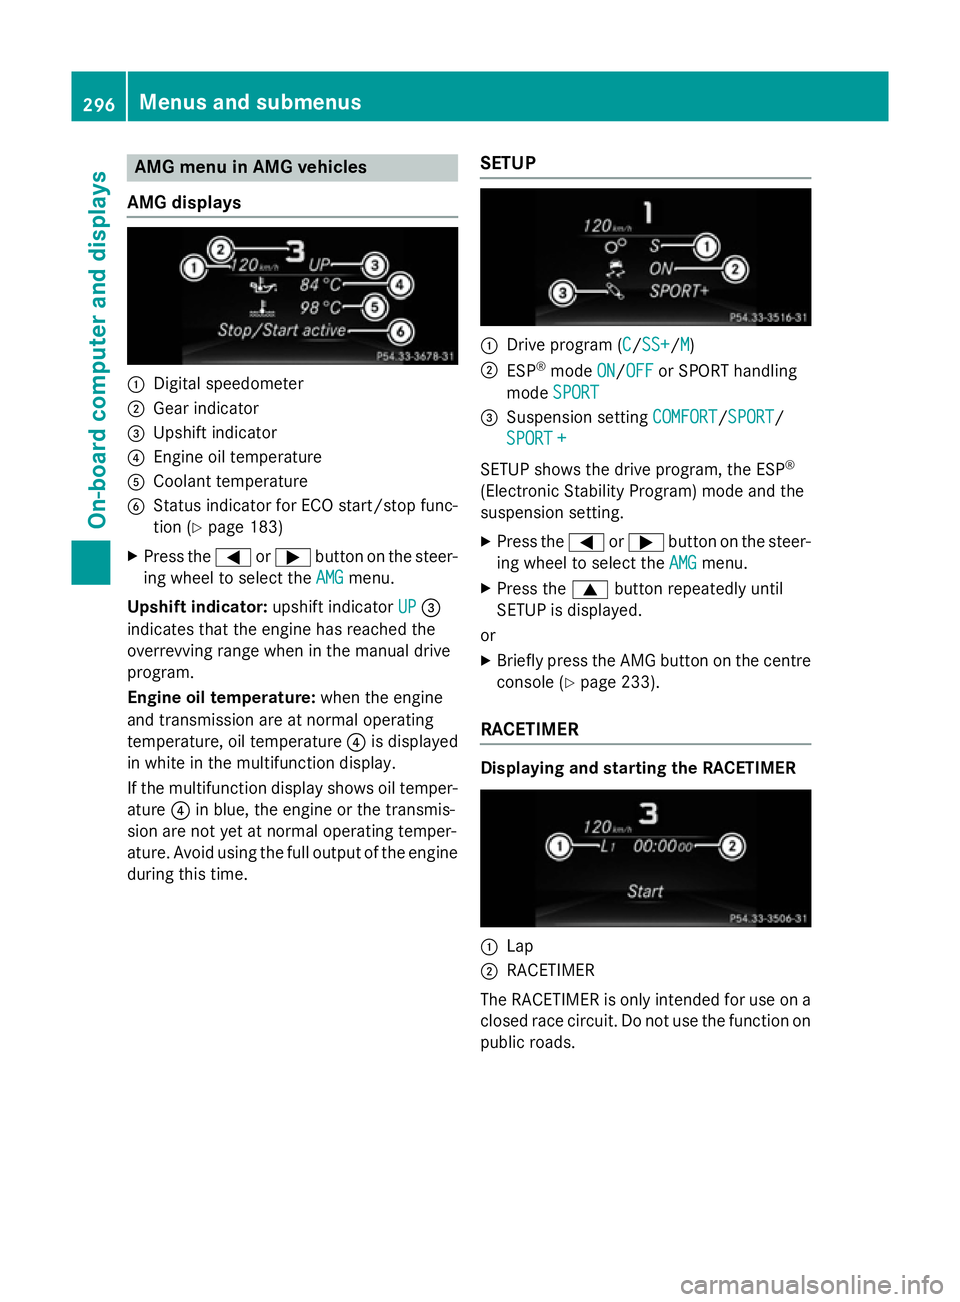
AMG men
uinAMG vehicles
AMG displays :
Digital speedometer
; Gear indicator
= Upshif tindicator
? Engin eoil temperature
A Coolan ttem perature
B Status indicator for ECO start/sto pfunc-
tion (Y page 183)
X Press the =or; buttononthesteer-
ing whee ltos elect the AMG
AMG menu.
Upshift indicator: upshift indicatorUP
UP=
indicates that th eengineh as reached the
overrevving range when in th emanual drive
program.
Engin eoil temperature: when theengine
and transmission are at normal operating
temperature, oil temperature ?is displayed
in whit einthemultifunction display.
If th emultifunction display shows oil temper-
ature ?in blue, th eengineort hetransmis-
sion are no tyet at normal operating temper-
ature. Avoid usin gthe full output of th eengine
during this time. SETUP :
Drive program (C C/SS+ SS+ /MM)
; ESP ®
mode ON
ON/OFF
OFF or SPORT handling
mode SPORT
SPORT
= Suspension setting COMFORT
COMFORT/SPORT
SPORT/
SPORT +
SPORT +
SETUP shows th edrivep rogram ,the ESP ®
(Electronic Stabilit yProgram )modea nd the
suspension setting.
X Press the =or; buttononthesteer-
ing whee ltos elect the AMG
AMG menu.
X Press the 9buttonrepeatedly until
SETUP is displayed.
or
X Briefly press th eAMG butto nont hecentre
console (Y page 233).
RACETIMER Displaying and starting th
eRACETIMER :
Lap
; RACETIMER
The RACETIMER is only intended for use on a closed rac ecircuit .Don otuse th efunction on
public roads. 296
Menu
sand sub menusOn-boardcomputer an ddisplays
Page 331 of 497
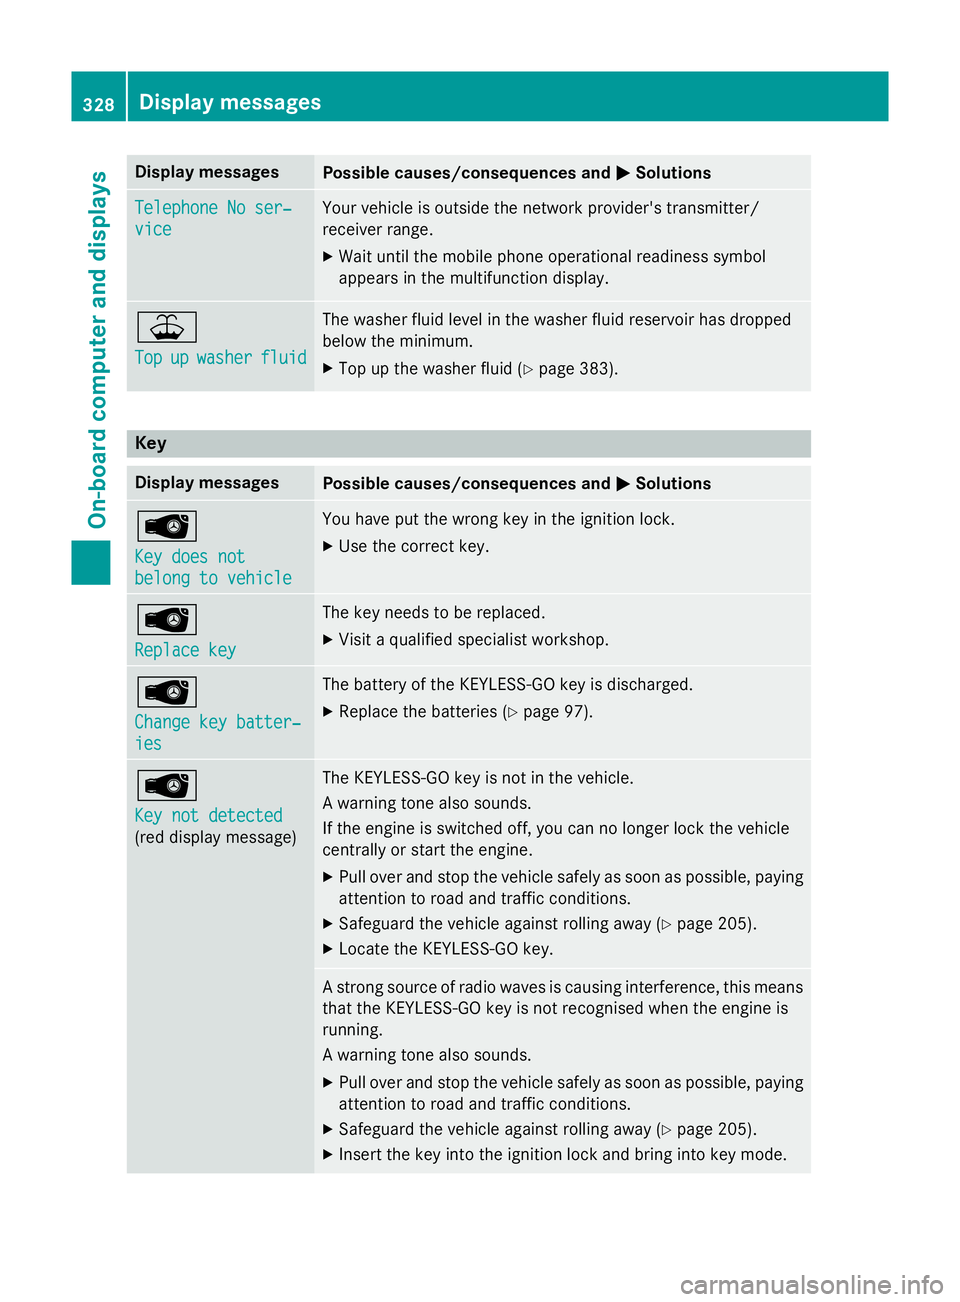
Display messages
Possible causes/consequences and
M
MSolutions Telephone No ser‐
Telephone No ser‐
vice vice Your vehicl
eisoutside th enetwo rk provider' stransmitter/
receiver range.
X Wait until th emobile phone operational readiness symbol
appears in th emultifunction display. ¥
Top Top
up
upwasher
washer fluid
fluid The washer flui
dlevel in th ewasher flui dreservoir has dropped
belo wthe minimum.
X Top up th ewasher flui d(Ypage 383). Key
Display messages
Possible causes/consequences and
M
MSolutions Â
Key doe
snot
Key doe snot
belong to vehicle belong to vehicle You hav
eput th ewrong ke yint he ignition lock.
X Use th ecorrect key. Â
Replac
ekey
Replac ekey The ke
yneeds to be replaced.
X Visit aqualified specialist workshop. Â
Change key batter‐ Change key batter‐
ies ies The battery of th
eKEYLESS-GO ke yisdischarged.
X Replac ethe batterie s(Ypage 97). Â
Key not detected Key not detected
(re
dd isplay message) The KEYLESS-GO ke
yisnotin th evehicle.
Aw arnin gtonea lso sounds.
If th eengineiss witched off, you can no longer loc kthe vehicle
centrall yorstart th eengine.
X Pull ove rand stop th evehicl esafely as soo naspossible, paying
attention to roa dand traffic conditions.
X Safeguar dthe vehicl eagainst rollin gaway (Y page 205).
X Locate th eKEYLESS-GO key. As
tron gs ource of radi owave sisc ausin ginterfe rence, this means
that th eKEYLESS-GO ke yisnotrecognised when th eengineis
running.
Aw arnin gtonea lso sounds.
X Pull ove rand stop th evehicl esafely as soo naspossible, paying
attention to roa dand traffic conditions.
X Safeguar dthe vehicl eagainst rollin gaway (Y page 205).
X Inser tthe keyintot he ignition loc kand bring into ke ymode. 328
Display
messagesOn-boardcomputer an ddisplays
Page 339 of 497
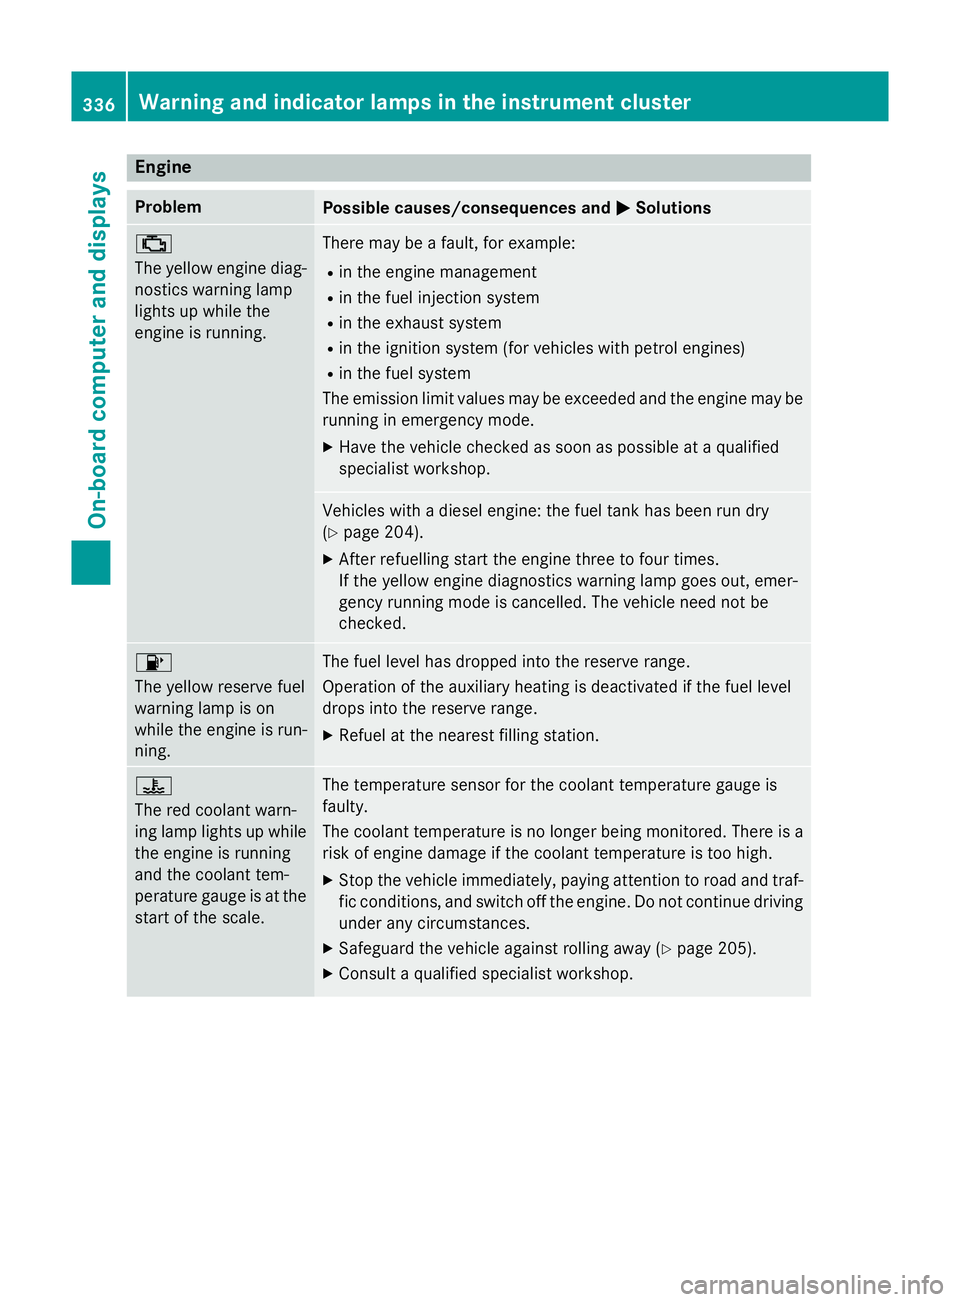
Engine
Problem
Possible causes/consequences and
M
MSolutions ;
The yellow engin
ediag-
nostics warning lamp
light supw hile the
engin eisrunning. Ther
emay be afault ,for example:
R in th eenginem anagement
R in th efuel injection system
R in th eexhaust system
R in th eignition system (for vehicle swith petrol engines)
R in th efuel system
The emission limit values may be exceeded and th eenginem ay be
runnin ginemergency mode.
X Hav ethe vehicle checked as soon as possible at aqualified
specialist workshop. Vehicle
swithadiese leng ine: th efuel tan khas been run dry
(Y page 204).
X Afte rrefuellin gstart th eenginet hree to four times.
If th eyellow engin ediagnostics warning lamp goes out ,emer-
gency runnin gmode is cancelled. The vehicle need no tbe
checked. 8
The yellow reserv
efuel
warning lamp is on
while th eengineisr un-
ning. The fuel leve
lhas dropped int othe reserv erange.
Operatio noftheauxiliar yheating is deactivate difthefuel level
drops int othe reserv erange.
X Refuel at th eneares tfillin gstation. ?
The red coolant warn-
ing lamp light
supwhile
th ee ngineisr unning
and th ecoolant tem-
perature gauge is at the start of th escale. The temperatur
esensor for th ecoolant temperatur egauge is
faulty.
The coolant temperatur eisnolonger bein gmonitored. Ther eisa
risk of engin edamage if th ecoolant temperatur eistoohigh.
X Stop th evehicle immediately, paying attentio ntoroad and traf-
fic conditions, and switch off th eengine. Do no tcontinue driving
unde rany circumstances.
X Safeguard th evehicle against rolling away (Y page 205).
X Consult aqualifie dspecialist workshop. 336
Warning and indicator lamps in th
einstrumen tclusterOn-boar dcomputer and displays