2015 MERCEDES-BENZ E-CLASS CABRIOLET fog light bulb
[x] Cancel search: fog light bulbPage 16 of 349

Adaptive Highbeam Assist PLUS .... 117
Automatic headlamp mode ............ 114
Cornering light function ................. 117
Dipped-beam headlamps ............... 115
Driving abroad ............................... 114
Foglamps (extended range) ........... 117
Hazard warning lamps ..................
.116
Headlamp flasher ........................... 116
Light switch ................................... 114
Main-beam headlamps ................... 116
Motorway mode ............................ .117
Parking lamps ................................ 115
Rear foglamp ................................. 115
Setting brightness for display/
switches (on-board computer) ....... 223
Side lamps ..................................... 115
Switching the daytime driving
lights on/off (on-board com-
puter) ............................................. 224
Switching the exterior lighting
delayed switch-off on/off (on-
board computer) ............................ 225
Switching the surround lighting
on/off (on-board computer) .......... 225
Turn signals ................................... 116
see Interior lighting
see Replacing bulbs
LIM indicator lamp
Cruise control ................................ 163
DISTRONIC PLUS ........................... 169
Variable SPEEDTRONIC ................. 166
Limiting the speed
see SPEEDTRONIC
LINGUATRONIC
see Separate operating instructions
Loading guidelines ............................ 272
Locking
see Central locking
Locking (doors)
Automatic ........................................ 82
Emergency locking ........................... 82
From inside (central locking but-
ton) ................................................. .81
Locking centrally
see Central locking
Locking verification signal (on-
board computer) .............................. .226 Luggage cover
see Boot separator
Lumbar support
Adjusting the 4-way lumbar sup-
port ................................................ 104 M
M+S tyres .......................................... .323
Main-beam headlamps
Adaptive Highbeam Assist PLUS .... 117
Changing bulbs .............................. 120
Display message ............................ 236
Switching on/off ........................... 116
Maintenance
see ASSYST PLUS
Manual transmission
Engaging reverse gear ................... 146
Gear leve r...................................... 146
Pulling away ................................... 141
Shift recommendation ................... 147
Starting the engine ........................ 141
Matt finish (cleaning instructions) .. 297
Media Interface
USB port in the armrest of the
centre console ............................... 274
see Separate operating instructions
Memory card (audio) ......................... 218
Memory function ............................... 112
Mercedes-Benz Contact
Display message ............................ 232
Mercedes-Benz emergency call
system
Switch in the overhead control
panel .............................................. 281
Mercedes-Benz Intelligent Drive
360°camera .................................. 192
Active Blind Spot Assist ................. 203
Active Lane Keeping Assist ............ 206
Active Parking Assist ..................... 183
ATTENTION ASSIST ........................ 196
Blind Spot Assist ............................ 200
Cruise control ................................ 163
DISTRONIC PLUS ........................... 168
DISTRONIC PLUS with Steering
Assist and Stop&Go Pilot ............... 176
General notes ................................ 162
Lane Keeping Assist ...................... 202 Index
13
Page 191 of 349

Reversing camera
General notes Reversing camera
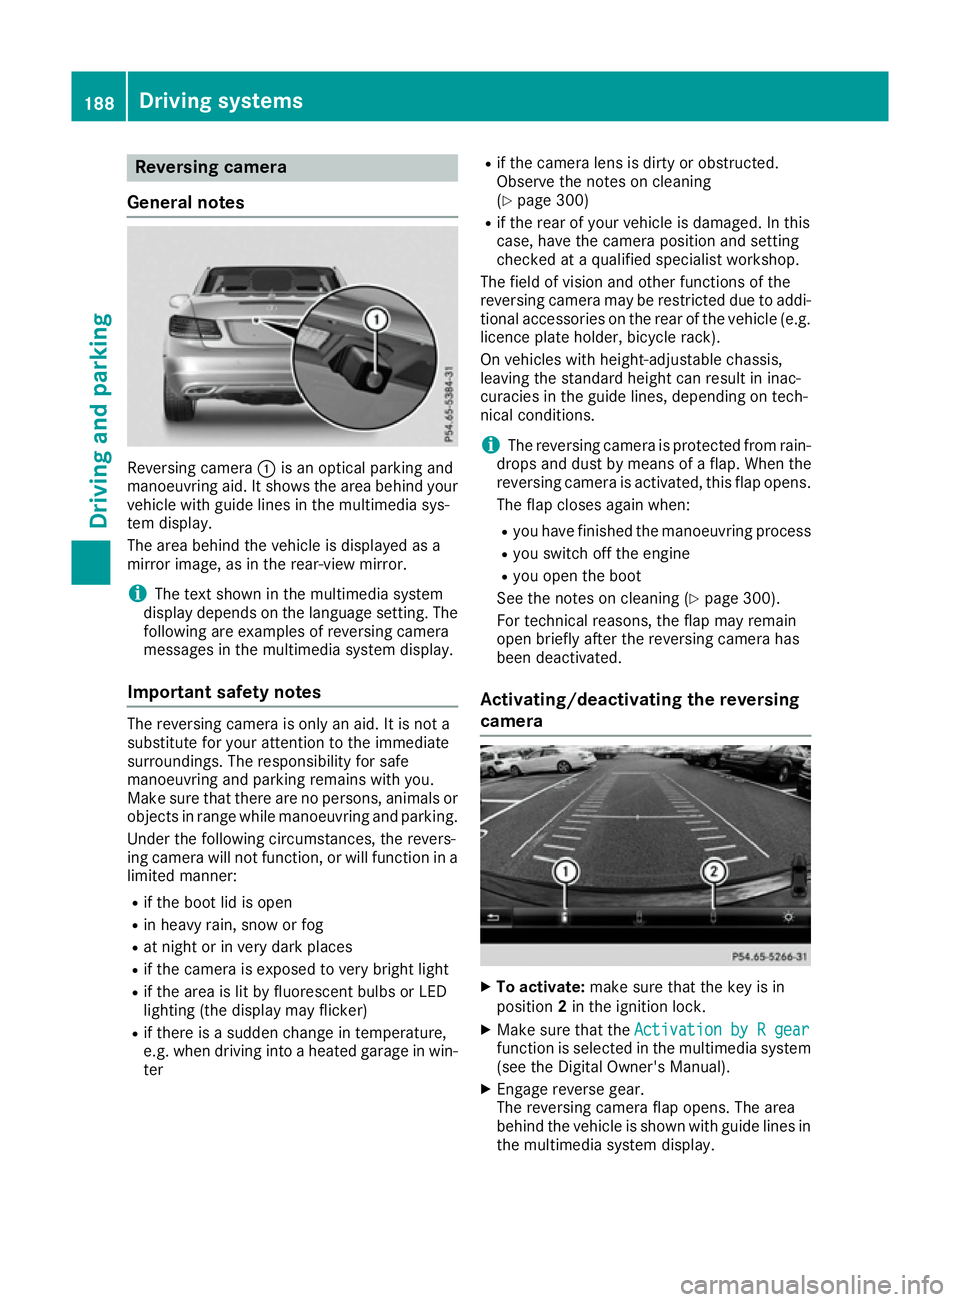
:is an optical parking and
manoeuvring aid. It shows the area behind your vehicle with guide lines in the multimedia sys-
tem display.
The area behind the vehicle is displayed as a
mirror image, as in the rear-view mirror.
i The text shown in the multimedia system
display depends on the language setting. The following are examples of reversing camera
messages in the multimedia system display.
Important safety notes The reversing camera is only an aid. It is not a
substitute for your attention to the immediate
surroundings. The responsibility for safe
manoeuvring and parking remains with you.
Make sure that there are no persons, animals or
objects in range while manoeuvring and parking.
Under the following circumstances, the revers-
ing camera will not function, or will function in a limited manner:
R if the boot lid is open
R in heavy rain, snow or fog
R at night or in very dark places
R if the camera is exposed to very bright light
R if the area is lit by fluorescent bulbs or LED
lighting (the display may flicker)
R if there is a sudden change in temperature,
e.g. when driving into a heated garage in win-
ter R
if the camera lens is dirty or obstructed.
Observe the notes on cleaning
(Y page 300)
R if the rear of your vehicle is damaged. In this
case, have the camera position and setting
checked at a qualified specialist workshop.
The field of vision and other functions of the
reversing camera may be restricted due to addi-
tional accessories on the rear of the vehicle (e.g.
licence plate holder, bicycle rack).
On vehicles with height-adjustable chassis,
leaving the standard height can result in inac-
curacies in the guide lines, depending on tech-
nical conditions.
i The reversing camera is protected from rain-
drops and dust by means of a flap. When the
reversing camera is activated, this flap opens.
The flap closes again when:
R you have finished the manoeuvring process
R you switch off the engine
R you open the boot
See the notes on cleaning (Y page 300).
For technical reasons, the flap may remain
open briefly after the reversing camera has
been deactivated.
Activating/deactivating the reversing
camera X
To activate: make sure that the key is in
position 2in the ignition lock.
X Make sure that the Activation by R gear Activation by R gear
function is selected in the multimedia system (see the Digital Owner's Manual).
X Engage reverse gear.
The reversing camera flap opens. The area
behind the vehicle is shown with guide lines in
the multimedia system display. 188
Driving systemsDriving and parking
Page 196 of 349

R
Top view and image from the reversing cam-
era (130° viewing angle)
R Top view and image from the front camera
(130° viewing angle without displaying the
maximum steering wheel angle)
R Top view and enlarged rear view
R Top view and enlarged front view
R Top view and trailer view (vehicles with trailer
tow hitch)
R Top view and images from the rear-facing side
cameras (rear wheel view)
R Top view and images from the forward-facing
side cameras (front wheel view)
When the function is active and you shift the
transmission from Dor Rto N, the dynamic
guide lines are hidden.
When you change between transmission posi-
tions Dand R, you see the previously selected
front or rear view.
Distances measured by PARKTRONIC will also
be optically displayed:
R as red or yellow brackets around the vehicle
symbol in top view in split-screen mode or
R at the bottom right as red or yellow brackets
around the vehicle symbol in full-screen mode
The line thickness and colour of the brackets
show how far the vehicle is from an object.
R yellow brackets with thin lines: PARKTRONIC
is active
R yellow brackets with normal lines: an object is
present in close range of the vehicle
R red line: an object is present in the immediate
close range of the vehicle
Important safety notes The 360° camera is only an aid and may show a
distorted view of obstacles, show them incor-
rectly or not at all. The 360° camera is not a
substitute for attentive driving.
The responsibility for safe manoeuvring and
parking remains with you. Make sure that there are no persons, animals or objects in range
while manoeuvring and parking.
You are always responsible for safety, and must
always pay attention to your surroundings when parking and manoeuvring. This applies to the
areas behind, in front of and beside the vehicle.
You could otherwise endanger yourself and oth- ers. The 360° camera will not function or will func-
tion only in a limited manner:
R if the doors are open
R if the exterior mirrors are folded in
R if the boot lid is open
R in heavy rain, snow or fog
R at night or in very dark places
R if the cameras are exposed to very bright light
R if the area is lit by fluorescent bulbs or LED
lighting (the display may flicker)
R if there is a sudden change in temperature,
e.g. when driving into a heated garage in win-
ter
R if the camera lenses are dirty or covered
R if the vehicle components in which the cam-
eras are fitted are damaged. In this event,
have the camera position and setting checked at a qualified specialist workshop.
Do not use the 360° camera under such cir-
cumstances. You could otherwise injure others
or damage objects when parking the vehicle.
Guide lines are always shown at road level. In
trailer mode, the guide lines are shown at the
level of the trailer coupling.
The field of vision and other functions of the
camera system may be restricted due to addi-
tional accessories on the rear of the vehicle (e.g.
licence plate holder, bicycle rack).
On vehicles with height-adjustable suspension,
due to the technical conditions, leaving the
standard height can result in:
R inaccuracies in the guide lines
R inaccuracies in the display of generated
images (top view)
Activation conditions The 360° camera image can be displayed if:
R your vehicle is equipped with a 360° camera
R the key is in position 2in the ignition lock
R the multimedia system is switched on
R the 360° camera 360° camera function is switched on
Activating the 360° camera X
Press the Øbutton in the centre console
for longer than two seconds.
The following appears depending on whether
transmission position Dor Ris selected: Driving systems
193Driving and parking Z