2015 MERCEDES-BENZ E-CLASS CABRIOLET ignition
[x] Cancel search: ignitionPage 158 of 349

G
WARNING
Electrostatic charge can cause sparks and
thereby ignite fuel vapours. There is a risk of
fire and explosion.
Always touch the vehicle body before opening the fuel filler flap or touching the fuel pump
nozzle. This discharges any electrostatic
charge that may have built up. G
WARNING
Vehicles with a diesel engine:
If you mix diesel fuel with petrol, the flash
point of this fuel mixture is lower than that of pure diesel fuel. When the engine is running,
components in the exhaust system may over-
heat unnoticed. There is a risk of fire.
Never refuel with petrol. Never add petrol to
diesel fuel.
! Do not use diesel to refuel vehicles with a
petrol engine. Do not switch on the ignition if you accidentally refuel with the wrong fuel.
Otherwise, the fuel will enter the fuel system.
Even small amounts of the wrong fuel can
result in damage to the fuel system and the
engine. Notify a qualified specialist workshop
and have the fuel tank and fuel lines drained
completely.
! Do not use petrol to refuel vehicles with a
diesel engine. Do not switch on the ignition if you accidentally refuel with the wrong fuel.
Otherwise, fuel can enter the fuel system.
Even small amounts of the wrong fuel could
result in damage to the fuel system and the
engine. The repair costs are high. Notify a
qualified specialist workshop and have the
fuel tank and fuel lines drained completely.
! Overfilling the fuel tank could damage the
fuel system.
! Take care not to spill any fuel on painted
surfaces. You could otherwise damage the
paintwork.
! Use a filter when adding fuel from a fuel can.
The fuel lines and/or the fuel injection system could otherwise be blocked by particles fromthe fuel can. Do not get into the vehicle again during the refu-
elling process. Otherwise, electrostatic charge
could build up again.
If you overfill the fuel tank, some fuel may spray out when you remove the fuel pump nozzle.
Further information on fuel and fuel quality
(Y page 337). Refuelling
General notes Observe the important safety notes
(Y
page 154).
The fuel filler flap is unlocked or locked auto-
matically when you unlock or lock the vehicle
with the key or using KEYLESS-GO.
The position of the 8fuel filler cap is dis-
played in the instrument cluster. The arrow next to the filling pump indicates the side of the vehi-
cle.
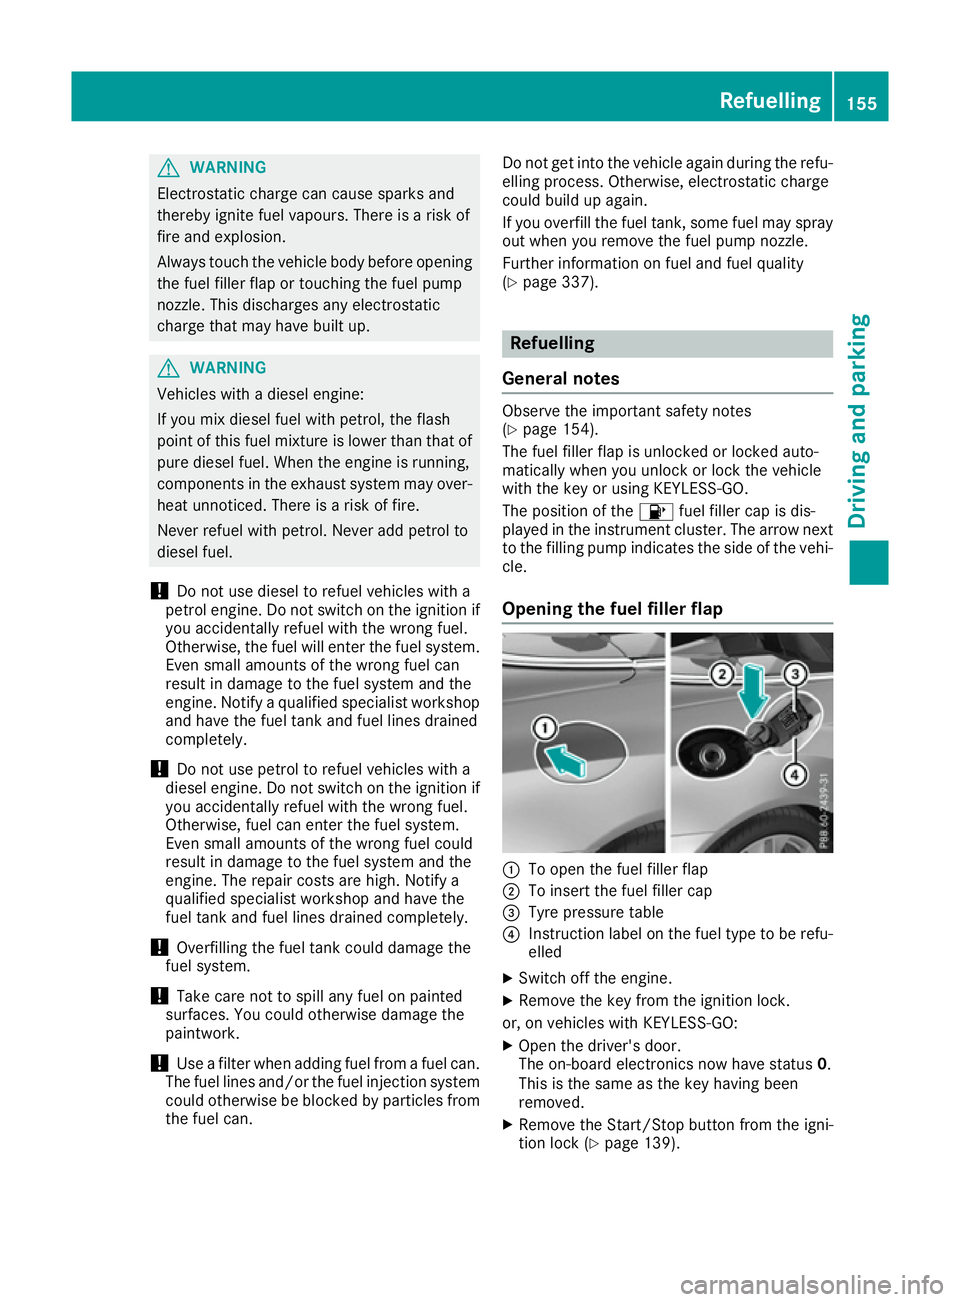
Opening the fuel filler flap :
To open the fuel filler flap
; To insert the fuel filler cap
= Tyre pressure table
? Instruction label on the fuel type to be refu-
elled
X Switch off the engine.
X Remove the key from the ignition lock.
or, on vehicles with KEYLESS‑ GO:
X Open the driver's door.
The on-board electronics now have status 0.
This is the same as the key having been
removed.
X Remove the Start/Stop button from the igni-
tion lock (Y page 139). Refuelling
155Driving and parking Z
Page 160 of 349

Problems with the fuel and fuel tank
Problem
Possible causes/consequences and
M
MSolutions Fuel is leaking from the
vehicle.
G
WARNING
The fuel line or the fuel tank is faulty.
There is a risk of fire or explosion. X Apply the electric parking brake.
X Switch off the engine.
X Remove the key from the ignition lock.
or, on vehicles with KEYLESS‑GO: X Open the driver's door.
The on-board electronics now have status 0. This is the same as the
key having been removed.
X Do not restart the engine under any circumstances.
X Consult a qualified specialist workshop. The engine does not
start. The fuel tank of a vehicle with a diesel engine has been run completely
dry.
X Refuel the vehicle with at least 5 litres of diesel.
X Turn the ignition on for approximately ten seconds (Y page 139).
X Start the engine continuously for a maximum of ten seconds until it
runs smoothly.
If the engine does not start: X Turn the ignition on again for a maximum of ten seconds
(Y page 139).
X Start the engine again continuously for a maximum of ten seconds
until it runs smoothly.
If the engine does not start after three attempts:
X Consult a qualified specialist workshop. The fuel filler flap cannot
be opened. The fuel filler flap is not unlocked.
X Unlock the vehicle (Y page 74). The key battery is discharged or nearly discharged.
X Unlock the vehicle using the emergency key element (Y page 76).The fuel filler flap is unlocked, but the opening mechanism is jammed.
X Consult a qualified specialist workshop. Parking
Important safety notes
G
WARNING
Flammable material such as leaves, grass or
twigs may ignite if they come into contact with hot parts of the exhaust system or exhaust
gas flow. There is a risk of fire.
Park the vehicle so that no flammable mate-
rial can come into contact with hot vehicle
components. In particular, do not park on dry
grassland or harvested grain fields. Parking
157Driving and parking Z
Page 161 of 349

G
WARNING
If you leave children unattended in the vehi-
cle, they may be able to set the vehicle in
motion if, for example, they:
R release the parking brake
R shift the automatic transmission out of park
position Por shift manual transmission into
neutral
R start the engine
In addition, they may operate vehicle equip-
ment and become trapped. There is a risk of
an accident and injury.
When leaving the vehicle, always take the key with you and lock the vehicle. Never leave
children unattended in the vehicle.
! Always secure the vehicle correctly against
rolling away. Otherwise, the vehicle or its driv-
etrain could be damaged.
To ensure that the vehicle is safeguarded
against rolling away unintentionally:
R the parking brake must be applied
R on vehicles with manual transmission, engage
1st gear or reverse gear
R on vehicles with automatic transmission, the
transmission must be in position Pand the
key must be removed from the ignition lock
R the front wheels must be turned towards the
kerb on steep uphill or downhill gradients Switching off the engine
Important safety notes G
WARNING
The automatic transmission switches to neu-
tral position Nwhen you switch off the engine.
The vehicle may roll away. There is a risk of an
accident.
After switching off the engine, always switch
to parking position P. Prevent the parked vehi-
cle from rolling away by applying the parking
brake. Vehicles with manual transmission X
Shift to either 1st gear or reverse gear R.
X Turn the key to position 0in the ignition lock
and remove it.
The immobiliser is activated.
X Firmly depress the parking brake.
Vehicles with automatic transmission X
Firmly depress the parking brake.
X Shift the transmission to position P.
X With the key: turn the key to position 0in the
ignition lock and remove it.
The immobiliser is activated.
X With KEYLESS-GO: press the Start/Stop
button (Y page 139).
The engine stops and all the indicator lamps in the instrument cluster go out.
When the driver's door is closed, this corre-
sponds to key position 1. When the driver's
door is open, this corresponds to key position
0: "key removed".
If you switch the engine off with the transmis-
sion in position Ror D, the automatic transmis-
sion shifts to Nautomatically.
With the key: if you then open the driver's door
or the front-passenger door or remove the key
from the ignition, the automatic transmission
shifts to Pautomatically.
With KEYLESS-GO: if you then open the driver's
or front-passenger door, the automatic trans-
mission shifts to P.
If you want the automatic transmission to
remain in neutral N, e.g. when having the vehicle
cleaned in an automatic car wash with a towing
system:
X Vehicles with KEYLESS-GO: remove the
Start/Stop button from the ignition lock.
X Insert the key into the ignition lock.
X All vehicles: switch the ignition on.
X Depress the brake pedal and keep it
depressed.
X Shift to neutral N.
X Release the brake pedal.
X Release the parking brake.
X Switch off the ignition and leave the key in the
ignition lock. 158
ParkingDriving and parking
Page 162 of 349

Parking brake
G
WARNING
If you must brake the vehicle with the parking brake, the braking distance is considerably
longer and the wheels could lock. This increa-
ses the risk of skidding and an accident.
Only use the parking brake to brake the vehi- cle when the service brake is faulty. Do not
apply the parking brake too firmly. If the
wheels lock, release the parking brake until
the wheels begin turning again. G
WARNING
If you leave children unattended in the vehi-
cle, they may be able to set the vehicle in
motion if, for example, they:
R release the parking brake
R shift the automatic transmission out of park
position Por shift manual transmission into
neutral
R start the engine
In addition, they may operate vehicle equip-
ment and become trapped. There is a risk of
an accident and injury.
When leaving the vehicle, always take the key with you and lock the vehicle. Never leave
children unattended in the vehicle. The brake lights do not light up when you brake
the vehicle with the parking brake. X
To apply: depress parking brake ;firmly.
The J indicator lamp in the instrument
cluster lights up if the engine is running.
X To release: depress the brake pedal and keep
it depressed.
X Pull release handle :.
The J indicator lamp in the instrument
cluster goes out. Parking up the vehicle
If you leave the vehicle parked up for longer than
four weeks, the battery may be damaged by
exhaustive discharging.
If you leave the vehicle parked up for longer than six weeks, it may suffer from lack of use.
X Contact a qualified specialist workshop and
seek advice.
i You can obtain information about trickle
chargers from a qualified specialist work-
shop. Driving tips
General notes
G
WARNING
If you switch off the ignition while driving,
safety-relevant functions are only available
with limitations, or not at all. This could affect, for example, the power steering and the brake
boosting effect. You will require considerably
more effort to steer and brake. There is a risk of an accident.
Do not switch off the ignition while driving. ECO display
The ECO display provides feedback on how eco-
nomical your driving characteristics are. The Driving tips
159Driving and parking Z
Page 183 of 349

pneumatic drill, could cause PARKTRONIC to
malfunction.
PARKTRONIC may not function correctly on
uneven terrain.
PARKTRONIC is activated automatically when
you: R switch on the ignition
R shift to position D,Ror Non vehicles with
automatic transmission
R release the parking brake
PARKTRONIC is deactivated at speeds above
18 km/ h.It is reactivated at lower speeds.
Range of the sensors General notes
PARKTRONIC does not take into account obsta- cles located:
R below the detection range, e.g. persons, ani-
mals or objects
R above the detection range, e.g. overhanging
loads, tail sections or loading ramps of goods vehicles :
Example: sensors in the front bumper, left-
hand side
The sensors must be free of dirt, ice and slush.
Otherwise, they may not function correctly.
Clean the sensors regularly, taking care not to
scratch or damage them (Y page 300).Range Example: side view
Example: top view
Front sensors Centre Approx. 100 cm
Corners Approx. 60 cm
Rear sensors
Centre Approx. 120 cm
Corners Approx. 80 cm
Minimum distance
Centre Approx. 20 cm
Corners Approx. 15 cm
If there is an obstacle within this range, the rel-
evant warning displays light up and a warning
tone sounds. If the distance falls below the min- imum, the distance may no longer be shown. 180
Driving systemsDriving and parking
Page 184 of 349

Warning displays
Warning display for the front area
: Segments on the left-hand side of the vehi-
cle
; Segments on the right-hand side of the vehi-
cle
= Segments showing operational readiness
The warning displays show the distance
between the sensors and the obstacle. The
warning display for the front area is located on
the dashboard above the centre air vents. The
warning display for the rear area is located
between the rear seats.
The warning display for each side of the vehicle
is divided into five yellow and two red segments.
PARKTRONIC is operational if yellow segments
showing operational readiness =light up.
The gear lever position or the transmission posi- tion of the automatic transmission and the
direction in which the vehicle is rolling deter-
mine which warning display is active when the
engine is running.
Manual transmission: Gear lever position Warning display
Forward gear
or
Neutral
Front area activated
Reverse gear
Rear and front areas
activated Automatic transmission:
Transmission posi-
tion Warning display
D
Front area activated
R
or N Rear and front areas
activated
P
No areas activated
One or more segments light up as the vehicle
approaches an obstacle, depending on the vehi-
cle's distance from the obstacle.
From the:
R sixth segment onwards, you will hear an inter-
mittent warning tone for approximately two
seconds.
R seventh segment onwards, you will hear a
warning tone for approximately two seconds.
This indicates that you have now reached the minimum distance.
Deactivating/activating PARKTRONIC :
Deactivating/activating PARKTRONIC
; Indicator lamp
If indicator lamp ;lights up, PARKTRONIC is
deactivated. Active Parking Assist is then also
deactivated.
i PARKTRONIC is automatically activated
when you turn the key to position 2in the
ignition lock.
Towing a trailer !
Fold in the ball coupling if the trailer tow
hitch is not required. PARKTRONIC measures
the minimum detection range to an obstacle
from the bumper, not the ball coupling. Driving systems
181Driving and parking Z
Page 186 of 349

Problems with PARKTRONIC
Problem
Possible causes/consequences and
M
MSolutions Only the red segments in
the PARKTRONIC warn-
ing displays are lit. You
also hear a warning tone
for approximately two
seconds.
PARKTRONIC is then
deactivated and the indi-
cator lamp on the
PARKTRONIC button
lights up. PARKTRONIC has malfunctioned and has switched off.
X If problems persist, have PARKTRONIC checked at a qualified spe-
cialist workshop. Only the red segments in
the PARKTRONIC warn-
ing displays are lit.
PARKTRONIC is then
deactivated. The PARKTRONIC sensors are dirty or there is interference.
X
Clean the PARKTRONIC sensors (Y page 300).
X Switch the ignition back on. The problem may be caused by an external source of radio or ultra-
sound waves.
X See if PARKTRONIC functions in a different location. Active Parking Assist
General notes Active Parking Assist is an electronic parking aid
with ultrasound. It measures the road on both
sides of the vehicle. A parking symbol indicates a suitable parking space. Active steering inter-
vention and brake application can assist you
during parking. You may also use PARKTRONIC
(Y page 179).
i The active braking application is only avail-
able on vehicles with automatic transmission.
Important safety notes Active Parking Assist is only an aid. It is not a
substitute for your attention to the immediate
surroundings. The responsibility for safe
manoeuvring and parking remains with you.
Make sure that no persons, animals or objects
are in the manoeuvring range.
When PARKTRONIC is switched off, Active Park-
ing Assist is also unavailable. G
WARNING
While parking or pulling out of a parking
space, the vehicle swings out and can drive onto areas of the oncoming lane. This could
cause you to collide with other road users.
There is a risk of an accident.
Pay attention to other road users. Stop the
vehicle if necessary or cancel the Active Park-
ing Assist parking procedure.
! If unavoidable, you should drive over obsta-
cles such as kerbs slowly and not at a sharp
angle. Otherwise, you may damage the
wheels or tyres.
Active Parking Assist may also display spaces
not suitable for parking, e.g.: R parking or stopping prohibitions.
R in front of driveways or entrances and exits.
R unsuitable surfaces.
Parking tips:
R on narrow roads, drive as closely as possible
past the parking space.
R parking spaces that are littered or overgrown
might be identified or measured incorrectly.
R parking spaces that are partially occupied by
trailer drawbars might not be identified as
such or be measured incorrectly. Driving systems
183Driving and parking Z
Page 191 of 349

Reversing camera
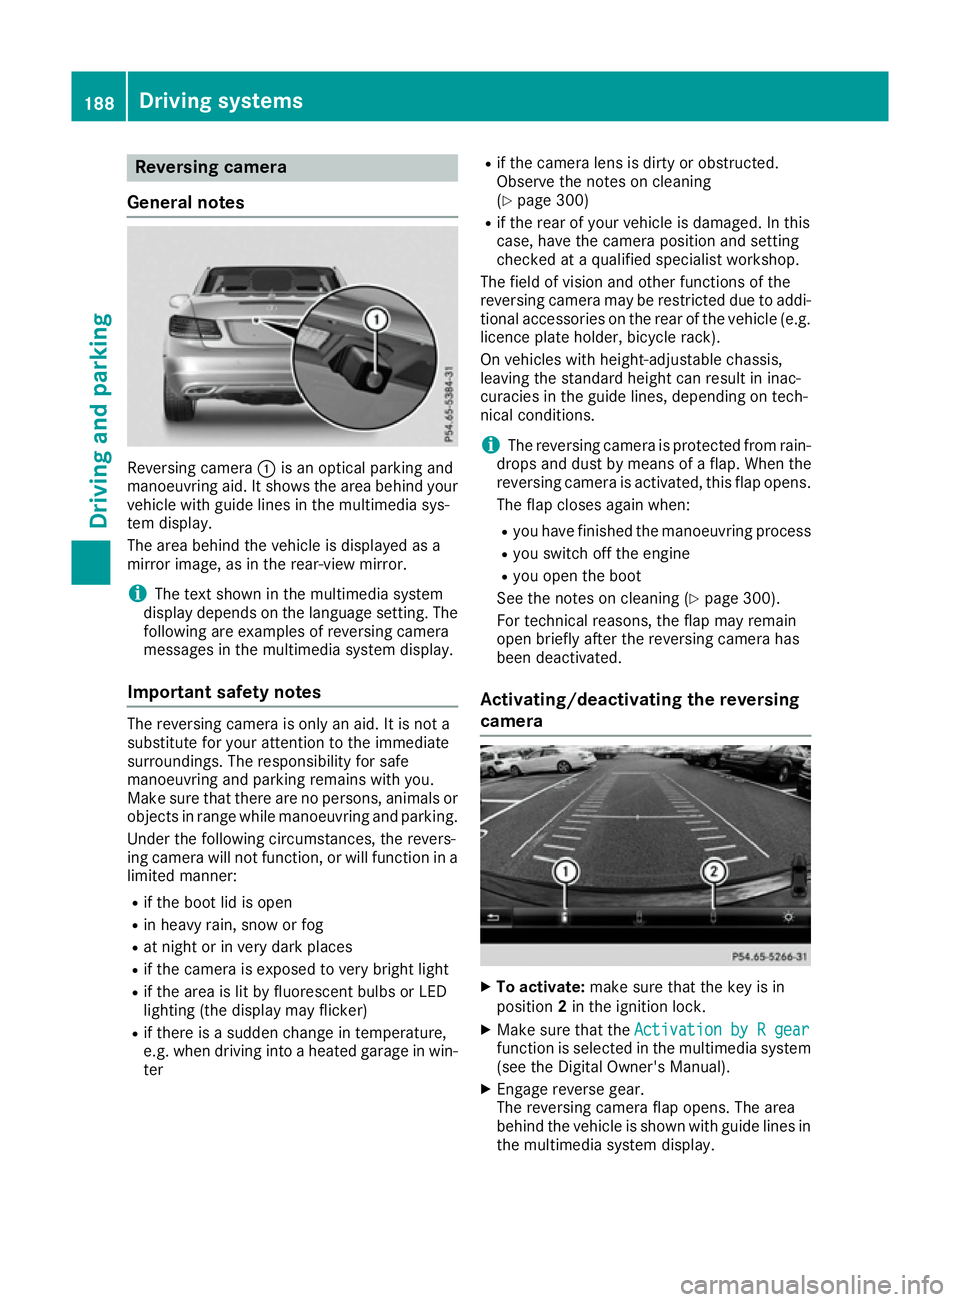
General notes Reversing camera
:is an optical parking and
manoeuvring aid. It shows the area behind your vehicle with guide lines in the multimedia sys-
tem display.
The area behind the vehicle is displayed as a
mirror image, as in the rear-view mirror.
i The text shown in the multimedia system
display depends on the language setting. The following are examples of reversing camera
messages in the multimedia system display.
Important safety notes The reversing camera is only an aid. It is not a
substitute for your attention to the immediate
surroundings. The responsibility for safe
manoeuvring and parking remains with you.
Make sure that there are no persons, animals or
objects in range while manoeuvring and parking.
Under the following circumstances, the revers-
ing camera will not function, or will function in a limited manner:
R if the boot lid is open
R in heavy rain, snow or fog
R at night or in very dark places
R if the camera is exposed to very bright light
R if the area is lit by fluorescent bulbs or LED
lighting (the display may flicker)
R if there is a sudden change in temperature,
e.g. when driving into a heated garage in win-
ter R
if the camera lens is dirty or obstructed.
Observe the notes on cleaning
(Y page 300)
R if the rear of your vehicle is damaged. In this
case, have the camera position and setting
checked at a qualified specialist workshop.
The field of vision and other functions of the
reversing camera may be restricted due to addi-
tional accessories on the rear of the vehicle (e.g.
licence plate holder, bicycle rack).
On vehicles with height-adjustable chassis,
leaving the standard height can result in inac-
curacies in the guide lines, depending on tech-
nical conditions.
i The reversing camera is protected from rain-
drops and dust by means of a flap. When the
reversing camera is activated, this flap opens.
The flap closes again when:
R you have finished the manoeuvring process
R you switch off the engine
R you open the boot
See the notes on cleaning (Y page 300).
For technical reasons, the flap may remain
open briefly after the reversing camera has
been deactivated.
Activating/deactivating the reversing
camera X
To activate: make sure that the key is in
position 2in the ignition lock.
X Make sure that the Activation by R gear Activation by R gear
function is selected in the multimedia system (see the Digital Owner's Manual).
X Engage reverse gear.
The reversing camera flap opens. The area
behind the vehicle is shown with guide lines in
the multimedia system display. 188
Driving systemsDriving and parking