2015 MERCEDES-BENZ E-CLASS CABRIOLET belt
[x] Cancel search: beltPage 104 of 349
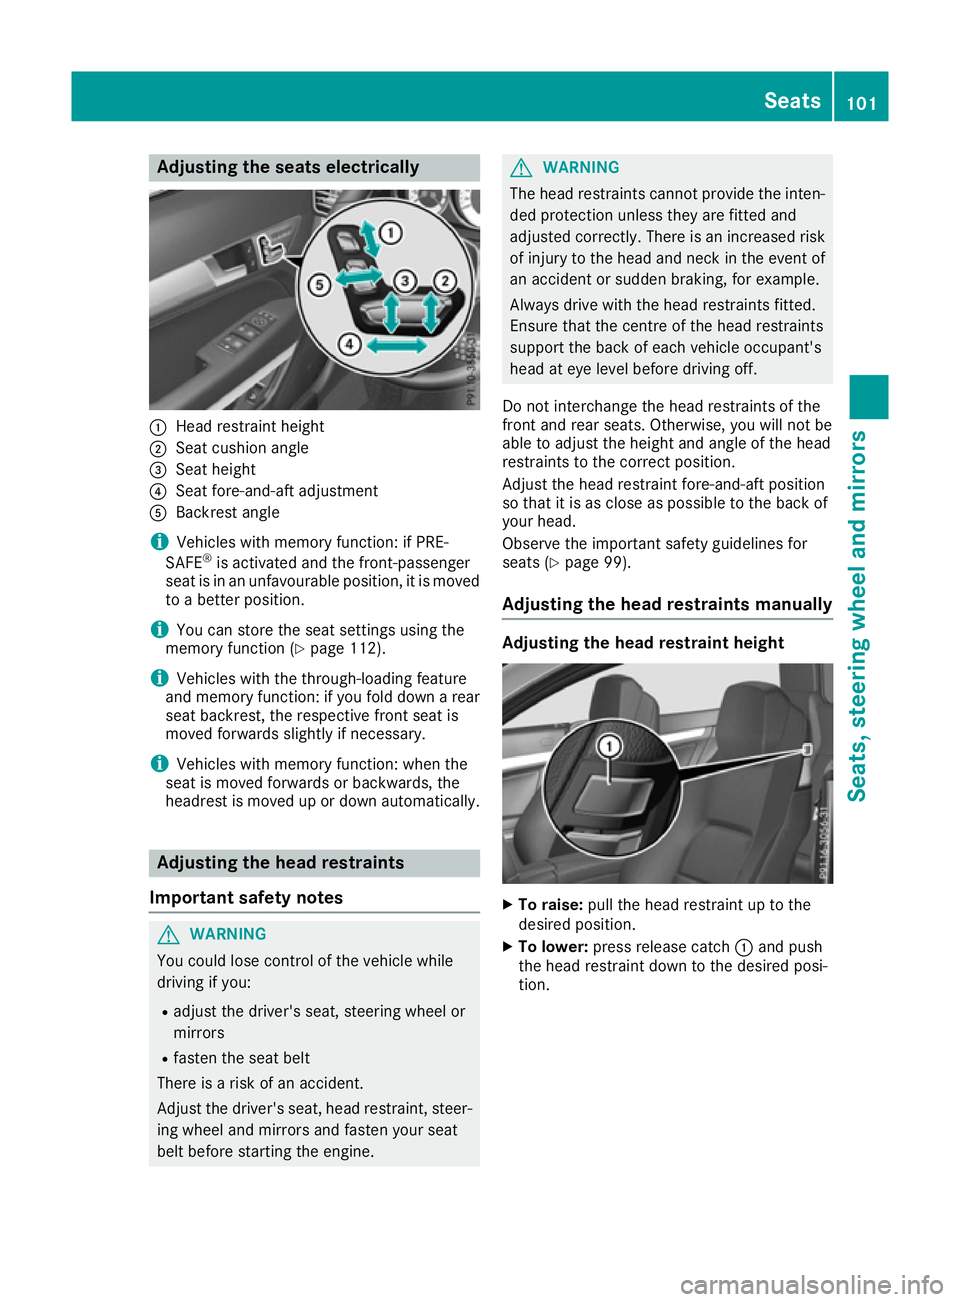
Adjusting the seats electrically
:
Head restraint height
; Seat cushion angle
= Seat height
? Seat fore-and-aft adjustment
A Backrest angle
i Vehicles with memory function: if PRE-
SAFE ®
is activated and the front-passenger
seat is in an unfavourable position, it is moved to a better position.
i You can store the seat settings using the
memory function (Y page 112).
i Vehicles with the through-loading feature
and memory function: if you fold down a rear
seat backrest, the respective front seat is
moved forwards slightly if necessary.
i Vehicles with memory function: when the
seat is moved forwards or backwards, the
headrest is moved up or down automatically. Adjusting the head restraints
Important safety notes G
WARNING
You could lose control of the vehicle while
driving if you:
R adjust the driver's seat, steering wheel or
mirrors
R fasten the seat belt
There is a risk of an accident.
Adjust the driver's seat, head restraint, steer-
ing wheel and mirrors and fasten your seat
belt before starting the engine. G
WARNING
The head restraints cannot provide the inten-
ded protection unless they are fitted and
adjusted correctly. There is an increased risk of injury to the head and neck in the event of
an accident or sudden braking, for example.
Always drive with the head restraints fitted.
Ensure that the centre of the head restraints
support the back of each vehicle occupant's
head at eye level before driving off.
Do not interchange the head restraints of the
front and rear seats. Otherwise, you will not be
able to adjust the height and angle of the head
restraints to the correct position.
Adjust the head restraint fore-and-aft position
so that it is as close as possible to the back of
your head.
Observe the important safety guidelines for
seats (Y page 99).
Adjusting the head restraints manually Adjusting the head restraint height
X
To raise: pull the head restraint up to the
desired position.
X To lower: press release catch :and push
the head restraint down to the desired posi-
tion. Seats
101Seats, steering wheel and mirrors Z
Page 105 of 349
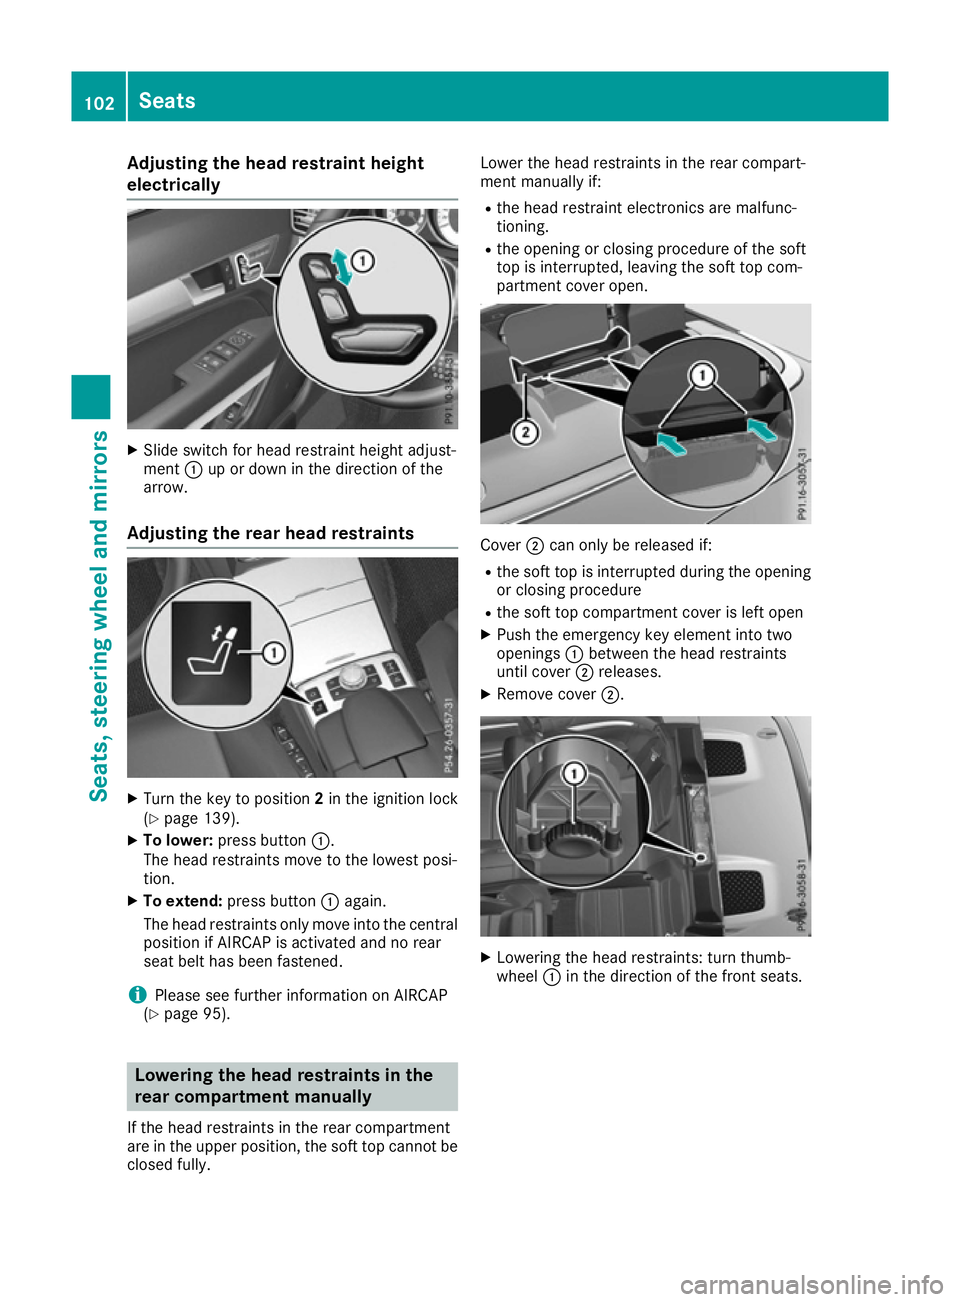
Adjusting the head restraint height
electrically X
Slide switch for head restraint height adjust-
ment :up or down in the direction of the
arrow.
Adjusting the rear head restraints X
Turn the key to position 2in the ignition lock
(Y page 139).
X To lower: press button :.
The head restraints move to the lowest posi-
tion.
X To extend: press button :again.
The head restraints only move into the central
position if AIRCAP is activated and no rear
seat belt has been fastened.
i Please see further information on AIRCAP
(Y page 95). Lowering the head restraints in the
rear compartment manually
If the head restraints in the rear compartment
are in the upper position, the soft top cannot be
closed fully. Lower the head restraints in the rear compart-
ment manually if:
R the head restraint electronics are malfunc-
tioning.
R the opening or closing procedure of the soft
top is interrupted, leaving the soft top com-
partment cover open. Cover
;can only be released if:
R the soft top is interrupted during the opening
or closing procedure
R the soft top compartment cover is left open
X Push the emergency key element into two
openings :between the head restraints
until cover ;releases.
X Remove cover ;. X
Lowering the head restraints: turn thumb-
wheel :in the direction of the front seats. 102
SeatsSeats
, steering wheel and mirrors
Page 106 of 349

Folding the front-seat backrests
forward/back
Important safety notes G
WARNING
If the backrest is not engaged, it could fold
forwards during a braking manoeuvre or in the event of an accident, for example. The seat
backrest will then push the vehicle occupant
against the seat belt. The seat belt cannot
protect as intended and could result in addi-
tional injury. This poses an increased risk of
injury.
Before each journey, make sure that the back- rest engages fully as described. G
WARNING
You could lose control of the vehicle while
driving if you:
R adjust the driver's seat, steering wheel or
mirror
R fasten the seat belt.
There is a risk of an accident.
Adjust the driver's seat, steering wheel or
mirror and fasten the seat belt before starting
the engine. G
WARNING
When adjusting a seat, you or another vehicle occupant could become trapped by the guiderail of the seat, for instance. There is a risk of
injury.
Make sure that no one has any part of their
body within the sweep of the seat when
adjusting it. Folding the seat backrest forwards With the EASY-ENTRY system, the seat moves
forwards if you have folded the backrest for-
wards and the seat is in the rear half of the
adjustment range. This makes it easier for pas-
sengers to get into and out of the rear compart-
ment.
The head restraint also lowers on vehicles with
electric seat adjustment.
X Vehicles without memory function:
release the head restraint if necessary and
push it down.
X Pull seat release handle :forwards and fold
the backrest forwards until the seat backrest
engages.
X Push the seat as far forwards as it will go.
X Vehicles with memory function: pull seat
release handle :forwards and fold the back-
rest forwards as far as it will go.
The seat moves automatically to the foremost
position.
Folding back the seat backrest X
Vehicles without memory function: push
the seat backrest back horizontally until the
seat reaches the position that was previously
set.
X Fold the seat backrest backwards until you
hear it engage. Do so in a smooth manner.
X After the seat backrest has been folded back,
check the position of the head restraint and
set it to the correct position.
X Vehicles with memory function: swing
back the seat backrest.
The seat moves automatically to the stored
position. Seats
103Seats, steering wheel and mirrors Z
Page 109 of 349
Problems with the seat heating or seat ventilation
Problem
Possible causes/consequences and
M
MSolutions The seat heating or seat
ventilation has switched
off prematurely or can-
not be switched on. The on-board voltage is too low because too many electrical consum-
ers are switched on.
X Switch off electrical consumers that you do not need, such as the
rear window heating or interior lighting.
Once the battery is sufficiently charged, the seat heating or seat
ventilation can be switched back on manually. AIRSCARF
G
WARNING
When AIRSCARF is switched on, very hot air
can flow from the vents in the head restraints. This could result in burns in the immediate
vicinity of the air vents. There is a risk of injury.
Reduce the heater output before it becomes
too hot. Driver's and front-passenger seat
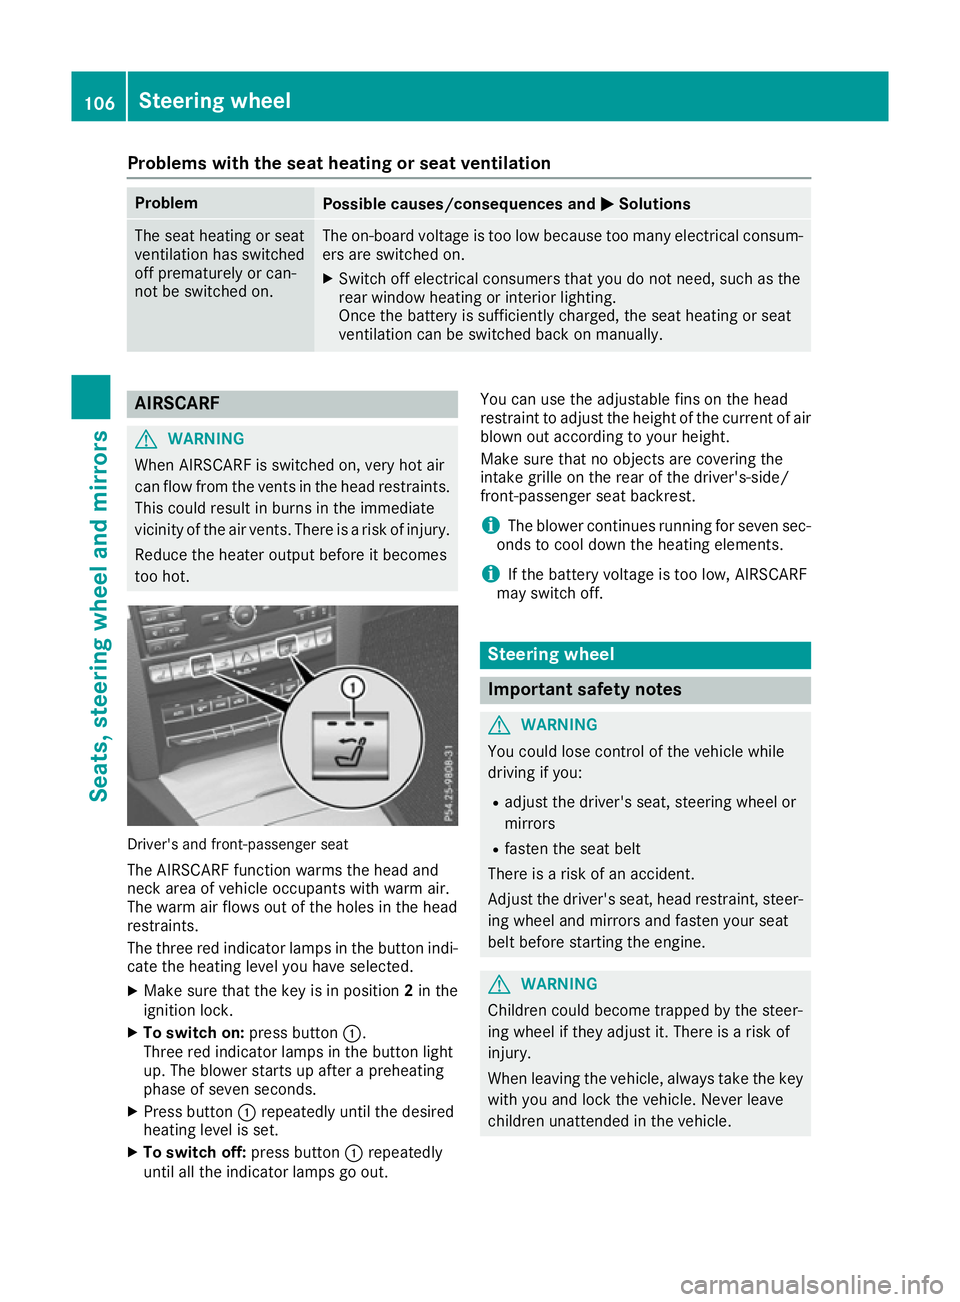
The AIRSCARF function warms the head and
neck area of vehicle occupants with warm air.
The warm air flows out of the holes in the head
restraints.
The three red indicator lamps in the button indi-
cate the heating level you have selected.
X Make sure that the key is in position 2in the
ignition lock.
X To switch on: press button:.
Three red indicator lamps in the button light
up. The blower starts up after a preheating
phase of seven seconds.
X Press button :repeatedly until the desired
heating level is set.
X To switch off: press button:repeatedly
until all the indicator lamps go out. You can use the adjustable fins on the head
restraint to adjust the height of the current of air
blown out according to your height.
Make sure that no objects are covering the
intake grille on the rear of the driver's-side/
front-passenger seat backrest.
i The blower continues running for seven sec-
onds to cool down the heating elements.
i If the battery voltage is too low, AIRSCARF
may switch off. Steering wheel
Important safety notes
G
WARNING
You could lose control of the vehicle while
driving if you:
R adjust the driver's seat, steering wheel or
mirrors
R fasten the seat belt
There is a risk of an accident.
Adjust the driver's seat, head restraint, steer-
ing wheel and mirrors and fasten your seat
belt before starting the engine. G
WARNING
Children could become trapped by the steer-
ing wheel if they adjust it. There is a risk of
injury.
When leaving the vehicle, always take the key with you and lock the vehicle. Never leave
children unattended in the vehicle. 106
Steering wheelSeats, steering wheel and mirrors
Page 113 of 349
The last position of the steering wheel is stored
when you switch off the ignition or when you
store the setting with the memory function
(Y page 112).
Crash-responsive EASY-EXIT feature If the crash-responsive EASY-EXIT feature is trig-
gered in an accident, the steering column will
move upwards when the driver's door is opened. This occurs irrespective of the position of the
key in the ignition lock. This makes it easier to
exit the vehicle and rescue the occupants.
The crash-responsive EASY-EXIT feature is only
operational if the EASY-EXIT/ENTRY feature is
activated in the on-board computer
(Y page 227). Mirrors
Rear-view mirror
X
Anti-dazzle mode: pivot anti-dazzle
switch :forwards or back. Exterior mirrors
Adjusting the exterior mirrors G
WARNING
You could lose control of the vehicle while
driving if you:
R adjust the driver's seat, steering wheel or
mirrors
R fasten the seat belt
There is a risk of an accident. Adjust the driver's seat, head restraint, steer-
ing wheel and mirrors and fasten your seat
belt before starting the engine. G
WARNING
The exterior mirrors reduce the size of the
image. Objects visible in the mirrors are
closer than they appear. You could misjudge
the distance from road users driving behind
you when changing lanes, for instance. There is a risk of an accident.
You should therefore always look over your
shoulder to determine the actual distance
from road users driving behind you. X
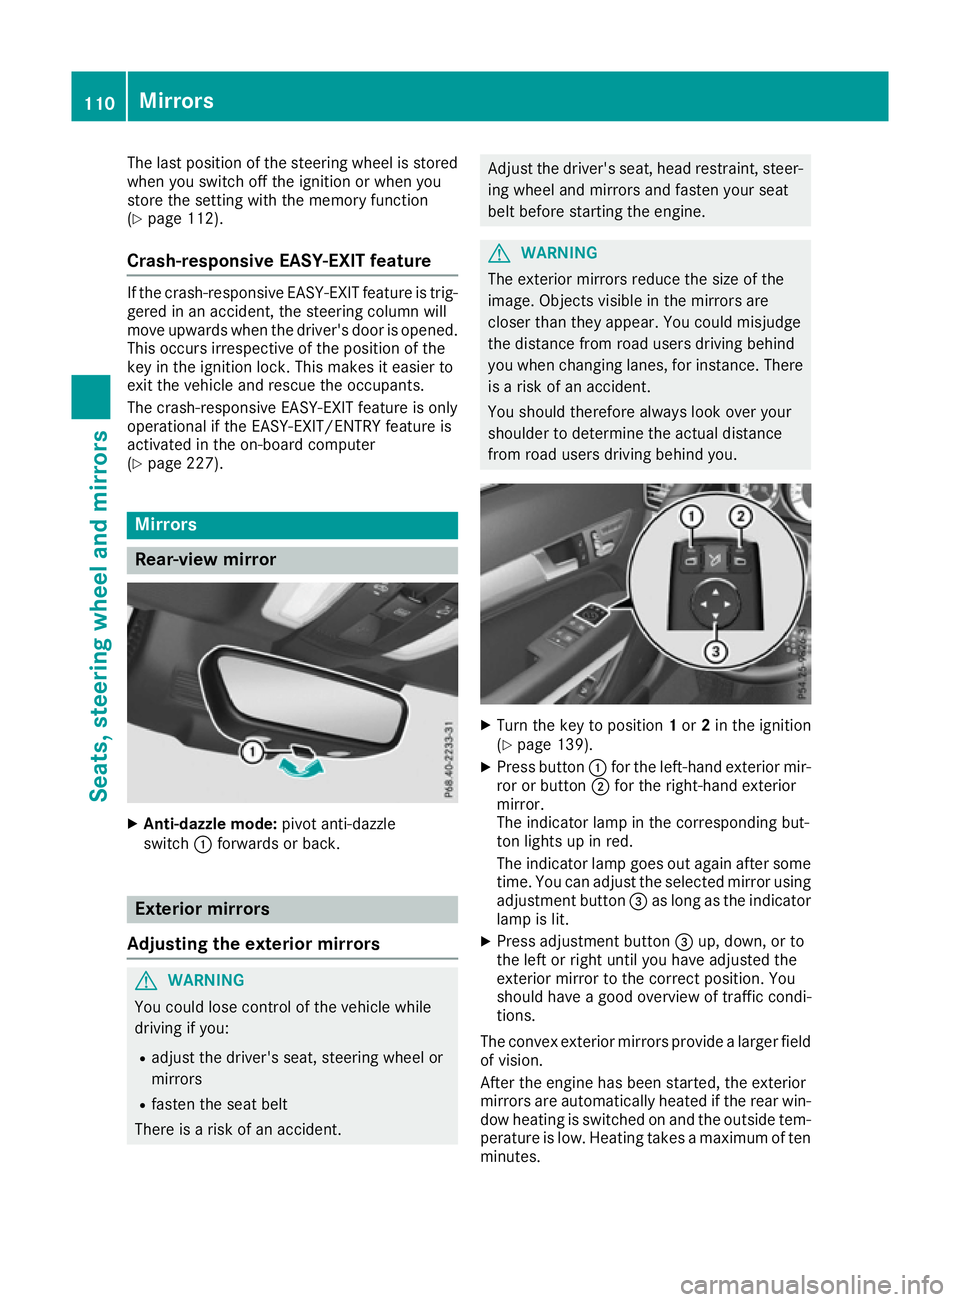
Turn the key to position 1or 2in the ignition
(Y page 139).
X Press button :for the left-hand exterior mir-
ror or button ;for the right-hand exterior
mirror.
The indicator lamp in the corresponding but-
ton lights up in red.
The indicator lamp goes out again after some
time. You can adjust the selected mirror using
adjustment button =as long as the indicator
lamp is lit.
X Press adjustment button =up, down, or to
the left or right until you have adjusted the
exterior mirror to the correct position. You
should have a good overview of traffic condi-
tions.
The convex exterior mirrors provide a larger field of vision.
After the engine has been started, the exterior
mirrors are automatically heated if the rear win-
dow heating is switched on and the outside tem- perature is low. Heating takes a maximum of tenminutes. 110
MirrorsSeats, steering wheel and mirrors
Page 145 of 349

after a cold start. This helps the catalytic con-
verter to reach its operating temperature
more quickly.
Hill start assist Hill start assist helps you when pulling away for-
wards or in reverse on an uphill gradient. It holds the vehicle for a short time after you have
removed your foot from the brake pedal. This
gives you enough time to move your foot from
the brake pedal to the accelerator pedal and
depress it before the vehicle begins to roll. G
WARNING
After a while, hill start assist no longer holds
the vehicle and it may roll away. There is a risk of an accident and injury.
Therefore, quickly move your foot from the
brake pedal to the accelerator pedal. Never
leave the vehicle when it is held by hill start
assist.
Hill start assist is not active if:
R you are pulling away on a level road or a
downhill gradient
R on vehicles with automatic transmission, the
transmission is in position N
R the parking brake is applied
R ESP ®
is malfunctioning ECO start/stop function
Introduction The ECO start/stop function switches the
engine off automatically if the vehicle is stopped
under certain conditions.
When pulling away again, the engine starts auto-
matically. The ECO start/stop function thereby
helps you to reduce the fuel consumption and
emissions of your vehicle.
Important safety notes G
WARNING
If the engine is switched off automatically and you exit the vehicle, the engine is restarted
automatically. The vehicle may begin moving. There is a risk of accident and injury. If you wish to exit the vehicle, always turn off
the ignition and secure the vehicle against
rolling away.
General notes :
ECO start/stop display
The ECO start/stop function is activated when-
ever you start the engine using the key or the
Start/Stop button.
If the ¤ symbol is shown in green in the mul-
tifunction display, the ECO start/stop function
switches the engine off automatically if the vehi- cle stops moving.
If the ECO start/stop function has been man-
ually deactivated (Y page 143) or a malfunction
has caused the system to be deactivated, the
¤ symbol is not displayed.
Automatic engine switch-off General notes
The ECO start/stop function is operational and
the ¤ symbol is displayed in green in the
multifunction display, if:
R the indicator lamp in the ECO button is lit
green
R the outside temperature is within the range
that is suitable for the system
R the engine is at normal operating temperature
R the set temperature for the vehicle interior
has been reached
R the battery is sufficiently charged
R the system detects that the windscreen is not
misted up when the air-conditioning system is switched on
R the bonnet is closed
R the driver's door is closed and the driver's
seat belt is fastened
If the conditions for automatic engine switch-off
are not all fulfilled, the ¤symbol is shown in
yellow. 142
DrivingDriving and parking
Page 146 of 349
i
All of the vehicle's systems remain active
when the engine is switched off automati-
cally.
i The engine can be switched off automati-
cally a maximum of four times (initial stop,
then three subsequent stops) in succession.
The ¤ symbol is shown in yellow in the
multifunction display after the engine has
been started automatically for the fourth
time. When the ¤symbol is shown in
green in the multifunction display, automatic
engine switch-off is again possible.
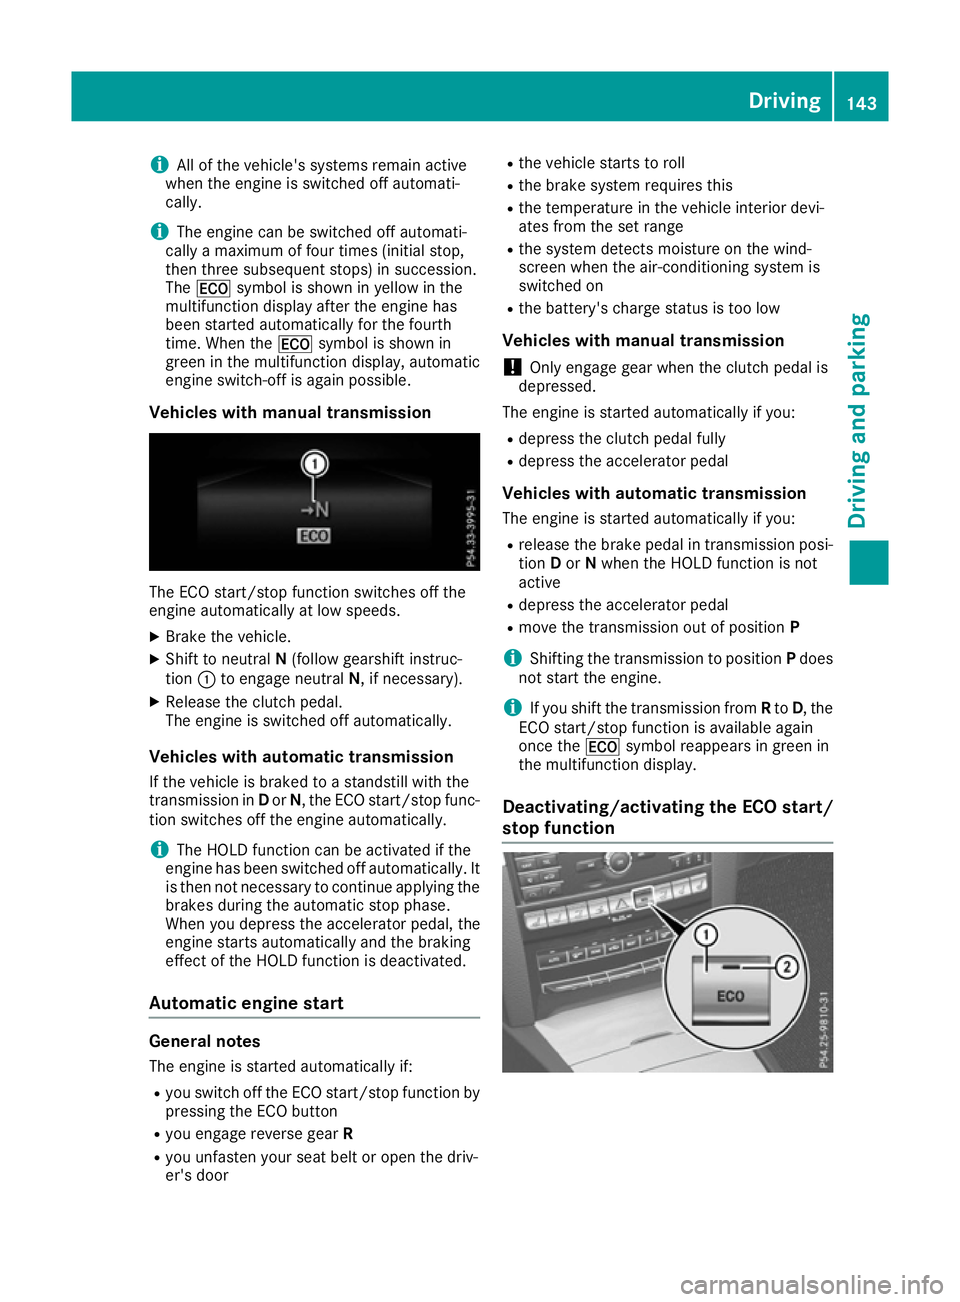
Vehicles with manual transmission The ECO start/stop function switches off the
engine automatically at low speeds.
X Brake the vehicle.
X Shift to neutral N(follow gearshift instruc-
tion :to engage neutral N, if necessary).
X Release the clutch pedal.
The engine is switched off automatically.
Vehicles with automatic transmission
If the vehicle is braked to a standstill with the
transmission in Dor N, the ECO start/stop func-
tion switches off the engine automatically.
i The HOLD function can be activated if the
engine has been switched off automatically. It
is then not necessary to continue applying the brakes during the automatic stop phase.
When you depress the accelerator pedal, the
engine starts automatically and the braking
effect of the HOLD function is deactivated.
Automatic engine start General notes
The engine is started automatically if:
R you switch off the ECO start/stop function by
pressing the ECO button
R you engage reverse gear R
R you unfasten your seat belt or open the driv-
er's door R
the vehicle starts to roll
R the brake system requires this
R the temperature in the vehicle interior devi-
ates from the set range
R the system detects moisture on the wind-
screen when the air-conditioning system is
switched on
R the battery's charge status is too low
Vehicles with manual transmission
! Only engage gear when the clutch pedal is
depressed.
The engine is started automatically if you:
R depress the clutch pedal fully
R depress the accelerator pedal
Vehicles with automatic transmission The engine is started automatically if you:
R release the brake pedal in transmission posi-
tion Dor Nwhen the HOLD function is not
active
R depress the accelerator pedal
R move the transmission out of position P
i Shifting the transmission to position
Pdoes
not start the engine.
i If you shift the transmission from
Rto D, the
ECO start/stop function is available again
once the ¤symbol reappears in green in
the multifunction display.
Deactivating/activating the ECO start/
stop function Driving
143Driving an d parking Z
Page 173 of 349
If it is not, press the cruise control lever in the
direction of arrow ;.
LIM indicator lamp :in the cruise control
lever goes out. DISTRONIC PLUS is selected.
Activating DISTRONIC PLUS Activation conditions
To activate DISTRONIC PLUS, the following con-
ditions must be fulfilled:
R the engine must be running. It may take up to
two minutes of driving before DISTRONIC
PLUS is ready for use.
R the parking brake must be released.
R ESP ®
must be switched on, but not interven-
ing.
R Active Parking Assist must not be activated.
R the transmission must be in position D.
R the driver's door must be closed when you
shift from Pto Dor your seat belt must be
fastened.
R the front-passenger door must be closed.
R the vehicle must not be skidding.
R the DISTRONIC PLUS function must be selec-
ted with the cruise control lever (Y page 169).
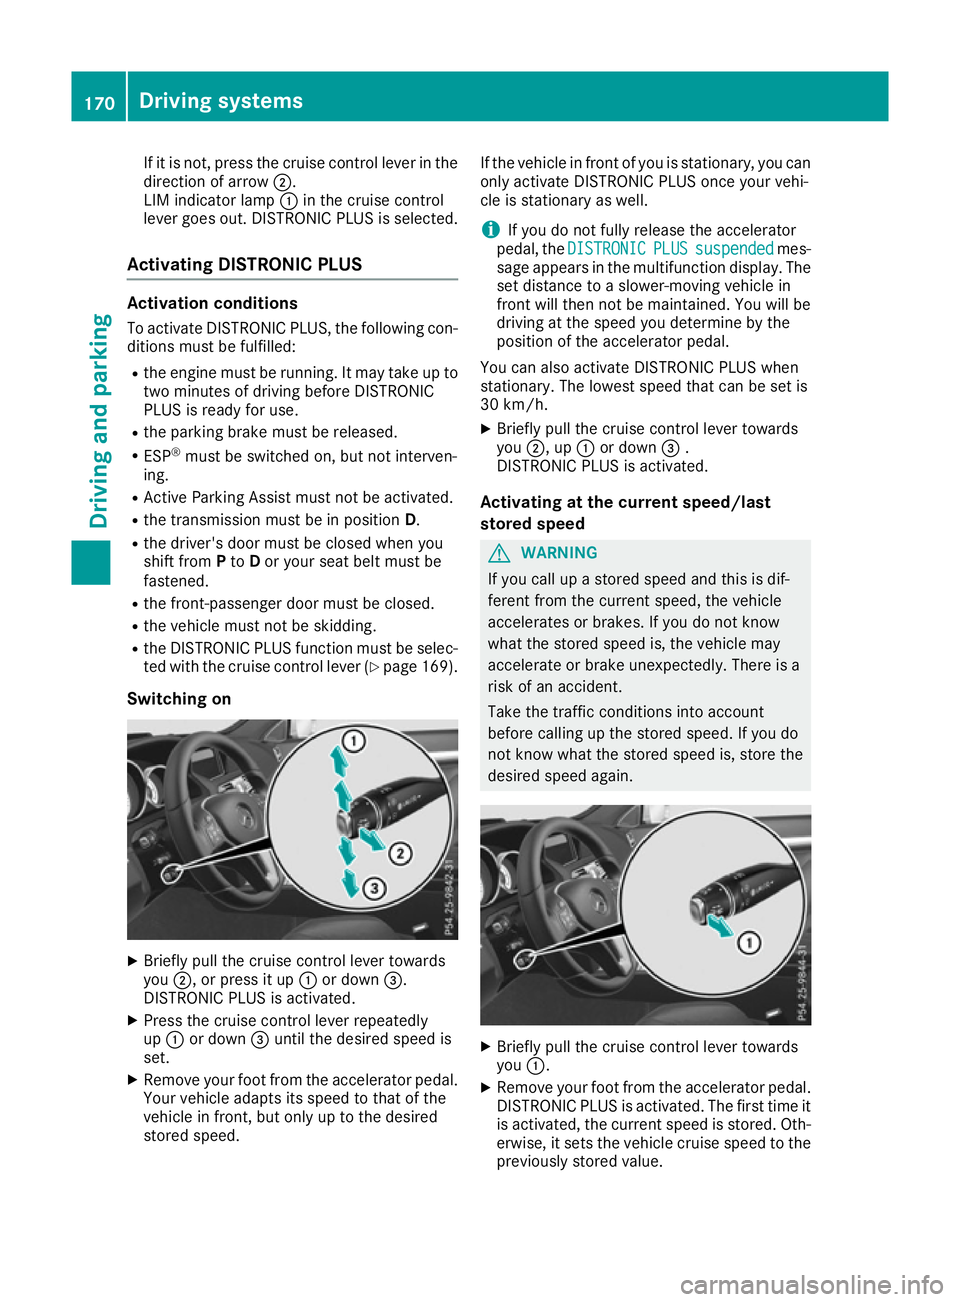
Switching on X
Briefly pull the cruise control lever towards
you ;, or press it up :or down =.
DISTRONIC PLUS is activated.
X Press the cruise control lever repeatedly
up : or down =until the desired speed is
set.
X Remove your foot from the accelerator pedal.
Your vehicle adapts its speed to that of the
vehicle in front, but only up to the desired
stored speed. If the vehicle in front of you is stationary, you can
only activate DISTRONIC PLUS once your vehi-
cle is stationary as well.
i If you do not fully release the accelerator
pedal, the DISTRONIC
DISTRONIC PLUS PLUSsuspended
suspended mes-
sage appears in the multifunction display. The
set distance to a slower-moving vehicle in
front will then not be maintained. You will be
driving at the speed you determine by the
position of the accelerator pedal.
You can also activate DISTRONIC PLUS when
stationary. The lowest speed that can be set is
30 km/h.
X Briefly pull the cruise control lever towards
you ;, up :or down =.
DISTRONIC PLUS is activated.
Activating at the current speed/last
stored speed G
WARNING
If you call up a stored speed and this is dif-
ferent from the current speed, the vehicle
accelerates or brakes. If you do not know
what the stored speed is, the vehicle may
accelerate or brake unexpectedly. There is a
risk of an accident.
Take the traffic conditions into account
before calling up the stored speed. If you do
not know what the stored speed is, store the
desired speed again. X
Briefly pull the cruise control lever towards
you :.
X Remove your foot from the accelerator pedal.
DISTRONIC PLUS is activated. The first time it
is activated, the current speed is stored. Oth-
erwise, it sets the vehicle cruise speed to the
previously stored value. 170
Driving systemsDriving and parking