2015 MERCEDES-BENZ E-CLASS CABRIOLET belt
[x] Cancel search: beltPage 59 of 349
tems" or "Suitability of the seats for attaching an
ISOFIX child restraint system".
Semi-universal child restraint systems are indi-
cated by the text "semi-universal" on the
approval label. These can be used if the vehicle and the seat are listed in the child restraint sys-
tem manufacturer's vehicle model list. For more
information, contact the child restraint system
manufacturer or visit their website.
If it is absolutely necessary to fit a child restraint system to the front-passenger seat:
X Always pay attention to the instructions under
"Child restraint system on the front-
passenger seat" (Y page 53).
There you will find instructions on how to cor- rectly route the shoulder belt strap from the
vehicle seat-belt extender or belt outlet to the
shoulder belt guide on the child restraint sys-
tem (Y page 54).
X Move the front-passenger seat as far back as
possible and into the lowest position.
X Move the backrest to an almost vertical posi-
tion.
The entire base of the child restraint system
must always rest on the seat cushion of the
front-passenger seat. The backrest of the
forward-facing child restraint system must, as far as possible, be resting on the backrest of
the front-passenger seat. The child restraint
system must not touch the roof or be put
under strain by the head restraint. Adjust the
angle of the seat backrest and the head
restraint position accordingly. Also observe
the child restraint system manufacturer's
installation instructions. 56
Children in the vehicleSafety
Page 60 of 349
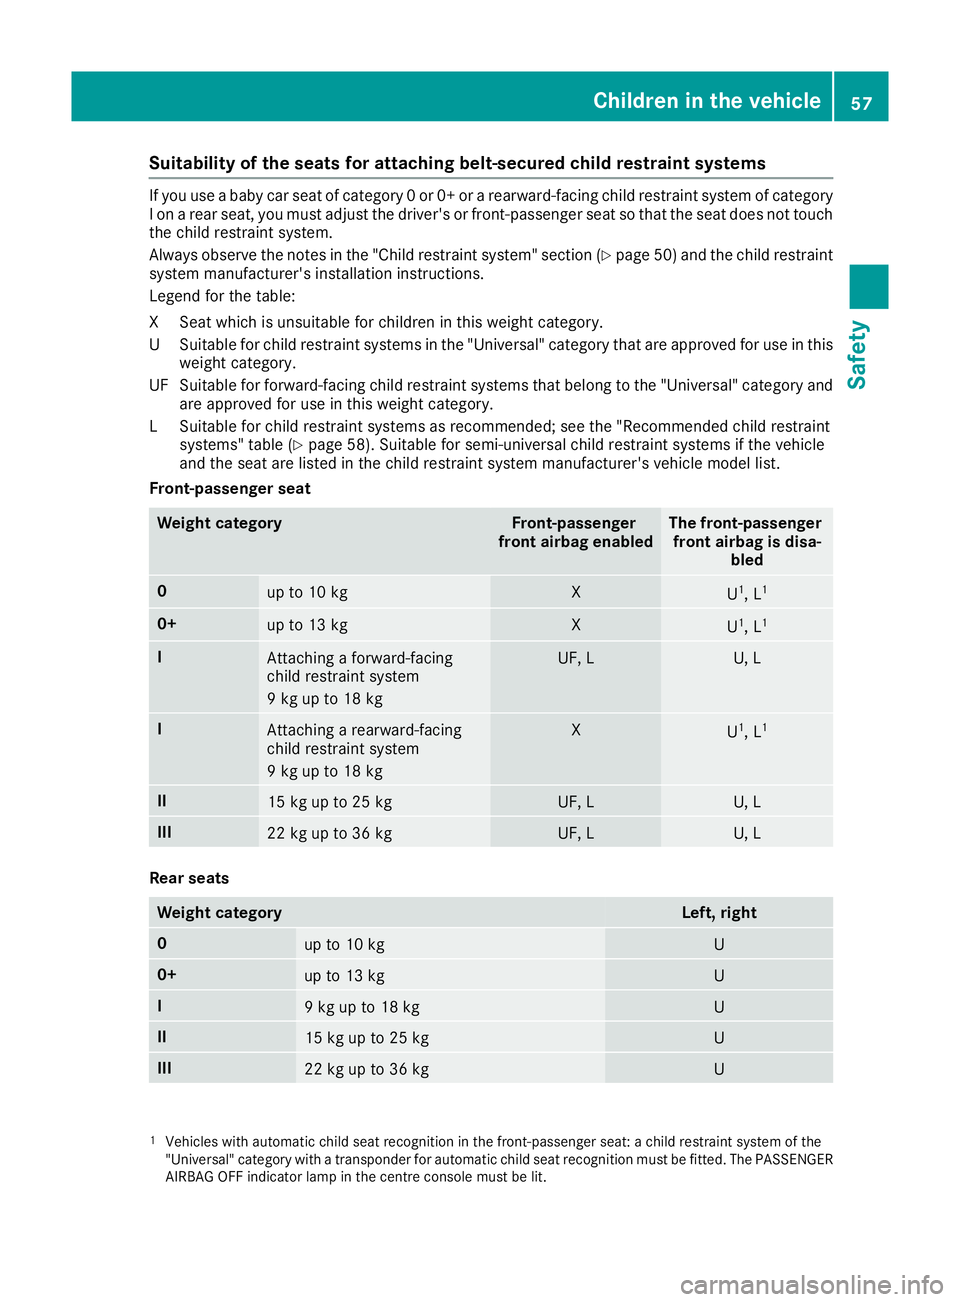
Suitability of the seats for attaching belt-secured child restraint systems
If you use a baby car seat of category 0 or 0+ or a rearward-facing child restraint system of category
I on a rear seat, you must adjust the driver's or front-passenger seat so that the seat does not touch
the child restraint system.
Always observe the notes in the "Child restraint system" section (Y page 50) and the child restraint
system manufacturer's installation instructions.
Legend for the table:
XS eat which is unsuitable for children in this weight category.
US uitable for child restraint systems in the "Universal" category that are approved for use in this
weight category.
UF Suitable for forward-facing child restraint systems that belong to the "Universal" category and are approved for use in this weight category.
LS uitable for child restraint systems as recommended; see the "Recommended child restraint
systems" table (Y page 58). Suitable for semi-universal child restraint systems if the vehicle
and the seat are listed in the child restraint system manufacturer's vehicle model list.
Front-passenger seat Weight category Front-passenger
front airbag enabled The front-passenger
front airbag is disa- bled 0
up to 10 kg X
U
1
, L 1 0+
up to 13 kg X
U
1
, L 1 I
Attaching a forward-facing
child restraint system
9 kg up to 18 kg UF, L U, L
I
Attaching a rearward-facing
child restraint system
9 kg up to 18 kg X
U
1
, L 1 II
15 kg up to 25 kg UF, L U, L
III
22 kg up to 36 kg UF, L U, L
Rear seats
Weight category Left, right
0
up to 10 kg U
0+
up to 13 kg U
I
9 kg up to 18 kg U
II
15 kg up to 25 kg U
III
22 kg up to 36 kg U
1
Vehicles with automatic child seat recognition in the front-passenger seat: a child restraint system of the
"Universal" category with a transponder for automatic child seat recognition must be fitted. The PASSENGER AIRBAG OFF indicator lamp in the centre console must be lit. Children in the vehicle
57Safety Z
Page 62 of 349
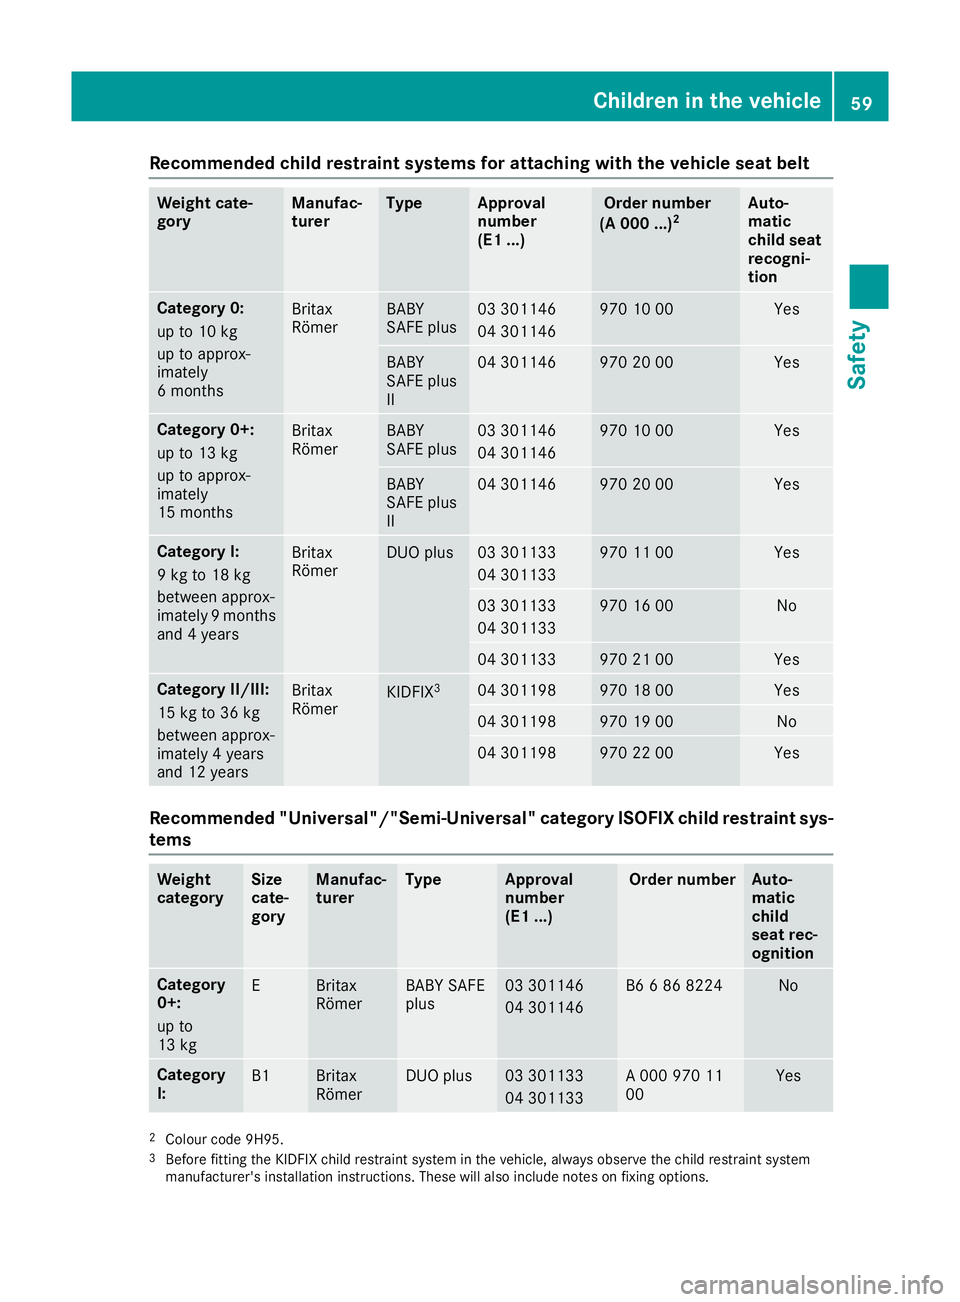
Recommended child restraint systems for attaching with the vehicle seat belt
Weight cate-
gory Manufac-
turer Type Approval
number
(E1 ...) Order number
(A 000 ...) 2 Auto-
matic
child seat
recogni-
tion Category 0:
up to 10 kg
up to approx-
imately
6 months
Britax
Römer BABY
SAFE plus 03 301146
04 301146 970 10 00 Yes
BABY
SAFE plus
II 04 301146 970 20 00 Yes
Category 0+:
up to 13 kg
up to approx-
imately
15 months
Britax
Römer BABY
SAFE plus 03 301146
04 301146 970 10 00 Yes
BABY
SAFE plus
II 04 301146 970 20 00 Yes
Category I:
9 kg to 18 kg
between approx-
imately 9 months
and 4 years Britax
Römer DUO plus 03 301133
04 301133 970 11 00 Yes
03 301133
04 301133 970 16 00 No
04 301133 970 21 00 Yes
Category II/III:
15 kg to 36 kg
between approx-
imately 4 years
and 12 years
Britax
Römer
KIDFIX
3 04 301198 970 18 00 Yes
04 301198 970 19 00 No
04 301198 970 22 00 Yes
Recommended "Universal"/"Semi-Universal" category ISOFIX child restraint sys-
tems Weight
category Size
cate-
gory Manufac-
turer Type Approval
number
(E1 ...) Order number Auto-
matic
child
seat rec-
ognition
Category
0+:
up to
13 kg
E Britax
Römer BABY SAFE
plus 03 301146
04 301146 B6 6 86 8224 No
Category
I:
B1 Britax
Römer DUO plus 03 301133
04 301133 A 000 970 11
00 Yes
2
Colour code 9H95.
3 Before fitting the KIDFIX child restraint system in the vehicle, always observe the child restraint system
manufacturer's installation instructions. These will also include notes on fixing options. Children in the vehicle
59Safety Z
Page 73 of 349

PRE-SAFE
®
Brake warns you. Terminate the
intervention in a non-critical driving situation. G
WARNING
PRE-SAFE ®
Brake cannot always clearly iden-
tify people, especially if they are moving. In
these cases, PRE-SAFE ®
Brake cannot inter-
vene. There is a risk of an accident.
Always pay particular attention to the traffic
situation and be ready to brake, especially if
PRE-SAFE ®
Brake warns you.
In order to maintain the appropriate distance to
the vehicle in front and thus prevent a collision, you must apply the brakes yourself. G
WARNING
PRE-SAFE ®
Brake does not react:
R to small people, e.g. children
R to animals
R to oncoming vehicles
R to crossing traffic
R when cornering
As a result, PRE-SAFE ®
Brake may neither
give warnings nor intervene in all critical sit-
uations. There is a risk of an accident.
Always pay careful attention to the traffic sit- uation and be ready to brake.
In the event of snowfall or heavy rain, detection can be impaired.
Detection by the radar sensor system is also
impaired in the event of:
R dirt on the sensors or obscured sensors
R interference by other radar sources
R strong radar reflections, for example, in multi-
storey car parks
R a narrow vehicle travelling in front, e.g. a
motorcycle
R a vehicle travelling in front on a different line
Detection by the camera system is also impaired in the event of:
R dirt on the camera or if the camera is covered
R glare on the camera system, e.g. from the sun
being low in the sky R
darkness
R if:
- pedestrians move quickly, e.g. into the path
of the vehicle
- the camera system no longer detects a
pedestrian as a person due to special cloth-
ing or other objects
- a pedestrian is concealed by other objects
- the typical outline of a person is not distin-
guishable from the background
Following damage to the front end of the vehicle, have the radar sensor settings and operation
checked at a qualified specialist workshop. This
also applies to collisions at slow speeds where
there is no visible damage to the front of the
vehicle.
Following damage to the windscreen, have the
configuration and operation of the camera sys-
tem checked at a qualified specialist workshop.
Function X
To activate/deactivate: activate or deacti-
vate PRE-SAFE ®
Brake in the on-board com-
puter (Y page 221).
If the PRE-SAFE ®
Brake is not activated, the
æ symbol appears in the multifunction dis-
play.
This function will issue a warning if: R at a speed of approximately 30 km/ho r more
the distance maintained to the vehicle travel- ling in front is insufficient for several seconds
The · distance warning lamp then lights
up in the instrument cluster.
R at a speed of approximately 7 km/h or more,
you rapidly approach a vehicle in front
An intermittent warning tone will then sound
and the ·distance warning lamp will light
up in the instrument cluster.
X Brake immediately to defuse the situation.
or X Take evasive action provided it is safe to do
so.
The PRE-SAFE ®
Brake function can also brake
the vehicle automatically under the following
conditions:
R the driver and front passenger have their seat
belts fastened 70
Driving safety systemsSafety
Page 98 of 349
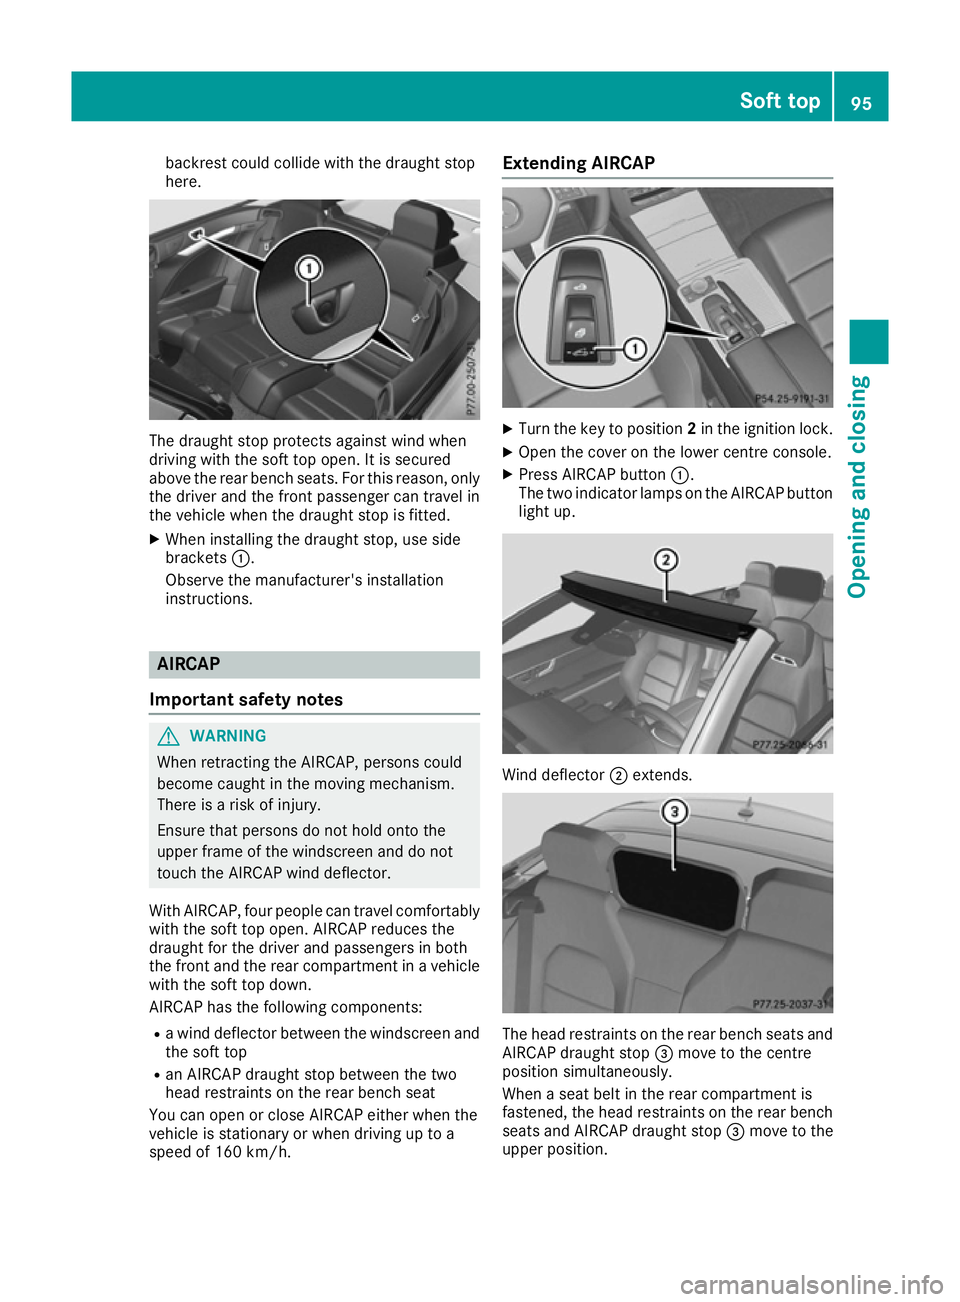
backrest could collide with the draught stop
here. The draught stop protects against wind when
driving with the soft top open. It is secured
above the rear bench seats. For this reason, only the driver and the front passenger can travel in
the vehicle when the draught stop is fitted.
X When installing the draught stop, use side
brackets :.
Observe the manufacturer's installation
instructions. AIRCAP
Important safety notes G
WARNING
When retracting the AIRCAP, persons could
become caught in the moving mechanism.
There is a risk of injury.
Ensure that persons do not hold onto the
upper frame of the windscreen and do not
touch the AIRCAP wind deflector.
With AIRCAP, four people can travel comfortably with the soft top open. AIRCAP reduces the
draught for the driver and passengers in both
the front and the rear compartment in a vehicle
with the soft top down.
AIRCAP has the following components:
R a wind deflector between the windscreen and
the soft top
R an AIRCAP draught stop between the two
head restraints on the rear bench seat
You can open or close AIRCAP either when the
vehicle is stationary or when driving up to a
speed of 160 km/h. Extending AIRCAP
X
Turn the key to position 2in the ignition lock.
X Open the cover on the lower centre console.
X Press AIRCAP button :.
The two indicator lamps on the AIRCAP button light up. Wind deflector
;extends. The head restraints on the rear bench seats and
AIRCAP draught stop =move to the centre
position simultaneously.
When a seat belt in the rear compartment is
fastened, the head restraints on the rear bench seats and AIRCAP draught stop =move to the
upper position. Soft top
95Opening and closing Z
Page 99 of 349
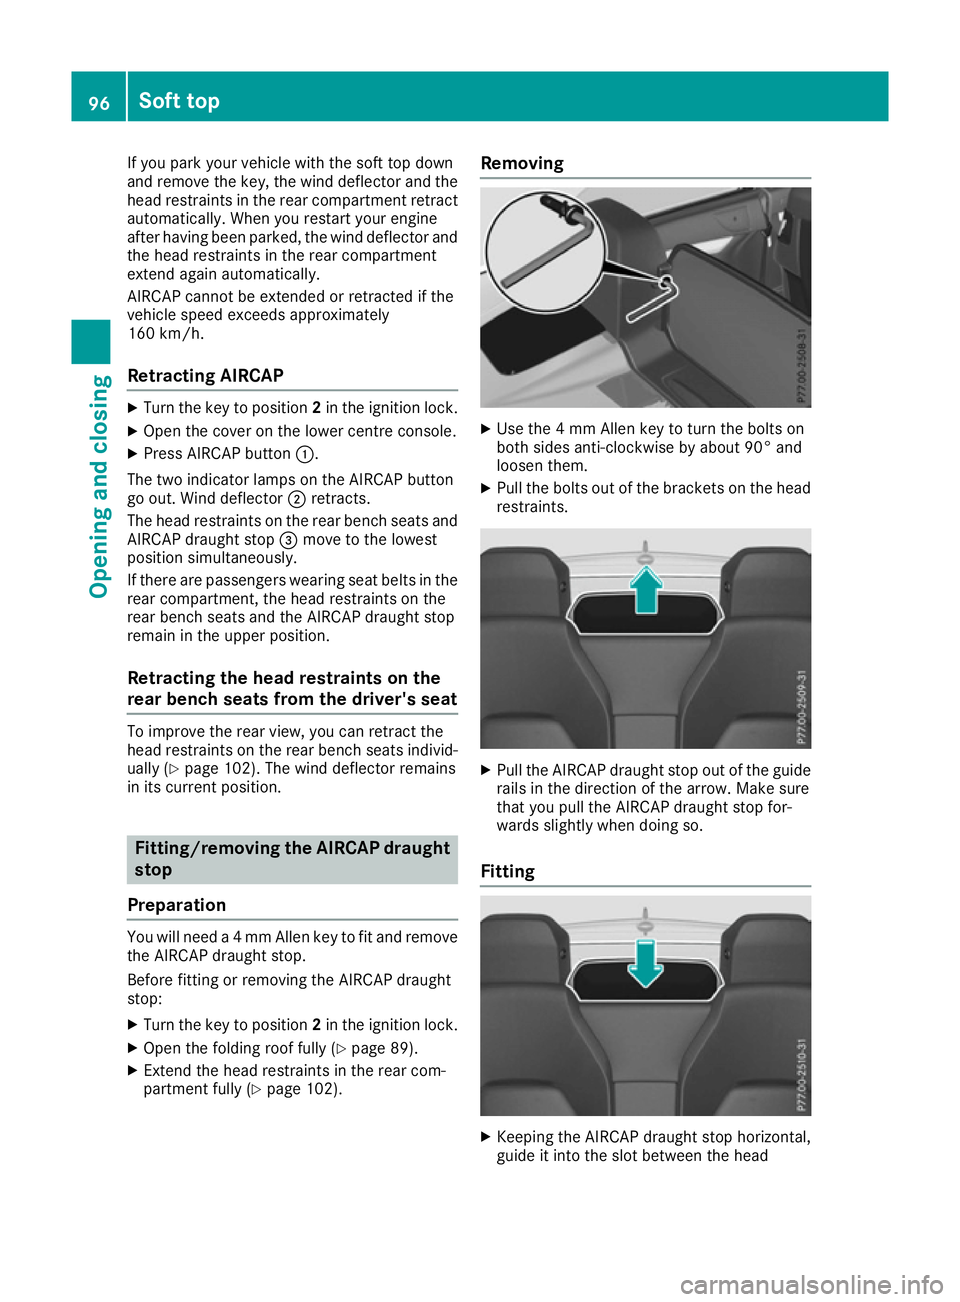
If you park your vehicle with the soft top down
and remove the key, the wind deflector and the
head restraints in the rear compartment retract automatically. When you restart your engine
after having been parked, the wind deflector and
the head restraints in the rear compartment
extend again automatically.
AIRCAP cannot be extended or retracted if the
vehicle speed exceeds approximately
160 km/h.
Retracting AIRCAP X
Turn the key to position 2in the ignition lock.
X Open the cover on the lower centre console.
X Press AIRCAP button :.
The two indicator lamps on the AIRCAP button
go out. Wind deflector ;retracts.
The head restraints on the rear bench seats and
AIRCAP draught stop =move to the lowest
position simultaneously.
If there are passengers wearing seat belts in the rear compartment, the head restraints on the
rear bench seats and the AIRCAP draught stop
remain in the upper position.
Retracting the head restraints on the
rear bench seats from the driver's seat To improve the rear view, you can retract the
head restraints on the rear bench seats individ- ually (Y page 102). The wind deflector remains
in its current position. Fitting/removing the AIRCAP draught
stop
Preparation You will need a 4 mm Allen key to fit and remove
the AIRCAP draught stop.
Before fitting or removing the AIRCAP draught
stop:
X Turn the key to position 2in the ignition lock.
X Open the folding roof fully (Y page 89).
X Extend the head restraints in the rear com-
partment fully (Y page 102). Removing
X
Use the 4 mm Allen key to turn the bolts on
both sides anti-clockwise by about 90° and
loosen them.
X Pull the bolts out of the brackets on the head
restraints. X
Pull the AIRCAP draught stop out of the guide
rails in the direction of the arrow. Make sure
that you pull the AIRCAP draught stop for-
wards slightly when doing so.
Fitting X
Keeping the AIRCAP draught stop horizontal,
guide it into the slot between the head 96
Soft topOpening and closing
Page 102 of 349
Correct driver's seat position
G
WARNING
You could lose control of the vehicle while
driving if you:
R adjust the driver's seat, steering wheel or
mirrors
R fasten the seat belt
There is a risk of an accident.
Adjust the driver's seat, head restraint, steer-
ing wheel and mirrors and fasten your seat
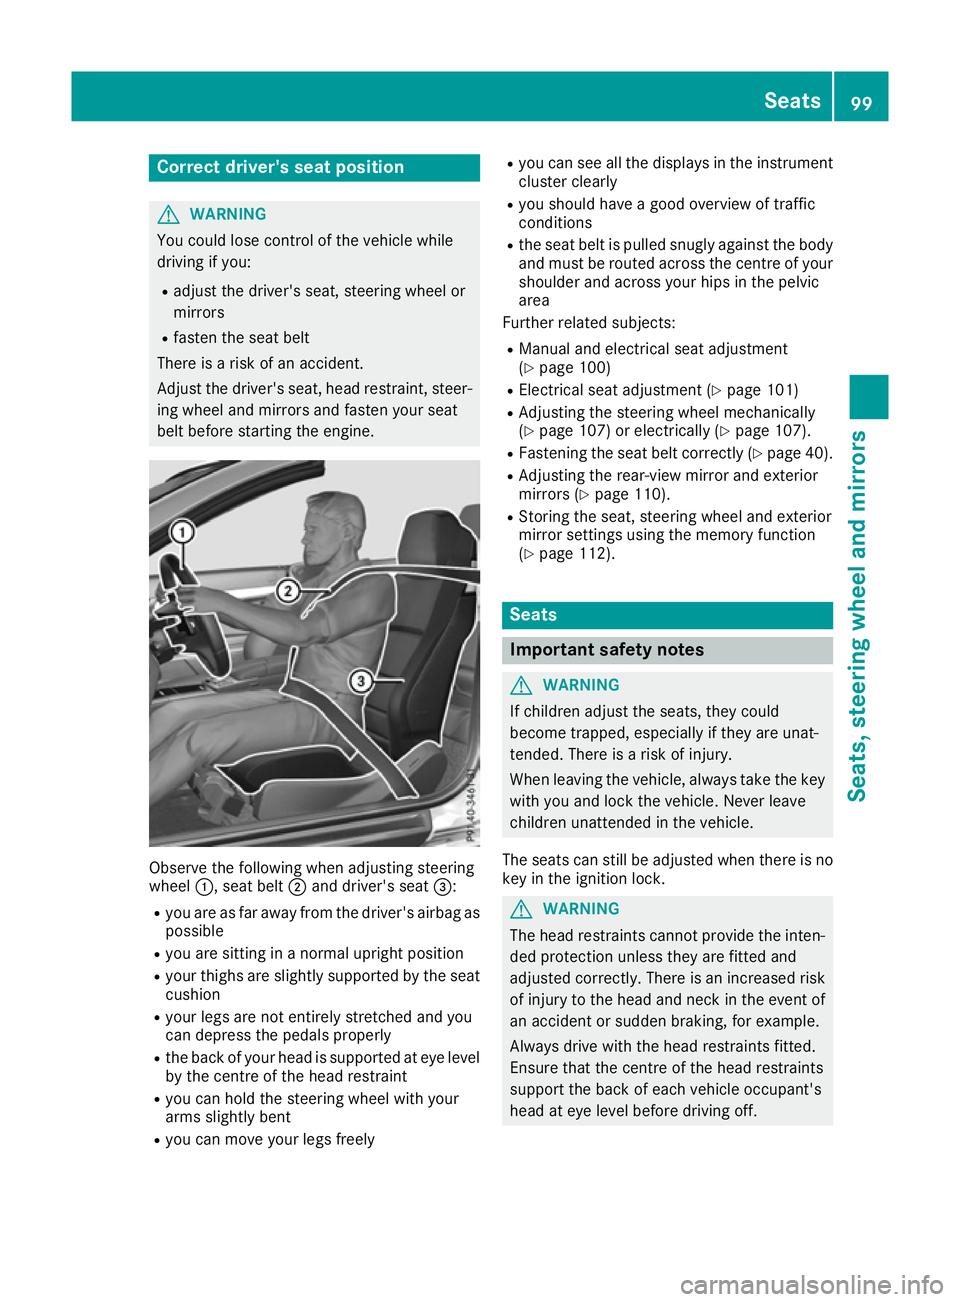
belt before starting the engine. Observe the following when adjusting steering
wheel
:, seat belt ;and driver's seat =:
R you are as far away from the driver's airbag as
possible
R you are sitting in a normal upright position
R your thighs are slightly supported by the seat
cushion
R your legs are not entirely stretched and you
can depress the pedals properly
R the back of your head is supported at eye level
by the centre of the head restraint
R you can hold the steering wheel with your
arms slightly bent
R you can move your legs freely R
you can see all the displays in the instrument
cluster clearly
R you should have a good overview of traffic
conditions
R the seat belt is pulled snugly against the body
and must be routed across the centre of your
shoulder and across your hips in the pelvic
area
Further related subjects:
R Manual and electrical seat adjustment
(Y page 100)
R Electrical seat adjustment (Y page 101)
R Adjusting the steering wheel mechanically
(Y page 107) or electrically (Y page 107).
R Fastening the seat belt correctly (Y page 40).
R Adjusting the rear-view mirror and exterior
mirrors (Y page 110).
R Storing the seat, steering wheel and exterior
mirror settings using the memory function
(Y page 112). Seats
Important safety notes
G
WARNING
If children adjust the seats, they could
become trapped, especially if they are unat-
tended. There is a risk of injury.
When leaving the vehicle, always take the key with you and lock the vehicle. Never leave
children unattended in the vehicle.
The seats can still be adjusted when there is no
key in the ignition lock. G
WARNING
The head restraints cannot provide the inten-
ded protection unless they are fitted and
adjusted correctly. There is an increased risk of injury to the head and neck in the event of
an accident or sudden braking, for example.
Always drive with the head restraints fitted.
Ensure that the centre of the head restraints
support the back of each vehicle occupant's
head at eye level before driving off. Seats
99Seats, steering wheel and mirrors Z
Page 103 of 349
Observe the safety notes on "Airbags"
(Y
page 42) and "Children in the vehicle"
(Y page 49). G
WARNING
You could lose control of the vehicle while
driving if you:
R adjust the driver's seat, steering wheel or
mirrors
R fasten the seat belt
There is a risk of an accident.
Adjust the driver's seat, head restraint, steer-
ing wheel and mirrors and fasten your seat
belt before starting the engine. G
WARNING
If you adjust the seat height carelessly, you or other vehicle occupants could be trapped andthereby injured. Children in particular could
accidentally press the electrical seat adjust-
ment buttons and become trapped. There is a
risk of injury.
While moving the seats, make sure that your
hands or other body parts do not get under the
lever assembly of the seat adjustment sys-
tem. G
WARNING
When adjusting a seat, you or another vehicle occupant could become trapped by the guiderail of the seat, for instance. There is a risk of
injury.
Make sure that no one has any part of their
body within the sweep of the seat when
adjusting it.
! To avoid damage to the seats and the seat
heating, observe the following information:
R do not spill any liquids on the seats. If liquid
is spilled on the seats, dry them as soon as possible.
R if the seat covers are damp or wet, do not
switch on the seat heating. The seat heat-
ing should also not be used to dry the seats.
R clean the seat covers as recommended;
see "Interior care".
R do not transport heavy loads on the seats.
Do not place sharp objects on the seat cushions, e.g. knives, nails or tools. The
seats should only be occupied by passen-
gers, if possible.
R when the seat heating is in operation, do
not cover the seats with insulating materi-
als, e.g. blankets, coats, bags, seat covers,
child seats or booster seats.
! Make sure that there are no objects in the
footwell under or behind the seats when mov- ing the seats back. There is a risk that the
seats and/or the objects could be damaged.
i The head restraints in the front seats are
fitted with the NECK-PRO system (Y page 47).
For this reason, it is not possible to remove
the head restraints from the front seats.
For more information, contact a qualified spe-
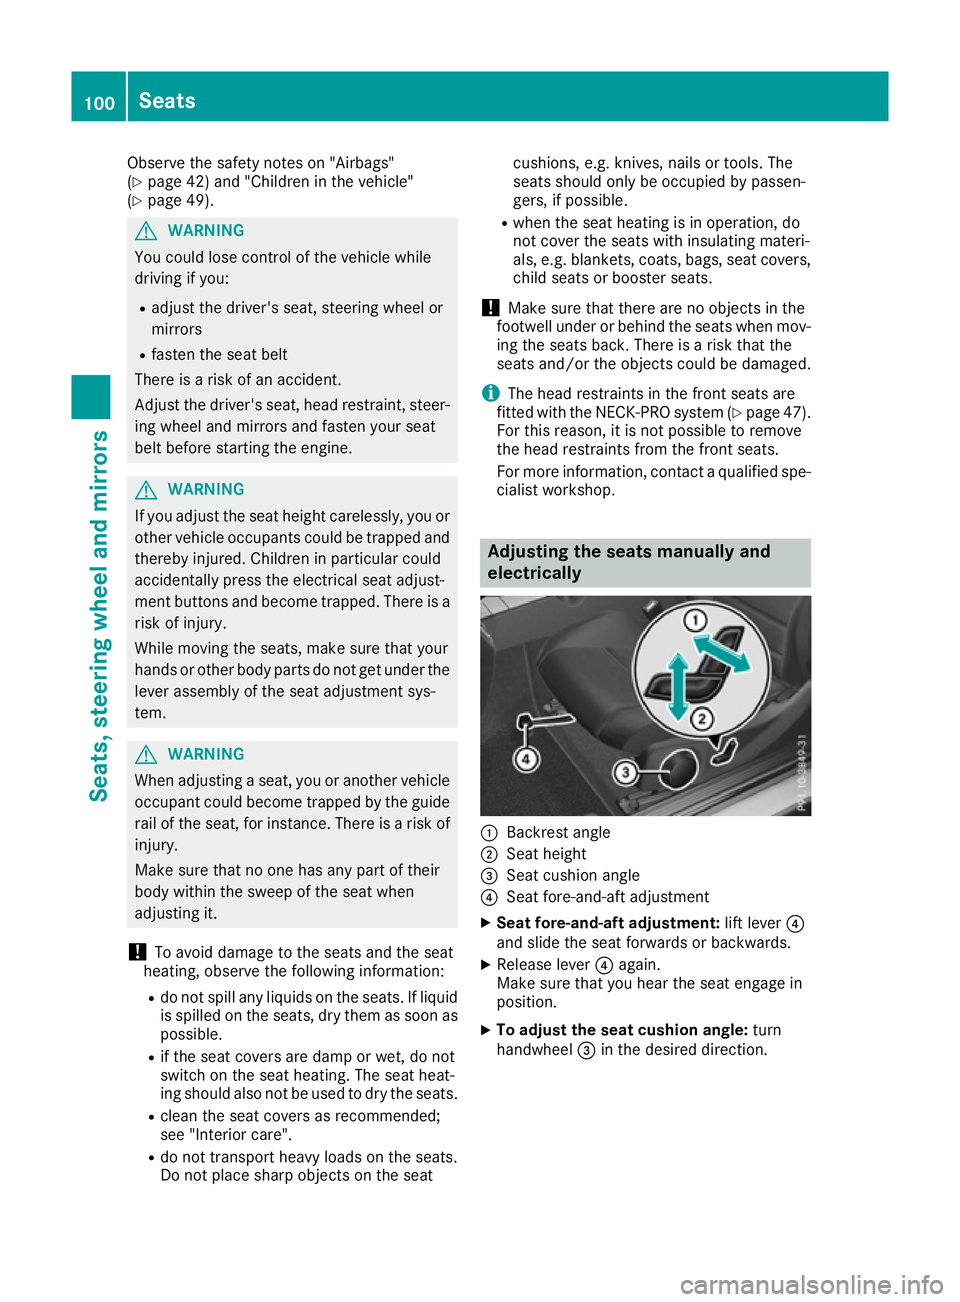
cialist workshop. Adjusting the seats manually and
electrically :
Backrest angle
; Seat height
= Seat cushion angle
? Seat fore-and-aft adjustment
X Seat fore-and-aft adjustment: lift lever?
and slide the seat forwards or backwards.
X Release lever ?again.
Make sure that you hear the seat engage in
position.
X To adjust the seat cushion angle: turn
handwheel =in the desired direction. 100
SeatsSeats, steering wheel and mirrors