2015 MERCEDES-BENZ E-CLASS CABRIOLET dimensions
[x] Cancel search: dimensionsPage 8 of 349
Remote control .............................. 133
Setting the departure time ............
.134
Switching on/off (on the centre
console) ......................................... 133
Auxiliary ventilation
Activating/deactivating ................. 133
Axle load, permissible (trailer tow-
ing) ...................................................... 344 B
Back button ....................................... 264
Bag hook ............................................ 276
Ball coupling
Folding in ....................................... 211
Folding in/out ................................ 210
Folding out ..................................... 210
BAS (Brake Assist System) ................. 62
BAS PLUS (Brake Assist System
PLUS) with Cross-Traffic Assist
Function/notes ................................ 62
BAS PLUS with Cross-Traffic Assist
(Brake Assist PLUS with Cross-
Traffic Assist)
Important safety notes .................... 63
Battery (key)
Checking .......................................... 77
Important safety notes .................... 77
Replacing ......................................... 77
Battery (vehicle)
Charging ........................................ 312
Display message ............................ 239
Important safety notes .................. 310
Jump starting ................................. 313
Belt
see Seat belts
Belt tensioner
Activation ......................................... 45
Blind Spot Assist
Activating/deactivating (on-
board computer) ............................ 222
Display message ............................ 242
Notes/function .............................. 200
Trailer towing ................................. 202
see Active Blind Spot Assist
BlueTEC (AdBlue ®
) ............................ .340 Bluetooth
®
Connecting another mobile
phone ............................................ 267
Searching for a mobile phone ....... .266
See also Digital Owner's Manual ... 263
Telephony ...................................... 266
Bonnet
Active bonnet (pedestrian protec-tion) ............................................... 289
Closing .......................................... .291
Display message ............................ 250
Important safety notes .................. 289
Opening ......................................... 290
Boot
Emergency release .......................... 84
Important safety notes .................... 82
Locking separately ........................... 83
Opening (automatically from
inside) .............................................. 83
Opening/closing (manually from
outside) ............................................ 83
Boot lid
Display message ............................ 250
Opening dimensions ..................... .342
Boot load (maximum) ........................ 342
Boot separator
Display message ............................ 252
General notes .................................. 94
Opening/closing .............................. 94
Brake Assist
see BAS (Brake Assist System)
Brake fluid
Display message ............................ 232
Notes ............................................. 341
Brake force distribution
see EBD (electronic brake force
distribution)
Brake lamps
Adaptive .......................................... .66
Display message ............................ 236
Brakes
ABS .................................................. 62
Adaptive Brake Assist ...................... 66
BAS .................................................. 62
BAS PLUS with Cross-Traffic
Assist ............................................... 62
Brake fluid (notes) ........................ .341
Display message ............................ 230 Index
5
Page 23 of 349
Trailer
Folding the ball coupling in/out ..... 210
Trailer coupling
see Towing a trailer
Trailer towing
7-pin connector ............................. 212
Blind Spot Assist ............................ 202
Cleaning the trailer tow hitch ......... 301
Coupling up a traile r...................... 211
Decoupling a trailer ....................... 211
Driving tips .................................... 209
Folding in the ball coupling ............ 211
Folding out the ball coupling .......... 210
Important safety notes .................. 208
Lights display message .................. 236
Mounting dimensions .................... 343
Parktronic ...................................... 181
Power supply ................................. 211
Trailer load s................................... 344
Transmission
see Automatic transmission
see Manual transmission
Transmission position display ......... 147
Transmission position display
(DIRECT SELECT lever) ...................... 147
Transporting the vehicle .................. 317
Trim pieces (cleaning instruc-
tions) .................................................. 302
Trip computer (on-board com-
puter) .................................................. 216
Trip meter
Calling up ....................................... 215
Resetting (on-board computer) ...... 216
Turn signals
Switching on/of f........................... 116
TV
Operating (on-board computer) ..... 219
see Separate operating instructions
Two-way radio
Frequencies ................................... 335
Installation ..................................... 335
Transmission output (maximum) .... 335
Type identification plate
see Vehicle identification plate
Tyre changing tool kit ....................... 305
Tyre inflation compressor
see TIREFIT kit Tyre pressure
Calling up (on-board computer) ..... 326
Display message ............................ 246
Not reached (TIREFIT) .................... 309
Reached (TIREFIT) .......................... 309
Recommended ............................... 324
Tyre pressure loss warning
General notes ................................ 325
Important safety notes .................. 326
Restarting ...................................... 326
Tyre pressure monitor
Checking the tyre pressure elec-
tronically ........................................ 327
Function/note s............................. 326
General notes ................................ 326
Important safety notes .................. 327
Restarting ...................................... 328
Warning lamp ................................. 262
Warning message .......................... 328
Tyres
Changing a whee l.......................... 328
Checking ........................................ 321
Direction of rotation ...................... 329
Display message ............................ 246
Important safety notes .................. 321
Information on driving .................... 321
MOExtended tyre s......................... 323
Replacing ....................................... 329
Service life ..................................... 322
Storing ........................................... 329
Tyre size (data ).............................. 333
Tyre tread ...................................... 322
Wheel and tyre combinations ........ 333
see Flat tyre U
Unlocking Emergency unlocking ....................... 82
From inside the vehicle (central
unlocking button) ............................. 81
USB devices
Connecting to the Media Inter-
face ............................................... 271 V
Vanity mirror (in sun visor) .............. 27920
Index
Page 24 of 349
Variable SPEEDTRONIC
see SPEEDTRONIC
Vehicle
Correct use ...................................... 27
Data acquisition ............................... 27
Display message ............................ 248
Electronics ..................................... 335
Equipment ....................................... 25
Implied warranty .............................. 27
Individual settings .......................... 223
Leaving parked up ......................... 159
Locking (in an emergency) ............... 82
Locking (key) ................................... 74
Lowering ........................................ 332
Pulling away ................................... 141
Raising ........................................... 330
Registration ..................................... 27
Securing from rolling away ............ 330
Tow-starting ................................... 315
Towing away .................................. 315
Transporting .................................. 317
Unlocking (in an emergency) ........... 82
Unlocking (key) ................................ 74
Vehicle data ................................... 342
Vehicle data ....................................... 342
Vehicle dimensions ........................... 342
Vehicle emergency locking ................ 82
Vehicle identification number
see VIN
Vehicle identification plate .............. 336
Vehicle tool kit .................................. 305
Video
Operating the DVD ......................... 218
See also Digital Owner's Manua l... 263
VIN
Seat ............................................... 337
Type plate ...................................... 336 W
Warning and indicator lamps ABS ................................................ 256
Brakes ........................................... 255
Distance warning signal ................. 261
ESP ®
.............................................. 256
ESP ®
OFF ....................................... 257
Fuel tank ........................................ 259
General notes ................................ 253 LIM (cruise control) ........................ 163
LIM (DISTRONIC PLUS) .................. 169
LIM (variable SPEEDTRONIC) ......... 166
Overview .......................................... 31
PASSENGER AIR BAG OFF ............... 38
Reserve fue l................................... 259
Seat belt ........................................ 254
Tyre pressure monitor ................... 262
Warning triangle ................................ 304
Washer fluid
Display message ............................ 252
Wheel and tyre combinations
Tyres .............................................. 333
Wheel bolt tightening torque ........... 332
Wheel chock ...................................... 330
Wheels
Changing a whee l.......................... 328
Changing/replacing ....................... 329
Checking ........................................ 321
Cleaning ......................................... 299
Emergency spare wheel ................. 333
Fitting a new wheel ........................ 332
Fitting a wheel ............................... 329
Important safety notes .................. 321
Information on driving .................... 321
Removing a whee l.......................... 331
Storing ........................................... 329
Tightening torque ........................... 332
Wheel size/tyre size ...................... 333
Wind deflector (cleaning instruc-
tions) .................................................. 298
Windows
Cleaning ......................................... 299
see Side windows
Windscreen
Demisting ...................................... 129
Windscreen washer fluid
see Windscreen washer system
Windscreen washer system
Important safety notes .................. 342
Topping up ..................................... 293
Windscreen wipers
Problem (malfunction) ................... 122
Replacing the wiper blades ............ 120
Switching on/of f........................... 120
Winter operation
Important safety notes .................. 323
Radiator cover ............................... 291 Index
21
Page 86 of 349
!
The boot lid swings upwards when opened.
Therefore, make sure that there is sufficient
clearance above the boot lid.
The opening dimensions of the boot lid can be
found in the "Vehicle data" section
(Y page 342).
Stow luggage or loads preferably in the boot.
Observe the loading guidelines (Y page 272).
Do not leave the key in the boot. You could oth-
erwise lock yourself out.
The boot lid can be:
R opened and closed manually from outside
R opened automatically from inside
R locked separately
R unlocked with the emergency key element Opening/closing from the outside
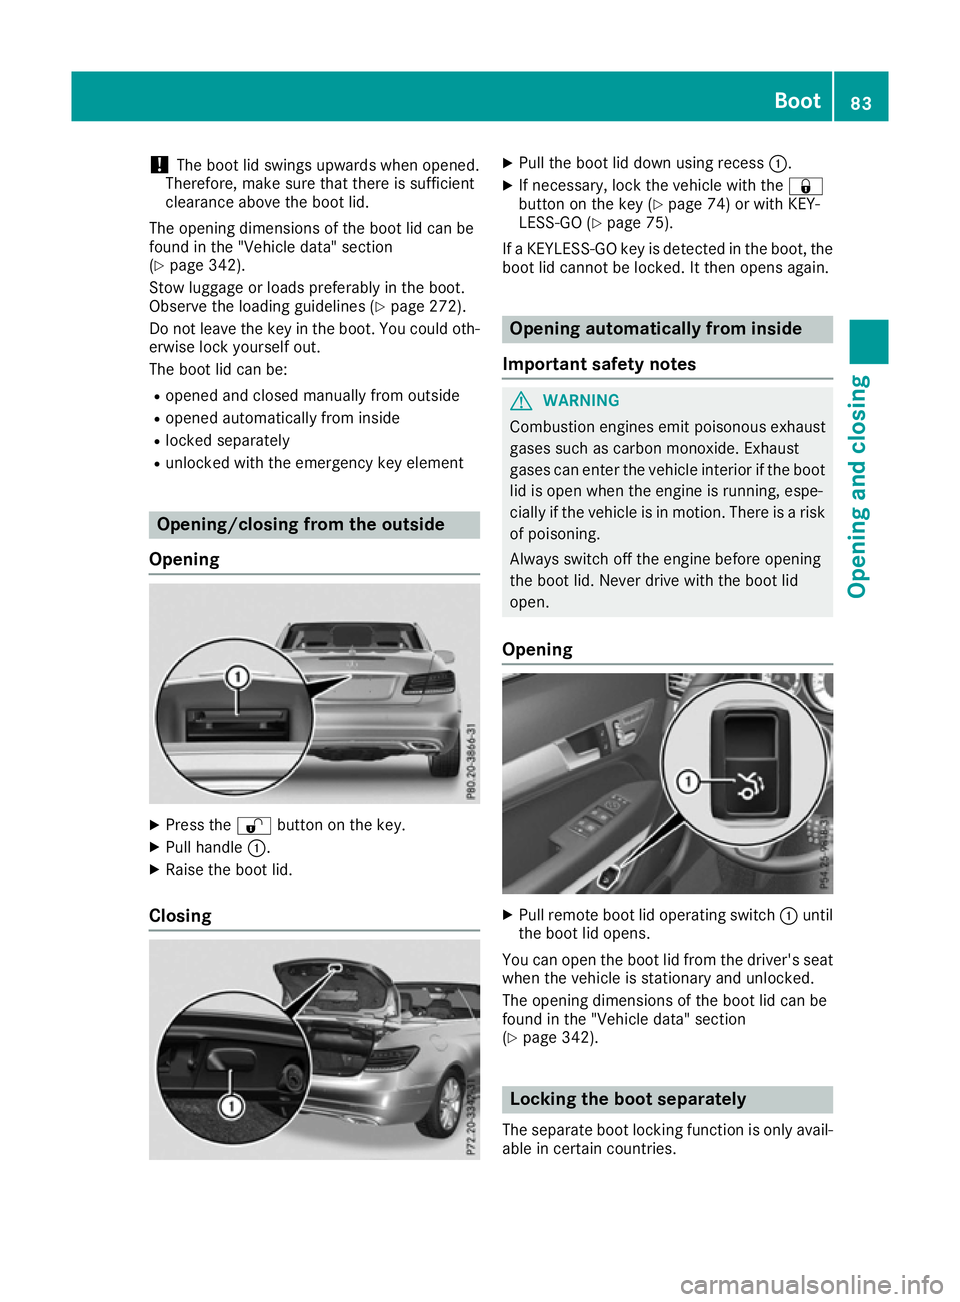
Opening X
Press the %button on the key.
X Pull handle :.
X Raise the boot lid.
Closing X
Pull the boot lid down using recess :.
X If necessary, lock the vehicle with the &
button on the key (Y page 74) or with KEY-
LESS-GO (Y page 75).
If a KEYLESS-GO key is detected in the boot, the
boot lid cannot be locked. It then opens again. Opening automatically from inside
Important safety notes G
WARNING
Combustion engines emit poisonous exhaust
gases such as carbon monoxide. Exhaust
gases can enter the vehicle interior if the boot
lid is open when the engine is running, espe-
cially if the vehicle is in motion. There is a risk of poisoning.
Always switch off the engine before opening
the boot lid. Never drive with the boot lid
open.
Opening X
Pull remote boot lid operating switch :until
the boot lid opens.
You can open the boot lid from the driver's seat when the vehicle is stationary and unlocked.
The opening dimensions of the boot lid can be
found in the "Vehicle data" section
(Y page 342). Locking the boot separately
The separate boot locking function is only avail-
able in certain countries. Boot
83Opening and closing Z
Page 212 of 349

You will find the applicable permissible values,
which must not be exceeded, in the vehicle
documents.
You will find the values approved by the manu-
facturer on the vehicle identification plates and
those for the towing vehicle under "Technical
data" (Y page 344).
When towing a trailer, your vehicle's handling
characteristics will be different in comparison to
when driving without a trailer.
The vehicle/trailer combination:
R is heavier
R is restricted in its acceleration and gradient-
climbing capability
R has an increased braking distance
R is affected more by strong crosswinds
R demands more sensitive steering
R has a larger turning circle
This can impair the vehicle's handling charac-
teristics. Adapt your driving style accordingly.
Maintain a safe distance. Drive carefully.
When towing a trailer, always adjust your speed to the current road and weather conditions. Do
not exceed the maximum permissible speed for
your vehicle/trailer combination. Notes on towing a trailer
General notes The E 500 model cannot be used to tow a trailer.
i When towing a trailer, set the tyre pressure
on the rear axle of the towing vehicle for a
maximum load; see the tyre pressure table in
the fuel filler flap (Y page 324).
Please note that when towing a trailer, the fol-
lowing driving systems have limited availability
or are not available at all.
R PARKTRONIC (Y page 179)
R Active Parking Assist (Y page 183)
R Blind Spot Assist (Y page 200)
i The height of the ball coupling changes with
the load of the vehicle. If necessary, use a
trailer with a height-adjustable drawbar.
You will find fitting dimensions and loads under "Technical data" (Y page 343). Driving tips i
Observe the notes on ESP ®
trailer stabilisa-
tion (Y page 68).
The maximum permissible speed for vehicle/
trailer combinations depends on the type of
trailer. Before beginning the journey, check the
trailer's documents to see what the maximum
permitted speed is. Observe the legally prescri-
bed maximum speed in the relevant country.
For certain Mercedes-Benz vehicles, the maxi-
mum permissible rear axle load is increased
when towing a trailer. See the "Technical data"
section to find out whether this applies to your
vehicle (Y page 344). If you utilise any of the
added maximum rear axle load when towing a
trailer, the vehicle/trailer combination may not
exceed a maximum speed of 100 km/h for rea-
sons concerning the operating permit. This also applies in countries in which the permissible
maximum speed for vehicle/trailer combina-
tions is above 100 km/h.
When towing a trailer, your vehicle's handling
characteristics will be different in comparison to
when driving without a trailer and it will con-
sume more fuel.
Change into a lower gear in good time on long
and steep downhill gradients.
i This also applies if you have activated cruise
control, SPEEDTRONIC or DISTRONIC PLUS.
This will use the braking effect of the engine, so
less braking will be required to maintain vehicle speed. This relieves the load on the brake sys-
tem and prevents the brakes from overheating
and wearing too quickly. If you need additional
braking, depress the brake pedal repeatedly
rather than continuously.
Driving tips If the trailer swings from side to side:
X Do not accelerate.
X Do not countersteer.
X Brake if necessary.
R Maintain a greater distance to the vehicle in
front than when driving without a trailer.
R Avoid braking abruptly. If possible, brake gen-
tly at first to allow the trailer to run on. Then,
increase the braking force rapidly.
R The values given for gradient-climbing capa-
bilities from a standstill refer to sea level.
When driving in mountainous areas, note that Towing a trailer
209Driving and parking Z
Page 332 of 349

Interchanging the wheels
G
WARNING
Interchanging the front and rear wheels may
severely impair the driving characteristics if
the wheels or tyres have different dimensions. The wheel brakes or suspension components may also be damaged. There is a risk of acci-
dent.
Interchange front and rear wheels only if the
wheels and tyres are of the same dimensions.
! On vehicles fitted with a tyre pressure mon-
itor, electronic components are located in the wheel.
Tyre-fitting tools should not be applied in thearea of the valve, as this could damage the
electronic components.
Only have tyres changed at a qualified spe-
cialist workshop.
Interchanging the front and rear wheels of dif-
fering dimensions can render the general oper-
ating permit invalid.
Observe the instructions and safety notes in the "Fitting a wheel" section (Y page 329).
The wear patterns on the front and rear tyres
differ depending on the operating conditions.
Interchange the wheels before a clear wear pat-
tern has formed on the tyres. Front tyres typi-
cally wear more on the shoulders and the rear
tyres in the centre.
On vehicles that have the same size front and
rear wheels, you can interchange the wheels
every 5,000 to 10,000 km depending on the
degree of tyre wear. Ensure that the direction of
rotation is maintained.
Clean the contact surfaces of the wheel and the
brake disc thoroughly every time a wheel is
interchanged. Check the tyre pressure and, if
necessary, restart the tyre pressure loss warn-
ing system (Y page 326) or the tyre pressure
monitor (Y page 328). Direction of rotation
Tyres with a specified direction of rotation have additional benefits, e.g. if there is a risk of aqua- planing. These advantages can only be gained if
the tyres are fitted corresponding to the direc-
tion of rotation. An arrow on the sidewall of the tyre indicates its
correct direction of rotation. Storing wheels
Store wheels that are not being used in a cool,
dry and preferably dark place. Protect the tyres
against oil, grease, petrol and diesel. Fitting a wheel
Preparing the vehicle X
Stop the vehicle on solid, non-slippery and
level ground.
X Apply the parking brake.
X Move the front wheels to the straight-ahead
position.
X Vehicles with manual transmission:
depress the clutch pedal fully and engage first
or reverse gear.
X Vehicles with automatic transmission:
shift the automatic transmission to position
P.
X Switch off the engine.
X Remove the key from the ignition lock.
or, on vehicles with KEYLESS‑GO:
X Open the driver's door.
The on-board electronics now have status 0.
This is the same as the key having been
removed.
X Remove the Start/Stop button from the igni-
tion lock (Y page 139).
X If included in the vehicle equipment, remove
the tyre-change tool kit from the vehicle
(Y page 305).
X Safeguard the vehicle against rolling away.
i Apart from some country-specific variants,
vehicles are not equipped with tyre-changing
tools. Some tools for changing a wheel are
specific to the vehicle. For more information
on which tools are required to perform a
wheel change on your vehicle, consult a quali- fied specialist workshop.
Necessary tyre-changing tools may include,
for example:
R jack
R wheel chock Changing a wheel
329Wheels and tyres Z
Page 336 of 349

tem or the tyre pressure monitor cannot func-
tion reliably. Only restart the tyre pressure loss
warning system or tyre pressure monitor when
the defective wheel has been replaced with a
new wheel.
Vehicles with a tyre pressure monitor: all fit-
ted wheels must be equipped with functioning
sensors. Wheel and tyre combinations
You can ask for information regarding permitted wheel-tyre combinations at a Mercedes-Benz
Service Centre.
! For safety reasons, Mercedes-Benz recom-
mends that you only use tyres and wheels
which have been approved by Mercedes-Benz specifically for your vehicle.
These are specially adapted to the control
systems, such as ABS or ESP ®
and are
marked as follows:
R MO = Mercedes-Benz Original
R MOE = Mercedes-Benz Original Extended
(tyres featuring run-flat characteristics)
R MO1 = Mercedes-Benz Original (only cer-
tain AMG tyres)
Mercedes-Benz Original Extended tyres may
only be used on wheels that have been spe-
cifically approved by Mercedes-Benz.
Only use tyres, wheels or accessories tested
and approved by Mercedes-Benz. Certain
characteristics, e.g. handling, vehicle noise
emissions or fuel consumption, may other-
wise be adversely affected. In addition, when driving with a load, tyre dimension variations
could cause the tyres to come into contact
with the bodywork and axle components. This
could result in damage to the tyres or the
vehicle.
Mercedes-Benz accepts no liability for dam-
age resulting from the use of tyres, wheels or
accessories other than those tested and
approved.
Further information about wheels, tyres and
approved combinations can be obtained from any qualified specialist workshop.
! Retreaded tyres are neither tested nor rec-
ommended by Mercedes-Benz, since previ-
ous damage cannot always be detected on
retreaded tyres. As a result, Mercedes-Benz cannot guarantee vehicle safety if retreaded
tyres are fitted. Do not fit used tyres if you
have no information about their previous
usage.
! Large wheels: the lower the section width
for a certain wheel size, the lower the ride
comfort is on poor road surfaces. Roll comfort and suspension comfort are reduced and therisk of damage to the wheels and tyres as a
result of driving over obstacles increases.
The recommended tyre pressures can be found
in the tyre pressure table on the fuel filler flap.
For further information on tyre pressure, see
(Y page 324). Check tyre pressures regularly
and only when the tyres are cold.
Notes on the vehicle equipment – always fit the
vehicle:
R with tyres of the same size across an axle
(left/right)
R with the same type of tyres at a given time
(summer tyres, winter tyres, MOExtended
tyres)
Exception: it is permissible to fit a different
type or make in the event of a flat tyre.
Observe the "MOExtended tyres (tyres with
run-flat characteristics)" section
(Y page 306).
Vehicles with MOExtended tyres are not equip-
ped with a TIREFIT kit at the factory. It is there-
fore recommended that you additionally equip
your vehicle with a TIREFIT kit if you fit tyres that do not feature run-flat characteristics, e.g. win-
ter tyres. A TIREFIT kit can be obtained from a
qualified specialist workshop. Emergency spare wheel
Important safety notes
G
WARNING
The wheel/tyre dimensions and the tyre type of the spare wheel/emergency spare wheel
and the wheel to be replaced may differ. Fit-
ting a spare wheel/emergency spare wheel
may severely impair the driving characteris-
tics. There is a risk of accident. Emergency spare
wheel
333Wheels an d tyres
Z
Page 337 of 349
To prevent hazardous situations:
R Adapt your driving style accordingly and
drive carefully.
R Never fit more than one spare wheel/emer-
gency spare wheel if the dimensions are
different to those of the wheel being
replaced.
R Only use a spare wheel/emergency spare
wheel briefly if the dimensions are different
to those of the wheel being replaced.
R Do not switch off ESP ®
.
R Have the spare wheel/emergency spare
wheel in question replaced at the nearest
qualified specialist workshop. Make sure
that the wheel/tyre dimensions and tyre
type are correct.
When using an emergency spare wheel or spare wheel of a different size, you must not exceed
the maximum speed of 80 km/h.
Snow chains must not be fitted to emergency
spare wheels. General notes
You can ask for information regarding permitted
emergency spare wheels at a Mercedes-Benz
Service Centre.
You should regularly check the pressure of all
your tyres, including the emergency spare
wheel, particularly prior to long trips, and cor-
rect the pressure as necessary (Y page 324).
The value on the wheel is valid.
An emergency spare wheel may also be fitted
against the direction of rotation. Observe the
time restriction on use as well as the speed lim- itation specified on the emergency spare wheel.
Replace the tyres after six years at the latest,
regardless of wear. This also applies to the
emergency spare wheel.
i If you are driving with the emergency spare
wheel fitted, the tyre pressure loss warning
system or the tyre pressure monitor cannot
function reliably. Only restart the tyre pres-
sure loss warning system or tyre pressure
monitor when the defective wheel has been
replaced with a new wheel.
Vehicles with a tyre pressure monitor: for a
few minutes after an emergency spare wheel is fitted, the system may still display the tyre
pressure of the removed wheel. The value dis-
played for the position where the emergency
spare wheel is fitted is not the same as the
current tyre pressure of the emergency spare
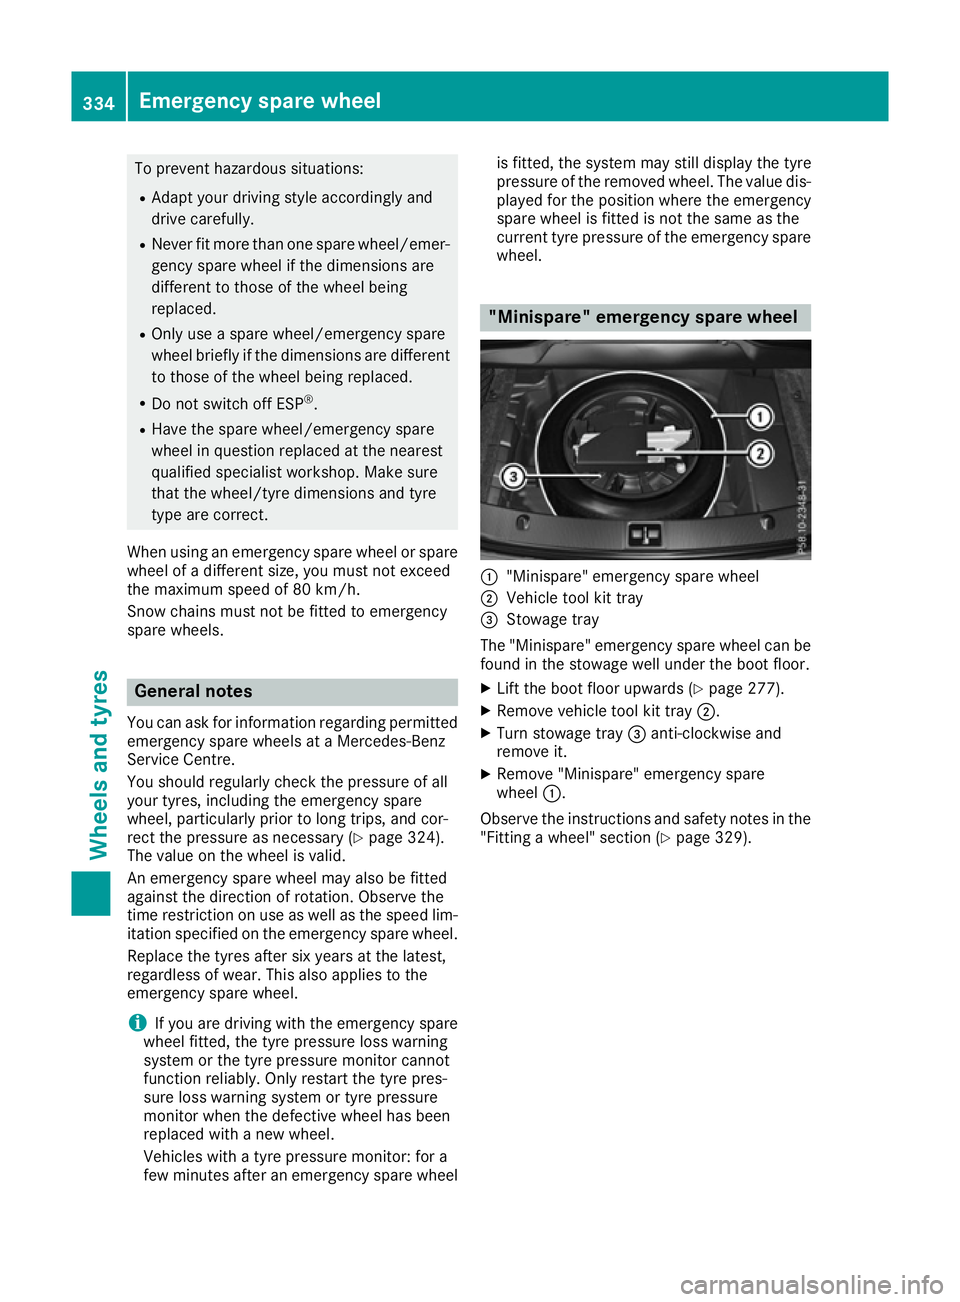
wheel. "Minispare" emergency spare wheel
:
"Minispare" emergency spare wheel
; Vehicle tool kit tray
= Stowage tray
The "Minispare" emergency spare wheel can be found in the stowage well under the boot floor.
X Lift the boot floor upwards (Y page 277).
X Remove vehicle tool kit tray ;.
X Turn stowage tray =anti-clockwise and
remove it.
X Remove "Minispare" emergency spare
wheel :.
Observe the instructions and safety notes in the "Fitting a wheel" section (Y page 329).334
Emergency spare wheelWheels and tyres