2015 MERCEDES-BENZ E-CLASS CABRIOLET reset
[x] Cancel search: resetPage 90 of 349

X
Touch recessed sensor surface :on the
door handle until the side windows are fully
closed.
i Make sure you only touch recessed sensor
surface :.
X To interrupt convenience closing: release
recessed sensor surface :on the door han-
dle. Resetting the side windows
If a side window can no longer be closed fully,
you must reset it.
X Close all doors.
X Turn the key to position 1or 2in the ignition
lock.
X Pull the corresponding switch on the door
control panel until the side window is com-
pletely closed (Y page 85).
X Hold the switch for an additional second.
If the side window opens again slightly: X Immediately pull the corresponding switch on
the door control panel until the side window is completely closed (Y page 85).
X Hold the switch for an additional second.
X If the corresponding side window remains
closed after the button has been released, the
side window has been reset correctly. If this is
not the case, repeat the steps above again. Side windows
87Opening and closing Z
Page 91 of 349
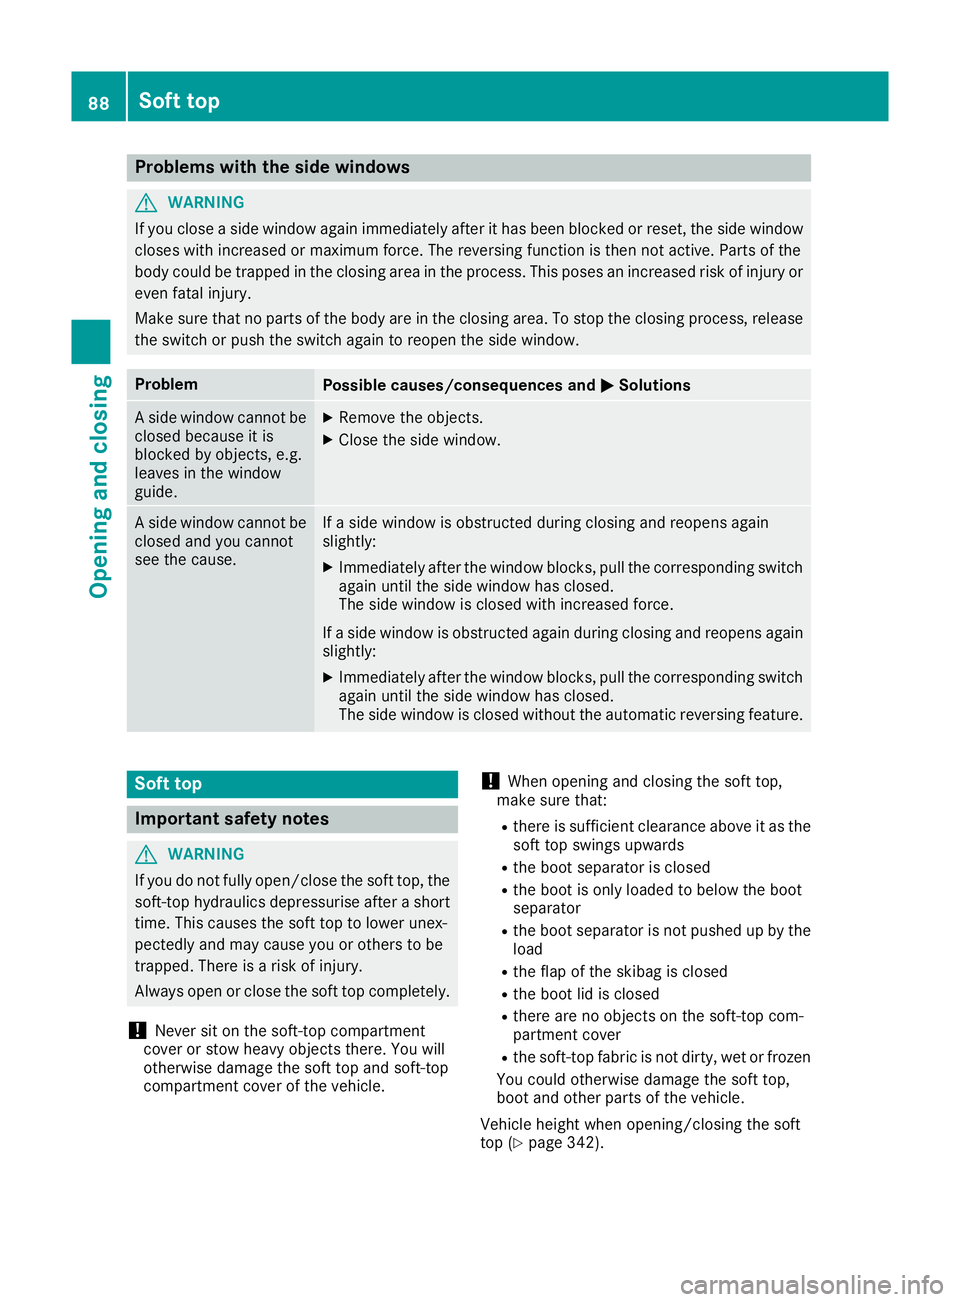
Problems with the side windows
G
WARNING
If you close a side window again immediately after it has been blocked or reset, the side window
closes with increased or maximum force. The reversing function is then not active. Parts of the
body could be trapped in the closing area in the process. This poses an increased risk of injury or even fatal injury.
Make sure that no parts of the body are in the closing area. To stop the closing process, releasethe switch or push the switch again to reopen the side window. Problem
Possible causes/consequences and
M MSolutions A side window cannot be
closed because it is
blocked by objects, e.g.
leaves in the window
guide. X
Remove the objects.
X Close the side window. A side window cannot be
closed and you cannot
see the cause. If a side window is obstructed during closing and reopens again
slightly:
X Immediately after the window blocks, pull the corresponding switch
again until the side window has closed.
The side window is closed with increased force.
If a side window is obstructed again during closing and reopens again slightly:
X Immediately after the window blocks, pull the corresponding switch
again until the side window has closed.
The side window is closed without the automatic reversing feature. Soft top
Important safety notes
G
WARNING
If you do not fully open/close the soft top, the soft-top hydraulics depressurise after a short time. This causes the soft top to lower unex-
pectedly and may cause you or others to be
trapped. There is a risk of injury.
Always open or close the soft top completely.
! Never sit on the soft-top compartment
cover or stow heavy objects there. You will
otherwise damage the soft top and soft-top
compartment cover of the vehicle. !
When opening and closing the soft top,
make sure that:
R there is sufficient clearance above it as the
soft top swings upwards
R the boot separator is closed
R the boot is only loaded to below the boot
separator
R the boot separator is not pushed up by the
load
R the flap of the skibag is closed
R the boot lid is closed
R there are no objects on the soft-top com-
partment cover
R the soft-top fabric is not dirty, wet or frozen
You could otherwise damage the soft top,
boot and other parts of the vehicle.
Vehicle height when opening/closing the soft
top (Y page 342). 88
Soft topOpening and closing
Page 114 of 349
i
The exterior mirrors can also be heated
manually by switching on the rear window
heating.
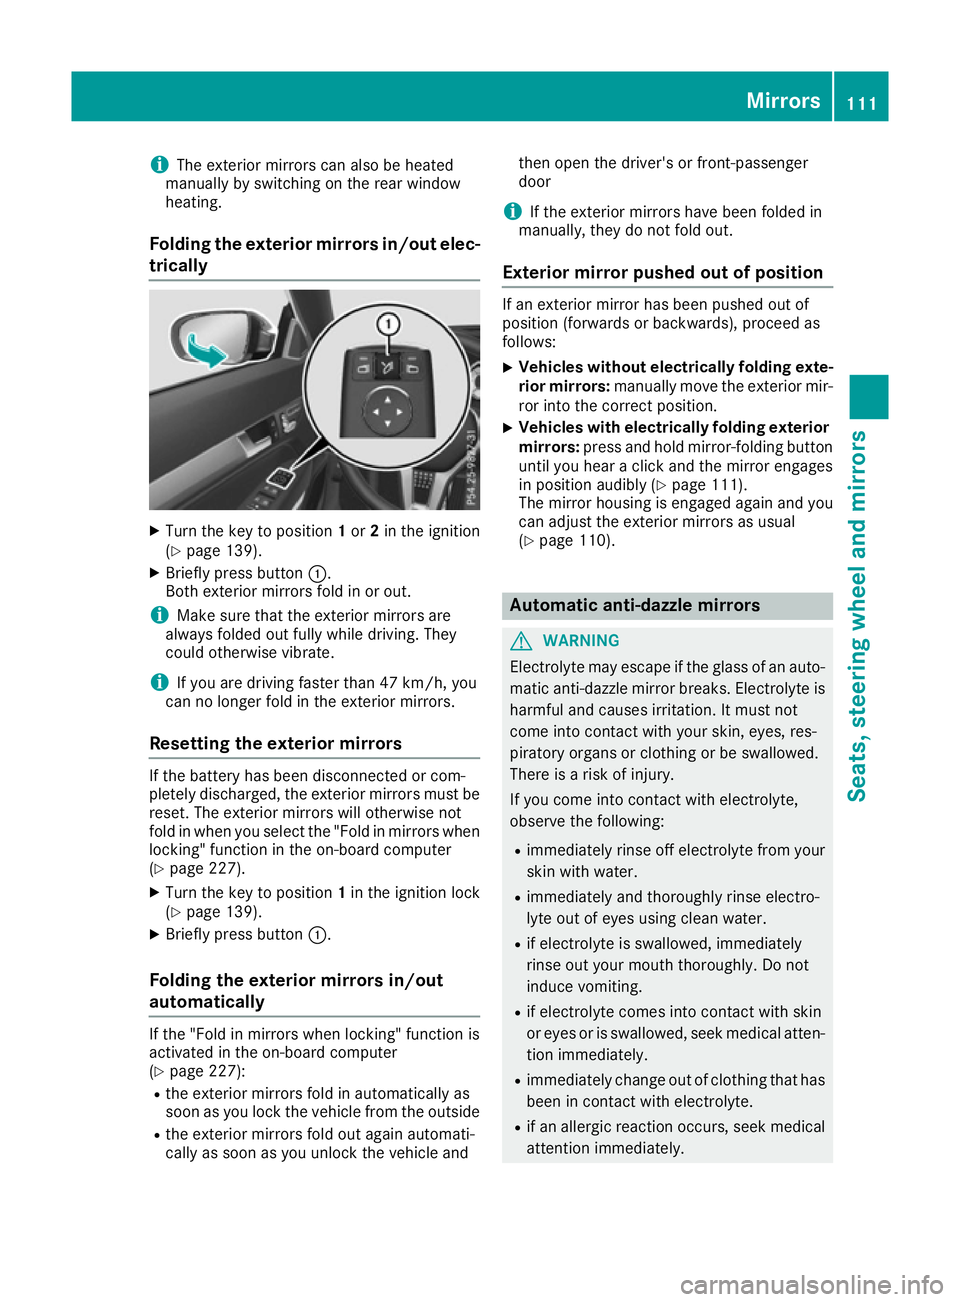
Folding the exterior mirrors in/out elec- trically X
Turn the key to position 1or 2in the ignition
(Y page 139).
X Briefly press button :.
Both exterior mirrors fold in or out.
i Make sure that the exterior mirrors are
always folded out fully while driving. They
could otherwise vibrate.
i If you are driving faster than 47 km/h,
you
can no longer fold in the exterior mirrors.
Resetting the exterior mirrors If the battery has been disconnected or com-
pletely discharged, the exterior mirrors must be
reset. The exterior mirrors will otherwise not
fold in when you select the "Fold in mirrors whenlocking" function in the on-board computer
(Y page 227).
X Turn the key to position 1in the ignition lock
(Y page 139).
X Briefly press button :.
Folding the exterior mirrors in/out
automatically If the "Fold in mirrors when locking" function is
activated in the on-board computer
(Y page 227):
R the exterior mirrors fold in automatically as
soon as you lock the vehicle from the outside
R the exterior mirrors fold out again automati-
cally as soon as you unlock the vehicle and then open the driver's or front-passenger
door
i If the exterior mirrors have been folded in
manually, they do not fold out.
Exterior mirror pushed out of position If an exterior mirror has been pushed out of
position (forwards or backwards), proceed as
follows:
X Vehicles without electrically folding exte-
rior mirrors: manually move the exterior mir-
ror into the correct position.
X Vehicles with electrically folding exterior
mirrors: press and hold mirror-folding button
until you hear a click and the mirror engages
in position audibly (Y page 111).
The mirror housing is engaged again and you
can adjust the exterior mirrors as usual
(Y page 110). Automatic anti-dazzle mirrors
G
WARNING
Electrolyte may escape if the glass of an auto- matic anti-dazzle mirror breaks. Electrolyte is
harmful and causes irritation. It must not
come into contact with your skin, eyes, res-
piratory organs or clothing or be swallowed.
There is a risk of injury.
If you come into contact with electrolyte,
observe the following:
R immediately rinse off electrolyte from your
skin with water.
R immediately and thoroughly rinse electro-
lyte out of eyes using clean water.
R if electrolyte is swallowed, immediately
rinse out your mouth thoroughly. Do not
induce vomiting.
R if electrolyte comes into contact with skin
or eyes or is swallowed, seek medical atten-
tion immediately.
R immediately change out of clothing that has
been in contact with electrolyte.
R if an allergic reaction occurs, seek medical
attention immediately. Mir
rors
111Seats, ste ering wheel and mirrors Z
Page 115 of 349

The rear-view mirror and the exterior mirror on
the driver's side automatically go into anti-daz-
zle mode if the following conditions are met
simultaneously:
R the ignition is switched on and
R incident light from headlamps strikes the sen-
sor in the rear-view mirror
The mirrors do not dip if reverse gear is engaged. Parking position of the exterior mirror
on the front-passenger side
Setting and storing the parking position You can set the front-passenger side exterior
mirror so that you can see the rear wheel on that side as soon as you engage reverse gear. You
can store this position.
Using reverse gear :
Button for the exterior mirror on the driver's
side
; Button for the exterior mirror on the front-
passenger side
= Adjustment button
? Memory button M
X Park the vehicle and turn the key to position 2
in the ignition lock (Y page 139).
X Press button ;for the exterior mirror on the
front-passenger side.
X Engage reverse gear.
The exterior mirror on the front-passenger
side moves to the preset parking position.
X Use adjustment button =to adjust the exte-
rior mirror to a position that allows you to see
the rear wheel and the kerb.
The parking position is stored. i
If you shift the transmission to another posi-
tion, the exterior mirror on the front-
passenger side returns to the driving position.
Using the memory button You can store the parking position of the exte-
rior mirror on the front-passenger side using
memory button
M?. The reverse gear must not
be engaged.
X Turn the key to position 2in the ignition lock
(Y page 139).
X With the exterior mirror on the front-
passenger side activated, use adjustment
button =to adjust the exterior mirror. The
rear wheel and the kerb should be visible in
the exterior mirror.
X Press memory button M? and one of the
arrows on adjustment button =within three
seconds.
The parking position is stored if the exterior
mirror does not move.
X If the exterior mirror moves out of position,
repeat the steps.
Calling up a stored parking position X
Turn the key to position 2in the ignition lock
(Y page 139).
X Adjust the exterior mirror on the front-
passenger side using button ;.
X Engage reverse gear.
The exterior mirror on the front-passenger
side moves to the stored parking position.
The exterior mirror on the front-passenger side
moves back to its original position:
R as soon as you exceed a speed of 15 km/h
R if you press button :for the exterior mirror
on the driver's side Memory function
Storing settings
G
WARNING
If you use the memory function on the driver's side while driving, the adjustments could
cause you to lose control of the vehicle. There
is a risk of an accident. 112
Memory functionSeats, steering wheel and mirrors
Page 116 of 349
Only use the memory function on the driver's
side while the vehicle is stationary. G
WARNING
If children activate the memory function, they
could become trapped, especially if they are
unattended. There is a risk of injury.
When leaving the vehicle, always take the key with you and lock the vehicle. Never leave
children unattended in the vehicle. G
WARNING
When the memory function adjusts the seat or steering wheel, you and other vehicle occu-
pants – particularly children – could become
trapped. There is a risk of injury.
While the memory function is making adjust-
ments, make sure that no one has any body
parts in the sweep of the seat or steering
wheel. If somebody becomes trapped, imme-
diately release the memory function position
button. The adjustment process is stopped.
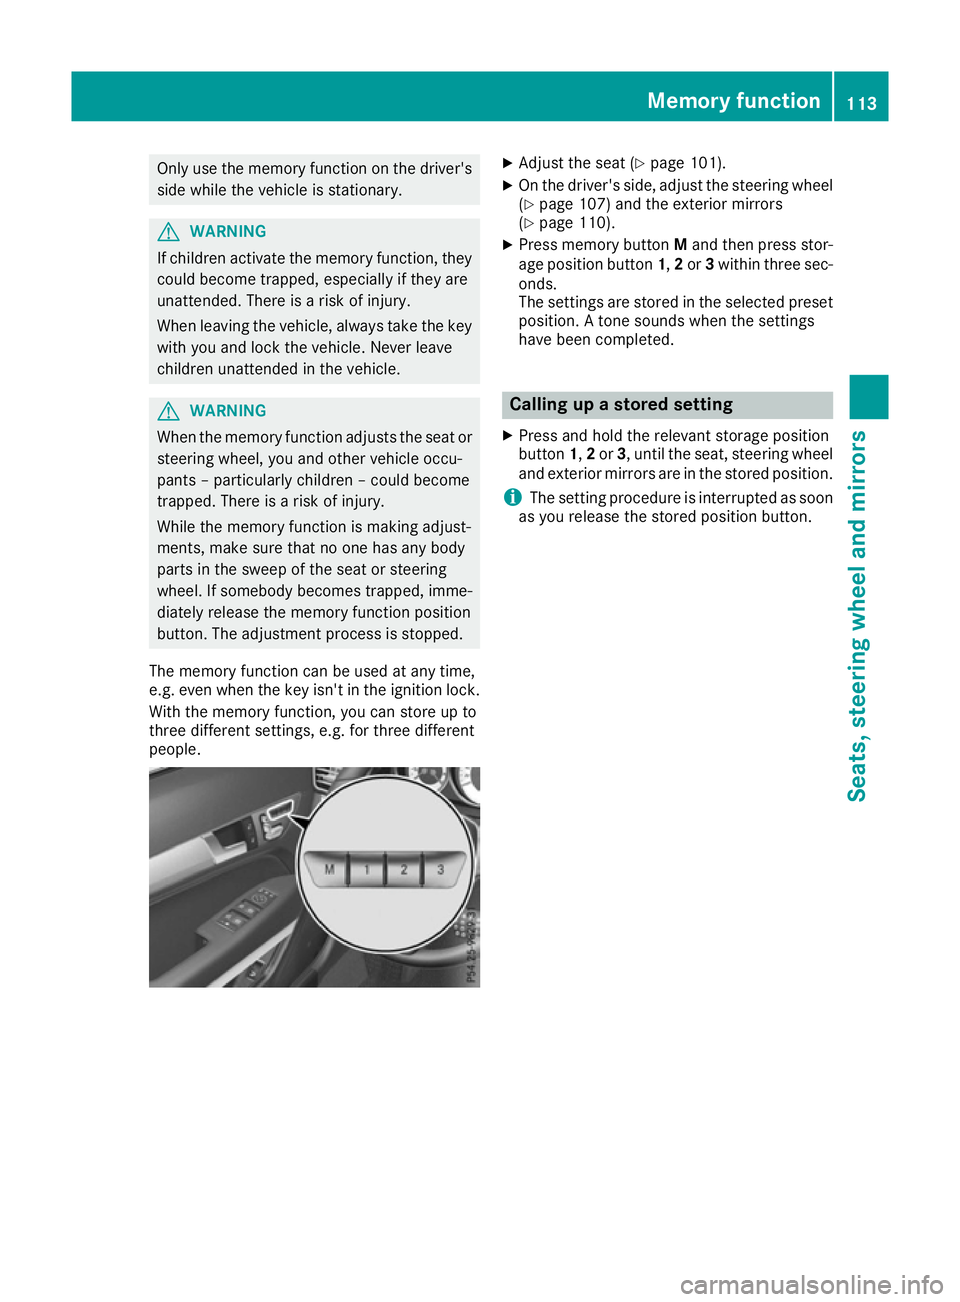
The memory function can be used at any time,
e.g. even when the key isn't in the ignition lock.
With the memory function, you can store up to
three different settings, e.g. for three different
people. X
Adjust the seat (Y page 101).
X On the driver's side, adjust the steering wheel
(Y page 107) and the exterior mirrors
(Y page 110).
X Press memory button Mand then press stor-
age position button 1,2or 3within three sec-
onds.
The settings are stored in the selected preset position. A tone sounds when the settings
have been completed. Calling up a stored setting
X Press and hold the relevant storage position
button 1,2or 3, until the seat, steering wheel
and exterior mirrors are in the stored position.
i The setting procedure is interrupted as soon
as you release the stored position button. Memory function
113Seats, steering wheel and mirrors Z
Page 163 of 349

ECO display assists you in achieving the most
economical driving style for the selected set-
tings and prevailing conditions. Consumption
can be significantly influenced by your driving
style.
The ECO display consists of three bars:
R Acceleration
Acceleration
R Constant Constant
R Coasting
Coasting
The percentage count is the mean value of the
three bar values. The three bars and the mean
value begin at the value of 50%. A higher per-
centage count indicates a more economical
driving style.
The ECO display does not indicate the actual fuel
consumption. A fixed percentage count in the
ECO display does not indicate a fixed consump- tion.
In addition to driving style, the consumption is
affected by many other factors, such as:
R load
R tyre pressure
R cold start
R choice of route
R the use of electrical consumers
These factors are not included in the ECO dis-
play.
The evaluation of your driving style takes the
following three categories into consideration:
R Acceleration Acceleration (evaluation of all acceleration
processes):
- the bar fills up: moderate acceleration,
especially at higher speeds
- the bar empties: sporty acceleration
R Constant Constant (assessment of driving behaviour
at all times):
- the bar fills up: constant speed and avoid-
ance of unnecessary acceleration and
deceleration
- the bar empties: fluctuations in speed
R Coasting Coasting (assessment of all deceleration
processes):
- the bar fills up: anticipatory driving, keep-
ing your distance and early release of the
accelerator. The vehicle can coast without
use of the brakes.
- the bar empties: frequent braking
i An economical driving style involves driving
at a moderate engine speed. To achieve a higher value in the categories
Acceleration
Acceleration andConstant Constant:
R observe the gearshift recommendation
R drive the vehicle in drive program E(vehi-
cles with automatic transmission)
i On long journeys at a constant speed, e.g.
on the motorway, only the bar for Constant
Constant
will change.
i The ECO display summarises the driving
characteristics from the start of the journey to
its completion. Therefore, there are dynamic
changes in the bars at the start of a journey.
During a prolonged driving time, these
changes are smaller. For more dynamic
changes, perform a manual reset.
Further information on the ECO display
(Y page 216). Brakes
Important safety notes G
WARNING
If you shift down on a slippery road surface in an attempt to increase the engine's braking
effect, the drive wheels could lose their grip.
This increases the risk of skidding and having
an accident.
Do not shift down for additional engine brak-
ing on a slippery road surface.
Downhill gradients Do not depress the brake pedal continuously
while the vehicle is in motion, e.g. never cause
the brakes to rub by constantly applying light
pressure to the pedal. This results in excessive
and premature wear to the brake pads.
Change into a lower gear in good time on long
and steep downhill gradients.
Take particular note of this when driving a laden vehicle and when towing a trailer.
i This also applies if you have activated cruise
control, SPEEDTRONIC or DISTRONIC PLUS.
This will use the braking effect of the engine, so
less braking will be required to maintain vehicle
speed. This relieves the load on the brake sys-
tem and prevents the brakes from overheating
and wearing too quickly. 160
Driving
tipsDriving an d parking
Page 217 of 349
Under normal operating conditions and with the
specified coolant level, the coolant temperature
may rise to 120 †.
At high outside temperatures and when driving
uphill, the coolant temperature may rise to the
end of the scale. Operating the on-board computer
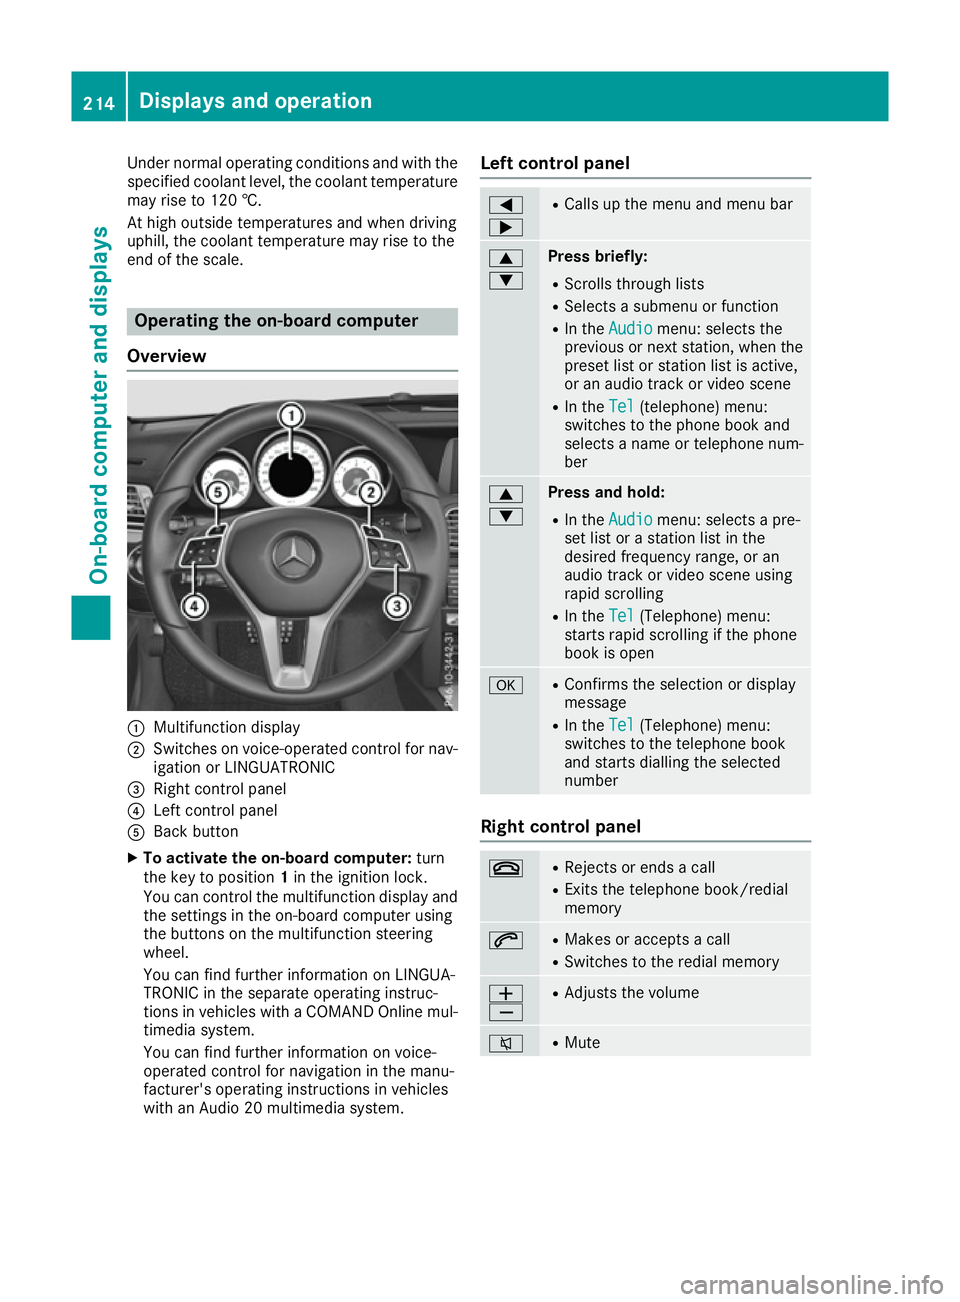
Overview :
Multifunction display
; Switches on voice-operated control for nav-
igation or LINGUATRONIC
= Right control panel
? Left control panel
A Back button
X To activate the on-board computer: turn
the key to position 1in the ignition lock.
You can control the multifunction display and the settings in the on-board computer using
the buttons on the multifunction steering
wheel.
You can find further information on LINGUA-
TRONIC in the separate operating instruc-
tions in vehicles with a COMAND Online mul-
timedia system.
You can find further information on voice-
operated control for navigation in the manu-
facturer's operating instructions in vehicles
with an Audio 20 multimedia system. Left control panel =
; R
Calls up the menu and menu bar 9
: Press briefly:
R Scrolls through lists
R Selects a submenu or function
R In the Audio Audio menu: selects the
previous or next station, when the preset list or station list is active,
or an audio track or video scene
R In the Tel Tel(telephone) menu:
switches to the phone book and
selects a name or telephone num-
ber 9
: Press and hold:
R
In the Audio Audio menu: selects a pre-
set list or a station list in the
desired frequency range, or an
audio track or video scene using
rapid scrolling
R In the Tel Tel(Telephone) menu:
starts rapid scrolling if the phone
book is open a R
Confirms the selection or display
message
R In the Tel Tel(Telephone) menu:
switches to the telephone book
and starts dialling the selected
number Right control panel
~ R
Rejects or ends a call
R Exits the telephone book/redial
memory 6 R
Makes or accepts a call
R Switches to the redial memory W
X R
Adjusts the volume 8 R
Mute 214
Displays and operationOn-board computer and displays
Page 219 of 349
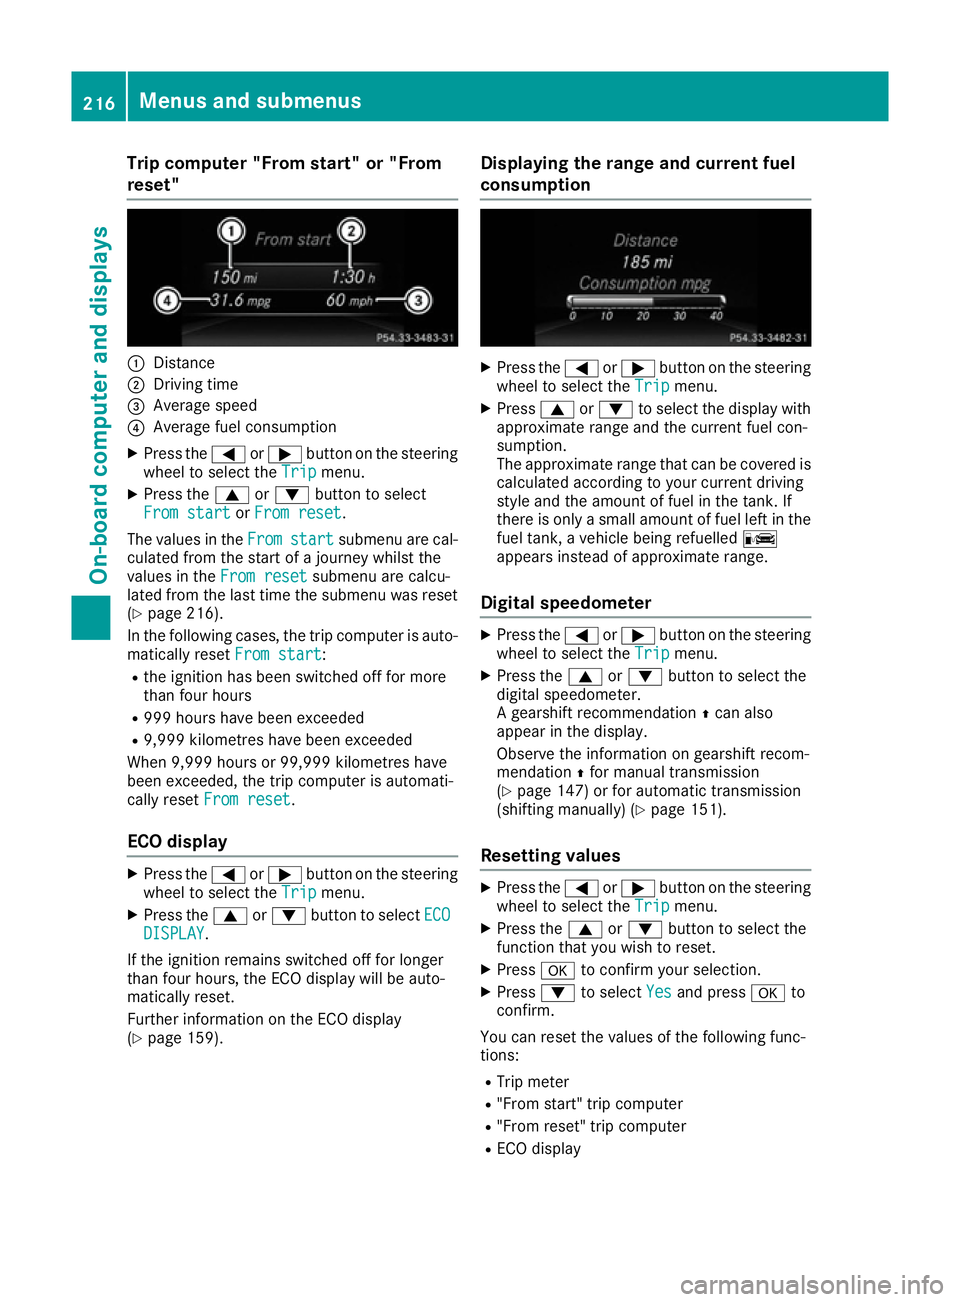
Trip computer "From start" or "From
reset" :
Distance
; Driving time
= Average speed
? Average fuel consumption
X Press the =or; button on the steering
wheel to select the Trip
Tripmenu.
X Press the 9or: button to select
From start
From start orFrom reset
From reset.
The values in the From
Fromstart
start submenu are cal-
culated from the start of a journey whilst the
values in the From reset From resetsubmenu are calcu-
lated from the last time the submenu was reset
(Y page 216).
In the following cases, the trip computer is auto-
matically reset From start
From start:
R the ignition has been switched off for more
than four hours
R 999 hours have been exceeded
R 9,999 kilometres have been exceeded
When 9,999 hours or 99,999 kilometres have
been exceeded, the trip computer is automati-
cally reset From reset From reset.
ECO display X
Press the =or; button on the steering
wheel to select the Trip
Tripmenu.
X Press the 9or: button to select ECO
ECO
DISPLAY
DISPLAY.
If the ignition remains switched off for longer
than four hours, the ECO display will be auto-
matically reset.
Further information on the ECO display
(Y page 159). Displaying the range and current fuel
consumption X
Press the =or; button on the steering
wheel to select the Trip Tripmenu.
X Press 9or: to select the display with
approximate range and the current fuel con-
sumption.
The approximate range that can be covered is calculated according to your current driving
style and the amount of fuel in the tank. If
there is only a small amount of fuel left in the
fuel tank, a vehicle being refuelled C
appears instead of approximate range.
Digital speedometer X
Press the =or; button on the steering
wheel to select the Trip Tripmenu.
X Press the 9or: button to select the
digital speedometer.
A gearshift recommendation Zcan also
appear in the display.
Observe the information on gearshift recom-
mendation Zfor manual transmission
(Y page 147) or for automatic transmission
(shifting manually) (Y page 151).
Resetting values X
Press the =or; button on the steering
wheel to select the Trip Tripmenu.
X Press the 9or: button to select the
function that you wish to reset.
X Press ato confirm your selection.
X Press :to select Yes
Yesand press ato
confirm.
You can reset the values of the following func-
tions: R Trip meter
R "From start" trip computer
R "From reset" trip computer
R ECO display 216
Menus and submenusOn-board computer and displays