2015 MERCEDES-BENZ E-CLASS CABRIOLET bonnet
[x] Cancel search: bonnetPage 8 of 349
Remote control .............................. 133
Setting the departure time ............
.134
Switching on/off (on the centre
console) ......................................... 133
Auxiliary ventilation
Activating/deactivating ................. 133
Axle load, permissible (trailer tow-
ing) ...................................................... 344 B
Back button ....................................... 264
Bag hook ............................................ 276
Ball coupling
Folding in ....................................... 211
Folding in/out ................................ 210
Folding out ..................................... 210
BAS (Brake Assist System) ................. 62
BAS PLUS (Brake Assist System
PLUS) with Cross-Traffic Assist
Function/notes ................................ 62
BAS PLUS with Cross-Traffic Assist
(Brake Assist PLUS with Cross-
Traffic Assist)
Important safety notes .................... 63
Battery (key)
Checking .......................................... 77
Important safety notes .................... 77
Replacing ......................................... 77
Battery (vehicle)
Charging ........................................ 312
Display message ............................ 239
Important safety notes .................. 310
Jump starting ................................. 313
Belt
see Seat belts
Belt tensioner
Activation ......................................... 45
Blind Spot Assist
Activating/deactivating (on-
board computer) ............................ 222
Display message ............................ 242
Notes/function .............................. 200
Trailer towing ................................. 202
see Active Blind Spot Assist
BlueTEC (AdBlue ®
) ............................ .340 Bluetooth
®
Connecting another mobile
phone ............................................ 267
Searching for a mobile phone ....... .266
See also Digital Owner's Manual ... 263
Telephony ...................................... 266
Bonnet
Active bonnet (pedestrian protec-tion) ............................................... 289
Closing .......................................... .291
Display message ............................ 250
Important safety notes .................. 289
Opening ......................................... 290
Boot
Emergency release .......................... 84
Important safety notes .................... 82
Locking separately ........................... 83
Opening (automatically from
inside) .............................................. 83
Opening/closing (manually from
outside) ............................................ 83
Boot lid
Display message ............................ 250
Opening dimensions ..................... .342
Boot load (maximum) ........................ 342
Boot separator
Display message ............................ 252
General notes .................................. 94
Opening/closing .............................. 94
Brake Assist
see BAS (Brake Assist System)
Brake fluid
Display message ............................ 232
Notes ............................................. 341
Brake force distribution
see EBD (electronic brake force
distribution)
Brake lamps
Adaptive .......................................... .66
Display message ............................ 236
Brakes
ABS .................................................. 62
Adaptive Brake Assist ...................... 66
BAS .................................................. 62
BAS PLUS with Cross-Traffic
Assist ............................................... 62
Brake fluid (notes) ........................ .341
Display message ............................ 230 Index
5
Page 32 of 349
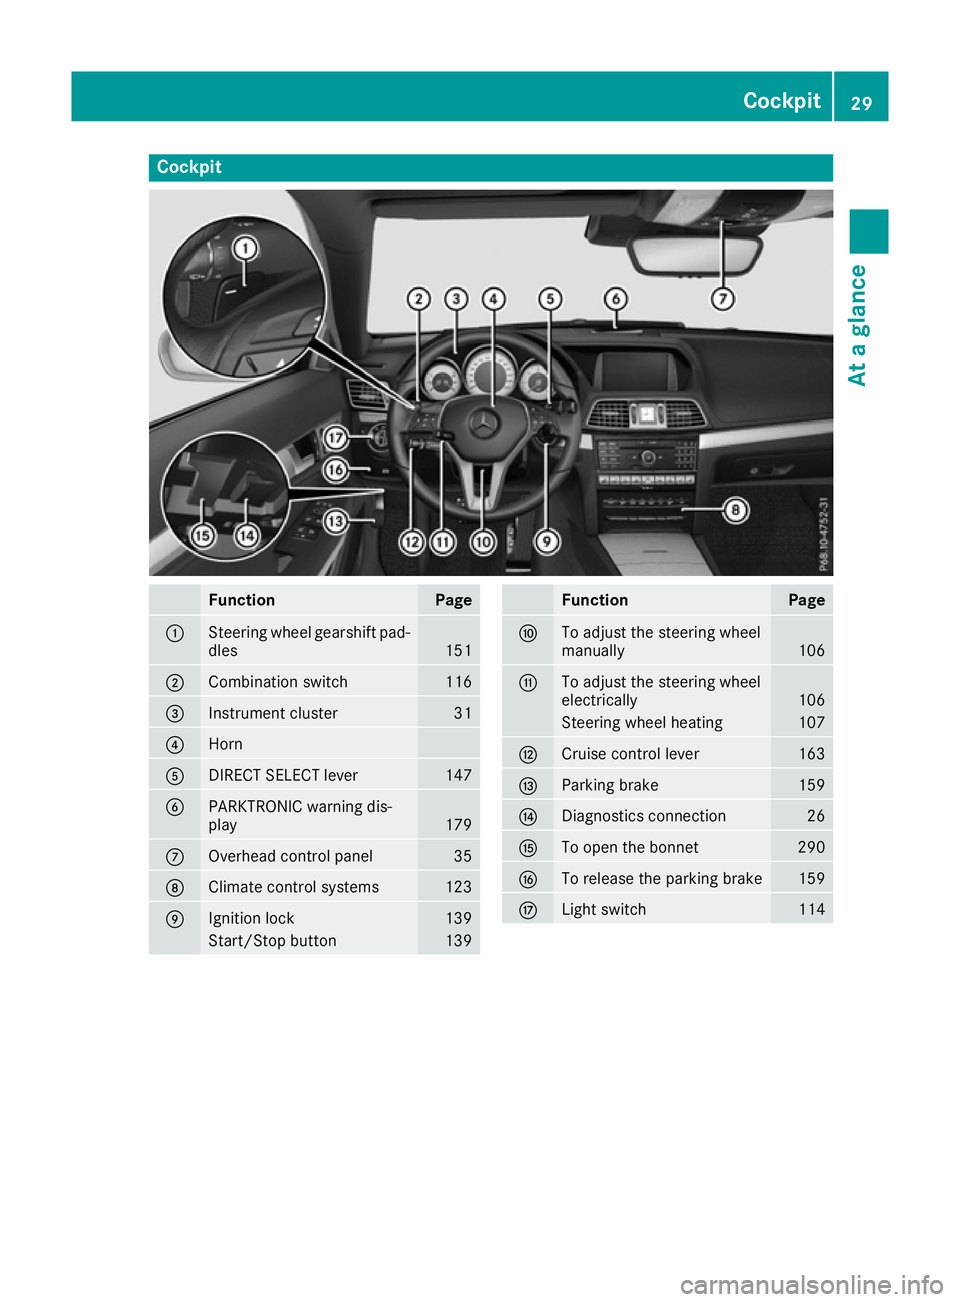
Cockpit
Function Page
:
Steering wheel gearshift pad-
dles 151
;
Combination switch 116
=
Instrument cluster 31
?
Horn
A
DIRECT SELECT lever 147
B
PARKTRONIC warning dis-
play
179
C
Overhead control panel 35
D
Climate control systems 123
E
Ignition lock 139
Start/Stop button 139 Function Page
F
To adjust the steering wheel
manually
106
G
To adjust the steering wheel
electrically
106
Steering wheel heating 107
H
Cruise control lever 163
I
Parking brake 159
J
Diagnostics connection 26
K
To open the bonnet 290
L
To release the parking brake 159
M
Light switch 114Cockpit
29At a glance
Page 33 of 349
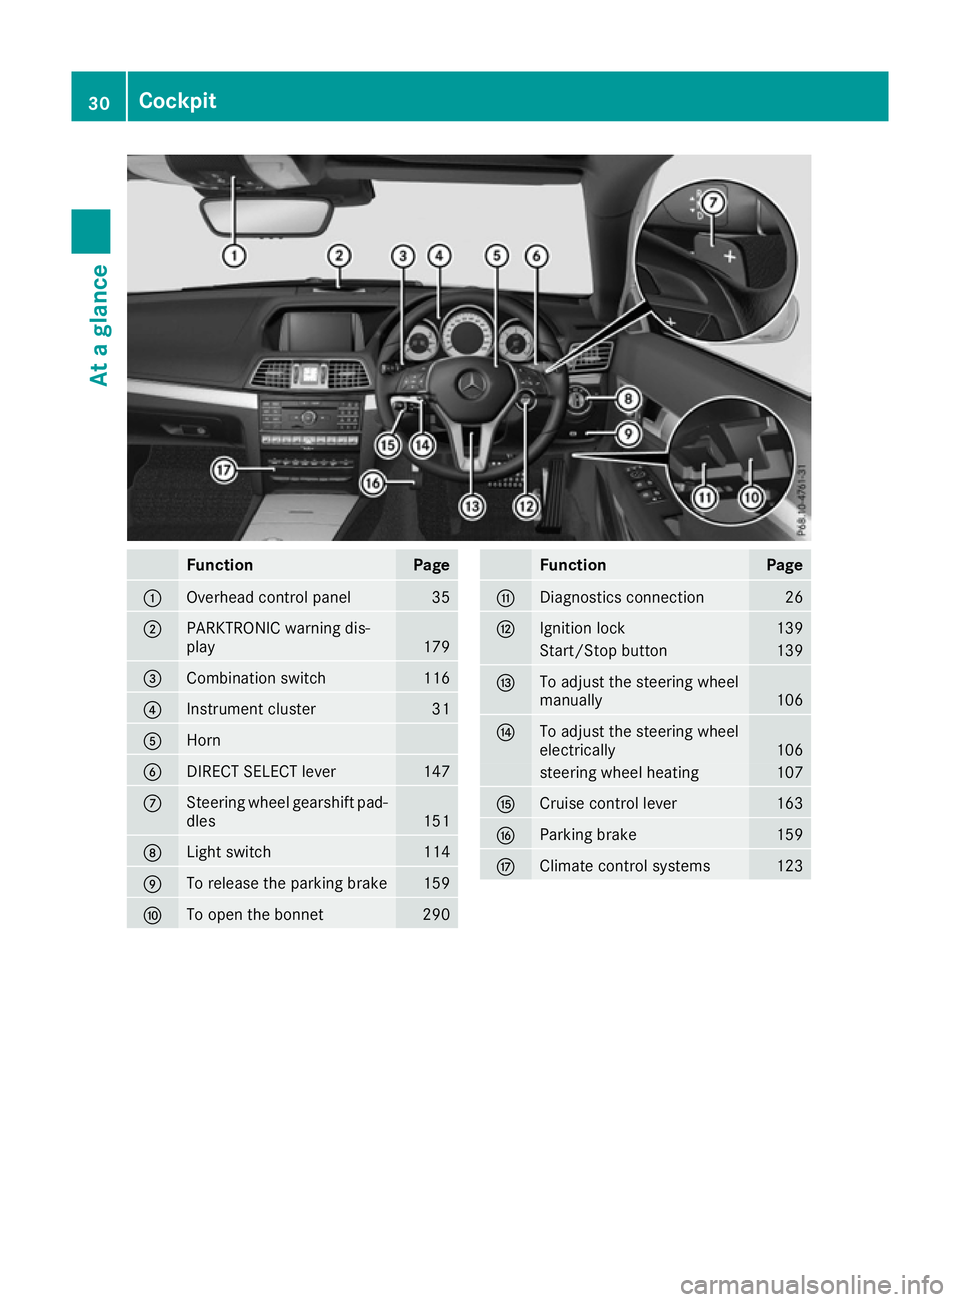
Function Page
:
Overhead control panel 35
;
PARKTRONIC warning dis-
play
179
=
Combination switch 116
?
Instrument cluster 31
A
Horn
B
DIRECT SELECT lever 147
C
Steering wheel gearshift pad-
dles 151
D
Light switch 114
E
To release the parking brake 159
F
To open the bonnet 290 Function Page
G
Diagnostics connection 26
H
Ignition lock 139
Start/Stop button 139
I
To adjust the steering wheel
manually
106
J
To adjust the steering wheel
electrically
106
steering wheel heating 107
K
Cruise control lever 163
L
Parking brake 159
M
Climate control systems 12330
CockpitAt a glance
Page 75 of 349

A visual and audible alarm is triggered if the
alarm system is primed and you open:
R a door
R the vehicle with the emergency key element
R the boot lid
R the bonnet
X To stop the alarm with the key: press the
% or& button on the key.
The alarm stops.
or X Remove the Start/Stop button from the igni-
tion lock.
X Insert the key into the ignition lock.
The alarm stops.
X To stop the alarm using KEYLESS-GO:
grasp the outside door handle. The key must
be outside the vehicle.
The alarm stops.
or X Press the Start/Stop button on the dash-
board. The key must be inside the vehicle.
The alarm stops.
The alarm does not switch off, even if you close the open door that has triggered it, for example. Tow-away protection
Function An audible and visual alarm is triggered if your
vehicle's angle of inclination is altered while
tow-away protection is primed. This can occur if the vehicle is jacked up on one side, for exam-
ple.
Priming X
Make sure that:
R the doors are closed
R the boot lid is closed
Only then is tow-away protection primed.
X Lock the vehicle with the key or KEYLESS-GO.
Tow-away protection is primed after approx-
imately 30 seconds. Switching off X
Unlock the vehicle with the key or KEYLESS-
GO.
or X Insert the key into the ignition lock.
Tow-away protection is switched off automat-
ically.
Deactivating X
Remove the key from the ignition lock.
X Press button :.
Indicator lamp ;lights up briefly.
X Lock the vehicle with the key or KEYLESS-GO.
Tow-away protection is deactivated.
Tow-away protection remains deactivated until:
R the vehicle is unlocked again and
R a door is opened and closed again and
R the vehicle is locked again
To prevent a false alarm, deactivate tow-away
protection if you lock your vehicle and it:
R is being transported
R is being loaded onto a ferry or car transporter,
for example
R is parked on a movable surface, e.g. in a split-
level garage Interior motion sensor
Function When the interior motion sensor is primed, a
visual and audible alarm is triggered if move-
ment is detected in the vehicle interior. This can
occur if someone reaches into the vehicle inte-
rior, for example. 72
Protection against theftSafety
Page 123 of 349

Replacing the front bulbs
Main-beam headlamps (static LED
headlamps) X
Switch off the lights.
X Open the bonnet.
X Turn housing cover :anti-clockwise and
remove it.
X Turn bulb holder ;anti-clockwise and pull
out.
X Pull the bulb out of bulb holder ;.
X Insert the new bulb into bulb holder ;.
X Insert bulb holder ;and turn it clockwise.
X Press on housing cover :and turn it to the
right. Windscreen wipers
Switching the windscreen wipers on/
off
! Do not operate the windscreen wipers when
the windscreen is dry, as this could damage
the wiper blades. Moreover, dust that has col-
lected on the windscreen can scratch the
glass if wiping takes place when the wind-
screen is dry.
If it is necessary to switch on the windscreen wipers in dry weather conditions, always
operate them using washer fluid.
! If the windscreen wipers leave smears on
the windscreen after the vehicle has been
washed in an automatic car wash, this may be
due to wax or other residue. Clean the wind-
screen with washer fluid after an automatic
car wash. !
Intermittent wiping with rain sensor: due to
optical influences and the windscreen becom-
ing dirty in dry weather conditions, the wind-
screen wipers may be activated inadvertently. This could damage the windscreen wiper
blades or scratch the windscreen.
For this reason, you should always switch off
the windscreen wipers in dry weather. 1
$ Windscreen wipers off
2 Ä Intermittent wipe, low (rain sensor set
to low sensitivity)
3 Å Intermittent wipe, high (rain sensor
set to high sensitivity)
4 ° Continuous wipe, slow
5 ¯ Continuous wipe, fast
B í Single wipe
î To wipe with washer fluid
X Turn the key to position 1or 2in the ignition
lock.
X Turn the combination switch to the corre-
sponding position.
In the ÄorÅ position, the appropriate
wiping frequency is set automatically according
to the intensity of the rain. In the Åposition,
the rain sensor is more sensitive than in the
Ä position, causing the windscreen wiper to
wipe more frequently.
If the wiper blades are worn, the windscreen will
no longer be wiped properly. This could prevent you from observing the traffic conditions. Replacing the wiper blades
Important safety notes G
WARNING
If the windscreen wipers begin to move while
you are changing the wiper blades, you can be 120
Windscreen wipersLights and windscreen wipers
Page 124 of 349
trapped by the wiper arm. There is a risk of
injury.
Always switch off the windscreen wipers and
ignition before changing the wiper blades.
! To avoid damaging the windscreen wiper
blades, make sure that you touch only the
wiper arm of the windscreen wiper.
! Never open the bonnet if a windscreen
wiper arm has been folded away from the
windscreen.
Never fold a windscreen wiper arm without a
wiper blade back onto the windscreen.
Hold the windscreen wiper arm firmly when
you change the wiper blade. If you release the
windscreen wiper arm without a wiper blade
and it falls onto the windscreen, the wind-
screen may be damaged by the force of the
impact.
Mercedes-Benz recommends that you have
the wiper blades changed at a qualified spe-
cialist workshop.
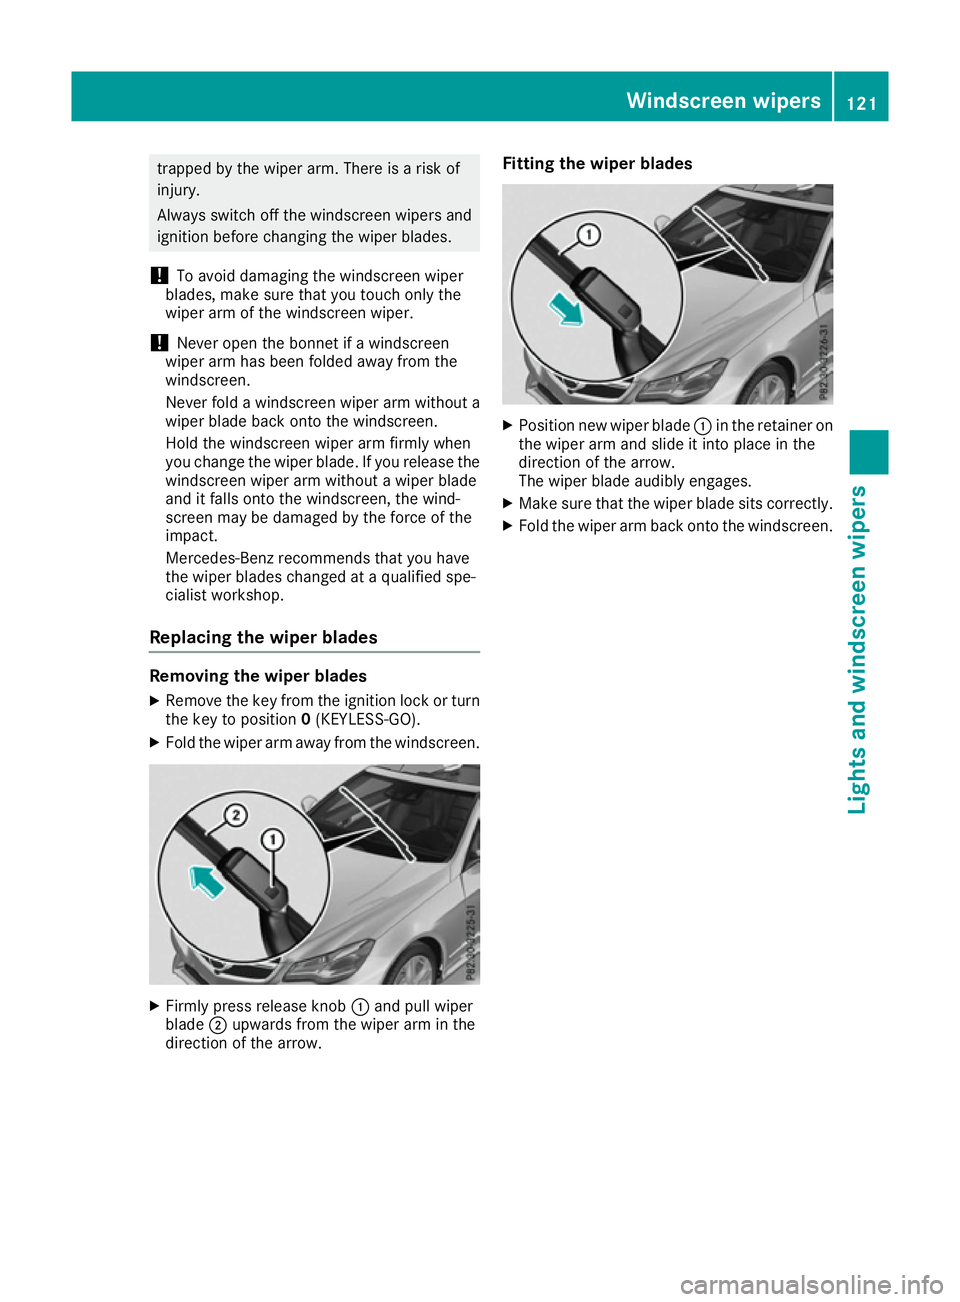
Replacing the wiper blades Removing the wiper blades
X Remove the key from the ignition lock or turn
the key to position 0(KEYLESS-GO).
X Fold the wiper arm away from the windscreen. X
Firmly press release knob :and pull wiper
blade ;upwards from the wiper arm in the
direction of the arrow. Fitting the wiper blades
X
Position new wiper blade :in the retainer on
the wiper arm and slide it into place in the
direction of the arrow.
The wiper blade audibly engages.
X Make sure that the wiper blade sits correctly.
X Fold the wiper arm back onto the windscreen. Windscreen
wipers
121Lights and windscreen wipers Z
Page 139 of 349
Problems with the auxiliary heating/ventilation
Problem
Possible causes/consequences and
M
MSolutions FAIL
¨ The signal transmission between the transmitter and the vehicle is
faulty.
X
Change your position in relation to the vehicle, moving closer if
necessary. FAIL The auxiliary heating cannot be switched on or has switched itself off.
The starter battery is not sufficiently charged.
X Charge the starter battery. The fuel tank content is below the reserve fuel level.
X Refuel at the nearest filling station. The auxiliary heating or auxiliary ventilation is faulty.
X Have the auxiliary heating or auxiliary ventilation checked at a
qualified specialist workshop. Air vents
Important safety notes
G
WARNING
Very hot or very cold air can flow from the air vents. This could result in burns or frostbite in the immediate vicinity of the air vents. There
is a risk of injury.
Make sure that all vehicle occupants always
maintain a sufficient distance to the air out-
lets. If necessary, redirect the airflow to
another area of the vehicle interior.
In order to ensure the direct flow of fresh air
through the air vents into the vehicle interior,
please observe the following notes:
R keep the air inlet between the windscreen and
the bonnet free of blockages, such as ice,
snow or leaves.
R never cover the vents or ventilation grilles in
the vehicle interior. Adjusting the air vents
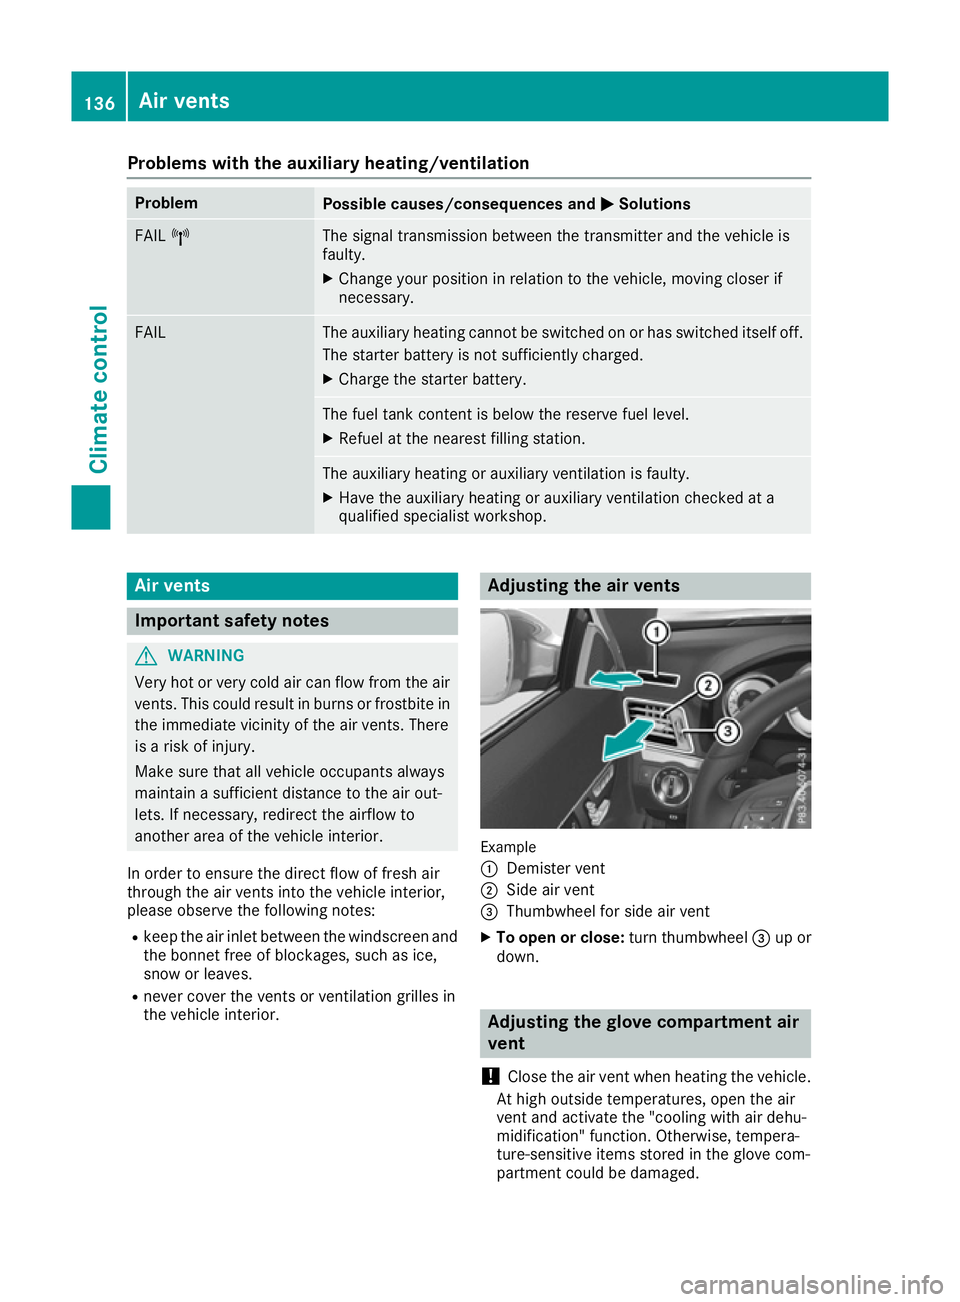
Example
:
Demister vent
; Side air vent
= Thumbwheel for side air vent
X To open or close: turn thumbwheel=up or
down. Adjusting the glove compartment air
vent
! Close the air vent when heating the vehicle.
At high outside temperatures, open the air
vent and activate the "cooling with air dehu-
midification" function. Otherwise, tempera-
ture-sensitive items stored in the glove com-
partment could be damaged. 136
Air ventsClimate control
Page 145 of 349

after a cold start. This helps the catalytic con-
verter to reach its operating temperature
more quickly.
Hill start assist Hill start assist helps you when pulling away for-
wards or in reverse on an uphill gradient. It holds the vehicle for a short time after you have
removed your foot from the brake pedal. This
gives you enough time to move your foot from
the brake pedal to the accelerator pedal and
depress it before the vehicle begins to roll. G
WARNING
After a while, hill start assist no longer holds
the vehicle and it may roll away. There is a risk of an accident and injury.
Therefore, quickly move your foot from the
brake pedal to the accelerator pedal. Never
leave the vehicle when it is held by hill start
assist.
Hill start assist is not active if:
R you are pulling away on a level road or a
downhill gradient
R on vehicles with automatic transmission, the
transmission is in position N
R the parking brake is applied
R ESP ®
is malfunctioning ECO start/stop function
Introduction The ECO start/stop function switches the
engine off automatically if the vehicle is stopped
under certain conditions.
When pulling away again, the engine starts auto-
matically. The ECO start/stop function thereby
helps you to reduce the fuel consumption and
emissions of your vehicle.
Important safety notes G
WARNING
If the engine is switched off automatically and you exit the vehicle, the engine is restarted
automatically. The vehicle may begin moving. There is a risk of accident and injury. If you wish to exit the vehicle, always turn off
the ignition and secure the vehicle against
rolling away.
General notes :
ECO start/stop display
The ECO start/stop function is activated when-
ever you start the engine using the key or the
Start/Stop button.
If the ¤ symbol is shown in green in the mul-
tifunction display, the ECO start/stop function
switches the engine off automatically if the vehi- cle stops moving.
If the ECO start/stop function has been man-
ually deactivated (Y page 143) or a malfunction
has caused the system to be deactivated, the
¤ symbol is not displayed.
Automatic engine switch-off General notes
The ECO start/stop function is operational and
the ¤ symbol is displayed in green in the
multifunction display, if:
R the indicator lamp in the ECO button is lit
green
R the outside temperature is within the range
that is suitable for the system
R the engine is at normal operating temperature
R the set temperature for the vehicle interior
has been reached
R the battery is sufficiently charged
R the system detects that the windscreen is not
misted up when the air-conditioning system is switched on
R the bonnet is closed
R the driver's door is closed and the driver's
seat belt is fastened
If the conditions for automatic engine switch-off
are not all fulfilled, the ¤symbol is shown in
yellow. 142
DrivingDriving and parking