2015 MERCEDES-BENZ E-CLASS CABRIOLET spare tire location
[x] Cancel search: spare tire locationPage 22 of 349

T
Tail lamps Display message ............................ 236
Tank
see Fuel tank
Technical data
Capacities ...................................... 337
Emergency spare wheel ................. 334
Information .................................... 335
Trailer load s................................... 344
Tyres/wheels ................................. 333
Vehicle data ................................... 342
Telephone
Accepting a call (multifunction
steering wheel) .............................. 219
Authorising a mobile phone (con-
necting) ......................................... 266
Connecting a Mobile phone (gen-
eral information) ............................ 266
Display message ............................ 251
Menu (on-board computer) ............ 219
Number from the phone book ........ 220
Redialling ....................................... 220
Rejecting/ending a call ................. 220
See also Digital Owner's Manua l... 263
Switching between mobile
phones ........................................... 267
Telephone compartment ................ 274
Telephone module with Bluetooth ®
(SAP profile) Activating and connecting the
module ........................................... 268
Charging a mobile phone ............... 270
Connecting the mobile phone ........ 269
Connecting the module using a
USB cable ...................................... 268
Data modem mode ........................ 269
Installing the module ..................... 268
Introduction ................................... 267
Saving/deleting the PIN for the
SIM card ........................................ 269
Setting s......................................... 269
SIM card mode .............................. 268
Text messages ............................... 270
Transferring the phone book .......... 269
Temperature
Coolant .......................................... 213 Outside temperature ...................... 213
Setting (climate control
)................ 128
TEMPOMAT
Function/note s............................. 163
Text messages
Telephone module with Blue-
tooth ®
(SAP profile) ....................... 270
Through-loading ................................ 276
TIREFIT kit .......................................... 307
Important safety notes .................. 307
Storage location ............................ 305
Tyre pressure not reached ............. 309
Tyre pressure reached ................... 309
Total distance recorder .................... 215
Tow-away protection
Activating ......................................... 72
Deactivating ..................................... 72
Function ........................................... 72
Tow-starting
Emergency engine starting ............ 318
Important safety notes .................. 315
Towing
Important safety notes .................. 315
Transporting the vehicle ................ 317
With the rear axle raised ................ 317
Towing a trailer
Active Blind Spot Assist ................. 205
Active Lane Keeping Assist ............ 208
Active Parking Assist ..................... 187
Axle load, permissibl e.................... 344
ESP ®
(Electronic Stability Pro-
gram) ............................................... 68
Failure check for LEDs ................... 212
General notes ................................ 209
Trailer tow hitch display message .. 251
Towing away
Fitting the towing ey e.................... 316
Removing the towing eye ............... 317
With both axles on the ground ....... 317
Towing eye ......................................... 305
Traffic Sign Assist
Activating/deactivating the warn-ing function .................................... 221
Display message ............................ 241
Function/note s............................. 197
Important safety notes .................. 198
Instrument cluster display ............. 198 Index
19
Page 308 of 349

Vehicle tool kit
General notes The vehicle tool kit can be found in the stowage
well under the boot floor (Y page 277).
Apart from some country-specific variants, vehi-
cles are not equipped with tyre-changing tools.
Some tools for changing a wheel are specific to the vehicle. For more information on which tools
are required to perform a wheel change on your vehicle, consult a qualified specialist workshop.
Necessary tyre-changing tools can include, for
example:
R Jack
R Wheel chock
R Wheel wrench
i The jack weighs approximately 2.1 kg.
The maximum load bearing capacity of the
jack can be found on the adhesive label on the jack.
The jack is maintenance-free. If there is a
malfunction, please contact a qualified spe-
cialist workshop.
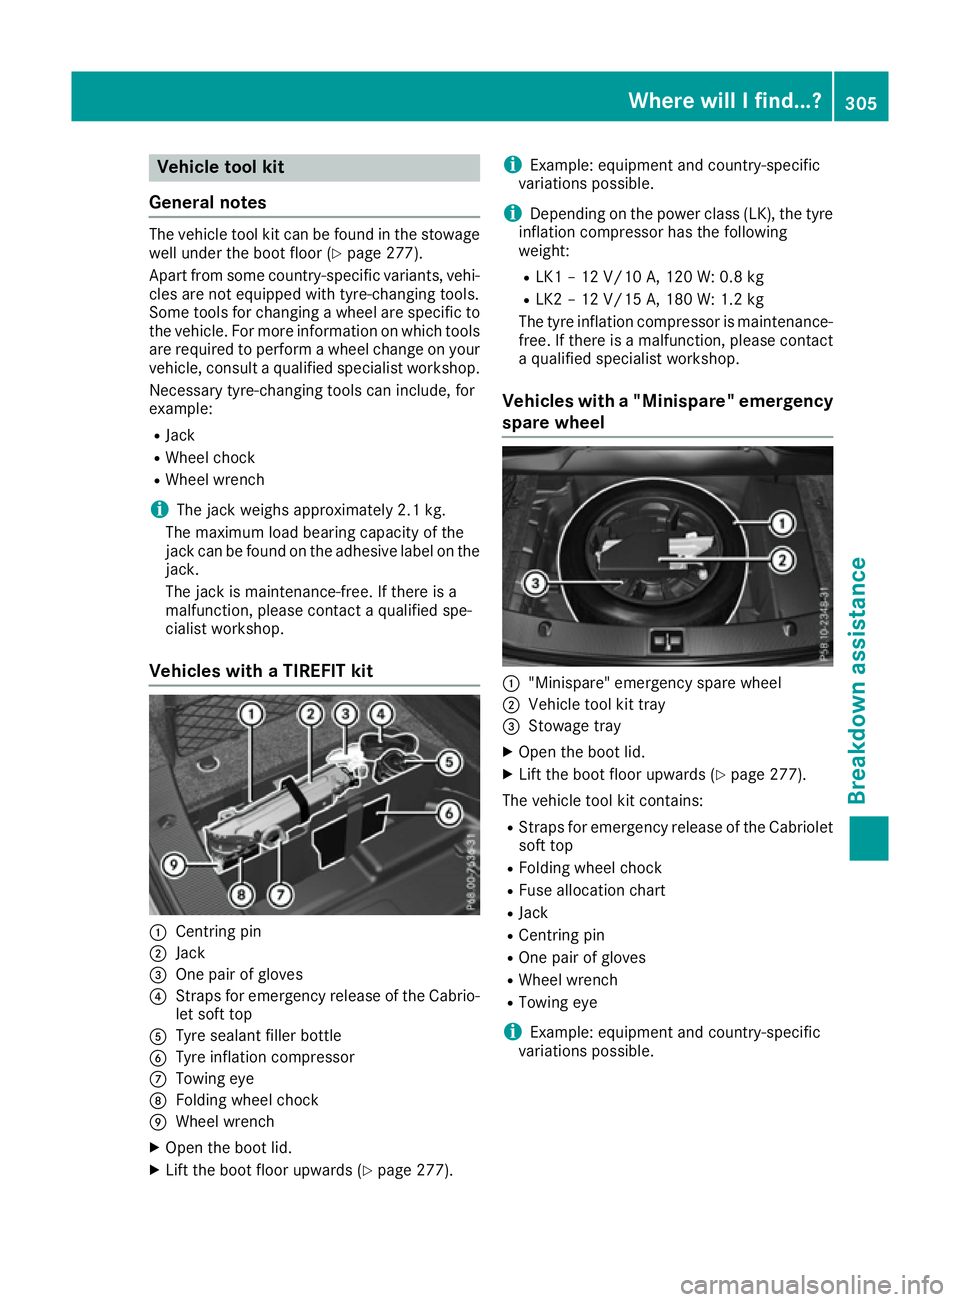
Vehicles with a TIREFIT kit :
Centring pin
; Jack
= One pair of gloves
? Straps for emergency release of the Cabrio-
let soft top
A Tyre sealant filler bottle
B Tyre inflation compressor
C Towing eye
D Folding wheel chock
E Wheel wrench
X Open the boot lid.
X Lift the boot floor upwards (Y page 277).i
Example: equipment and country-specific
variations possible.
i Depending on the power class (LK), the tyre
inflation compressor has the following
weight:
R LK1 – 12 V/10 A, 120 W: 0.8 kg
R LK2 – 12 V/15 A, 180 W:1.2 kg
The tyre inflation compressor is maintenance-
free. If there is a malfunction, please contact a qualified specialist workshop.
Vehicles with a "Minispare" emergency
spare wheel :
"Minispare" emergency spare wheel
; Vehicle tool kit tray
= Stowage tray
X Open the boot lid.
X Lift the boot floor upwards (Y page 277).
The vehicle tool kit contains: R Straps for emergency release of the Cabriolet
soft top
R Folding wheel chock
R Fuse allocation chart
R Jack
R Centring pin
R One pair of gloves
R Wheel wrench
R Towing eye
i Example: equipment and country-specific
variations possible. Where will I find...?
305Breakdown assistance
Page 325 of 349

Check the tyres regularly for signs of damage
and replace any damaged tyres immediately.
Check wheels and tyres for damage at least
once a month. Check wheels and tyres after
driving off-road or on rough roads. Damaged
wheels can cause a loss of tyre pressure. Pay
particular attention to damage such as:
R cuts in the tyres
R punctures
R tears in the tyres
R bulges on the tyres
R deformation or severe corrosion on wheels
Regularly check the tyre tread depth and the
condition of the tread across the whole width of
the tyre (Y page 322). If necessary, turn the
front wheels to full lock in order to inspect the
inner side of the tyre surface.
All wheels must have a valve cap to protect the valve against dirt and moisture. Do not fit any-
thing onto the valve other than the standard
valve cap or other valve caps approved for your
vehicle by Mercedes-Benz. Do not fit any other
valve caps or systems, e.g. tyre pressure moni-
toring systems.
Regularly check the pressure of all the tyres,
particularly prior to long trips. Adjust the tyre
pressure as necessary (Y page 324).
Observe the notes on the emergency spare
wheel (Y page 333).
The service life of tyres depends on various fac- tors, including the following:
R driving style
R tyre pressure
R mileage Notes on the tyre tread
G
WARNING
Insufficient tyre tread will reduce tyre trac-
tion. The tyre is no longer able to dissipate
water. This means that on wet road surfaces, the risk of aquaplaning increases, in particularwhere speed is not adapted to suit the driving
conditions. There is a risk of accident.
If the tyre pressure is too high or too low, tyres may exhibit different levels of wear at differ-
ent locations on the tyre tread. Thus, you should regularly check the tread depth and
the condition of the tread across the entire
width of all tyres.
Minimum tyre tread depth for:
R summer tyres: 3 mm
R M+S tyres: 4 mm
For safety reasons, replace the tyres before
the legally prescribed limit for the minimum
tyre tread depth is reached. Selecting, fitting and replacing tyres
G
WARNING
Exceeding the stated tyre load-bearing capa-
city and the approved maximum speed could
lead to tyre damage or the tyre bursting. There is a risk of accident.
Therefore, only use tyre types and sizes
approved for your vehicle model. Observe the
tyre load rating and speed rating required for your vehicle.
Pay special attention to country-specific
requirements for tyre approval. These require-
ments can stipulate a specific tyre type for your
vehicle. Furthermore, the use of certain tyre
types in certain regions and areas of operation
can be highly beneficial. You can find further
information regarding tyres at specialist tyre
retailers, at qualified specialist workshops or at
any Mercedes-Benz Service Centre.
R Only fit tyres and wheels of the same type and
make.
Exception: it is permissible to fit a different
type or make in the event of a flat tyre.
Observe the "MOExtended tyres (tyres with
run-flat characteristics)" section
(Y page 306).
R Only fit tyres of the correct size onto the
wheels.
R Run in new tyres at moderate speeds for the
first 100 km. They only reach their full per-
formance after this distance.
R Do not drive with tyres which have too little
tread depth. This otherwise significantly 322
OperationWheels and tyres