2015 MERCEDES-BENZ E-CLASS CABRIOLET tow
[x] Cancel search: towPage 276 of 349
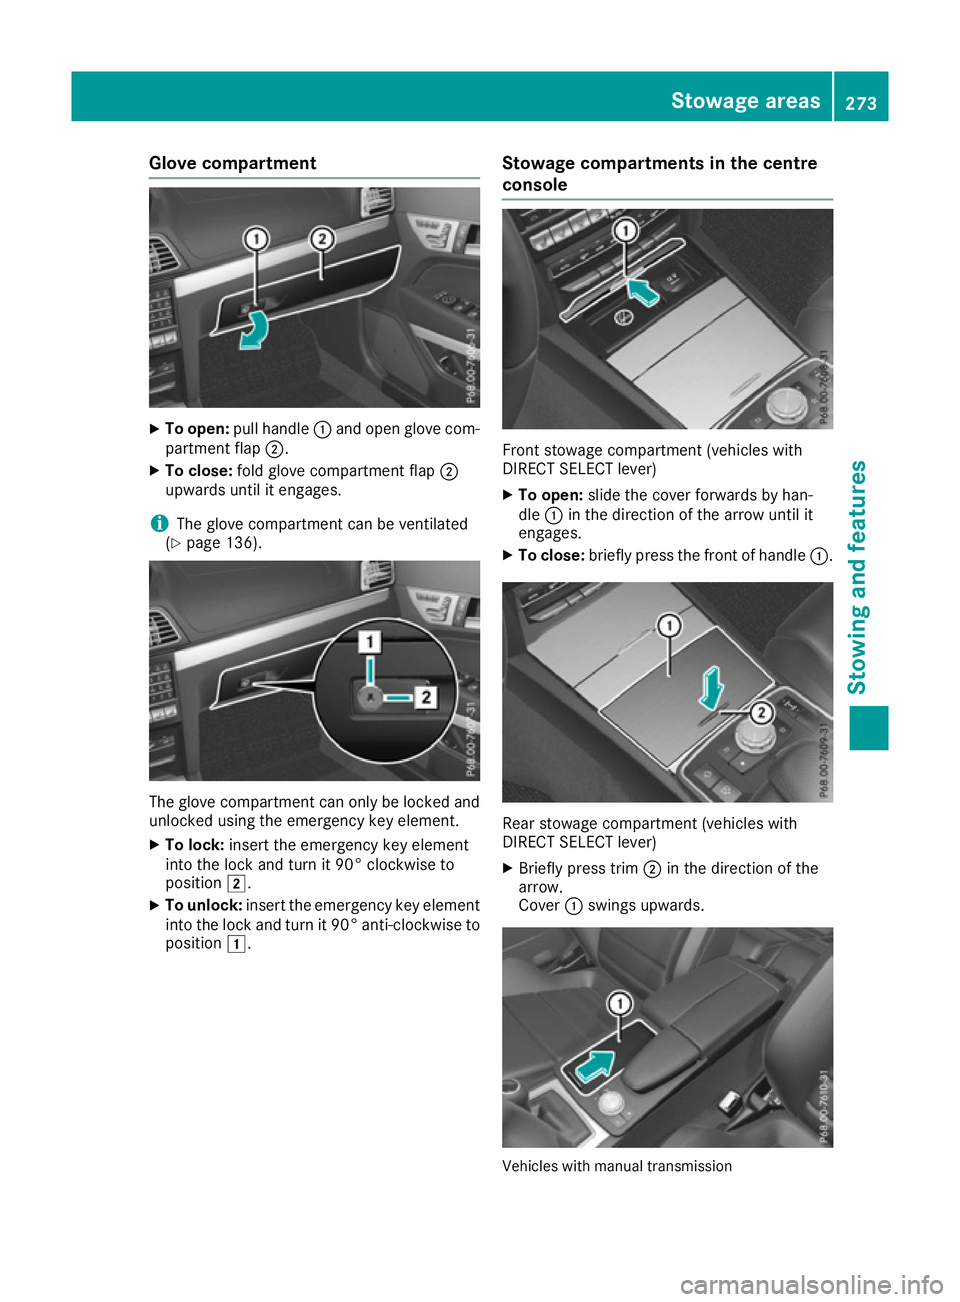
Glove compartment
X
To open: pull handle :and open glove com-
partment flap ;.
X To close: fold glove compartment flap ;
upwards until it engages.
i The glove compartment can be ventilated
(Y page 136). The glove compartment can only be locked and
unlocked using the emergency key element.
X To lock: insert the emergency key element
into the lock and turn it 90° clockwise to
position 2.
X To unlock: insert the emergency key element
into the lock and turn it 90° anti-clockwise to
position 1. Stowage compartments in the centre
console Front stowage compartment (vehicles with
DIRECT SELECT lever)
X To open: slide the cover forwards by han-
dle :in the direction of the arrow until it
engages.
X To close: briefly press the front of handle :. Rear stowage compartment (vehicles with
DIRECT SELECT lever)
X Briefly press trim ;in the direction of the
arrow.
Cover :swings upwards. Vehicles with manual transmission Stowage areas
273Stowing and features Z
Page 277 of 349
X
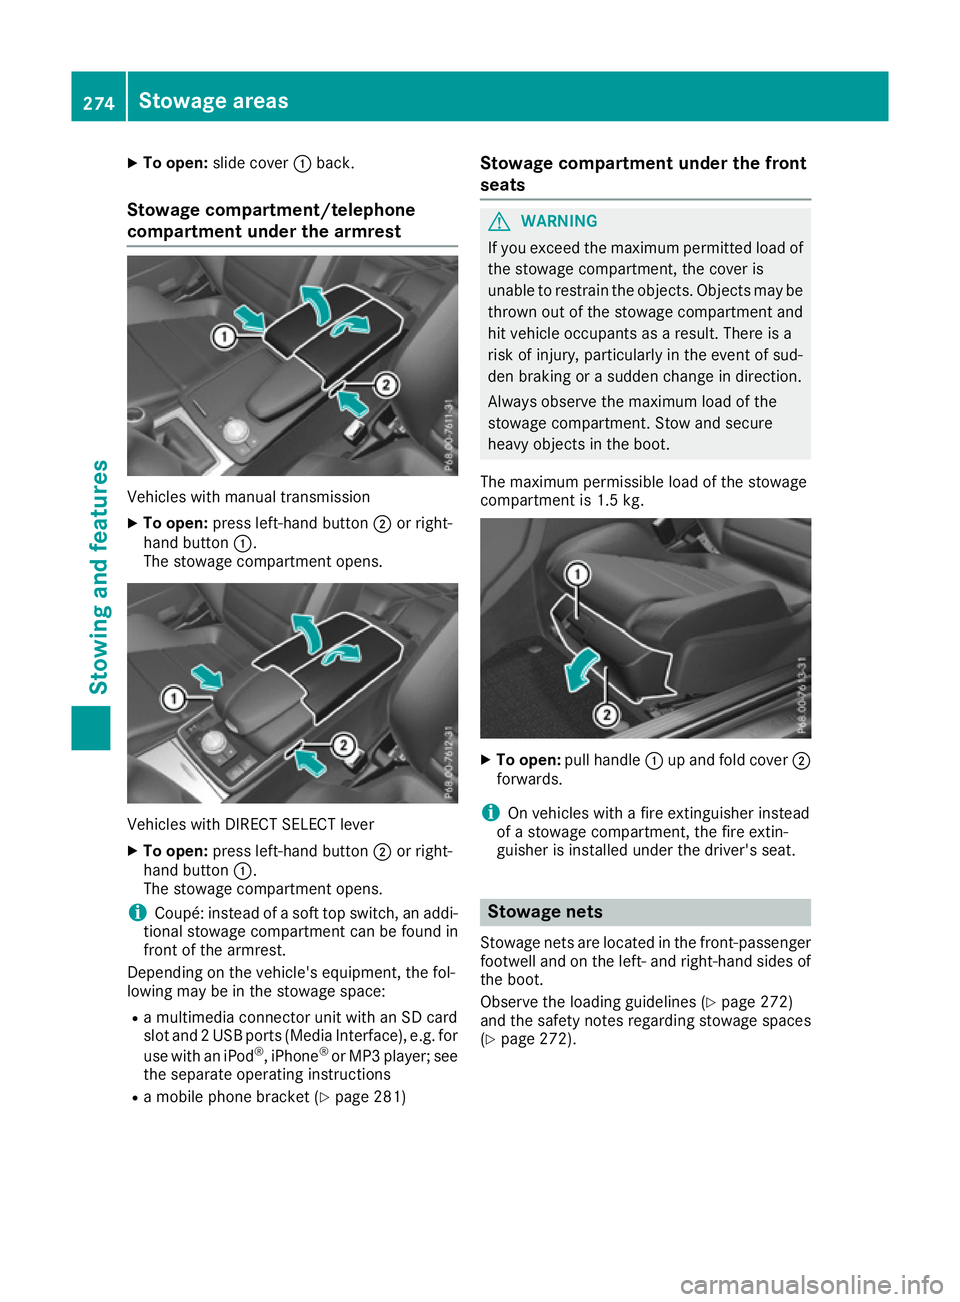
To open: slide cover :back.
Stowage compartment/telephone
compartment under the armrest Vehicles with manual transmission
X To open: press left-hand button ;or right-
hand button :.
The stowage compartment opens. Vehicles with DIRECT SELECT lever
X To open: press left-hand button ;or right-
hand button :.
The stowage compartment opens.
i Coupé: instead of a soft top switch, an addi-
tional stowage compartment can be found in
front of the armrest.
Depending on the vehicle's equipment, the fol-
lowing may be in the stowage space:
R a multimedia connector unit with an SD card
slot and 2 USB ports (Media Interface), e.g. for
use with an iPod ®
, iPhone ®
or MP3 player; see
the separate operating instructions
R a mobile phone bracket (Y page 281)Stowage compartment under the front
seats G
WARNING
If you exceed the maximum permitted load of the stowage compartment, the cover is
unable to restrain the objects. Objects may be
thrown out of the stowage compartment and
hit vehicle occupants as a result. There is a
risk of injury, particularly in the event of sud-
den braking or a sudden change in direction.
Always observe the maximum load of the
stowage compartment. Stow and secure
heavy objects in the boot.
The maximum permissible load of the stowage
compartment is 1.5 kg. X
To open: pull handle :up and fold cover ;
forwards.
i On vehicles with a fire extinguisher instead
of a stowage compartment, the fire extin-
guisher is installed under the driver's seat. Stowage nets
Stowage nets are located in the front-passenger footwell and on the left- and right-hand sides of
the boot.
Observe the loading guidelines (Y page 272)
and the safety notes regarding stowage spaces
(Y page 272). 274
Stowage areasSto
wing an d features
Page 278 of 349
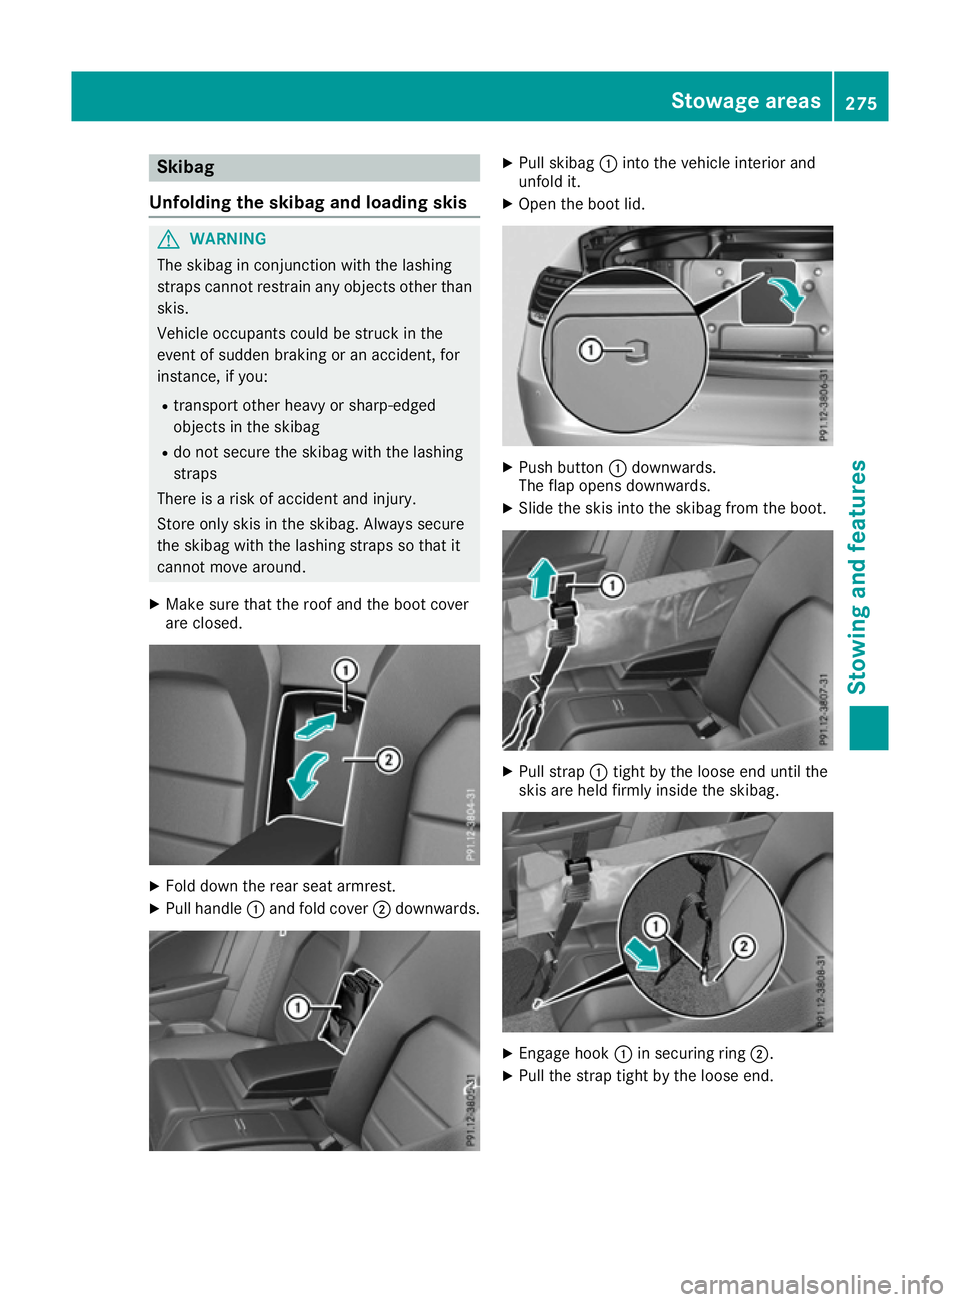
Skibag
Unfolding the skibag and loading skis G
WARNING
The skibag in conjunction with the lashing
straps cannot restrain any objects other than skis.
Vehicle occupants could be struck in the
event of sudden braking or an accident, for
instance, if you:
R transport other heavy or sharp-edged
objects in the skibag
R do not secure the skibag with the lashing
straps
There is a risk of accident and injury.
Store only skis in the skibag. Always secure
the skibag with the lashing straps so that it
cannot move around.
X Make sure that the roof and the boot cover
are closed. X
Fold down the rear seat armrest.
X Pull handle :and fold cover ;downwards. X
Pull skibag :into the vehicle interior and
unfold it.
X Open the boot lid. X
Push button :downwards.
The flap opens downwards.
X Slide the skis into the skibag from the boot. X
Pull strap :tight by the loose end until the
skis are held firmly inside the skibag. X
Engage hook :in securing ring ;.
X Pull the strap tight by the loose end. Stowage areas
275Stowing and features Z
Page 279 of 349
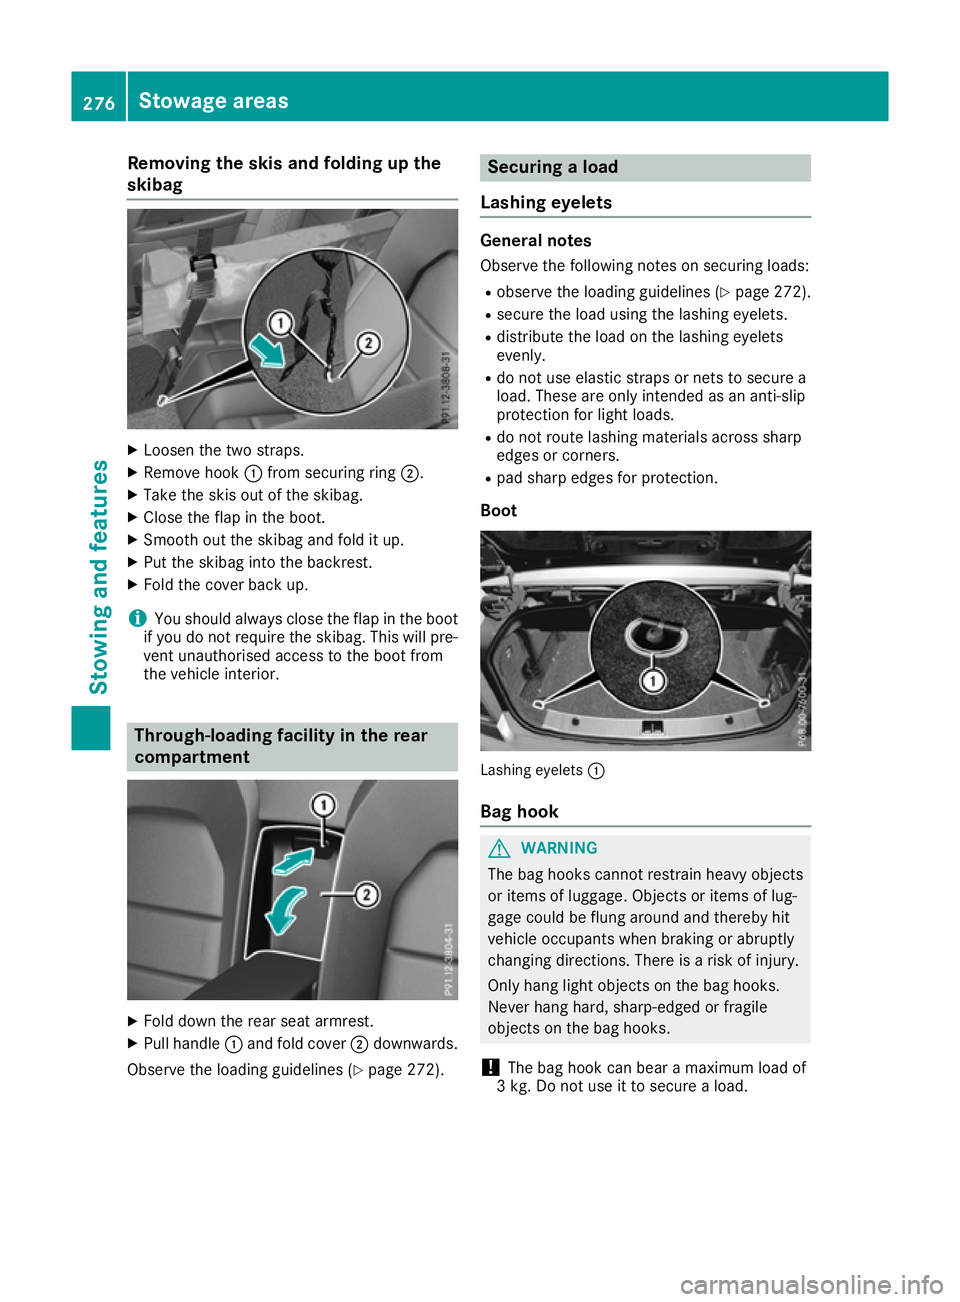
Removing the skis and folding up the
skibag X
Loosen the two straps.
X Remove hook :from securing ring ;.
X Take the skis out of the skibag.
X Close the flap in the boot.
X Smooth out the skibag and fold it up.
X Put the skibag into the backrest.
X Fold the cover back up.
i You should always close the flap in the boot
if you do not require the skibag. This will pre-
vent unauthorised access to the boot from
the vehicle interior. Through-loading facility in the rear
compartment
X
Fold down the rear seat armrest.
X Pull handle :and fold cover ;downwards.
Observe the loading guidelines (Y page 272). Securing a load
Lashing eyelets General notes
Observe the following notes on securing loads:
R observe the loading guidelines (Y page 272).
R secure the load using the lashing eyelets.
R distribute the load on the lashing eyelets
evenly.
R do not use elastic straps or nets to secure a
load. These are only intended as an anti-slip
protection for light loads.
R do not route lashing materials across sharp
edges or corners.
R pad sharp edges for protection.
Boot Lashing eyelets
:
Bag hook G
WARNING
The bag hooks cannot restrain heavy objects
or items of luggage. Objects or items of lug-
gage could be flung around and thereby hit
vehicle occupants when braking or abruptly
changing directions. There is a risk of injury.
Only hang light objects on the bag hooks.
Never hang hard, sharp-edged or fragile
objects on the bag hooks.
! The bag hook can bear a maximum load of
3 kg. Do not use it to secure a load. 276
Stowage areasStowing and features
Page 280 of 349
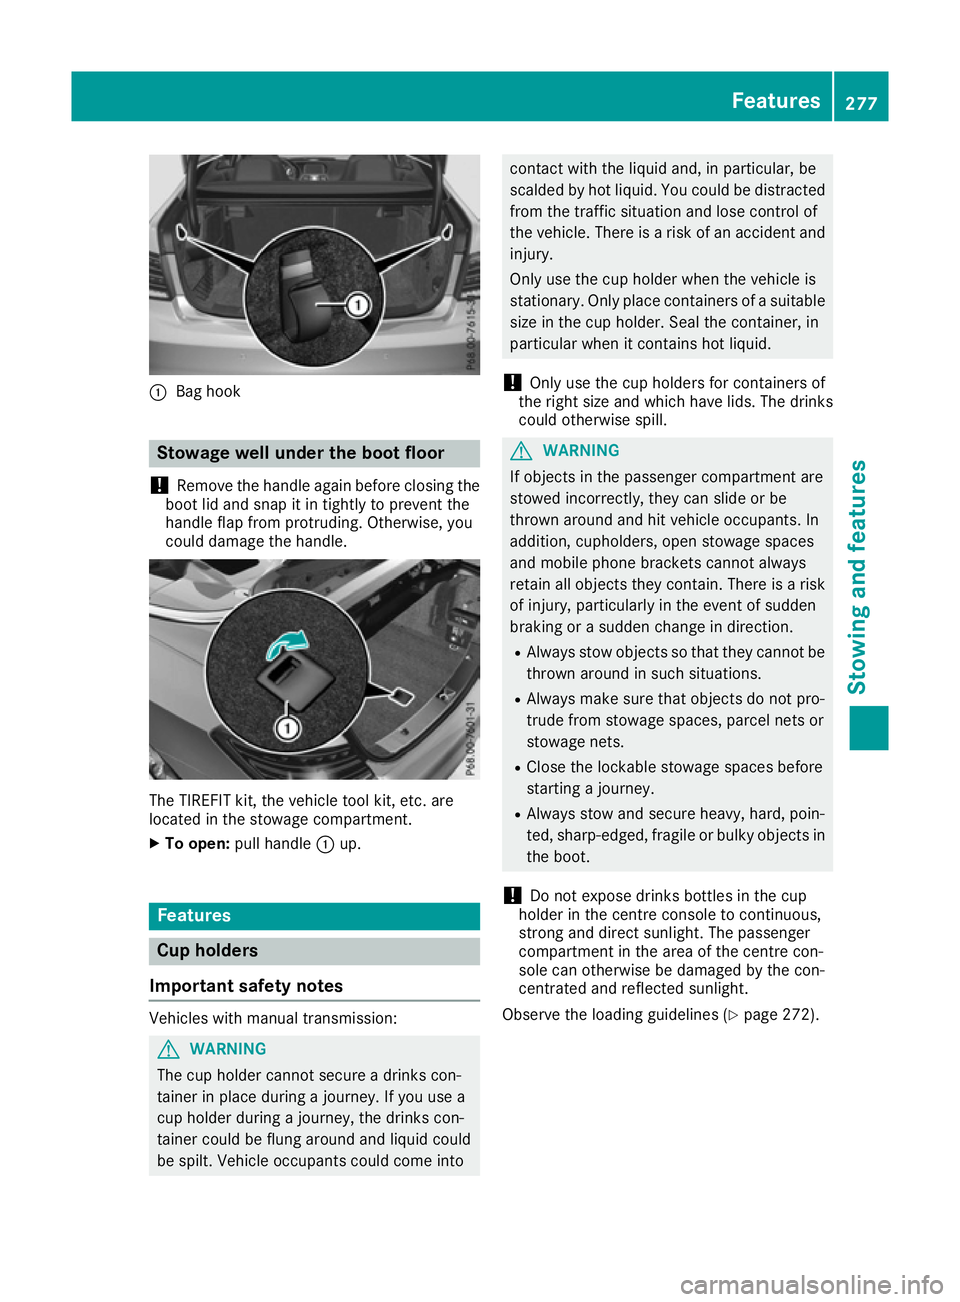
:
Bag hook Stowage well under the boot floor
! Remove the handle again before closing the
boot lid and snap it in tightly to prevent the
handle flap from protruding. Otherwise, you
could damage the handle. The TIREFIT kit, the vehicle tool kit, etc. are
located in the stowage compartment.
X To open: pull handle :up. Features
Cup holders
Important safety notes Vehicles with manual transmission:
G
WARNING
The cup holder cannot secure a drinks con-
tainer in place during a journey. If you use a
cup holder during a journey, the drinks con-
tainer could be flung around and liquid could
be spilt. Vehicle occupants could come into contact with the liquid and, in particular, be
scalded by hot liquid. You could be distracted
from the traffic situation and lose control of
the vehicle. There is a risk of an accident and
injury.
Only use the cup holder when the vehicle is
stationary. Only place containers of a suitable size in the cup holder. Seal the container, in
particular when it contains hot liquid.
! Only use the cup holders for containers of
the right size and which have lids. The drinks
could otherwise spill. G
WARNING
If objects in the passenger compartment are
stowed incorrectly, they can slide or be
thrown around and hit vehicle occupants. In
addition, cupholders, open stowage spaces
and mobile phone brackets cannot always
retain all objects they contain. There is a risk of injury, particularly in the event of sudden
braking or a sudden change in direction.
R Always stow objects so that they cannot be
thrown around in such situations.
R Always make sure that objects do not pro-
trude from stowage spaces, parcel nets or
stowage nets.
R Close the lockable stowage spaces before
starting a journey.
R Always stow and secure heavy, hard, poin-
ted, sharp-edged, fragile or bulky objects in
the boot.
! Do not expose drinks bottles in the cup
holder in the centre console to continuous,
strong and direct sunlight. The passenger
compartment in the area of the centre con-
sole can otherwise be damaged by the con-
centrated and reflected sunlight.
Observe the loading guidelines (Y page 272). Features
277Stowing and features Z
Page 281 of 349
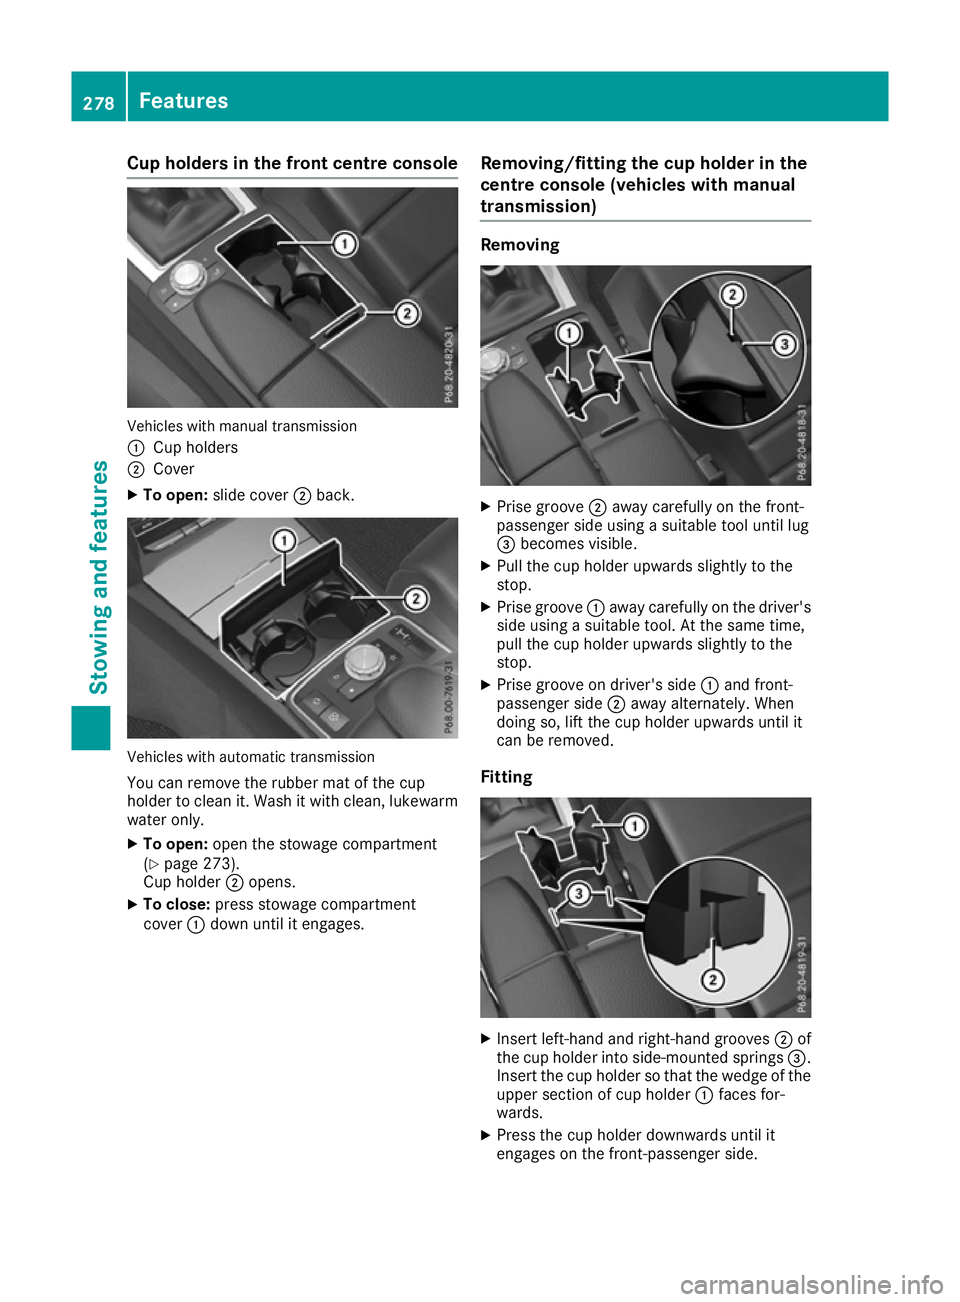
Cup holders in the front centre console
Vehicles with manual transmission
:
Cup holders
; Cover
X To open: slide cover ;back. Vehicles with automatic transmission
You can remove the rubber mat of the cup
holder to clean it. Wash it with clean, lukewarm
water only.
X To open: open the stowage compartment
(Y page 273).
Cup holder ;opens.
X To close: press stowage compartment
cover :down until it engages. Removing/fitting the cup holder in the
centre console (vehicles with manual
transmission) Removing
X
Prise groove ;away carefully on the front-
passenger side using a suitable tool until lug
= becomes visible.
X Pull the cup holder upwards slightly to the
stop.
X Prise groove :away carefully on the driver's
side using a suitable tool. At the same time,
pull the cup holder upwards slightly to the
stop.
X Prise groove on driver's side :and front-
passenger side ;away alternately. When
doing so, lift the cup holder upwards until it
can be removed.
Fitting X
Insert left-hand and right-hand grooves ;of
the cup holder into side-mounted springs =.
Insert the cup holder so that the wedge of the upper section of cup holder :faces for-
wards.
X Press the cup holder downwards until it
engages on the front-passenger side. 278
FeaturesStowing and features
Page 282 of 349
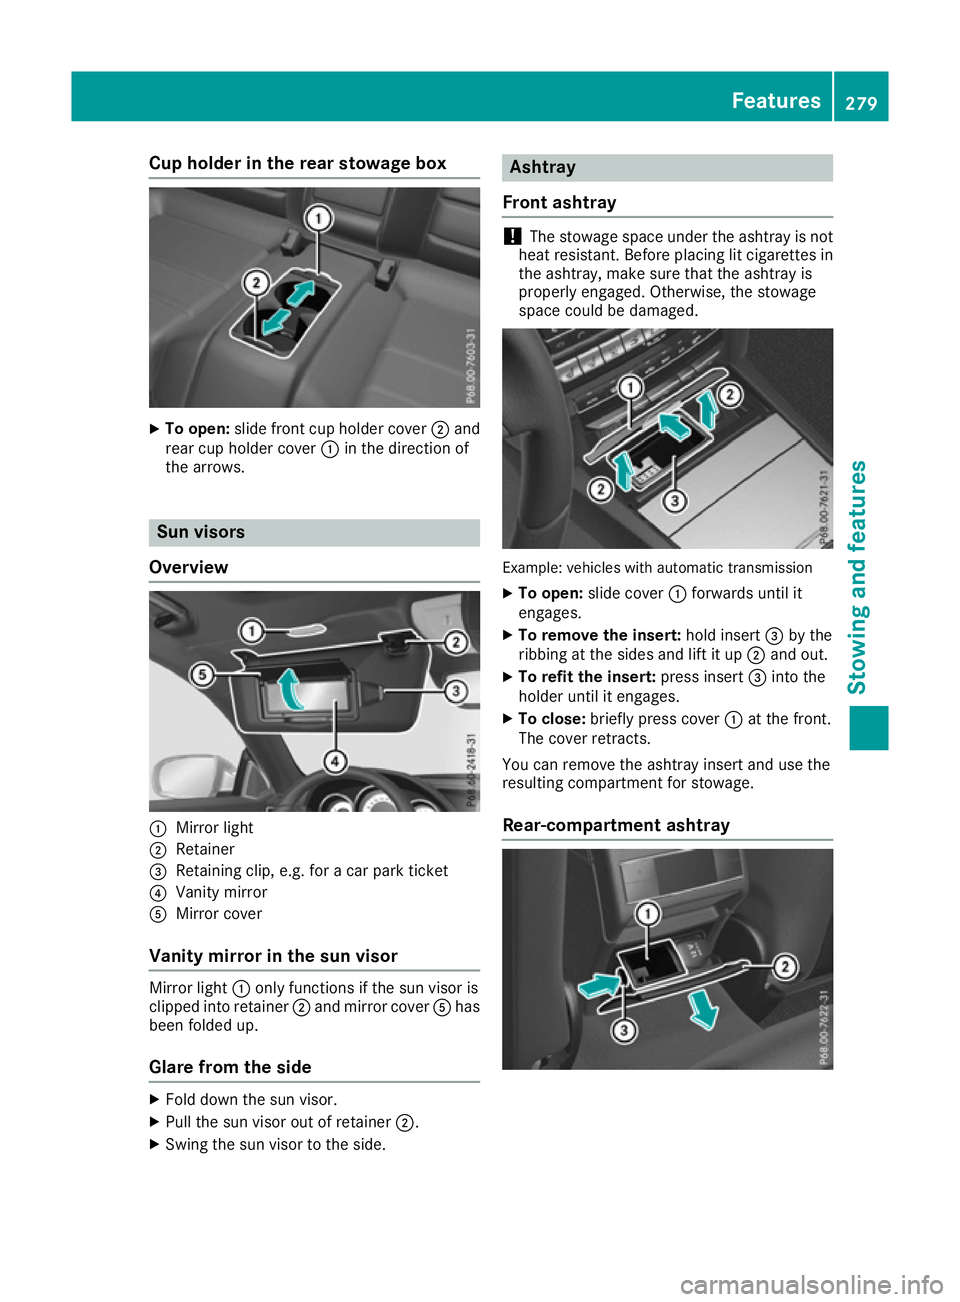
Cup holder in the rear stowage box
X
To open: slide front cup holder cover ;and
rear cup holder cover :in the direction of
the arrows. Sun visors
Overview :
Mirror light
; Retainer
= Retaining clip, e.g. for a car park ticket
? Vanity mirror
A Mirror cover
Vanity mirror in the sun visor Mirror light
:only functions if the sun visor is
clipped into retainer ;and mirror cover Ahas
been folded up.
Glare from the side X
Fold down the sun visor.
X Pull the sun visor out of retainer ;.
X Swing the sun visor to the side. Ashtray
Front ashtray !
The stowage space under the ashtray is not
heat resistant. Before placing lit cigarettes in the ashtray, make sure that the ashtray is
properly engaged. Otherwise, the stowage
space could be damaged. Example: vehicles with automatic transmission
X To open: slide cover :forwards until it
engages.
X To remove the insert: hold insert=by the
ribbing at the sides and lift it up ;and out.
X To refit the insert: press insert=into the
holder until it engages.
X To close: briefly press cover :at the front.
The cover retracts.
You can remove the ashtray insert and use the
resulting compartment for stowage.
Rear-compartment ashtray Features
279Stowing and features Z
Page 283 of 349
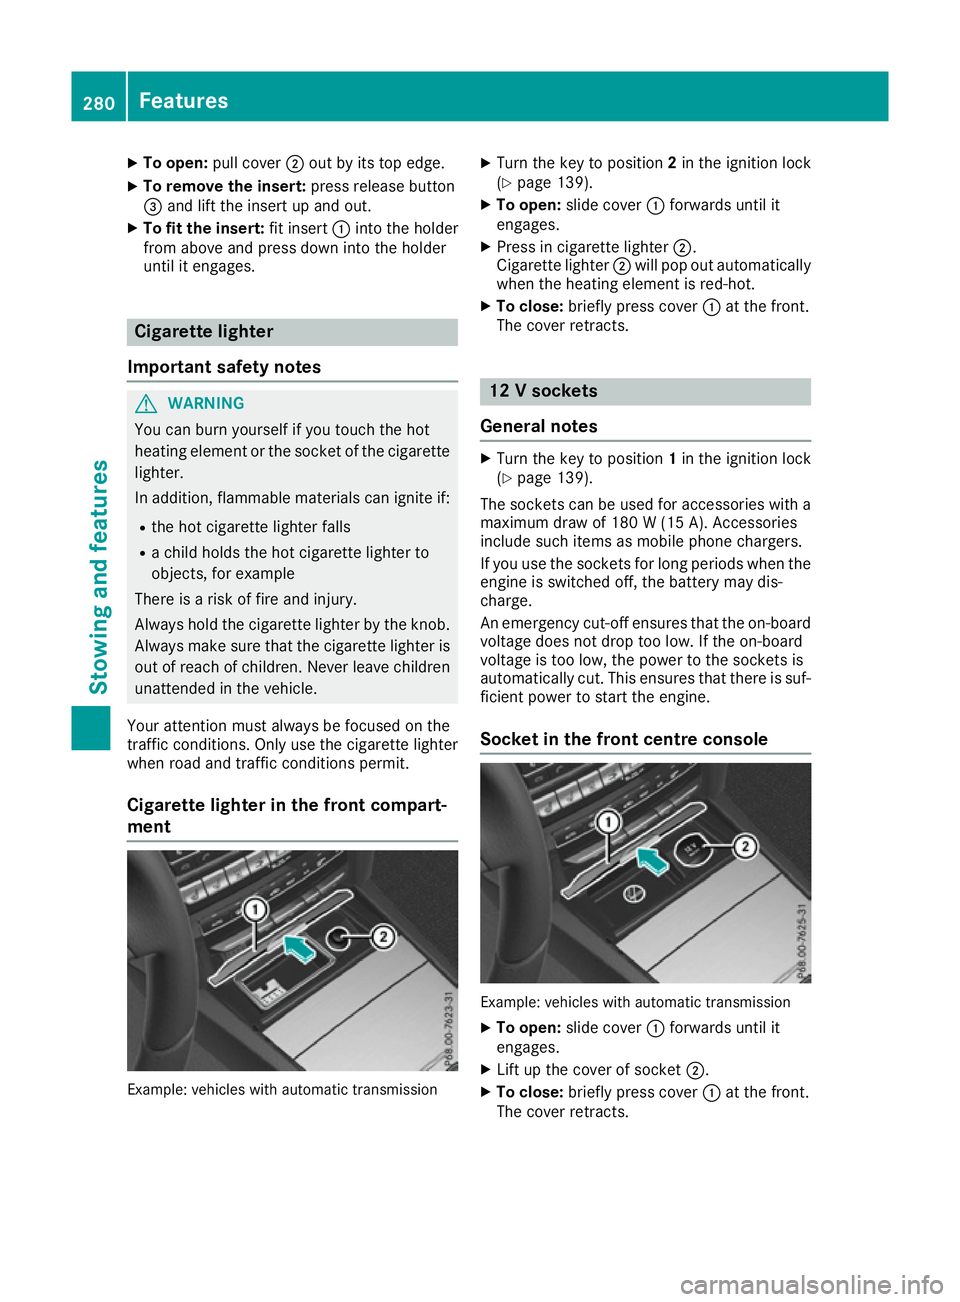
X
To open: pull cover ;out by its top edge.
X To remove the insert: press release button
= and lift the insert up and out.
X To fit the insert: fit insert:into the holder
from above and press down into the holder
until it engages. Cigarette lighter
Important safety notes G
WARNING
You can burn yourself if you touch the hot
heating element or the socket of the cigarette lighter.
In addition, flammable materials can ignite if:
R the hot cigarette lighter falls
R a child holds the hot cigarette lighter to
objects, for example
There is a risk of fire and injury.
Always hold the cigarette lighter by the knob.
Always make sure that the cigarette lighter is
out of reach of children. Never leave children unattended in the vehicle.
Your attention must always be focused on the
traffic conditions. Only use the cigarette lighter when road and traffic conditions permit.
Cigarette lighter in the front compart-
ment Example: vehicles with automatic transmission X
Turn the key to position 2in the ignition lock
(Y page 139).
X To open: slide cover :forwards until it
engages.
X Press in cigarette lighter ;.
Cigarette lighter ;will pop out automatically
when the heating element is red-hot.
X To close: briefly press cover :at the front.
The cover retracts. 12 V sockets
General notes X
Turn the key to position 1in the ignition lock
(Y page 139).
The sockets can be used for accessories with a
maximum draw of 180 W(15 A). Accessories
include such items as mobile phone chargers.
If you use the sockets for long periods when the engine is switched off, the battery may dis-
charge.
An emergency cut-off ensures that the on-boardvoltage does not drop too low. If the on-board
voltage is too low, the power to the sockets is
automatically cut. This ensures that there is suf-
ficient power to start the engine.
Socket in the front centre console Example: vehicles with automatic transmission
X To open: slide cover :forwards until it
engages.
X Lift up the cover of socket ;.
X To close: briefly press cover :at the front.
The cover retracts. 280
FeaturesStowing and fea
tures