2015 MERCEDES-BENZ CLA SHOOTING BRAKE bonnet
[x] Cancel search: bonnetPage 9 of 421
Activating/deactivating (on the
centre console) .............................. 157
Remote contro l.............................. 157
Axle load, permissible (trailer tow-
ing) ...................................................... 412 B
Bag hook ............................................ 321
Ball coupling
Folding in ....................................... 241
Folding out ..................................... 240
BAS (Brake Assist System) ................. 73
Battery (key)
Checking .......................................... 90
Important safety notes .................... 89
Replacing ......................................... 90
Battery (vehicle)
Charging ........................................ 359
Display message ............................ 284
Important safety notes .................. 356
Jump starting ................................. 360
Belt
see Seat belts
Belt tensioner
Activation ......................................... 57
Blind Spot Assist
Activating/deactivating (on-
board computer) ............................ 257
Display message ............................ 288
Notes/function .............................. 234
Trailer towing ................................. 236
Bonnet
Active bonnet (pedestrian protec-tion) ............................................... 334
Closing ........................................... 336
Display message ............................ 297
Important safety notes .................. 334
Opening ......................................... 335
Boot lid
see Tailgate
Boot load (maximum) ........................ 410
Brake
EBD .................................................. 80
Brake Assist
see BAS (Brake Assist System)
Brake fluid
Display message ............................ 273 Notes ............................................. 408
Brake force distribution
see EBD (electronic brake force
distribution)
Brake lamps
Adaptive ........................................... 76
Changing bulb s.............................. 137
Display message ............................ 280
Brakes
ABS .................................................. 73
Adaptive Brake Assist ...................... 75
BAS .................................................. 73
Brake fluid (notes) ......................... 408
Display message ............................ 266
Driving tips .................................... 197
Hill start assist ............................... 169
HOLD function ............................... 211
Important safety notes .................. 197
Parking brake ................................ 193
Warning lamp ................................. 303
Breakdown
Where will I find...? ........................ 350
see Flat tyre
see Tow-starting
see Towing away
Brightness control (instrument
cluster lighting) ................................... 32
Buttons on the steering column ...... 247 C
Calling up a fault see Display messages
Car
see Vehicle
Car wash (care) ................................. 341
Care
Automatic car wash ....................... 341
Carpets .......................................... 347
Display ........................................... 346
Exhaust pipe .................................. 345
Exterior lighting ............................. 344
Gear or selector lever .................... 346
High-pressure cleaner .................... 342
Interior ........................................... 346
Matt paintwork .............................. 342
Note s............................................. 340
Paint .............................................. 342 6
Index
Page 33 of 421
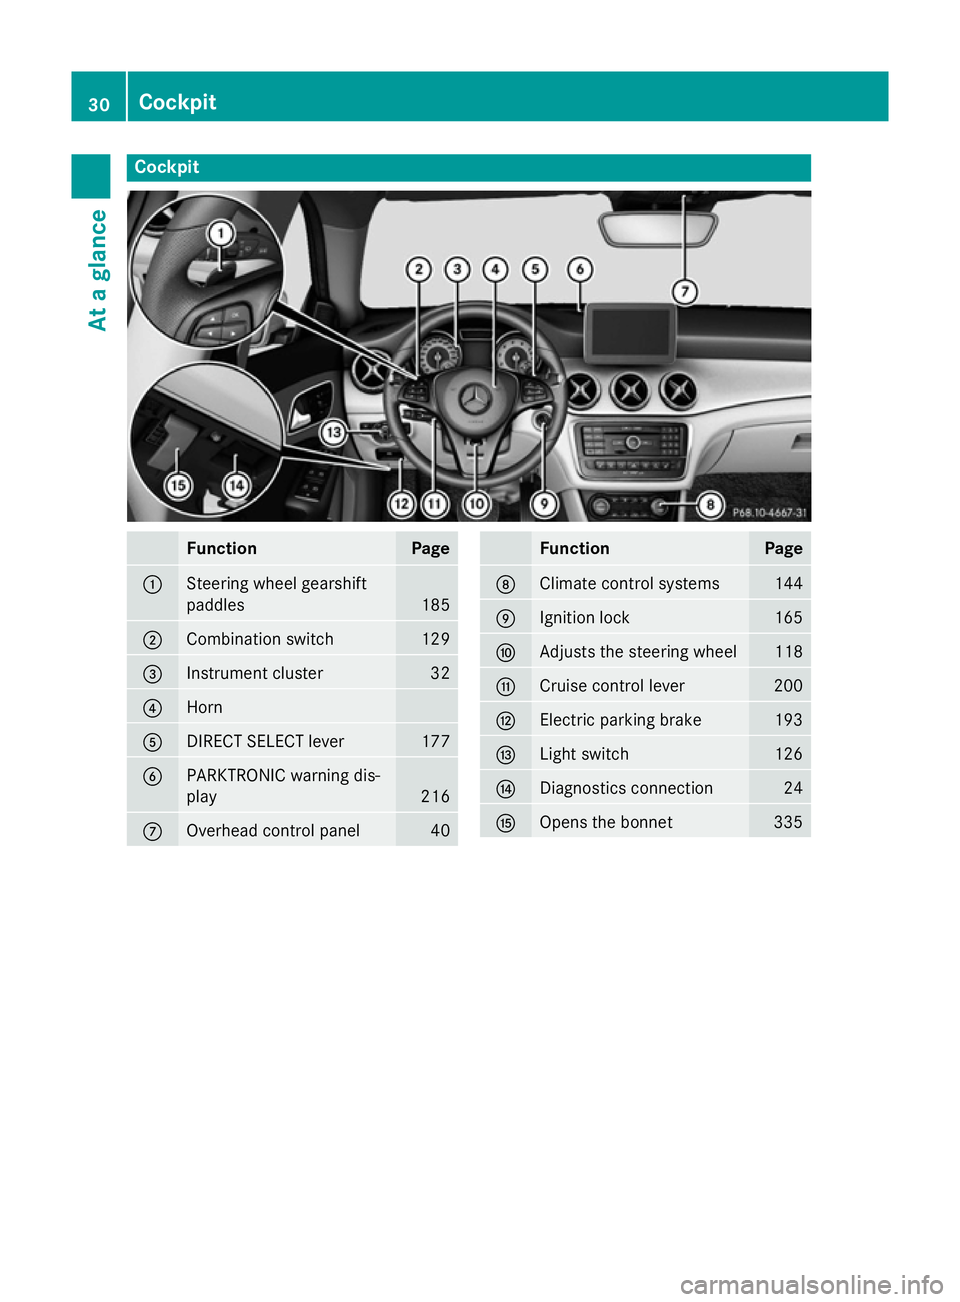
Cockpit
Function Page
:
Steering wheel gearshift
paddles
185
;
Combination switch 129
=
Instrument cluster 32
?
Horn
A
DIRECT SELECT lever 177
B
PARKTRONIC warning dis-
play
216
C
Overhead control panel 40 Function Page
D
Climate control systems 144
E
Ignition lock 165
F
Adjusts the steering wheel 118
G
Cruise control lever 200
H
Electric parking brake 193
I
Light switch 126
J
Diagnostics connection 24
K
Opens the bonnet 33530
CockpitAt a glance
Page 34 of 421
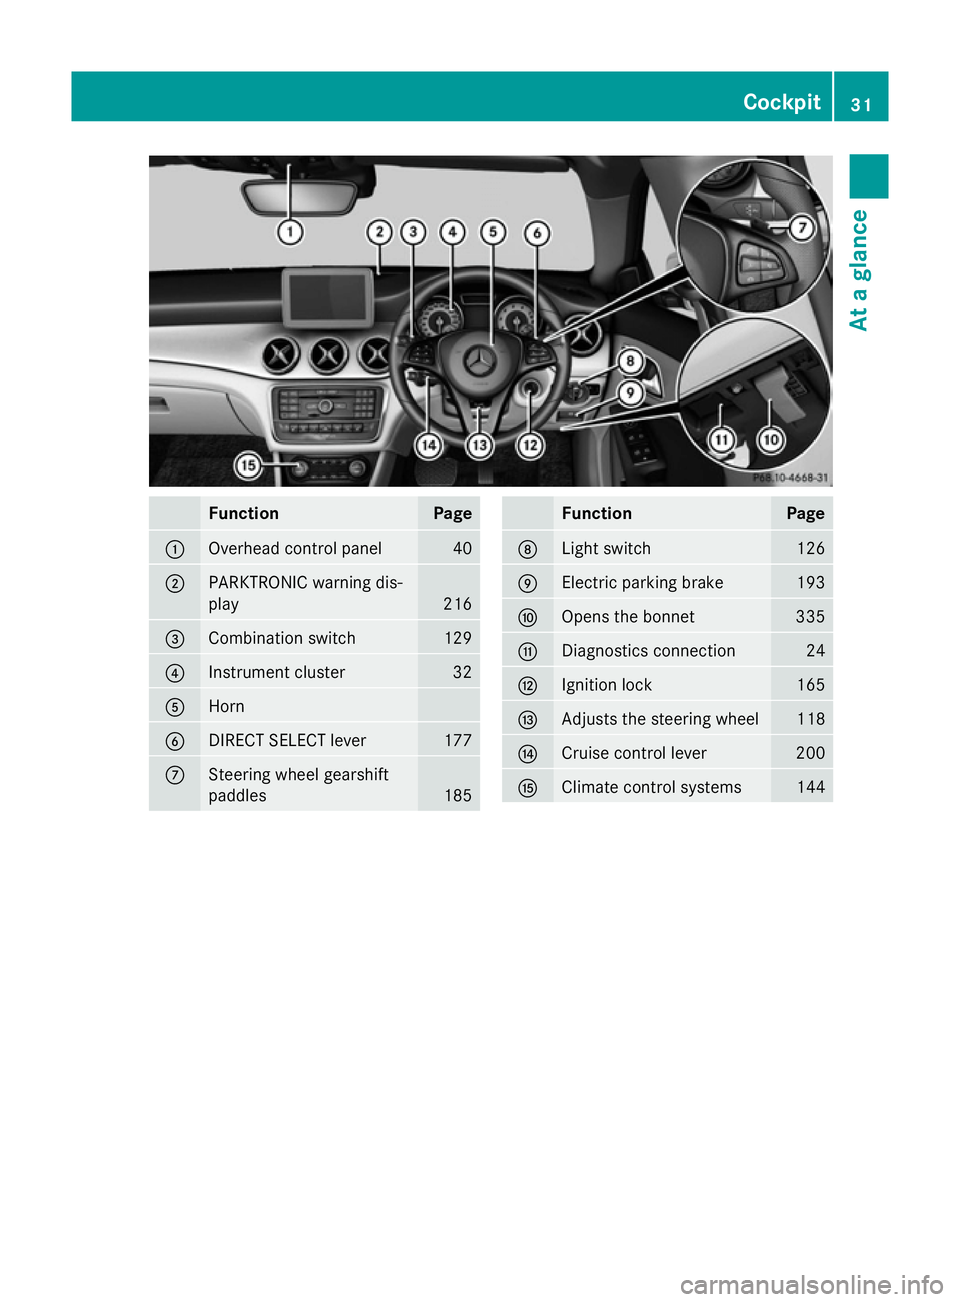
Function Page
:
Overhead control panel 40
;
PARKTRONIC warning dis-
play 216
=
Combination switch 129
?
Instrument cluster 32
A
Horn
B
DIRECT SELECT lever 177
C
Steering wheel gearshift
paddles
185 Function Page
D
Light switch 126
E
Electric parking brake 193
F
Opens the bonnet 335
G
Diagnostics connection 24
H
Ignition lock 165
I
Adjusts the steering wheel 118
J
Cruise control lever 200
K
Climate control systems 144Cockpit
31At a glance
Page 84 of 421
X
To activate with the key: remove the key
from the ignition lock.
X To activate with KEYLESS-GO start func-
tion or KEYLESS-GO: switch the ignition
off and open the driver's door.
X To deactivate: switch on the ignition.
When leaving the vehicle, always take the key with you and lock the vehicle. Anyone can
start the engine if a valid key has been left
inside the vehicle.
i The immobiliser is always deactivated
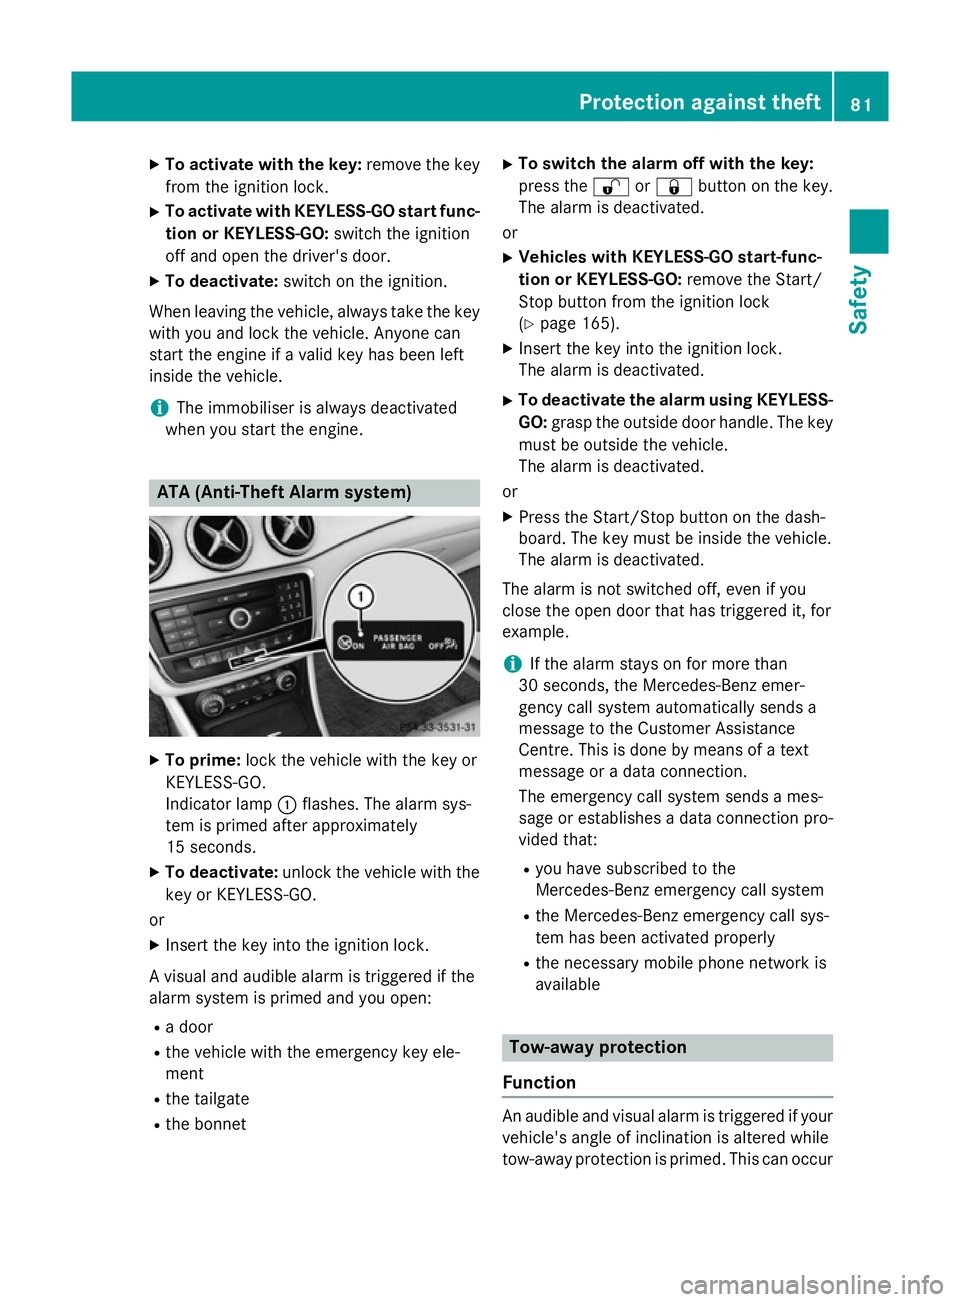
when you start the engine. ATA (Anti-Theft Alarm system)
X
To prime: lock the vehicle with the key or
KEYLESS-GO.
Indicator lamp :flashes. The alarm sys-
tem is primed after approximately
15 second s.
X To deactivate: unlock the vehicle with the
key or KEYLESS-GO.
or X Insert the key into the ignition lock.
A visual and audible alarm is triggered if the
alarm system is primed and you open:
R a door
R the vehicle with the emergency key ele-
ment
R the tailgate
R the bonnet X
To switch the alarm off with the key:
press the %or& button on the key.
The alarm is deactivated.
or X Vehicles with KEYLESS-GO start-func-
tion or KEYLESS-GO: remove the Start/
Stop button from the ignition lock
(Y page 165).
X Insert the key into the ignition lock.
The alarm is deactivated.
X To deactivate the alarm using KEYLESS-
GO: grasp the outside door handle. The key
must be outside the vehicle.
The alarm is deactivated.
or
X Press the Start/Stop button on the dash-
board. The key must be inside the vehicle.
The alarm is deactivated.
The alarm is not switched off, even if you
close the open door that has triggered it, for
example.
i If the alarm stays on for more than
30 seconds, the Mercedes‑ Benz emer-
gency call system automatically sends a
message to the Customer Assistance
Centre. This is done by means of a text
message or a data connection.
The emergency call system sends a mes-
sage or establishes a data connection pro-
vided that:
R you have subscribed to the
Mercedes‑Benz emergency call system
R the Mercedes‑ Benz emergency call sys-
tem has been activated properly
R the necessary mobile phone network is
available Tow-away protection
Function An audible and visual alarm is triggered if your
vehicle's angle of inclination is altered while
tow-away protection is primed. This can occur Protection against theft
81Safety Z
Page 139 of 421
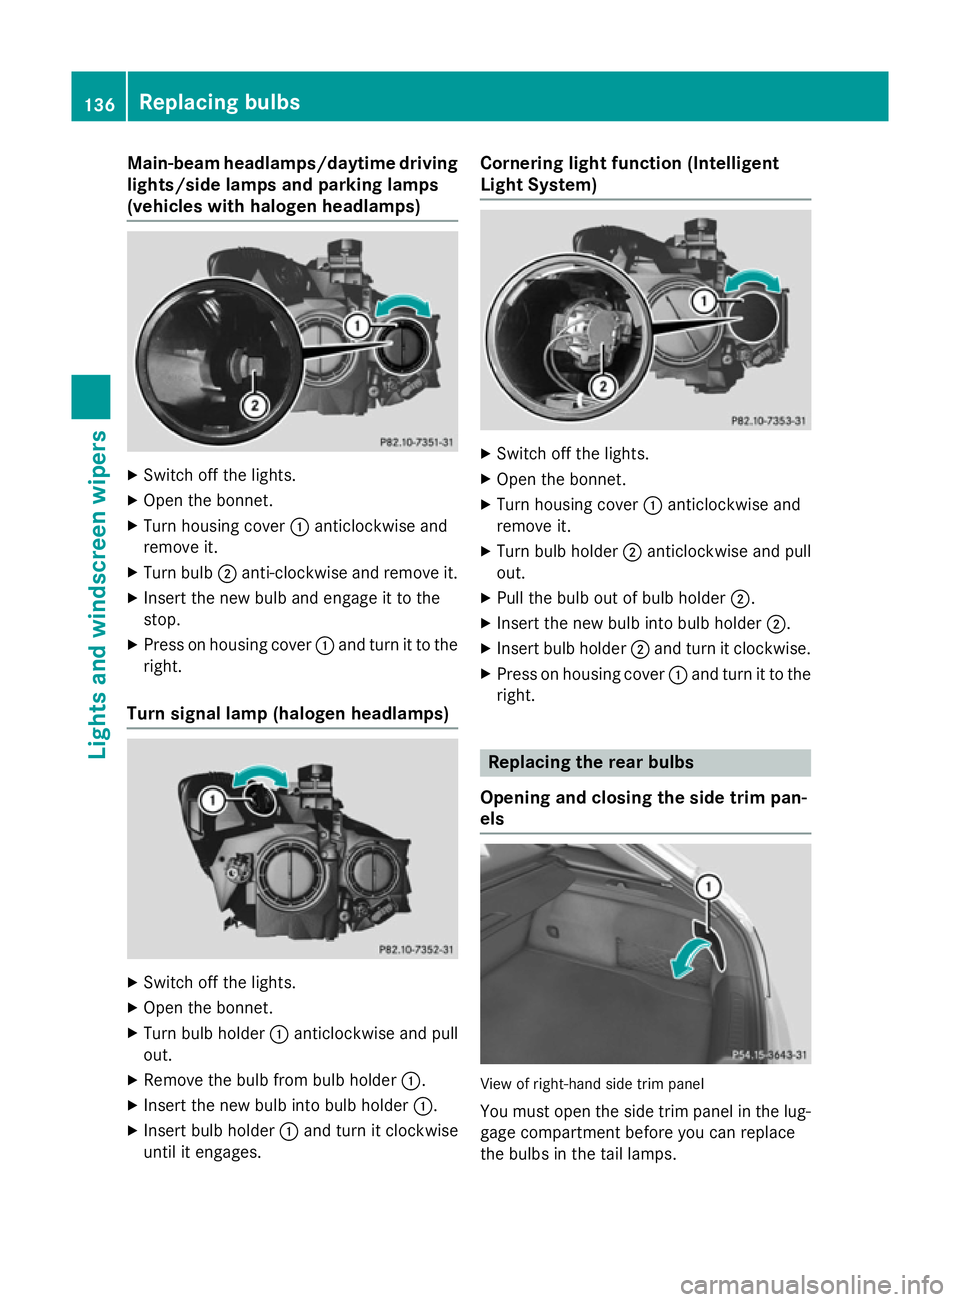
Main-beam headlamps/daytime driving
lights/side lamps and parking lamps
(vehicles with halogen headlamps) X
Switch off the lights.
X Open the bonnet.
X Turn housing cover :anticlockwise and
remove it.
X Turn bulb ;anti-clockwise and remove it.
X Insert the new bulb and engage it to the
stop.
X Press on housing cover :and turn it to the
right.
Turn signal lamp (halogen headlamps) X
Switch off the lights.
X Open the bonnet.
X Turn bulb holder :anticlockwise and pull
out.
X Remove the bulb from bulb holder :.
X Insert the new bulb into bulb holder :.
X Insert bulb holder :and turn it clockwise
until it engages. Cornering light function (Intelligent
Light System)
X
Switch off the lights.
X Open the bonnet.
X Turn housing cover :anticlockwise and
remove it.
X Turn bulb holder ;anticlockwise and pull
out.
X Pull the bulb out of bulb holder ;.
X Insert the new bulb into bulb holder ;.
X Insert bulb holder ;and turn it clockwise.
X Press on housing cover :and turn it to the
right. Replacing the rear bulbs
Opening and closing the side trim pan-
els View of right-hand side trim panel
You must open the side trim panel in the lug-
gage compartment before you can replace
the bulbs in the tail lamps. 136
Replacing bulbsLights and windscreen wipers
Page 142 of 421
!
Never open the bonnet/tailgate if a wiper
arm is folded away from the windscreen/
rear window.
Never fold a windscreen wiper arm without a wiper blade back onto the windscreen/
rear window.
Hold the windscreen wiper arm firmly when
you change the wiper blade. If you release
the wiper arm without a wiper blade and it
falls onto the windscreen/rear window, the windscreen/rear window may be damaged
by the force of the impact.
Mercedes-Benz recommends that you have the wiper blades changed at a qualified
specialist workshop.
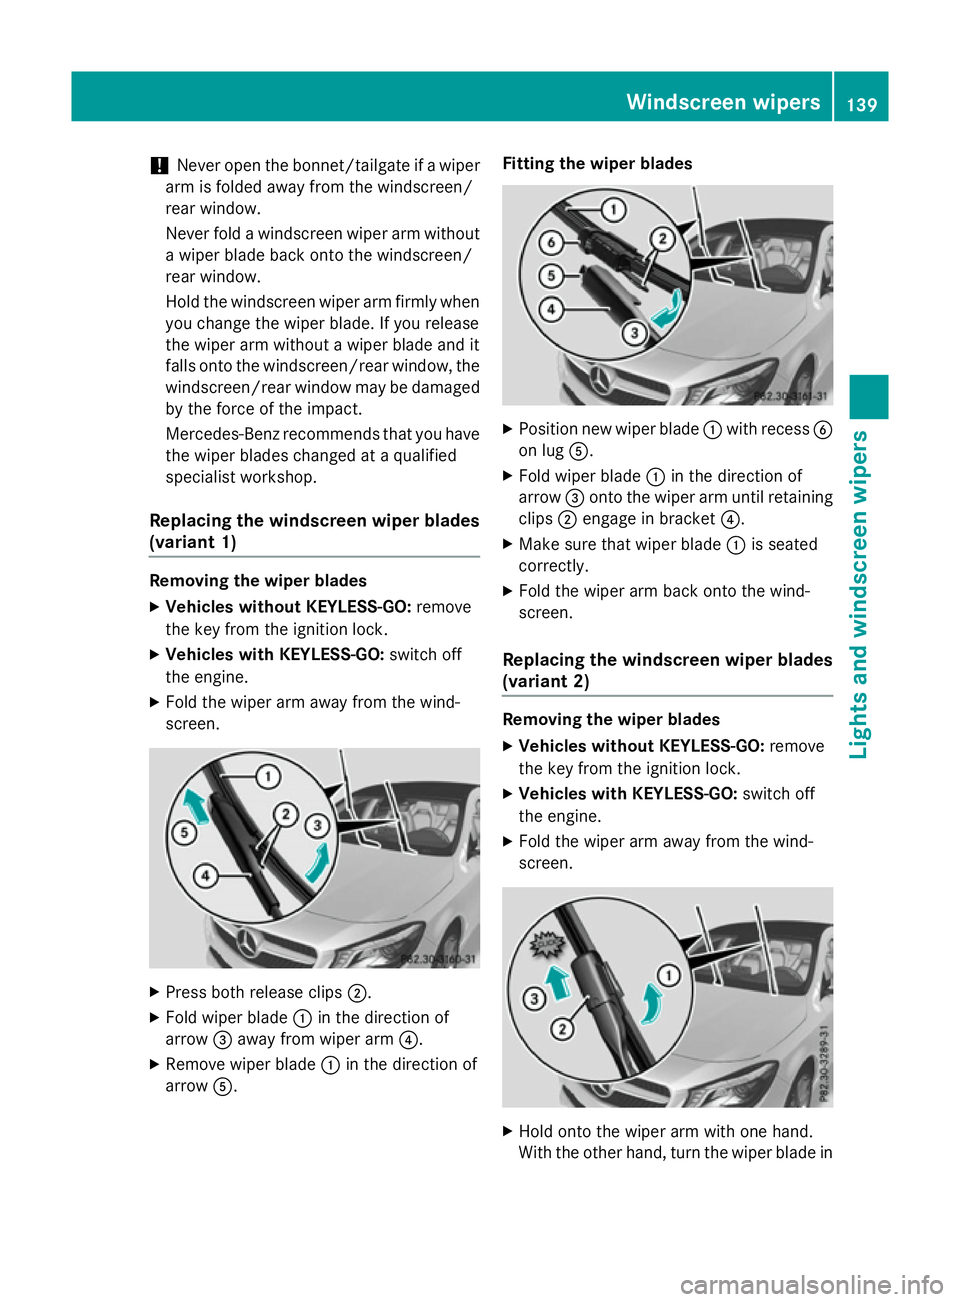
Replacing the windscreen wiper blades
(variant 1) Removing the wiper blades
X Vehicles without KEYLESS-GO: remove
the key from the ignition lock.
X Vehicles with KEYLESS-GO: switch off
the engine.
X Fold the wiper arm away from the wind-
screen. X
Press both release clips ;.
X Fold wiper blade :in the direction of
arrow =away from wiper arm ?.
X Remove wiper blade :in the direction of
arrow A. Fitting the wiper blades
X
Position new wiper blade :with recess B
on lug A.
X Fold wiper blade :in the direction of
arrow =onto the wiper arm until retaining
clips ;engage in bracket ?.
X Make sure that wiper blade :is seated
correctly.
X Fold the wiper arm back onto the wind-
screen.
Replacing the windscreen wiper blades
(variant 2) Removing the wiper blades
X Vehicles without KEYLESS-GO: remove
the key from the ignition lock.
X Vehicles with KEYLESS-GO: switch off
the engine.
X Fold the wiper arm away from the wind-
screen. X
Hold onto the wiper arm with one hand.
With the other hand, turn the wiper blade in Windscreen wipers
139Lights and windscreen wipers Z
Page 164 of 421
Problems with the auxiliary heating/ventilation
Problem
Possible causes/consequences and
M
MSolutions FAIL¨ The signal transmission between the transmitter and the vehicle is
faulty.
X Change your position in relation to the vehicle, moving closer if
necessary.
X Make another attempt to switch the auxiliary heating/ventila-
tion on or off using the remote control. FAIL The auxiliary heating cannot be switched on or has switched itself
off.
The starter battery is not sufficiently charged.
X Charge the starter battery.
X Make another attempt to switch on the auxiliary heating/venti-
lation using the remote control. The auxiliary heating cannot be switched on or has switched itself
off.
The fuel tank content is below the reserve fuel level.
X Refuel at the nearest filling station.
X Make another attempt to switch on the auxiliary heating using
the remote control. The auxiliary heating/ventilation cannot be switched on or has
switched itself off.
The auxiliary heating/ventilation is malfunctioning.
X Have the auxiliary heating/ventilation checked at a qualified
specialist workshop. Air vents
Important safety notes
G
WARNING
Very hot or very cold air can flow from the air vents. This could result in burns or frostbite in the immediate vicinity of the air vents. There
is a risk of injury.
Make sure that all vehicle occupants always
maintain a sufficient distance to the air out-
lets. If necessary, redirect the airflow to
another area of the vehicle interior. In order to ensure the direct flow of fresh air
through the air vents into the vehicle interior,
please observe the following notes:
R keep the air inlet between the windscreen
and the bonnet free of blockages, such as
ice, snow or leaves
R never cover the vents or ventilation grilles
in the vehicle interior
i Optimal climate control function is ach-
ieved by opening the air vents fully and set- ting the adjusters to the middle position. Air vents
161Climate control Z
Page 173 of 421
ECO start/stop function
Introduction The ECO start/stop function switches the
engine off automatically if the vehicle is stop-
ped under certain conditions.
When pulling away again, the engine starts
automatically. The ECO start/stop function
thereby helps you to reduce the fuel con-
sumption and emissions of your vehicle.
Important safety notes G
WARNING
If the engine is switched off automatically and you exit the vehicle, the engine is restarted
automatically. The vehicle may begin moving. There is a risk of accident and injury.
If you wish to exit the vehicle, always turn off
the ignition and secure the vehicle against
rolling away.
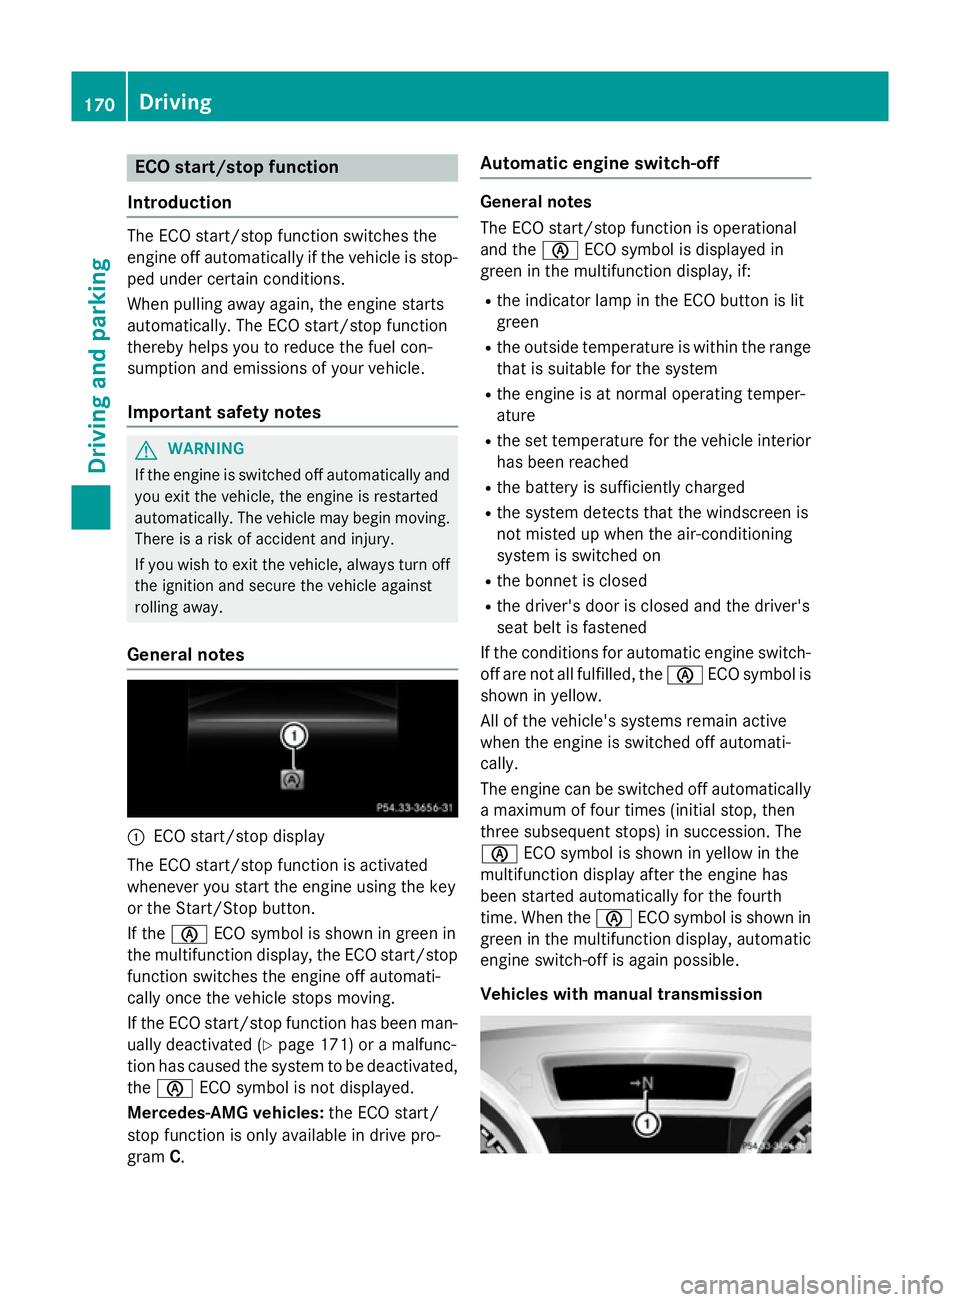
General notes :
ECO start/stop display
The ECO start/stop function is activated
whenever you start the engine using the key
or the Start/Stop button.
If the è ECO symbol is shown in green in
the multifunction display, the ECO start/stop
function switches the engine off automati-
cally once the vehicle stops moving.
If the ECO start/stop function has been man- ually deactivated (Y page 171) or a malfunc-
tion has caused the system to be deactivated, the è ECO symbol is not displayed.
Mercedes-AMG vehicles: the ECO start/
stop function is only available in drive pro-
gram C. Automatic engine switch-off General notes
The ECO start/stop function is operational
and the
èECO symbol is displayed in
green in the multifunction display, if:
R the indicator lamp in the ECO button is lit
green
R the outside temperature is within the range
that is suitable for the system
R the engine is at normal operating temper-
ature
R the set temperature for the vehicle interior
has been reached
R the battery is sufficiently charged
R the system detects that the windscreen is
not misted up when the air-conditioning
system is switched on
R the bonnet is closed
R the driver's door is closed and the driver's
seat belt is fastened
If the conditions for automatic engine switch- off are not all fulfilled, the èECO symbol is
shown in yellow.
All of the vehicle's systems remain active
when the engine is switched off automati-
cally.
The engine can be switched off automatically
a maximum of four times (initial stop, then
three subsequent stops) in succession. The
è ECO symbol is shown in yellow in the
multifunction display after the engine has
been started automatically for the fourth
time. When the èECO symbol is shown in
green in the multifunction display, automatic
engine switch-off is again possible.
Vehicles with manual transmission 170
DrivingDriving and parking