2015 MERCEDES-BENZ CLA SHOOTING BRAKE lock
[x] Cancel search: lockPage 142 of 421
!
Never open the bonnet/tailgate if a wiper
arm is folded away from the windscreen/
rear window.
Never fold a windscreen wiper arm without a wiper blade back onto the windscreen/
rear window.
Hold the windscreen wiper arm firmly when
you change the wiper blade. If you release
the wiper arm without a wiper blade and it
falls onto the windscreen/rear window, the windscreen/rear window may be damaged
by the force of the impact.
Mercedes-Benz recommends that you have the wiper blades changed at a qualified
specialist workshop.
Replacing the windscreen wiper blades
(variant 1) Removing the wiper blades
X Vehicles without KEYLESS-GO: remove
the key from the ignition lock.
X Vehicles with KEYLESS-GO: switch off
the engine.
X Fold the wiper arm away from the wind-
screen. X
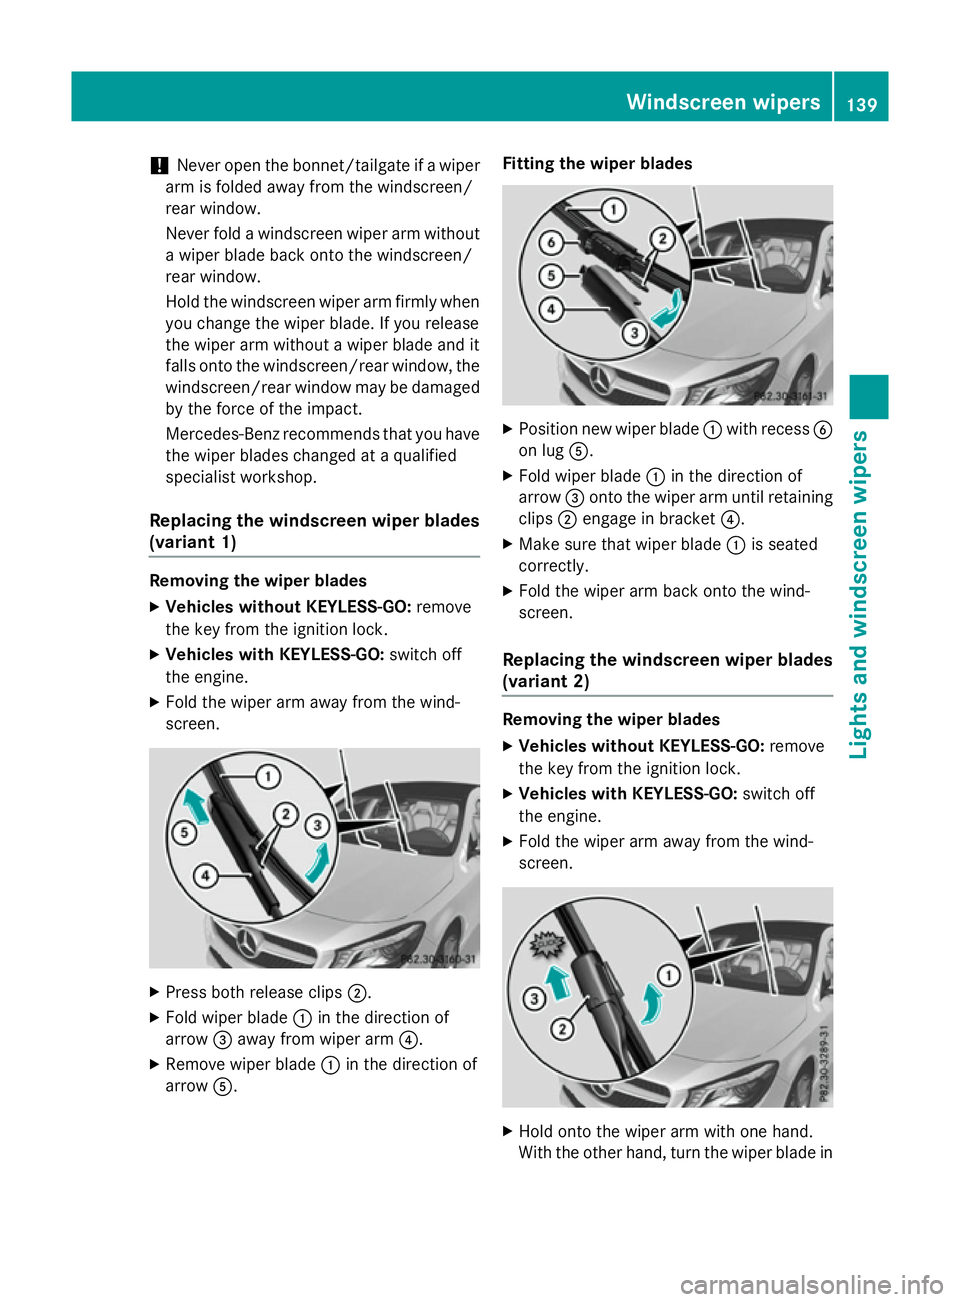
Press both release clips ;.
X Fold wiper blade :in the direction of
arrow =away from wiper arm ?.
X Remove wiper blade :in the direction of
arrow A. Fitting the wiper blades
X
Position new wiper blade :with recess B
on lug A.
X Fold wiper blade :in the direction of
arrow =onto the wiper arm until retaining
clips ;engage in bracket ?.
X Make sure that wiper blade :is seated
correctly.
X Fold the wiper arm back onto the wind-
screen.
Replacing the windscreen wiper blades
(variant 2) Removing the wiper blades
X Vehicles without KEYLESS-GO: remove
the key from the ignition lock.
X Vehicles with KEYLESS-GO: switch off
the engine.
X Fold the wiper arm away from the wind-
screen. X
Hold onto the wiper arm with one hand.
With the other hand, turn the wiper blade in Windscreen wipers
139Lights and windscreen wipers Z
Page 143 of 421
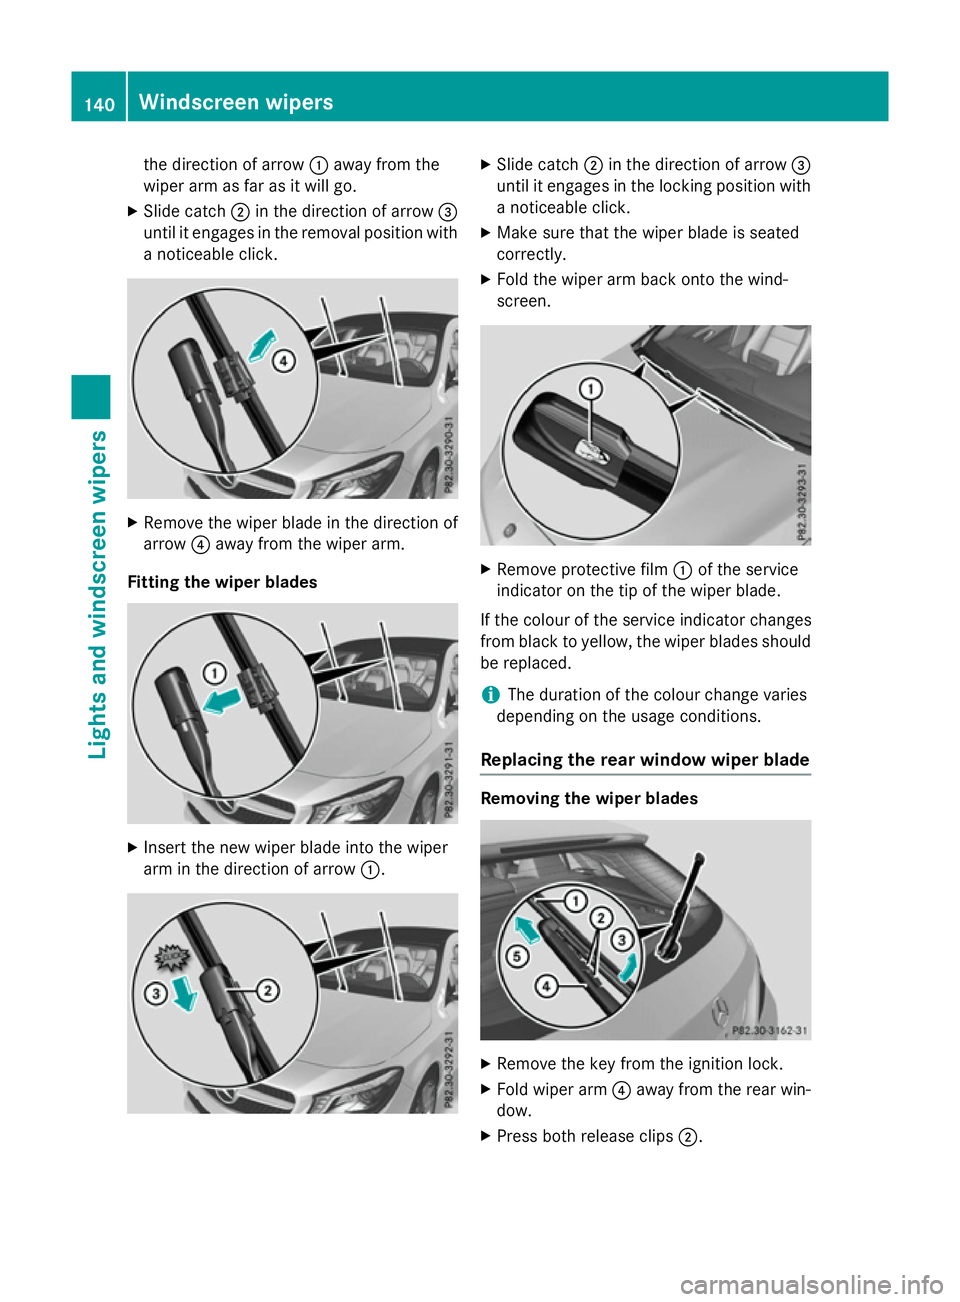
the direction of arrow
:away from the
wiper arm as far as it will go.
X Slide catch ;in the direction of arrow =
until it engages in the removal position with a noticeable click. X
Remove the wiper blade in the direction of
arrow ?away from the wiper arm.
Fitting the wiper blades X
Insert the new wiper blade into the wiper
arm in the direction of arrow :. X
Slide catch ;in the direction of arrow =
until it engages in the locking position with a noticeable click.
X Make sure that the wiper blade is seated
correctly.
X Fold the wiper arm back onto the wind-
screen. X
Remove protective film :of the service
indicator on the tip of the wiper blade.
If the colour of the service indicator changes
from black to yellow, the wiper blades should be replaced.
i The duration of the colour change varies
depending on the usage conditions.
Replacing the rear window wiper blade Removing the wiper blades
X
Remove the key from the ignition lock.
X Fold wiper arm ?away from the rear win-
dow.
X Press both release clips ;.140
Windscreen
wipersLights and windscreen wipers
Page 145 of 421
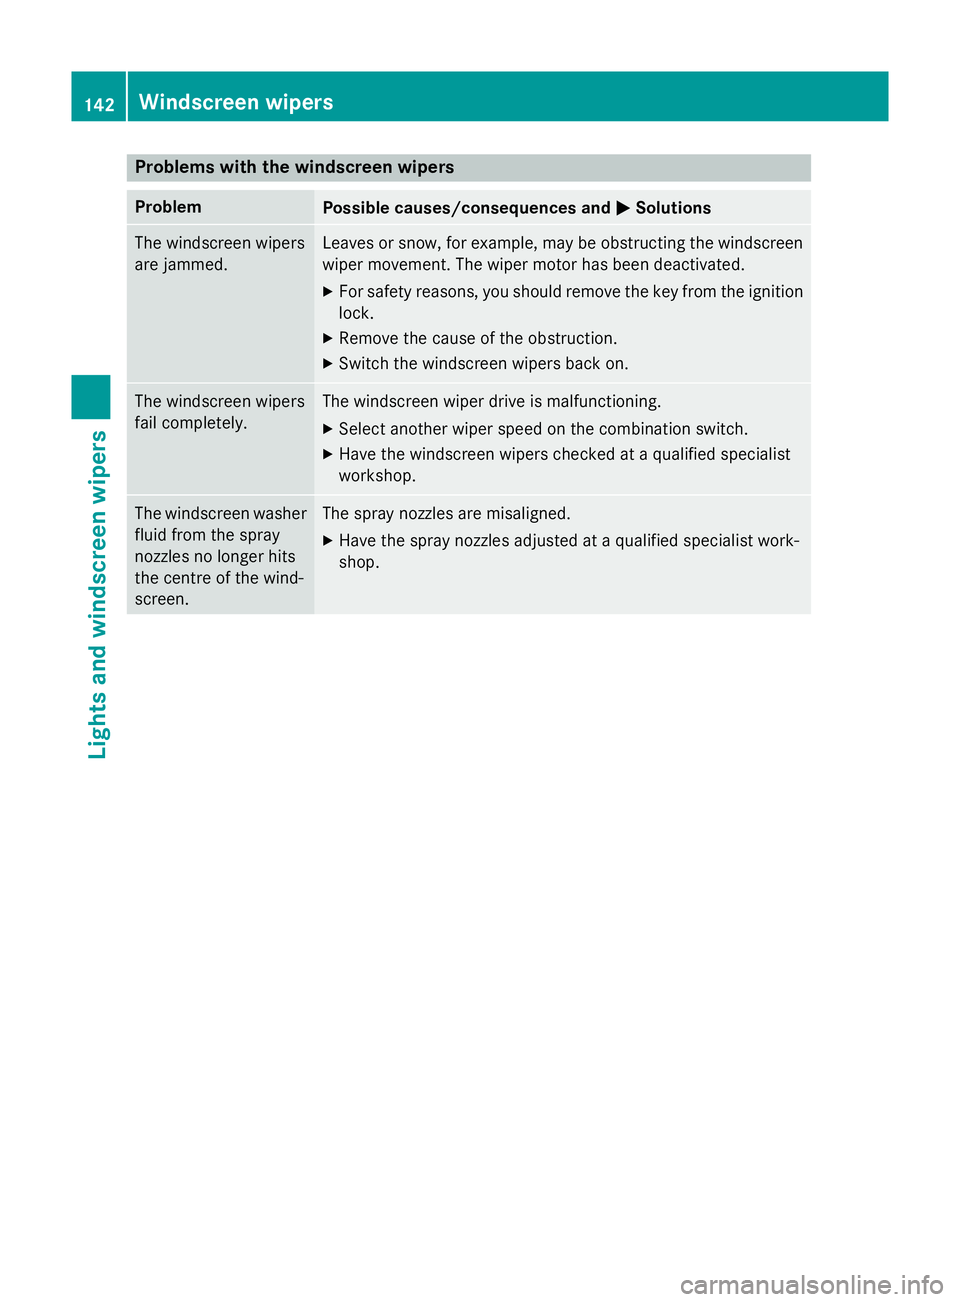
Problems with the windscreen wipers
Problem
Possible causes/consequences and
M
MSolutions The windscreen wipers
are jammed. Leaves or snow, for example, may be obstructing the windscreen
wiper movement. The wiper motor has been deactivated.
X For safety reasons, you should remove the key from the ignition
lock.
X Remove the cause of the obstruction.
X Switch the windscreen wipers back on. The windscreen wipers
fail completely. The windscreen wiper drive is malfunctioning.
X Select another wiper speed on the combination switch.
X Have the windscreen wipers checked at a qualified specialist
workshop. The windscreen washer
fluid from the spray
nozzles no longer hits
the centre of the wind-
screen. The spray nozzles are misaligned.
X Have the spray nozzles adjusted at a qualified specialist work-
shop. 142
Windscreen wipersLights and windscreen wipers
Page 148 of 421
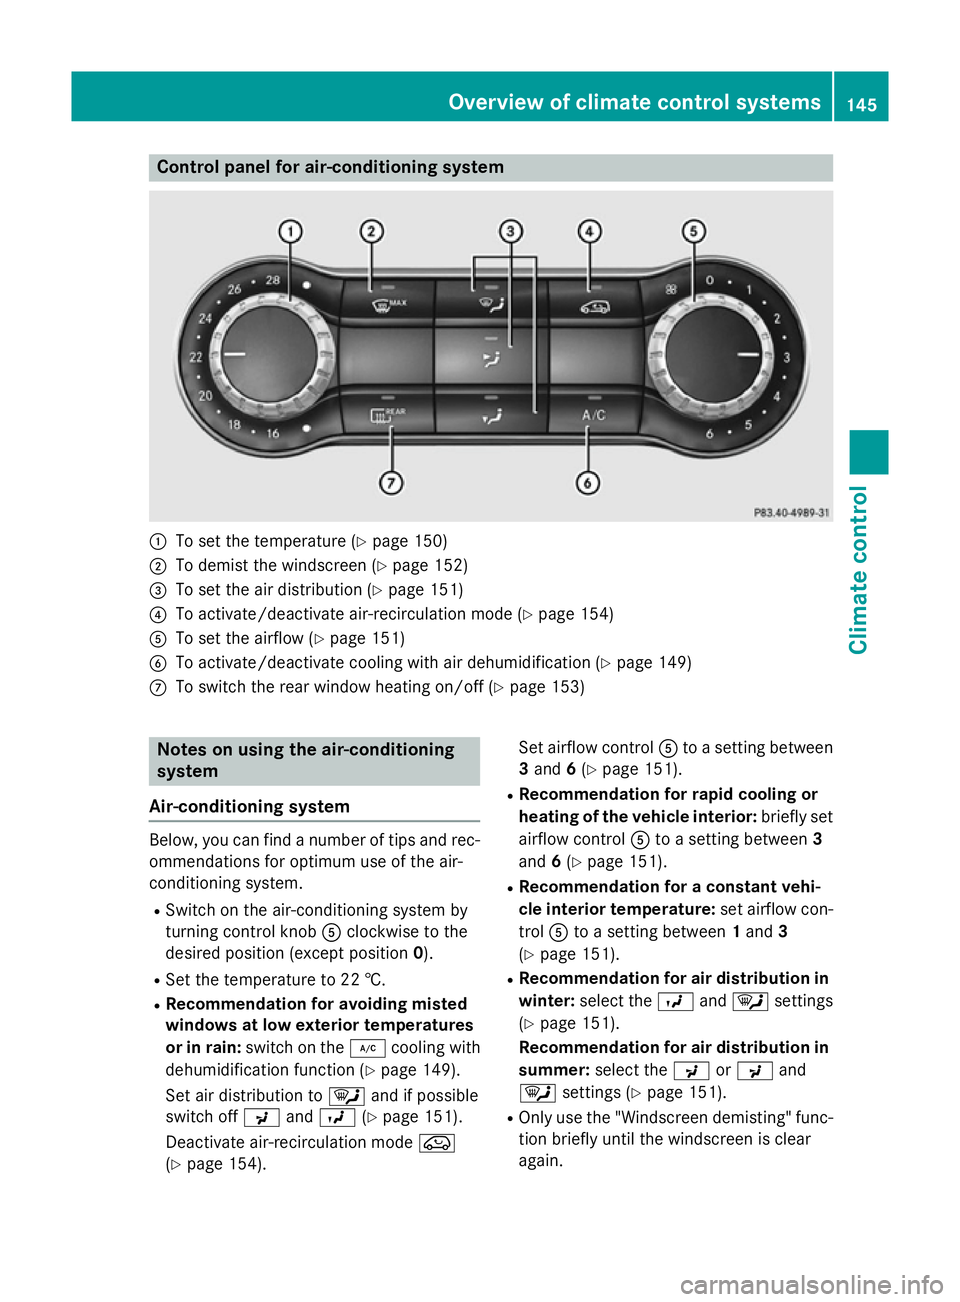
Control panel for air-conditioning system
:
To set the temperature (Y page 150)
; To demist the windscreen (Y page 152)
= To set the air distribution (Y page 151)
? To activate/deactivate air-recirculation mode (Y page 154)
A To set the airflow (Y page 151)
B To activate/deactivate cooling with air dehumidification (Y page 149)
C To switch the rear window heating on/off (Y page 153)Notes on using the air-conditioning
system
Air-conditioning system Below, you can find a number of tips and rec-
ommendations for optimum use of the air-
conditioning system.
R Switch on the air-conditioning system by
turning control knob Aclockwise to the
desired position (except position 0).
R Set the temperature to 22 †.
R Recommendation for avoiding misted
windows at low exterior temperatures
or in rain: switch on the ¿cooling with
dehumidification function (Y page 149).
Set air distribution to ¯and if possible
switch off PandO (Ypage 151).
Deactivate air-recirculation mode e
(Y page 154). Set airflow control
Ato a setting between
3 and 6(Y page 151).
R Recommendation for rapid cooling or
heating of the vehicle interior: briefly set
airflow control Ato a setting between 3
and 6(Y page 151).
R Recommendation for a constant vehi-
cle interior temperature: set airflow con-
trol Ato a setting between 1and 3
(Y page 151).
R Recommendation for air distribution in
winter: select the Oand¯ settings
(Y page 151).
Recommendation for air distribution in
summer: select the PorP and
¯ settings (Y page 151).
R Only use the "Windscreen demisting" func-
tion briefly until the windscreen is clear
again. Overview of climate control systems
145Climate control
Page 151 of 421
R
Use the residual heat function if you want to
heat or ventilate the vehicle interior when
the ignition is switched off. The residual
heat function can only be activated or deac- tivated with the ignition switched off.
R If you change the settings of the climate
control system, the climate status display
appears for approximately three seconds
at the bottom of the screen in the Audio/
COMAND display (see separate operating
instructions). You will see the current set-
tings of the various climate control func-
tions.
DYNAMIC SELECT button (except
Mercedes-AMG vehicles) You can choose between various drive pro-
grams with the DYNAMIC SELECT button
(Y
page 174).
If you have selected drive program E:
R when heating, the electrical heater booster
is deactivated and in the warming-up phase
heat output is reduced
R the rear window heating running time is
reduced
Depending on the configuration, the climate
settings can also be influenced in drive pro-
gram I.
If you have selected drive program Cor S, the
climate settings are not affected.
ECO start/stop function During automatic engine switch-off, the cli-
mate control only operates at a reduced capa-
city. If you require the full climate control out-
put, you can switch off the ECO start/stop
function by pressing the ECO button
(Y page 171). Operating the climate control system
Switching the climate control on/off
General notes When the climate control is switched off, the
air supply and air circulation are also
switched off. The windows could mist up.
Therefore, only switch off climate control
briefly.
Air-conditioning system X
Turn the key to position 2in the ignition
lock (Y page 165).
X To switch on: turn controlAclockwise to
the desired position (except position 0)
(Y page 145).
X To switch off: turn controlAanti-clock-
wise to position 0(Y page 145).
THERMOTRONIC automatic climate
control X
Turn the key to position 2in the ignition
lock (Y page 165).
X To activate: press theÃbutton.
The indicator lamp in the Ãbutton lights
up. Airflow and air distribution are set to
automatic mode.
or X Press the ^button.
The indicator lamp in the ^button goes
out. The previous settings are reactivated.
X To deactivate: press the^button.
The indicator lamp in the ^button lights
up.
i THERMOTRONIC automatic climate con-
trol: switch on climate control primarily
using the Ãbutton. 148
Operating the climate control systemClimate control
Page 153 of 421
Problems with the "Cooling with air dehumidification" function
Problem
Possible causes/consequences and
M
MSolutions The indicator lamp in
the
¿ button
flashes three times or
remains off. The cool-
ing with air dehumidifi-
cation function cannot
be activated. The cooling with air dehumidification function has been deactiva-
ted due to a malfunction.
X Visit a qualified specialist workshop. Setting climate control to automatic
mode
General notes Only THERMOTRONIC automatic climate con-
trol features the "Control climate control
automatically" function.
In automatic mode, the set temperature is
maintained automatically at a constant level.
The system automatically regulates the tem-
perature of the dispensed air, the airflow and
the air distribution.
The automatic mode functions optimally
when the "Cooling with air dehumidification"
function is activated. If desired, cooling with
air dehumidification can be deactivated.
If you deactivate the "Cooling with air-dehu-
midification" function, the air inside the vehi- cle will not be cooled. The air inside the vehi-cle will also not be dehumidified. The win-
dows can mist up more quickly. Therefore,
only deactivate the "Cooling with air-dehu-
midification" function briefly.
Setting climate control to automatic
mode X
Turn the key to position 2in the ignition
lock (Y page 165).
X Set the desired temperature.
X To activate: press theÃbutton.
The indicator lamp in the Ãbutton lights
up. Automatic air distribution and airflow
are activated. X
To switch to manual mode: press the
É orË button.
or
X Press the KorI button.
The indicator lamp in the Ãbutton goes
out. Automatic air distribution and airflow
are deactivated. Setting the temperature
Air-conditioning system You can set the temperature for the entire
vehicle. The set temperature is automatically
maintained at a constant level.
X Turn the key to position 2in the ignition
lock (Y page 165).
X To increase/reduce: turn control:anti-
clockwise or clockwise (Y page 145). Only
change the temperature setting in small
increments. Start at 22 †.
THERMOTRONIC automatic climate
control Different temperatures can be set for the
driver's and front-passenger sides. The set
temperature is automatically maintained at a
constant level.
X Turn the key to position 2in the ignition
lock (Y page 165).
X To increase/reduce: turn control:orE
anti-clockwise or clockwise (Y page 147).150
Operating the climate control systemClimate control
Page 154 of 421
Only change the temperature setting in
small increments. Start at 22 †.
Setting the air distribution
Air-conditioning system Air distribution settings
¯
Directs the airflow through the demis-
ter vents
P Directs the airflow through the centre
and side air vents
O Directs the airflow through the foot-
well air vents
i You can also activate several of the air
distribution settings simultaneously. In
order to do this, press several of the air
distribution buttons. The air is then routed
through different air vents.
i Regardless of the air distribution setting,
airflow is always directed through the side
air vents. The side air vents can only be
closed if the adjusters are turned clockwise until they engage.
Setting the air distribution X Turn the key to position 2in the ignition
lock (Y page 165).
X Press one or more of the P,O,¯
buttons.
The corresponding indicator lamp comes
on.
THERMOTRONIC automatic climate
control Air distribution settings
¯
Directs the airflow through the demis-
ter vents
P Directs the airflow through the centre
and side air vents
O Directs the airflow through the foot-
well air vents S
Directs the airflow through the centre
and side air vents as well as the foot-
well air vents
b Directs the airflow through the centre
and side air vents as well as the demis-
ter vents
a Directs the airflow through the foot-
well and demister vents
_ Directs the airflow through the demis-
ter vents, the centre and side air vents
as well as the footwell air vents
i Regardless of the air distribution setting,
airflow is always directed through the side
air vents. The side air vents can only be
closed if the adjusters are turned clockwise until they engage.
Setting the air distribution
X Turn the key to position 2in the ignition
lock (Y page 165).
X Press the ÉorË button repeatedly
until the desired symbol appears in the dis- play. Setting the airflow
Air-conditioning system X
Turn the key to position 2in the ignition
lock (Y page 165).
X To increase/reduce: turn controlAanti-
clockwise or clockwise (Y page 145).
THERMOTRONIC automatic climate
control X
Turn the key to position 2in the ignition
lock (Y page 165).
X To increase/reduce: press theKor
I button. Switching the ZONE function on/off
This function is only available with
THERMOTRONIC automatic climate control. Operating the climate control system
151Climate control
Page 155 of 421
X
To activate: press theábutton.
The indicator lamp in the ábutton lights
up.
The temperature setting for the driver's
side is not adopted for the front-passenger side.
X To deactivate: press theábutton.
The indicator lamp in the ábutton goes
out.
The temperature setting for the driver's
side is adopted for the front-passenger
side. Demisting the windscreen
General notes You can use this function to defrost the wind-
screen or to demist the inside of the wind-
screen and the side windows.
i You should only select the "Windscreen
demisting" function until the windscreen is clear again.
Switching the "Windscreen demisting"
function on/off X
Turn the key to position 2in the ignition
lock (Y page 165).
X To activate: press the¬button.
The indicator lamp in the ¬button lights
up.
The climate control system switches to the
following functions:
R high airflow
R high temperature
R air distribution to the windscreen and
front side windows
R air-recirculation mode off
i The "Windscreen demisting" function
automatically sets the blower output to the optimum demisting effect. As a result, the
airflow may increase or decrease automat-
ically after the ¬button is pressed. i
You can adjust the blower output man-
ually while the "Windscreen demisting"
function is in operation:
R Air-conditioning system: turn airflow
control Aanti-clockwise or clockwise
(Y page 145).
R THERMOTRONIC automatic climate con-
trol: press the óorô button.
X To deactivate: press the¬button.
The indicator lamp in the ¬button goes
out. The previous settings are reactivated.
Air-recirculation mode remains deactiva-
ted.
or
X THERMOTRONIC automatic climate con-
trol: press the Ãbutton.
The indicator lamp in the ¬button goes
out. Airflow and air distribution are set to
automatic mode.
or
X Air-conditioning system: turn temperature
control :anti-clockwise or clockwise
(Y page 145).
THERMOTRONIC automatic climate con-
trol: turn temperature control :orE anti-
clockwise or clockwise (Y page 147). Demisting the windows
Windows misted up on the inside Air-conditioning system
X Activate the ¿"Cooling with air dehu-
midification" function.
X If the windows continue to mist up, activate
the ¬ "Windscreen demisting" function.
i You should only select this setting until
the windscreen is clear again. 152
Operating the climate control systemClimate control