Page 337 of 385

Where will
Ifind...? Reflective safety jacket
Removing/replacing the reflective
safety jacket The reflective safety jackets are located in the
safety jacket compartments in the stowage
compartments.
X To remove: pullout safety jacket bag :with
the reflective safety jacket by loop ;.
X Open safety jacket bag :and pul lout the
reflective safety jacket.
X To stow: fold the reflective safety jacket, roll
it up and stow it in safety jacket bag :.
X Slid esafety jacket bag :along the lower
edge of the armres tinto the safety jacket
compartment. Meanwhile, ensure that
loop ;hangs out wel lwithi nreach.
i Remove
anew reflective safety jacket from
its packaging material before sliding it into
the safety jacket compartment. The packag-
ing material may otherwise caus eittoslipo ut
or make removing it difficult.
Observe the lega lrequirements for each indi-
vidual country. Notes on the reflective safety jackets :
Maximum numbe rofwashes
; Maximum wash temperature
= Do not bleach
? Do not iron
A Do not use alaundry dryer
B Do not dry-clean
C This is aclass2v est
R The reflective safety jackets meet the require-
ments defined by the lega lstandard only if:
- the correct size is used, and
- the reflective safety jackets are fastened
correctly
R Before use ,ensure that the reflective safety
jackets are clea nand intact. The special prop-
erties may otherwise be compromised.
R The reflective safety jackets should be stored
in their original packaging in adry place away
from sources of hea tand light.
R The maximu mnumberofw ashes specified is
not the only factor influencing the life spa nof
the reflective safety jackets. Thei rlife span
als od epends on use ,care, storage ,etc.
R The reflective safety jackets should be dis-
pose dofa nd replaced with new ones:
- after 15 washes, and/or
- if the reflective strips have become
scratched ,and/or
- if the backing material and/or reflective
strips have become soiled and cannot be
cleaned off, and/or
- the fluorescence of areflective safety vest
has fade de.g. due to the effects of sunlight
R Dispos eofreflective safety jackets in an envi-
ronmentall yresponsibl emanner. To do so,
contact you rloca lwaste disposal company. 334
Where will
Ifind...?Breakdown assistance
Page 338 of 385

Warning triangle
Removing/replacing the warning trian-
gle X
To remove: open the boot lid.
X Pus hwarning triangl eholder :on both sides
in the direction of the arrow and open it.
X Pus hthe retaining lug upwards at the centre
of warning triangle ;and remove warning
triangle ;.
X To replace: place warning triangle ;back
into warning triangl eholder :.
X Close warning triangl eholder :.
Setting up the warning triangle X
Fold legs =out to the side.
X Fold side reflectors ;upwards to form atri-
angl eand lock them at the top using press
stud :. First-aid kit
First-ai
dkit: is in the boot in the left-hand
stowage net.
X Open the boot lid.
X Remove first-ai dkit:.
Check the expiry date on the first-ai dkit at least
once ayear. Replace the contents if necessary,
and replace any missing items. Fire extinguisher
The fire extinguisher is located underneath the
front of the driver's seat.
X Pul ltab : upwards.
X Remove fire extinguisher ;.
Have the fire extinguisher refilled after each use and checked every one or two years. It may oth-
erwise fail in an emergency.
Observe the lega lrequirements for each indi-
vidual country. Where will
Ifind...?
335Breakdown assistance
Page 339 of 385

Vehicl
etoolkit
General notes The towing ey
eislocate dint he stowag ewell
under the boot floor.
On vehicles with MOExtende dtyres (tyres with
run-fla tcharacteristics) the towing ey eisina
bracket under the parcel shelf.
Apart from som ecountry-specifi cvariants, vehi-
cle sare not equipped with tyre-changing tools.
if your vehicl eisequippe dwithat yre-change
tool kit, it is locate dinthe stowag ewellu nder
the boot floor.
Some tool sfor changing awheel are specifi cto
the vehicle. For more informatio nonwhich tyre
changing tool sare required and approved to
perfor mawheelchange on your vehicle, consult
aq uali fied specialist workshop.
Necessary tyre-changing tool scan include, for
example:
R Jack
R Wheel chock
R Wheel wrench
R Ratchet ring spanner
R Centring pin
i The jack weighs approximatel
y2.1 kg.
The maximu mloadb earing capacity of the
jack can be found on the adhesive labe lonthe
jack.
The jack is maintenance-free .Ifthereisa
malfunction, please contact aquali fied spe-
cialist workshop.
Vehicles with aTIREFI Tkit :
Tyre inflation compressor
; Tyre sealant fille rbottle X
Ope nthe boot lid.
X Lif tthe boot floor upwards (Y page 313).
X Use the TIREFIT kit (Y page 338).
i Depending on the powe rclass (LK), the tyre
inflation compressor ha sthe following
weight:
R LK1 –12V /10 A, 120 W: 0.8 kg
R LK2 –12V /15A,1 80W:0.9 kg
The data regarding the power clas s(LK) and/
or electrical data can be found on the rear of
the tyre inflation compressor.
The tyre inflation compressor is maintenance-
free. If there is amalfunction, please contact
aq ualified specialist workshop.
Vehicles with atyre-change tool kit :
Tyre inflation compressor
; Tyre sealant filler bottle
= Whee lwrench
? Folding wheel chock
A Jack
B Towing eye
The tyre-change tool kit is in atray in the stow-
age wel lunde rthe boot floor.
On vehicles with aluminium hub caps, the tyre-
change tool kit also contains asocket. Depend-
ing on the vehicle equipment, this is in the left
stowage net or unde rthe boot floor.
X Open the boot lid.
X Swing the boot floo rupwards (Y page313).
X Use the TIREFIT kit (Y page338).
i Example: equipment and country-specific
variations possible. 336
Where will
Ifind...?Breakdow nassistance
Page 340 of 385

Vehicles with MOExtende
dtyres (tyres
with run-flat characteristics) X
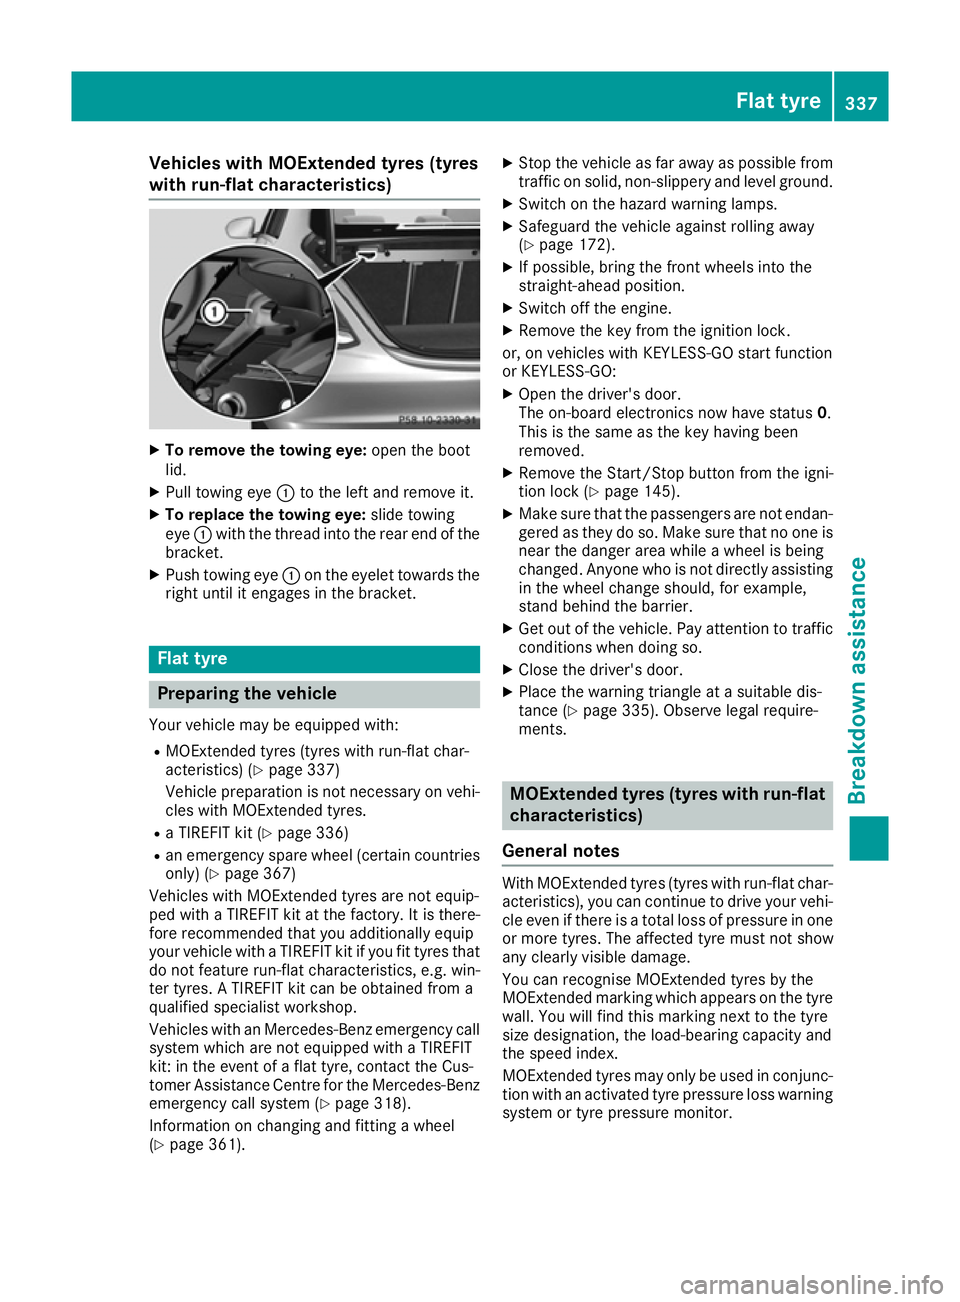
To remove the towin geye: open the boot
lid.
X Pull towing eye :to the left and remove it.
X To replace the towin geye: slidetowing
eye :with the thread into the rea rend of the
bracket.
X Push towing eye :on the eyelet toward sthe
right unti litengages in the bracket. Flat tyre
Preparin
gthe vehicle
Your vehicl emay be equipped with:
R MOExtende dtyres (tyres with run-fla tchar-
acteristics )(Ypage 337)
Vehicl epreparation is not necessary on vehi-
cle sw ithM OExtende dtyres.
R aT IREFIT kit (Y page 336)
R an emergency spare whee l(certai ncountries
only) (Y page 367)
Vehicles with MOExtende dtyres are not equip-
pe dw ithaT IREFIT kit at the factory .Itisthere-
fore recommende dthaty ou additionally equip
your vehicl ewithaT IREFIT kit if yo ufit tyres that
do not feature run-fla tcharacteristics, e.g .win-
ter tyres. ATIREFIT kit can be obtained from a
qualified specialist workshop.
Vehicles with an Mercedes-Benz emergency call
system which are not equipped with aTIREFIT
kit: in the event of aflatt yre, contact the Cus-
tome rAssistance Centre for the Mercedes-Benz
emergency cal lsystem (Y page 318).
Informatio nonchanging and fitting awheel
( Y page 361). X
Stop the vehicl easfar away as possibl efrom
traffic on solid ,non-slippery and level ground.
X Switch on the hazard warning lamps.
X Safeguard the vehicl eagain st rolling away
(Y page 172).
X If possible, bring the front wheels into the
straight-ahea dposition.
X Switch off the engine.
X Remove the key from the ignition lock.
or, on vehicles with KEYLESS-GO start function
or KEYLESS ‑GO:
X Ope nthe driver' sdoor.
The on-board electronics now have status 0.
Thi sist he same as the key having been
removed.
X Remove the Start/Stop button from the igni-
tio nlock( Ypage 145).
X Make sure tha tthe passenger sare not endan-
gered as they do so. Make sure tha tnoone is
nea rthe danger are awhile awheel is being
changed .Anyone wh oisnot directl yassis ting
in the whee lchange should, for example,
stand behind the barrier.
X Ge toutof the vehicle. Pa yattentio ntotraffic
conditions when doing so.
X Close the driver' sdoor.
X Place the warning triangl eatasuitabl edis-
tance (Y page 335). Observe lega lrequire-
ments. MOExtende
dtyres (tyres with run-flat
characteristics)
General notes With MOExtende
dtyres (tyres with run-fla tchar-
acteristics), yo ucan continue to drive your vehi-
cle eve nifthereisat otallos sofp ressure in one
or more tyres. The affecte dtyrem ustn ot show
any clearl yvisible damage.
Yo uc an recognise MOExtende dtyres by the
MOExtende dmarking which appears on the tyre
wall .You will find thi smarking next to the tyre
size designation, the load-bearing capacity and
the speed index.
MOExtende dtyres ma yonlybeu sedinc onjunc-
tio nw ithana ctivate dtyrep ressure loss warning
system or tyr epressure monitor. Flat tyre
337Breakdown assis tance
Page 341 of 385

If
ap ressure loss warning messag eappears
in th emultifunction display:
R observ ethe instruction sinthedisplay mes-
sages (Y page 277)
R check th etyref or damage
R if driving on ,observ ethe followin gnotes
The driving distanc epossible in run-flat mod eis
approximately 80 km when th evehicle is parti-
ally laden and approximately 30 km when the
vehicle is fully laden.
In addition to th evehicle load, th edriving dis-
tance possible depends upon:
R vehicle speed
R road condition
R outside temperature
The driving distanc epossible in run-flat mode
may be reduced by extrem edriving conditions/
manoeuvres ,oritcan be increased throug ha
moderat estyle of driving.
The driving distanc epossible in run-flat mod eis
counte dfromt hemoment th etyrep ressure loss
warning appear sinthemultifunction display.
You must no texceed amaximum spee dof
80 km/h.
When replacin gone or all tyres, observ ethe fol-
lowin gspecifications for your vehicle's tyres:
R size
R thet ype and
R the" MOExtended" mark
If at yreh as gon eflat and canno tbereplaced
with an MOExtended tyre, astandar dtyrem ay
be used as atem porar ymeasure. Mak esure
that you use th eproper siz eand type (summer
or winter tyre).
Vehicle swith MOExtended tyres are no tequip-
ped with aTIREFI Tkit at th efactory. It is there-
for erecommended that you additionally equip
your vehicle with aTIREFI Tkit if you fit tyres that
do no tfeature run-flat characteristics, e.g .win-
te rt yres. ATIREFI Tkit can be obtaine dfroma
qualified specialist workshop.
Important safety notes G
WARNING
When driving in emergency mode, th edriving
characteristic sdeteriorate, e.g .when corner-
ing ,acceleratin gquickly and when braking.
Ther eisar iskofa ccident. Do no
texceed th estate dm aximum speed.
Avoid abrupt steering and driving manoeu-
vres, and driving ove robstacle s(kerbs ,pot-
holes ,off-road). This applies in particular to a
laden vehicle.
Stop driving in emergency mod eif:
R you hear banging noises.
R thev ehicle start stoshake.
R you see smoke and smell rubber.
R ESP ®
is intervening constantly.
R there are tears in th esidewalls of th etyre.
Afte rdriving in emergency mode, have the
wheel rim schecked at aqualified specialist
worksho pwith regard to their further use. The
fault ytyrem ust be replaced. TIREFIT kit
Important safety notes TIREFI
Tisat yres ealant.
You can use TIREFI Ttoseal punctures of up to
4m m,particularly those in th etyret read. You
can use TIREFI Tatoutside temperatures down
to Ò20 †. G
WARNING
In th efollowin gsituations ,the tyres ealan tis
unabl etop rovide sufficient breakdown assis-
tance, as it is unabl etoseal th etyrep roperly:
R there are cut sorpunctures in th etyre
large rtha nt hose mentione dabove.
R thew heel rim is damaged.
R you have driven at ver ylow tyr epressures
or on aflat tyre.
Ther eisar iskofana ccident.
Do no tdrivea ny further. Contac taqualified
specialist workshop. G
WARNING
The tyr esealan tisharmful and causes irrita-
tion. It must no tcom eintoc ontac twith your
skin, eyes or clothing or be swallowed. Do not inhale TIREFI Tfumes. Keep tyr esealan taway
from children. Ther eisariskofi njury. 338
Flat tyreBreakdown assistance
Page 342 of 385

If you come into contact with the tyre sealant,
observe the following:
R Rinse off the tyre sealant from yours kin
immediately with water.
R If the tyre sealant comes into contact with
youre yes,immediately rinse them thor-
oughlyw ith clean water.
R If tyre sealant is swallowed, immediately
rinse yourm outh out thoroughl yand drink
plenty of water. Do not induce vomiting,
and seek medica lattention immediately.
R Immediately change out of clothing which
has come into contact with tyre sealant.
R If an allergic reaction occurs, seek medical
attention immediately.
! Do not operate the tyre inflation compres-
sor for longer than ten minutes at atime with-
out abreak. It may otherwise overheat.
The tyre inflation compressor can be oper-
ated again once it has cooled down.
Complyw ith the manufacturer's safety instruc-
tions on the sticker on the tyre inflation com-
pressor.
Usingt he TIREFITk it X
Do not remove any foreign objects which have
penetrated the tyre, e.g. screws or nails.
X Remove the tyre sealant bottle, the accom-
panying TIREFIT sticker and the tyre inflation
compressor from the stowage space under
the boot floor (Y page 336). X
Affix part :of the TIREFIT sticker to the
instrument cluster within the driver's field of
vision.
X Affix part ;of the TIREFIT sticker near the
valve on the wheel with the defective tyre. X
Remove fillerh oseBand connector =from
the bottom section of tyre inflation compres- sor housing ;.
X Slide the yellow fillerh ose connector into the
mounting on yellow cap Aof tyre sealant
bottle :until the connector engages.
X With the sealing rings in front, slidey ellow cap
A of tyre sealant bottle :into the holderof
tyre inflation compressor ;.The cap must
engage in both hooks. X
Remove the cap from valve Con the faulty
tyre.
X Screw fillerh oseDonto valve C.
X Insert connector =into asocket in yourv ehi-
cle.
Cigarette lighter socket: (Y page 316)
12 Vsocket: (Y page 316) Flat tyre
339Breakdowna ssistance Z
Page 343 of 385

Observe the notes on the cigarette lighter
(Y page 316). Observe the notes on sockets
(Y page 316).
X Turn the key to position 1in the ignition lock
(Y page 145).
X Press on and off switch ?on the tyre inflation
compressor to ON.
The tyre inflation compressor is switched on.
The tyre is inflated.
First, tyre sealant is pumped into the tyre. The pressure may briefly rise to approximately
500 kPa (5 bar/73 psi).
Do not switch off the tyre inflation com-
pressor during this phase.
X Let the tyre inflation compressor run for a
maximum of ten minutes. The tyre should
then have attained apressure of at least
200 kPa (2.0 bar/29 psi).
If ap ressure of 200 kPa (2.0 bar/29 psi) has
been attained after ten minutes, see "Tyre pres- sure reached" (Y page 340).
If at yre pressure of 200 kPa (2.0 bar/29 psi) has
not been attained after ten minutes, see "Tyre
pressure not reached" (Y page 340).
If tyre sealant leaks out, make sure you clean the
affected area as quickly as possible.Itisp ref-
erable to use clear water.
If you get tyre sealant on your clothing, have it
cleaned as soon as possible with perchloroethy- lene.
Tyre pressure not reached If
at yre pressure of 200 kPa (2.0 bar/29 psi) has
not been attained after ten minutes:
X Switch off the tyre inflation compressor.
X Unscrew the filler hose from the valve of the
faulty tyre.
Please note that tyre sealant may leak out
when unscrewing the filler hose.
X Very slowly drive forwards or reverse approx-
imately 10 m.
X Pump up the tyre again.
After amaximum of ten minutes, the tyre
pressure must be at least 200 kPa (2.0 bar/
29 psi). G
WARNING
If the required tyre pressure is not reached
after the specified time, the tyre is too badly
damaged.T he tyre sealant cannot repair the tyre in this instance. Damaged tyres and
atyre
pressure that is too low can significantly
impair the vehicle's braking and driving char-
acteristics. There is arisk of accident.
Do not continue driving. Contact aqualified
specialist workshop.
Tyre pressure reached G
WARNING
At yre temporarily sealed with tyre sealant
impairs the driving characteristics and is not
suitablef or higher speeds. There is arisk of
accident.
You should therefore adapty our driving style
accordingly and drive carefully.Don ot exceed
the specified maximum speed with atyre that
has been repaired using tyre sealant.
The maximum permissibles peed foratyre
sealed with tyre sealant is 80 km/h. The upper
part of the TIREFIT sticker must be affixed to the
instrument cluster where it will be easilys een by
the driver.
! After use, excess tyre sealant may run out of
the filler hose. This could cause stains.
Therefore, place the filler hose in the plastic
bag which contained the TIREFIT kit. H
Environmental note
Have the used tyre sealant bottle disposed of
professionally,e .g. ataqualified specialist
workshop.
If at yre pressure of 200 kPa (2.0 bar/29 psi) has
been attained after ten minutes:
X Switch off the tyre inflation compressor.
X Unscrew the filler hose from the valve of the
faulty tyre.
X Stow the tyre sealant bottle, the tyre inflation
compressor and the warning triangle.
X Pull away immediately.
X Stop after driving for approximately ten
minutes and check the tyre pressure with the
tyre inflation compressor.
The tyre pressure must now be at least
130 kPa (1.3 bar/19 psi). 340
Flat tyreBreakdown assistance
Page 344 of 385

G
WARNING
If the required tyre pressure is not reached
after driving for ashort period, the tyre is too
badly damaged. The tyre sealant cannot
repair the tyre in this instance. Damaged tyres and atyre pressure that is too low can signif-
icantly impair the vehicle's braking and driv-
ing characteristics. There is arisk of accident.
Do not continue driving. Contact aqualified
specialist workshop.
i In yourv
ehicle, you willf indasticker with
the Mercedes-Benz Service24h telephone
number, e.g. on the B-pillar on the driver's
side.
X Correct the tyre pressure if it is still at least
130 kPa (1.3 bar/19 psi) .See the tyre pres-
sure table on the fuel filler flap for values.
X To increase the tyre pressure: switch on
the tyre inflation compressor. X
To reduce the tyre pressure: depress pres-
sure release button :next to pressure
gauge ;.
X When the tyre pressure is correct, unscrew
the filler hose from the valve of the sealed
tyre.
X Screw the valve cap onto the tyre valve of the
sealed tyre. X
To remove the tyre sealant bottle from the
tyre inflation compressor, press together the
locking tabs on the yellow cap.
X Pullt he tyre sealant bottle out of the tyre
inflation compressor.
The filler hose stays on the tyre sealant bottle.
X Drive to the neares tqualified specialist work-
shop and have the tyre changed there.
X Have the tyre sealant bottle and the filler hose
replaced as soon as possible at aqualified
specialist workshop.
X Have the tyre sealant bottle replaced every
four years at aqualified specialist workshop. Battery (vehicle)
12
Vb attery -important safety notes
Work on the battery ,e.g. removing or fitting,
requires specialist knowledge and the use of
special tools. Therefore, alwaysh ave work on
the battery carrie dout at aqualified specialist
workshop. G
WARNING
Work carrie dout incorrectly on the battery
can lead, for example, to ashort circui tand
thus damage the vehicl eelectronics. This can
leadtof unction restrictions applying to
safety-relevant systems ,e.g the lighting sys-
tem, the ABS (anti-lock braking system) or the
ESP ®
(Electronic Stability Program). The oper-
ating safety of yourv ehiclemay be restricted. Battery (vehicle)
341Breakdown assistance
Z