2015 MERCEDES-BENZ C-Class language
[x] Cancel search: languagePage 72 of 214
Set as Intermediate Destination
Set as Intermediate Destination
adds the new destination in addition to the
existing destination and opens the inter-
mediate destinations list.
i The route is calculated using the digital
map data. The calculation time depends on
the distance from the destination, for
example.
The calculated route may differ from the
ideal route, e.g. due to road works or
incomplete map data. Please also refer to
the notes about the digital map
(Y page 96).
Calling up the keyword search
X To select the magnifying glass symbol:
while in the address entry menu, slide
6, turn and then press the controller.
Viewing the vicinity of the destination
X To select symbol 0043: turn the controller and
press to confirm.
You can explore the destination area.
Requirement for exploring a destination:
mbrace must be activated for Internet
access (Y page 136). Keyword search
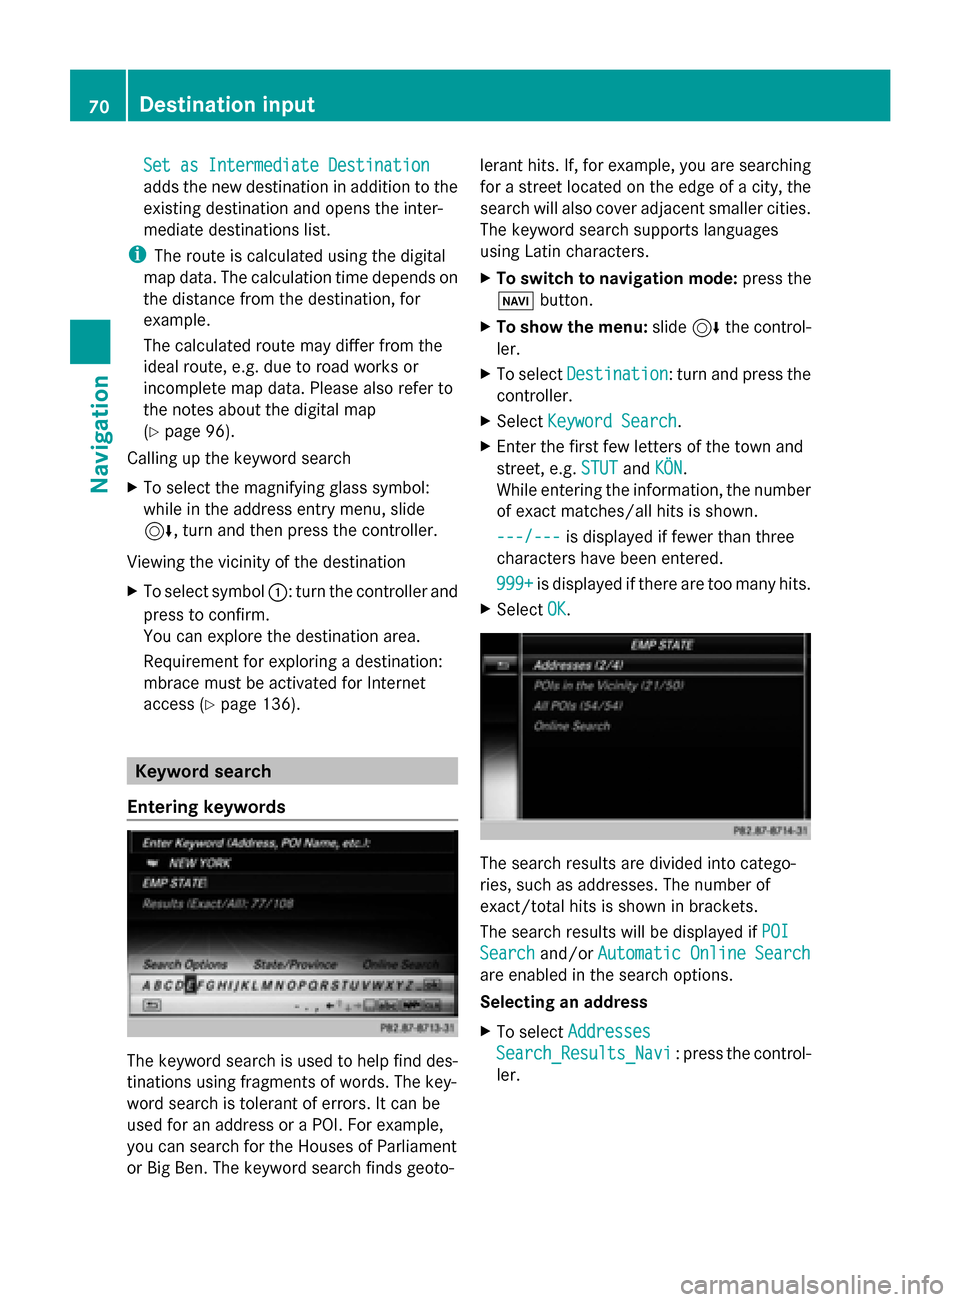
Entering keywords The keyword search is used to help find des-
tinations using fragments of words. The key-
word search is tolerant of errors. It can be
used for an address or a POI. For example,
you can search for the Houses of Parliament
or Big Ben. The keyword search finds geoto- lerant hits. If, for example, you are searching
for a street located on the edge of a city, the
search will also cover adjacent smaller cities.
The keyword search supports languages
using Latin characters.
X
To switch to navigation mode: press the
00BE button.
X To show the menu: slide6the control-
ler.
X To select Destination Destination: turn and press the
controller.
X Select Keyword Search
Keyword Search.
X Enter the first few letters of the town and
street, e.g. STUT STUTandKÖN
KÖN.
While entering the information, the number
of exact matches/all hits is shown.
---/--- ---/--- is displayed if fewer than three
characters have been entered.
999+ 999+ is displayed if there are too many hits.
X Select OK
OK. The search results are divided into catego-
ries, such as addresses. The number of
exact/total hits is shown in brackets.
The search results will be displayed if
POI POI
Search
Search and/orAutomatic Online Search
Automatic Online Search
are enabled in the search options.
Selecting an address
X To select Addresses Addresses
Search_Results_Navi Search_Results_Navi : press the control-
ler. 70
Destination inputNavigation
Page 90 of 214
X
To switch to navigation mode: press the
00BE button.
X To show the menu: slide6the control-
ler.
X To select Traffic
Traffic: turn and press the con-
troller.
X To select Messages On Route
Messages On Route: turn and
press the controller.
The traffic report window appears. Several
traffic reports may be available for the cal-
culated route, marked for example by 1/3.
The report shows the following information:
R State/province, road and display of the
affected direction
R Section of the road to which the traffic
report applies
R Traffic icon and traffic report
X To display the next/previous traffic
report: turn the controller.
X To close the display: press the0038but-
ton.
Displaying all traffic reports X
To switch to navigation mode: press the
00BE button.
X To show the menu: slide6the control-
ler.
X To select Traffic Traffic: turn and press the con-
troller.
X To select All Messages
All Messages: turn and press
the controller.
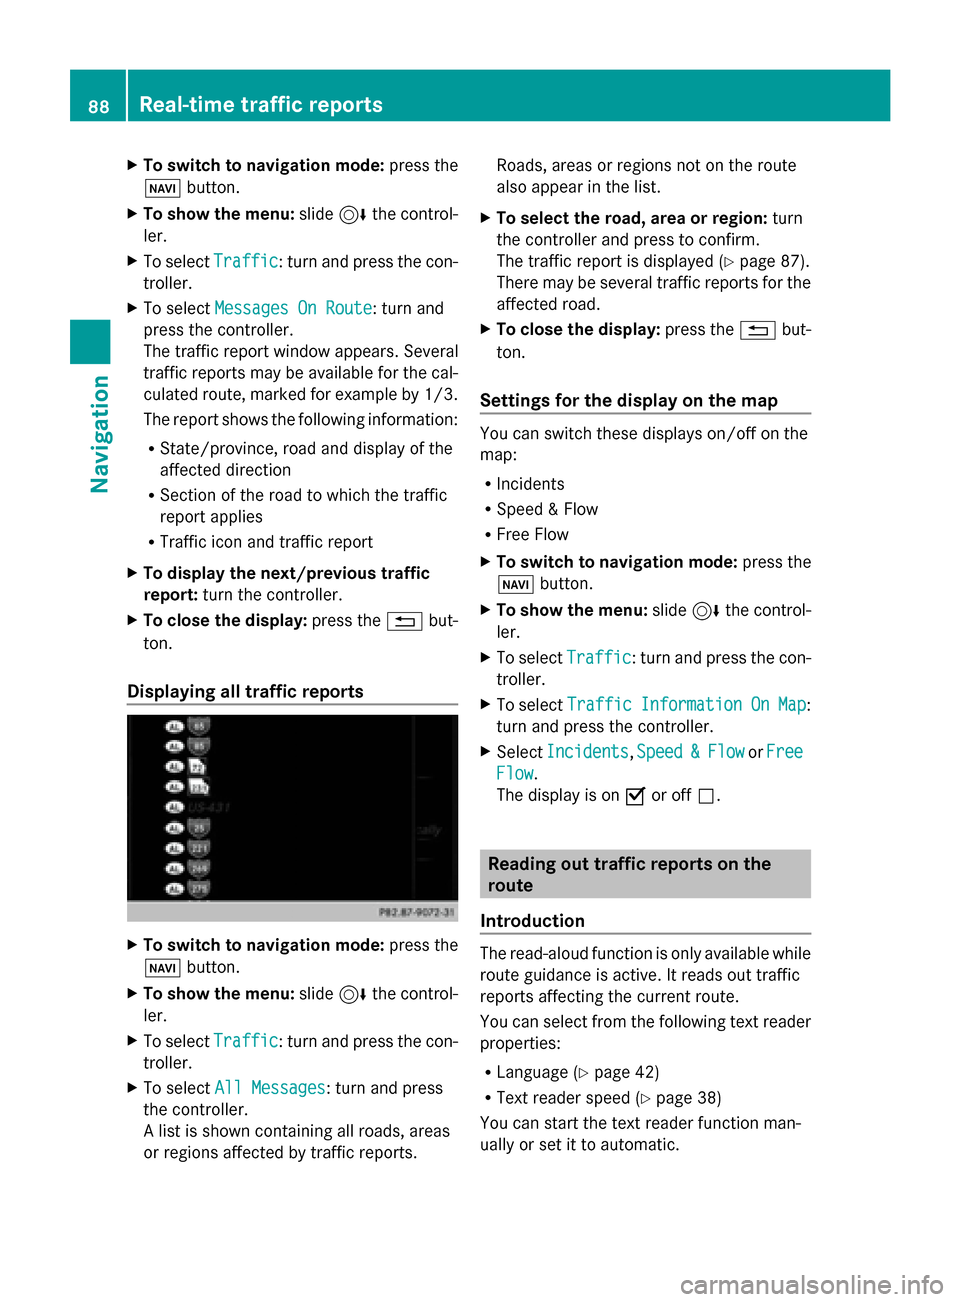
A list is shown containing all roads, areas
or regions affected by traffic reports. Roads, areas or regions not on the route
also appear in the list.
X To select the road, area or region: turn
the controller and press to confirm.
The traffic report is displayed (Y page 87).
There may be several traffic reports for the
affected road.
X To close the display: press the0038but-
ton.
Settings for the display on the map You can switch these displays on/off on the
map:
R
Incidents
R Speed & Flow
R Free Flow
X To switch to navigation mode: press the
00BE button.
X To show the menu: slide6the control-
ler.
X To select Traffic Traffic: turn and press the con-
troller.
X To select Traffic
Traffic Information
Information On
OnMap
Map:
turn and press the controller.
X Select Incidents
Incidents ,Speed
Speed &
&Flow
Flow orFree
Free
Flow
Flow.
The display is on 0073or off 0053. Reading out traffic reports on the
route
Introduction The read-aloud function is only available while
route guidance is active. It reads out traffic
reports affecting the current route.
You can select from the following text reader
properties:
R Language (Y page 42)
R Text reader speed (Y page 38)
You can start the text reader function man-
ually or set it to automatic. 88
Real-time traffic reportsNavigation
Page 108 of 214
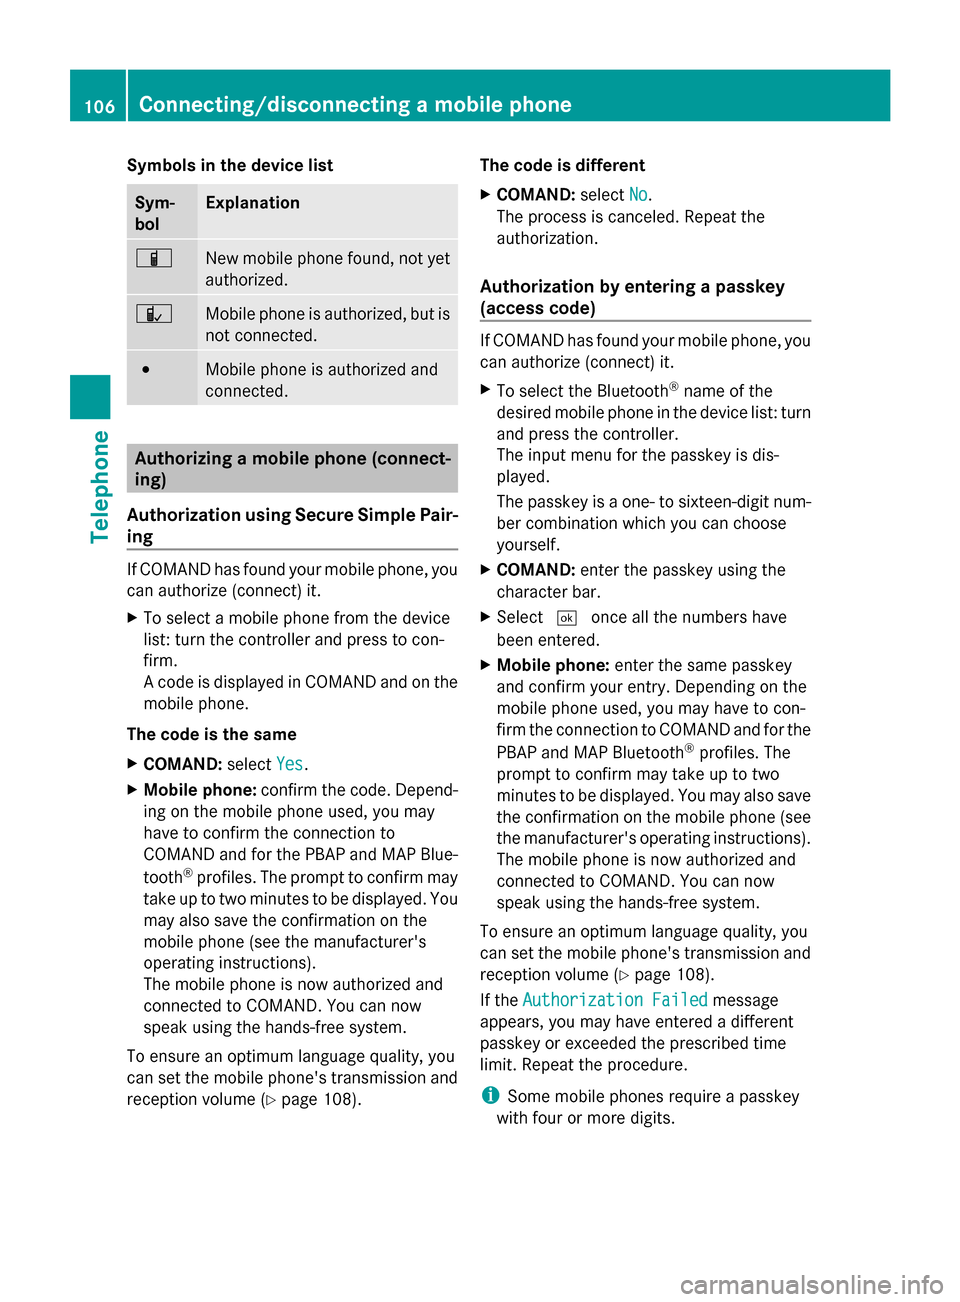
Symbols in the device list
Sym-
bol Explanation
00D3
New mobile phone found, not yet
authorized.
00DC
Mobile phone is authorized, but is
not connected.
0036
Mobile phone is authorized and
connected.
Authorizing a mobile phone (connect-
ing)
Authorization using Secure Simple Pair-
ing If COMAND has found your mobile phone, you
can authorize (connect) it.
X To select a mobile phone from the device
list: turn the controller and press to con-
firm.
A code is displayed in COMAND and on the
mobile phone.
The code is the same
X COMAND: selectYes Yes.
X Mobile phone: confirm the code. Depend-
ing on the mobile phone used, you may
have to confirm the connection to
COMAND and for the PBAP and MAP Blue-
tooth ®
profiles. The prompt to confirm may
take up to two minutes to be displayed. You
may also save the confirmation on the
mobile phone (see the manufacturer's
operating instructions).
The mobile phone is now authorized and
connected to COMAND. You can now
speak using the hands-free system.
To ensure an optimum language quality, you
can set the mobile phone's transmission and
reception volume (Y page 108). The code is different
X
COMAND: selectNo
No.
The process is canceled. Repeat the
authorization.
Authorization by entering a passkey
(access code) If COMAND has found your mobile phone, you
can authorize (connect) it.
X
To select the Bluetooth ®
name of the
desired mobile phone in the device list: turn
and press the controller.
The input menu for the passkey is dis-
played.
The passkey is a one- to sixteen-digit num-
ber combination which you can choose
yourself.
X COMAND: enter the passkey using the
character bar.
X Select 0054once all the numbers have
been entered.
X Mobile phone: enter the same passkey
and confirm your entry. Depending on the
mobile phone used, you may have to con-
firm the connection to COMAND and for the
PBAP and MAP Bluetooth ®
profiles. The
prompt to confirm may take up to two
minutes to be displayed. You may also save
the confirmation on the mobile phone (see
the manufacturer's operating instructions).
The mobile phone is now authorized and
connected to COMAND. You can now
speak using the hands-free system.
To ensure an optimum language quality, you
can set the mobile phone's transmission and
reception volume (Y page 108).
If the Authorization Failed
Authorization Failed message
appears, you may have entered a different
passkey or exceeded the prescribed time
limit. Repeat the procedure.
i Some mobile phones require a passkey
with four or more digits. 106
Connecting/disconnecting a mobile phoneTelephone
Page 109 of 214
i
If you wish to re-authorize the mobile
phone after de-authorizing it, you can
choose another passkey for it. Establishing the connection from the
mobile phone
The Bluetooth ®
device name of COMAND is
"MB Bluetooth".
X COMAND: call up the telephone menu.
X To switch to the menu bar: slide 6the
controller.
X To select Connect Device Connect Device: turn the con-
troller and press to confirm.
The device list is displayed.
X To select Connect via Phone
Connect via Phone: turn and
press the controller.
A message is displayed, stating that you
can start the search on your mobile phone.
X Mobile phone: start the search for a Blue-
tooth ®
device (see manufacturer's operat-
ing instructions).
COMAND is displayed with the name "MB
Bluetooth" in the mobile phone's device
list.
X Select "MB Bluetooth".
A prompt appears in the COMAND display
asking whether the mobile phone should be
authorized.
X COMAND: selectYes
Yes.
If No No is selected, the procedure is canceled.
If your mobile phone supports Secure Sim-
ple Pairing, a code is now displayed on both
devices.
The code is the same
X COMAND: selectYes
Yes.
X Mobile phone: confirm the code. Depend-
ing on the mobile phone used, you may
have to confirm the connection to
COMAND and for the PBAP and MAP Blue-
tooth ®
profiles. The prompt to confirm may
take up to two minutes to be displayed. You
may also save the confirmation on the mobile phone (see the manufacturer's
operating instructions).
The mobile phone is now authorized and
connected to COMAND. You can now
speak using the hands-free system.
To ensure an optimum language quality, you
can set the mobile phone's transmission and
reception volume (Y page 108).
The code is different
X COMAND: selectNo
No.
The process is canceled. Repeat the pro-
cedure.
If your mobile phone does not support Secure
Simple Pairing, an input menu is displayed for
the passkey. The passkey is a one- to sixteen-
digit number combination which you can
choose yourself. Enter the same passkey on
both COMAND and the mobile phone and
confirm. Depending on the mobile phone
used, you may have to confirm the connection
to COMAND and for the PBAP and MAP Blue-
tooth ®
profiles. Reconnecting automatically
COMAND always searches for the last con-
nected mobile phone.
If no connection can be made to the most
recently connected mobile phone, the system
searches for the mobile phone that was con-
nected before that one. Switching between mobile phones
If you have authorized more than one mobile
phone, you can switch between the individual
phones.
X To call up the telephone menu: press the
002B button.
X To show the menu bar: slide 6the con-
troller. Connecting/disconnecting a mobile phone
107Telephone Z
Page 132 of 214
X
To call up the telephone menu: press the
002B button.
X To switch to the menu bar: slide 6the
controller.
X To select 0083: turn and press the controller.
The message menu is displayed.
X To switch to the menu bar: slide 6the
controller.
X To select Folder
Folder: turn and press the con-
troller.
X To select Text Message
Text Message orE-Mail
E-Mail: turn
and press the controller.
The selected folder is displayed.
X To select the message: turn and press the
controller.
The message is displayed.
X To scroll through the message or select
phone numbers in the text: turn the con-
troller.
The display scrolls up or down line by line,
or skips to the next or previous telephone
number and automatically highlights it.
X To return to the list: press 0038.
The following sub-folders can be selected
for text messages and e-mails:
R Inbox
Inbox
This folder contains all the incoming mes-
sages.
R Outbox Outbox
This folder contains all the outgoing mes-
sages.
R Drafts
Drafts
This folder contains all the messages that
you have saved as a draft.
i Folders cannot be selected if they are
empty.
Depending on the mobile phone used, the
sub-folder function may be available. Read-aloud function for messages X
To start the read-aloud function: press the
controller when the message is displayed.
X To select Read Aloud Read Aloud: turn and press the
controller.
COMAND reads out the message.
X To cancel the read-aloud function: press
the 0063 button.
or
X Press the controller, select Cancel Read- Cancel Read-
Aloud Function
Aloud Function and press the controller
again.
You can set the language (Y page 42) and the
speed (Y page 38) of the read-aloud function.
Displaying details and phone numbers COMAND can also show a shortened sender
display in full.
X
To call up the telephone menu: press the
002B button.
X To switch to the menu bar: slide 6the
controller.
X To select 0083: turn and press the controller.
The message menu is displayed.
X To switch to the menu bar: slide 6the
controller.
X To select Folder Folder: turn and press the con-
troller.
X To select Text Message
Text Message orE-Mail
E-Mail: turn
and press the controller.
The selected folder is displayed.
X To highlight the desired message: turn the
controller.
X To select G: slide 9the controller.
X To select Details Details: turn and press the con-
troller.
The detailed view appears.
X To close the detailed display: slide8
the controller.
X To return to the telephone menu: press
the 003D button. 130
Messages (text messages and e-mails)Telephone
Page 194 of 214

General notes
Notes on discs !
Do not affix stickers or labels to the discs.
They could peel off and damage COMAND.
Stickers can cause the disc to bend, which
can result in read errors and disc recogni-
tion problems.
! COMAND is designed to play discs that
comply with the EN 60908 standard. There-
fore, you can only use discs with a maxi-
mum thickness of 1.3 mm.
If you insert thicker discs, e.g. those that
contain data on both sides (DVD on one
side and audio data on the other), they can-
not be ejected and can damage the device.
Only use round discs with a diameter of
12 cm. Do not use discs with a diameter of
8 cm, even with an adapter.
The variety of data media, burners and burn
software means there is no guarantee that
the system will be able to play discs that you
have copied yourself.
DVD playback conditions If video DVDs do not conform to the NTSC or
PAL TV standards, they may create picture,
sound or other problems during playback.
COMAND is capable of playing back video
DVDs produced according to the following
standards:
R Region code 1 or region code 0 (no region
code)
R PAL or NTSC standard
You will generally find the relevant details
either on the DVD itself or on the DVD case.
i If you insert a video DVD with a different
region code, a message to this effect
appears.
i COMAND is set to region code 1 at the
factory. This setting can be changed at an
authorized Mercedes-Benz Center. It is also
possible to play video DVDs with a different
region code, provided that they are pro- duced in accordance with the PAL or NTSC
TV standard. The region code can be
changed up to five times.
Control options There are four control menus available in
video DVD mode.
Most DVDs have their own control menu.
The DVD's control menu is operated directly
using the controller or DVD functions.
Control menu and
function Operation
R
DVD's control
menu
Selection of title,
scene, language,
subtitles ... Operation with the
controller
R
Menu Options Options
Selection of
brightness, con-
trast, color, for-
mat Operation using the
menu bar/options/
video settings
R
Video menu
Selection of
scene, fast
forward/rewind In full-screen mode,
slide
005200C5 the con-
troller R
DVD functions
Selection of title,
scene, language,
subtitles ... In full-screen mode,
press the controller
Function restrictions
Depending on the DVD, certain functions or
actions may not function at all. The symbol
0047
appears in the display. 192
Video DVD modeMedia
Page 196 of 214

DVD functions
X
To select DVD Functions DVD Functions : turn and press
the controller.
A menu appears ( Ypage 195). Video settings
Dynamic image enhancement The
Dynamic Image Enhancement Dynamic Image Enhancement function
automatically matches BrightnessCon‐
BrightnessCon‐
trast
trast andColor
Color to the film being played. X
To activate or deactivate: place or remove
a tick in front of Dynamic
DynamicImage
ImageEnhance‐
Enhance‐
ment
ment.
Manual image enhancement In order to manually adjust the brightness,
contrast and color, the dynamic image
enhancement function must be switched off. X
To select BrightnessContrast
BrightnessContrast orColor
Color:
turn and press the controller.
A sliding menu appears.
X To select the required value: turn the con-
troller.
X To exit the sliding menu: slide 00950052the con-
troller.
X To switch the Automatic Daylight Automatic Daylight
Adjustment
Adjustment on/off: press the controller.
Setting the picture format The following options are available for the
screen format in the DVD playing:
R Auto Auto;
R 16:9
16:9;
R 4:3
4:3 ;
R Zoom
Zoom.
X To set the picture format: turn and press
the controller.
The dot before the menu entry shows the
selected format. DVD's control menu
Most DVDs have their own control menu
which can be operated using the controller.
Showing the DVD's control menu
X To select Menu Menufrom the DVD functions
menu: turn and press the controller.
The DVD functions menu is hidden and the
DVD's menu entries (e.g. scenes, language,
trailers) are displayed.
X To select a menu entry: turn and press the
controller. 194
Video DVD
modeMedia
Page 197 of 214

Video menu
0043
Type of data medium
0044 Current title
0087 Shows the menu bars for the DVD basic
display
0085 Current scene
0083 Track time
Operating the video menu
X To show: in full-screen video mode, slide
00520064 the controller.
X To hide: slide 00970052the controller.
X To select the next/previous scene: turn the
controller to the clockwise/counter-clock-
wise.
X To fast forward/rewind: slide 009500520096and
hold the controller until the desired posi-
tion has been reached.
X To hide the video menu: slide 00970052the con-
troller.
X To show the menu bars for the DVD basic
display: press the controller.
The video menu is hidden and the DVD
basic menu appears. DVD functions
Showing/hiding the DVD functions X
To show DVD functions: in full-screen
video mode, press the controller.
The DVD functions menu is shown. X
To hide: in DVD functions select 0038: turn
and press the controller
X To show the DVD basic display: select
00E2 from the DVD functions: turn and
press the controller.
Overview of DVD functions 0043
Activates DVD control menu
0044 Hides DVD functions
0087 Shows the DVD basic display
0085 Confirms entry in control menu
0083 Navigates DVD lists
0084 Jumps to the start of the scene
006B Displays camera perspectives
006C Shows subtitles
006D Selects language
006E Stop function
006F Pause function
Using the DVD functions X
In full-screen mode, press the controller
The DVD functions menu is shown. Video DVD mode
195Media Z