2015 MERCEDES-BENZ B-Class ELECTRIC heating
[x] Cancel search: heatingPage 11 of 338
ESP
®
(Electronic Stability Pro-
gram)
Activating/deactivating (on-
board computer) ............................ 194
Characteristics ................................ .67
Deactivating/activating (notes )....... 67
Display message ............................ 201
ETS .................................................. 66
Function/note s................................ 66
General notes .................................. 66
Important safety information ........... 66
Warning lamp ................................. 233
ETS (Electronic Traction System) ....... 66
Exhaustive discharging (high-volt-
age battery) ....................................... 288
Exterior lighting
Cleaning ......................................... 275
see Lights
Exterior mirrors
Adjusting ......................................... 94
Dipping (automatic) ......................... 95
Out of position (troubleshooting) ..... 94
Storing settings (memory func-
tion) ................................................. 97
Storing the parking position ............. 95
Eyeglasses compartment ................. 241F
Flat tire MOExtended tire s.......................... 281
Preparing the vehicle ..................... 280
TIREFIT kit ...................................... 282
Floormats ........................................... 265
Folding table ...................................... 242
Front-passenger seat
Folding the backrest forward/
back ............................................... 243
Fuses
Allocation chart ............................. 297
Before changing ............................. 296
Fuse box in the engine compart-
ment .............................................. 296
Fuse box in the front-passenger
footwell .......................................... 297
Important safety notes .................. 296 G
Garage door opener Clearing the memory ..................... 264
General notes ................................ 261
Important safety notes .................. 261
Opening/closing the garage doo r..2 64
Programming (button in the rear-
view mirror) ................................... 262
Synchronizing the rolling code ....... 262
Generated electrical energy (Audio
20) ...................................................... 142
Genuine parts ...................................... 19
Glove box .......................................... .241 H
Hazard warning lamps Display message ............................ 226
Switching on/off ........................... 102
Head restraints
Adjusting ......................................... 90
Adjusting (manually) ........................ 91
Adjusting (rear) ................................ 91
Headlamps
Fogging up ..................................... 104
see Automatic headlamp mode
Heating
see Climate control
High beam flasher ............................. 102
High voltage
see Safety notes
High-beam headlamps
Adaptive Highbeam Assist ............. 103
Changing bulb s.............................. 108
Display message ............................ 215
Switching on/of f........................... 102
High-voltage battery
Battery care ................................... 145
Charging (charging station) ............ 149
Charging (mains socket) ................ 146
Charging cable warming ................ 145
Cruise range .................................. 142
Discharged battery ........................ 141
Display message ............................ 218
Displaying energy consumption
(on-board computer) ...................... 188 Index
9
Page 16 of 338
Reserve
High-voltage battery ...................... 236
Restraint system
Display messag e............................ 210
Introduction ..................................... 40
Warning lamp ................................. 236
Warning lamp (function) ................... 41
Reverse gear
Engaging ........................................ 135
Reversing feature
Side windows ................................... 83
Roadside Assistance (breakdown) .... 21
Roof carrier ........................................ 249
Roof lining and carpets (cleaning
guidelines) ......................................... 278
Roof load (maximum) ........................ 334S
Safety Children in the vehicle ..................... 56
Seat belts
Adjusting the height ......................... 44
center rear-compartment sea t......... 45
Cleaning ......................................... 278
Correct usage .................................. 44
Fastening ......................................... 44
Important safety guidelines ............. 42
Introduction ..................................... 42
Releasing ......................................... 45
Warning lamp ................................. 228
Warning lamp (function) ................... 45
Seats
Adjusting (electrically) ..................... 90
Adjusting (manually) ........................ 90
Adjusting the 4-way lumbar sup-
port .................................................. 91
Adjusting the head restraint ............ 90
Cleaning the cover ......................... 277
Correct driver's seat position ........... 88
Folding the backrest (rear com-
partment) forwards/back .............. 244
Important safety notes .................... 89
Seat heating problem ...................... 93
Storing settings (memory func-
tion) ................................................. 97
Switching seat heating on/of f......... 92
Securing cargo .................................. 245 Selector lever
Cleaning ......................................... 277
see DIRECT SELECT lever
Sensors (cleaning instructions) ....... 275
Service menu (on-board com-
puter) .................................................. 195
Service message
see ASSYST PLUS
Service products
Brake fluid ..................................... 332
Coolant (engine) ............................ 332
Important safety notes .................. 331
Refrigerant (air-conditioning sys-
tem) ............................................... 333
Washer fluid ................................... 333
Setting the air distribution ............... 120
Setting the airflow ............................ 121
Setting the maximum charge cur-
rent (Control system) ........................ 197
Settings
Factory (on-board computer) ......... 199
On-board compute r....................... 195
Side impact air bag ............................. 48
Side marker lamp (display mes-
sage) ................................................... 216
Side windows
Cleaning ......................................... 274
Convenience closing feature ............ 84
Convenience opening feature .......... 84
Important safety information ........... 83
Opening/closing .............................. 84
Problem (malfunction) ..................... 86
Resetting ......................................... 85
Reversing feature ............................. 83
SmartKey
Changing the battery ....................... 75
Changing the programming ............. 74
Checking the battery ....................... 75
Convenience closing feature ............ 84
Convenience opening feature .......... 84
Display message ............................ 226
Door central locking/unlocking ....... 72
Important safety notes .................... 72
KEYLESS-GO start function .............. 74
Loss ................................................. 77
Mechanical key ................................ 74
Positions (ignition lock) ................. 131 14
Index
Page 36 of 338
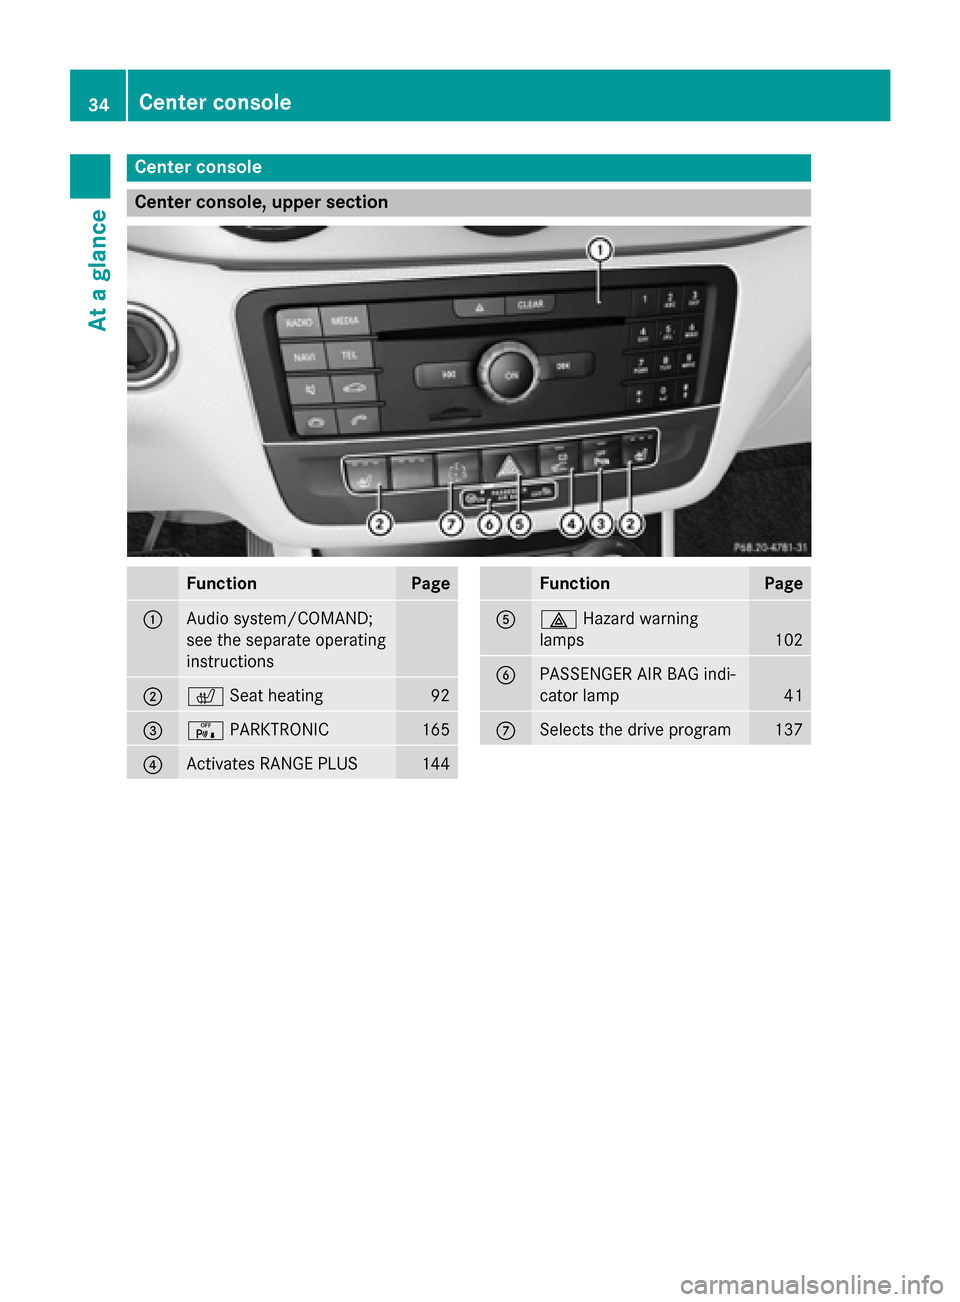
Center console
Center console, upper section
Function Page
:
Audio system/COMAND;
see the separate operating
instructions
;
c
Seat heating 92
=
c
PARKTRONIC 165
?
Activates RANGE PLUS 144 Function Page
A
£
Hazard warning
lamps 102
B
PASSENGER AIR BAG indi-
cator lamp
41
C
Selects the drive program 13734
Center consoleAt a glance
Page 80 of 338
Problem
Possible causes/consequences and
M
MSolutions KEYLESS-GO is malfunctioning.
X Lock/unlock the vehicle using the remote control function of
the SmartKey.
X Have the vehicle and SmartKey checked at a qualified specialist
workshop.
If the vehicle can also not be locked/unlocked using the remote
control function:
X Unlock (Y page 80) or lock (Y page 81) the vehicle using the
mechanical key.
X Have the vehicle and SmartKey checked at a qualified specialist
workshop. The drive system can-
not be started using the
SmartKey. The on-board voltage is too low.
X Switch off non-essential consumers, e.g. seat heating or interior
lighting, and try to start the drive system again.
If this does not work:
X Check the 12 V battery and charge it if necessary (Y page 287).
or
X Check the high-voltage battery and charge it if necessary
(Y page 141).
or
X Jump-start the vehicle (Y page 290).
or
X Consult a qualified specialist workshop. The drive system can-
not be started using the
Start/Stop button. The
SmartKey is in the vehi-
cle. The vehicle is locked.
X Unlock the vehicle and try to start the vehicle again. The SmartKey battery is discharged or nearly discharged.
X Check the SmartKey battery (Y page 75) and replace it if nec-
essary (Y page 75).
If this does not work:
X Start your vehicle with the SmartKey in the ignition lock. There is interference from a powerful source of radio waves.
X Start your vehicle with the SmartKey in the ignition lock. 78
SmartKeyOpening and closing
Page 91 of 338
The seat belt should:
R fit snugly across your body
R be routed across the middle of your
shoulder
R be routed in your pelvic area across the
hip joints
X Before starting off, adjust the rear-view mir-
ror and the exterior mirrors (Y page 94) in
such a way that you have a good view of
road and traffic conditions.
X Vehicles with a memory function: save
the seat and exterior mirror settings
(Y page 96). Seats
Important safety notes
G
WARNING
Children could become trapped if they adjust the seats, particularly when unattended.
There is a risk of injury.
When leaving the vehicle, always take the
SmartKey with you and lock the vehicle. Never leave children unsupervised in the vehicle.
The seats can still be adjusted when there is
no SmartKey in the ignition lock. G
WARNING
When you adjust a seat, you or other vehicle
occupants could become trapped, e.g. on the seat guide rail. There is a risk of injury.
Make sure when adjusting a seat that no one
has any body parts in the sweep of the seat.
Observe the safety notes on "Air bags"
(Y page 46) and "Children in the vehicle"
(Y page 56). G
WARNING
If the driver's seat is not engaged, it could
move unexpectedly while the vehicle is in
motion. This could cause you to lose control of the vehicle. There is a risk of an accident. Always make sure that the driver's seat is
engaged before starting the vehicle.
G
WARNING
You could lose control of your vehicle if you do the following while driving:
R adjust the driver's seat, head restraint,
steering wheel or mirrors
R fasten the seat belt
There is a risk of an accident.
Adjust the driver's seat, head restraint, steer-
ing wheel and mirror and fasten your seat belt before starting the vehicle's drive system. G
WARNING
If you adjust the seat height carelessly, you or other vehicle occupants could be trapped andthereby injured. Children in particular could
accidentally press the electrical seat adjust-
ment buttons and become trapped. There is a
risk of injury.
While moving the seats, make sure that your
hands or other body parts do not get under the
lever assembly of the seat adjustment sys-
tem.
! To avoid damage to the seats and the seat
heating, observe the following information:
R keep liquids from spilling on the seats. If
liquid is spilled on the seats, dry them as soon as possible.
R if the seat covers are damp or wet, do not
switch on the seat heating. The seat
heating should also not be used to dry
the seats.
R clean the seat covers as recommended;
see the "Interior care" section.
R do not transport heavy loads on the
seats. Do not place sharp objects on the seat cushions, e.g. knives, nails or tools.
The seats should only be occupied by
passengers, if possible.
R when the seat heating is in operation, do
not cover the seats with insulating mate- Seats
89Seats, steering wheel and mirrors Z
Page 94 of 338
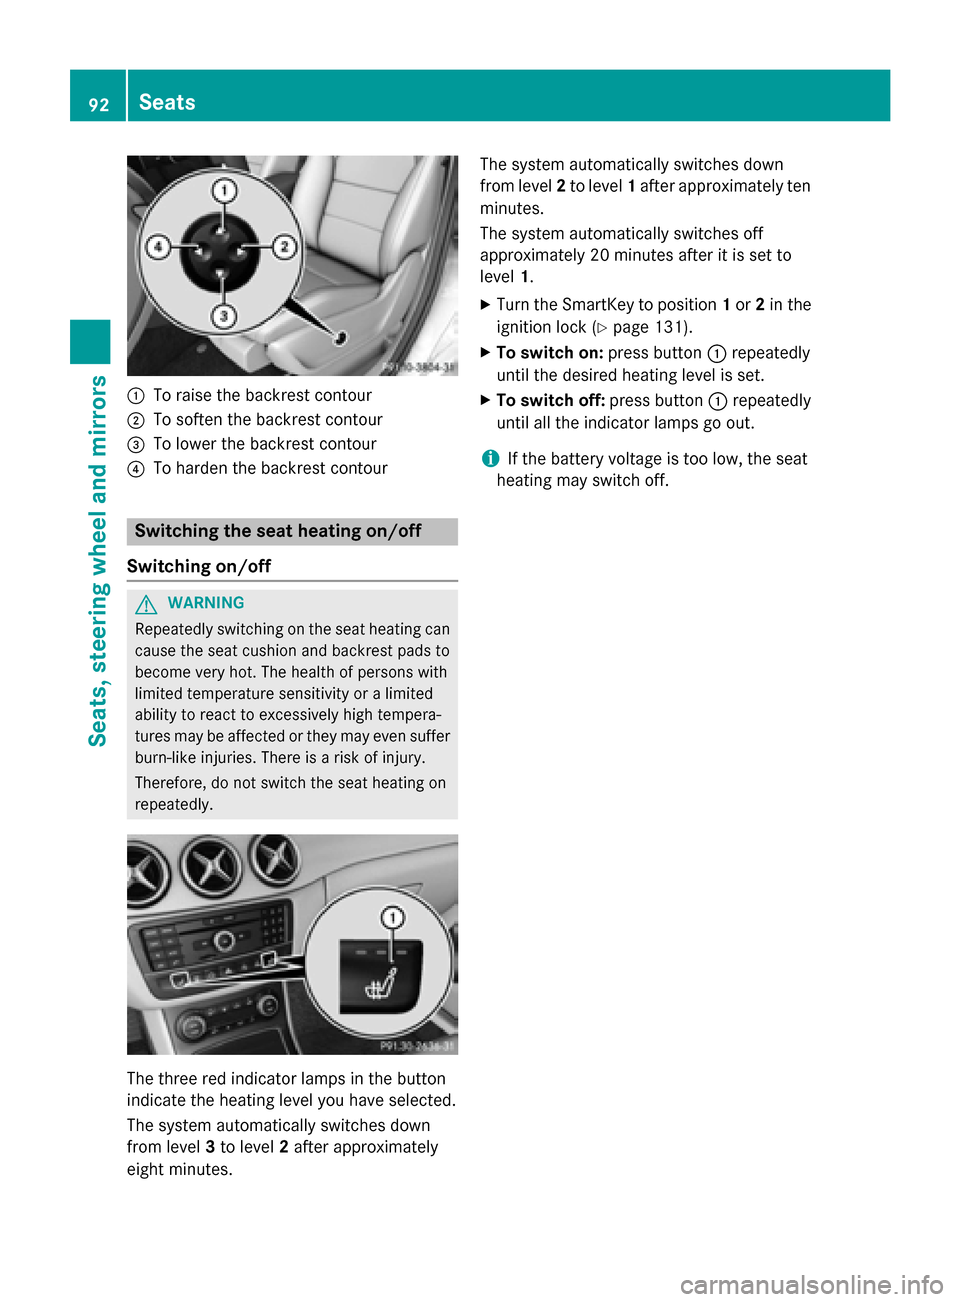
:
To raise the backrest contour
; To soften the backrest contour
= To lower the backrest contour
? To harden the backrest contour Switching the seat heating on/off
Switching on/off G
WARNING
Repeatedly switching on the seat heating can
cause the seat cushion and backrest pads to
become very hot. The health of persons with
limited temperature sensitivity or a limited
ability to react to excessively high tempera-
tures may be affected or they may even suffer burn-like injuries. There is a risk of injury.
Therefore, do not switch the seat heating on
repeatedly. The three red indicator lamps in the button
indicate the heating level you have selected.
The system automatically switches down
from level 3to level 2after approximately
eight minutes. The system automatically switches down
from level
2to level 1after approximately ten
minutes.
The system automatically switches off
approximately 20 minutes after it is set to
level 1.
X Turn the SmartKey to position 1or 2in the
ignition lock (Y page 131).
X To switch on: press button:repeatedly
until the desired heating level is set.
X To switch off: press button:repeatedly
until all the indicator lamps go out.
i If the battery voltage is too low, the seat
heating may switch off. 92
SeatsSeats, steering wheel and mirrors
Page 95 of 338
Problems with the seat heating
Problem
Possible causes/consequences and
M
MSolutions The seat heating has
switched off prema-
turely or cannot be
switched on. The on-board voltage is too low because too many electrical con-
sumers are switched on.
X Switch off electrical consumers that you do not need, such as
the rear window defroster or interior lighting.
Once the battery is sufficiently charged, the seat heating will
switch back on automatically. Steering wheel
Important safety notes
G
WARNING
You could lose control of your vehicle if you do the following while driving:
R adjust the driver's seat, head restraint,
steering wheel or mirrors
R fasten the seat belt
There is a risk of an accident.
Adjust the driver's seat, head restraint, steer-
ing wheel and mirror and fasten your seat belt before starting the vehicle's drive system. G
WARNING
Children could injure themselves if they
adjust the steering wheel. There is a risk of
injury.
When leaving the vehicle, always take the
SmartKey with you and lock the vehicle. Never leave children unsupervised in the vehicle. Adjusting the steering wheel
G
WARNING
If the steering wheel is unlocked while the
vehicle is in motion, it could change position
unexpectedly. This could cause you to lose
control of the vehicle. There is a risk of an
accident. Before starting off, make sure the steering
wheel is locked. Never unlock the steering
wheel while the vehicle is in motion.
:
Release lever
; To adjust the steering wheel height
= To adjust the steering wheel position
(fore-and-aft adjustment)
X Push release lever :down completely.
The steering column is unlocked.
X Adjust the steering wheel to the desired
position.
X Push release lever :up completely.
The steering column is locked.
X Check if the steering column is locked.
When doing so, try to push the steering
wheel up or down or try to move it in the
fore-and-aft direction. Steering wheel
93Seats, steering wheel and mirrors Z
Page 96 of 338
Mirrors
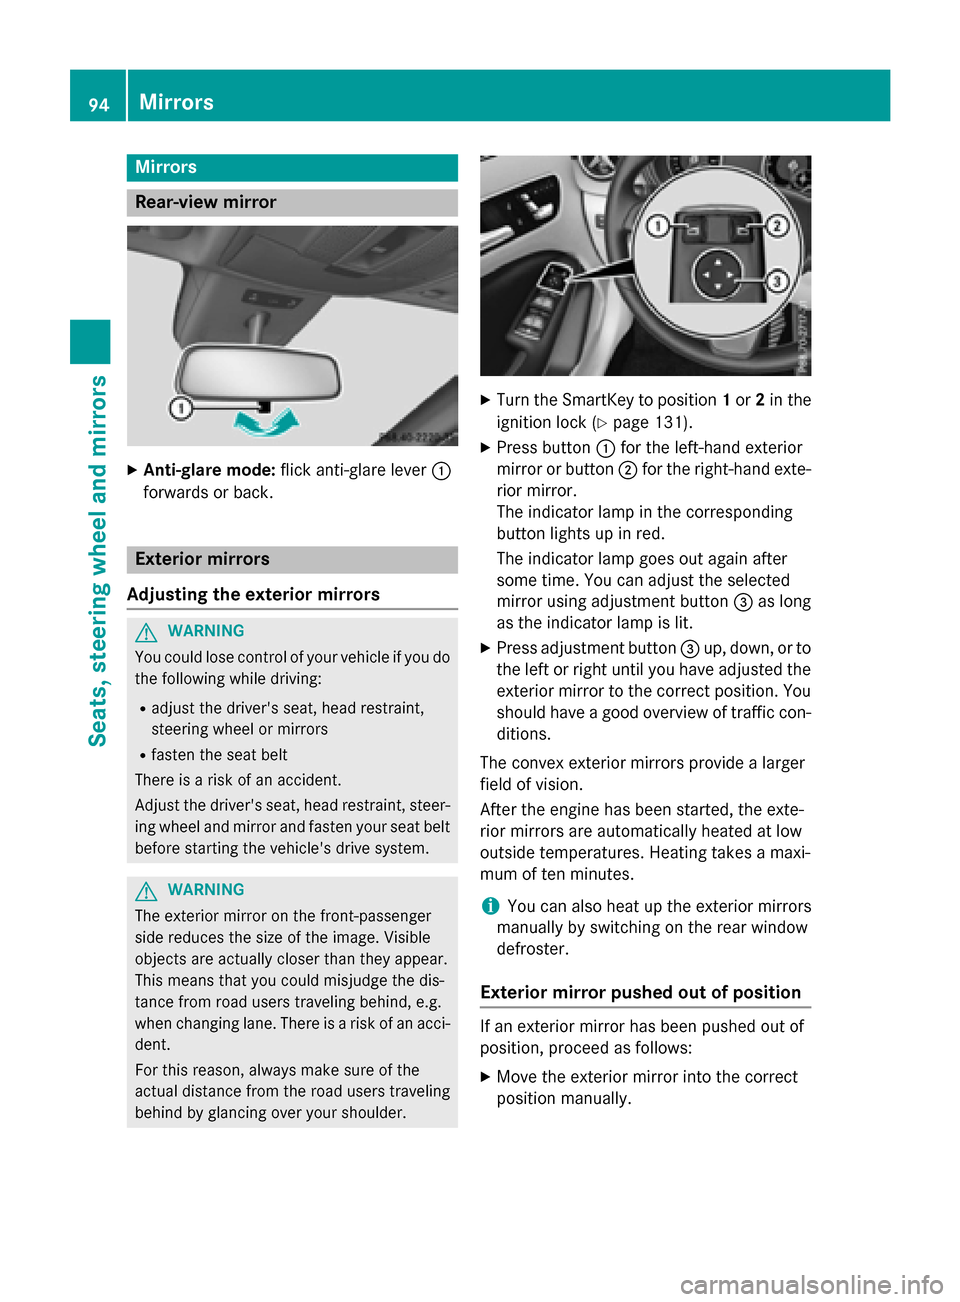
Rear-view mirror
X
Anti-glare mode: flick anti-glare lever :
forwards or back. Exterior mirrors
Adjusting the exterior mirrors G
WARNING
You could lose control of your vehicle if you do the following while driving:
R adjust the driver's seat, head restraint,
steering wheel or mirrors
R fasten the seat belt
There is a risk of an accident.
Adjust the driver's seat, head restraint, steer-
ing wheel and mirror and fasten your seat belt before starting the vehicle's drive system. G
WARNING
The exterior mirror on the front-passenger
side reduces the size of the image. Visible
objects are actually closer than they appear.
This means that you could misjudge the dis-
tance from road users traveling behind, e.g.
when changing lane. There is a risk of an acci-
dent.
For this reason, always make sure of the
actual distance from the road users traveling
behind by glancing over your shoulder. X
Turn the SmartKey to position 1or 2in the
ignition lock (Y page 131).
X Press button :for the left-hand exterior
mirror or button ;for the right-hand exte-
rior mirror.
The indicator lamp in the corresponding
button lights up in red.
The indicator lamp goes out again after
some time. You can adjust the selected
mirror using adjustment button =as long
as the indicator lamp is lit.
X Press adjustment button =up, down, or to
the left or right until you have adjusted the
exterior mirror to the correct position. You
should have a good overview of traffic con- ditions.
The convex exterior mirrors provide a larger
field of vision.
After the engine has been started, the exte-
rior mirrors are automatically heated at low
outside temperatures. Heating takes a maxi-
mum of ten minutes.
i You can also heat up the exterior mirrors
manually by switching on the rear window
defroster.
Exterior mirror pushed out of position If an exterior mirror has been pushed out of
position, proceed as follows:
X Move the exterior mirror into the correct
position manually. 94
MirrorsSeats, steering wheel and mirrors