2015 MERCEDES-BENZ B-Class ELECTRIC steering
[x] Cancel search: steeringPage 174 of 338
X
Drive forwards and back up as prompted by
the PARKTRONIC warning displays, several
times if necessary.
X Stop when PARKTRONIC sounds the con-
tinuous warning tone, if not before.
Once you have exited the parking space com-
pletely, the steering wheel is moved to the
straight-ahead position. You hear a tone and
the Park Assist Finished
Park Assist Finished message
appears in the multifunction display. You will
then have to steer and merge into traffic on
your own. PARKTRONIC is still available. You
can take over the steering, before the vehicle has exited the parking space completely. Thisis useful, for example when you recognize
that it is already possible to pull out of the
parking space.
Canceling Active Parking Assist X
Stop the movement of the multifunction
steering wheel or steer yourself.
Active Parking Assist will be canceled at
once. The Park Assist Canceled Park Assist Canceled mes-
sage appears in the multifunction display.
or
X Press the PARKTRONIC button
(Y page 167).
PARKTRONIC is switched off and Active
Parking Assist is immediately canceled.
The Park Assist Canceled
Park Assist Canceled message
appears in the multifunction display.
Active Parking Assist is canceled automati-
cally if:
R the electric parking brake is engaged
R transmission position Pis selected
R parking using Active Parking Assist is no
longer possible
R you are driving faster than 6 mph (10 km/h)
R a wheel spins, ESP ®
intervenes or fails. The
÷ warning lamp lights up in the instru-
ment cluster
A warning tone sounds. The parking symbol
disappears and the multifunction display shows the
Park Assist Canceled
Park Assist Canceled mes-
sage.
When Active Parking Assist is canceled, you
must steer and brake again yourself.
If a system malfunction occurs, the vehicle is braked to a standstill. To drive on, depress the
accelerator again. Rear view camera
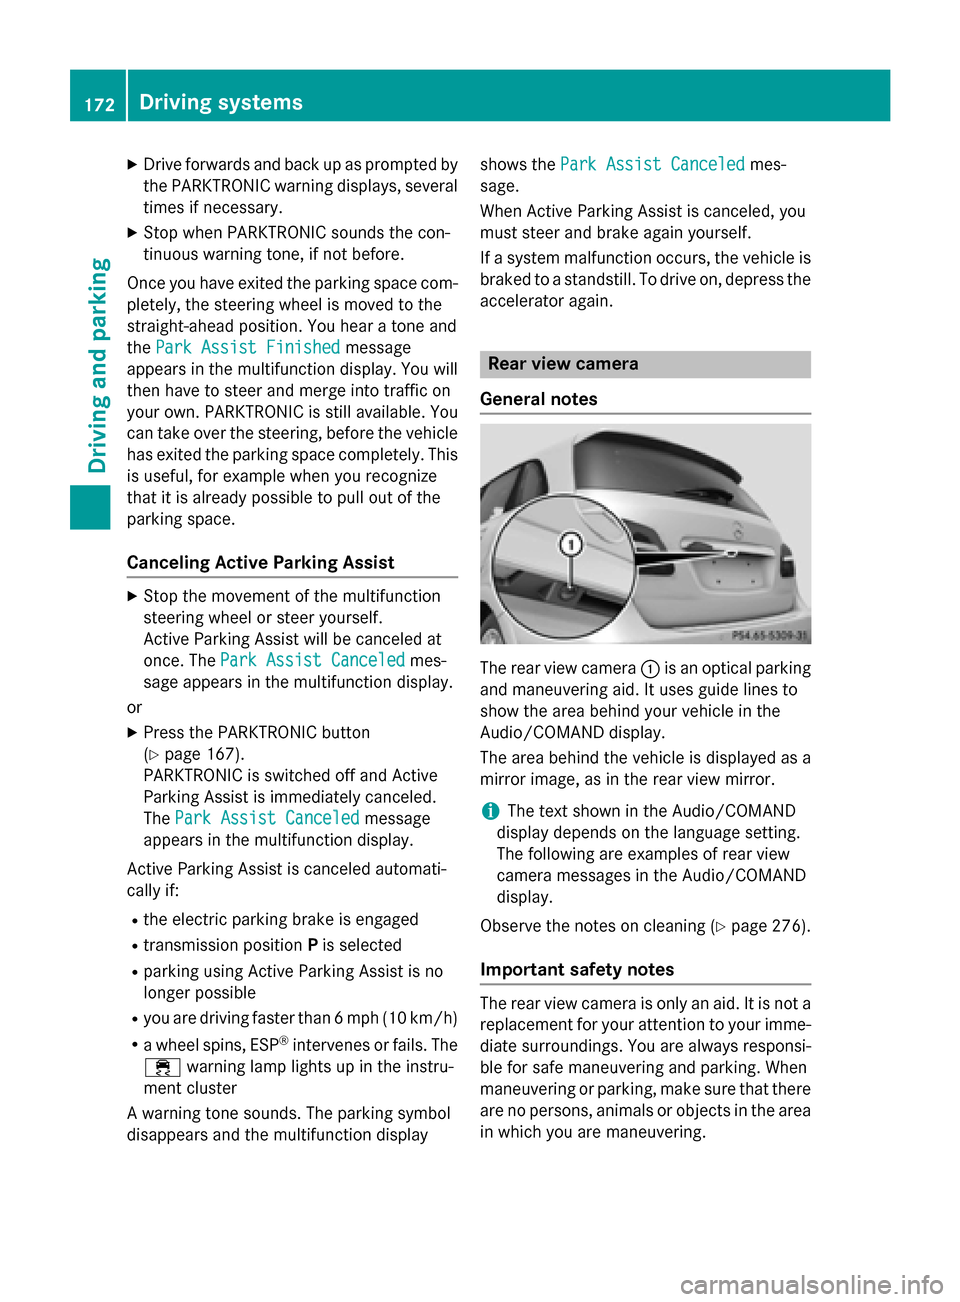
General notes The rear view camera
:is an optical parking
and maneuvering aid. It uses guide lines to
show the area behind your vehicle in the
Audio/COMAND display.
The area behind the vehicle is displayed as a
mirror image, as in the rear view mirror.
i The text shown in the Audio/COMAND
display depends on the language setting.
The following are examples of rear view
camera messages in the Audio/COMAND
display.
Observe the notes on cleaning (Y page 276).
Important safety notes The rear view camera is only an aid. It is not a
replacement for your attention to your imme-
diate surroundings. You are always responsi-
ble for safe maneuvering and parking. When
maneuvering or parking, make sure that there are no persons, animals or objects in the area in which you are maneuvering. 172
Driving systemsDriving an
d parking
Page 175 of 338
Under the following circumstances, the rear
view camera will not function, or will function
in a limited manner:
R if the trunk lid is open
R in heavy rain, snow or fog
R at night or in very dark places
R if the camera is exposed to very bright light
R if the area is lit by fluorescent bulbs or LED
lighting (the display may flicker)
R if there is a sudden change in temperature,
e.g. when driving into a heated garage in
winter
R if the camera lens is dirty or obstructed.
Observe the notes on cleaning
(Y page 276)
R if the rear of your vehicle is damaged. In this
event, have the camera position and setting checked at a qualified specialist workshop
The field of vision and other functions of the
rear view camera may be restricted due to
additional accessories on the rear of the vehi-
cle (e.g. license plate holder, bicycle rack).
Activating/deactivating the rear view
camera X
To activate: make sure that the key is in
position 2in the ignition lock.
X Make sure that the Activation by R Activation by R
gear
gear function is selected in Audio 20/
COMAND; see the Digital Operator's Man-
ual.
X Engage reverse gear.
The area behind the vehicle is shown with
guide lines in the Audio 20/COMAND dis-
play.
The image from the rear view camera is
available throughout the maneuvering
process.
To deactivate: the rear view camera deacti-
vates if you shift the transmission to Por after
driving forwards a short distance. Displays in the Audio 20/COMAND dis-
play The rear view camera may show a distorted
view of obstacles, show them incorrectly or
not at all. The rear view camera does not show
objects in the following positions:
R very close to the rear bumper
R under the rear bumper
R in the area immediately above the tailgate
handle
! Objects not at ground level may appear to
be further away than they actually are, e.g.:
R the bumper of a parked vehicle
R the drawbar of a trailer
R the ball coupling of a trailer tow hitch
R the rear section of an HGV
R a slanted post
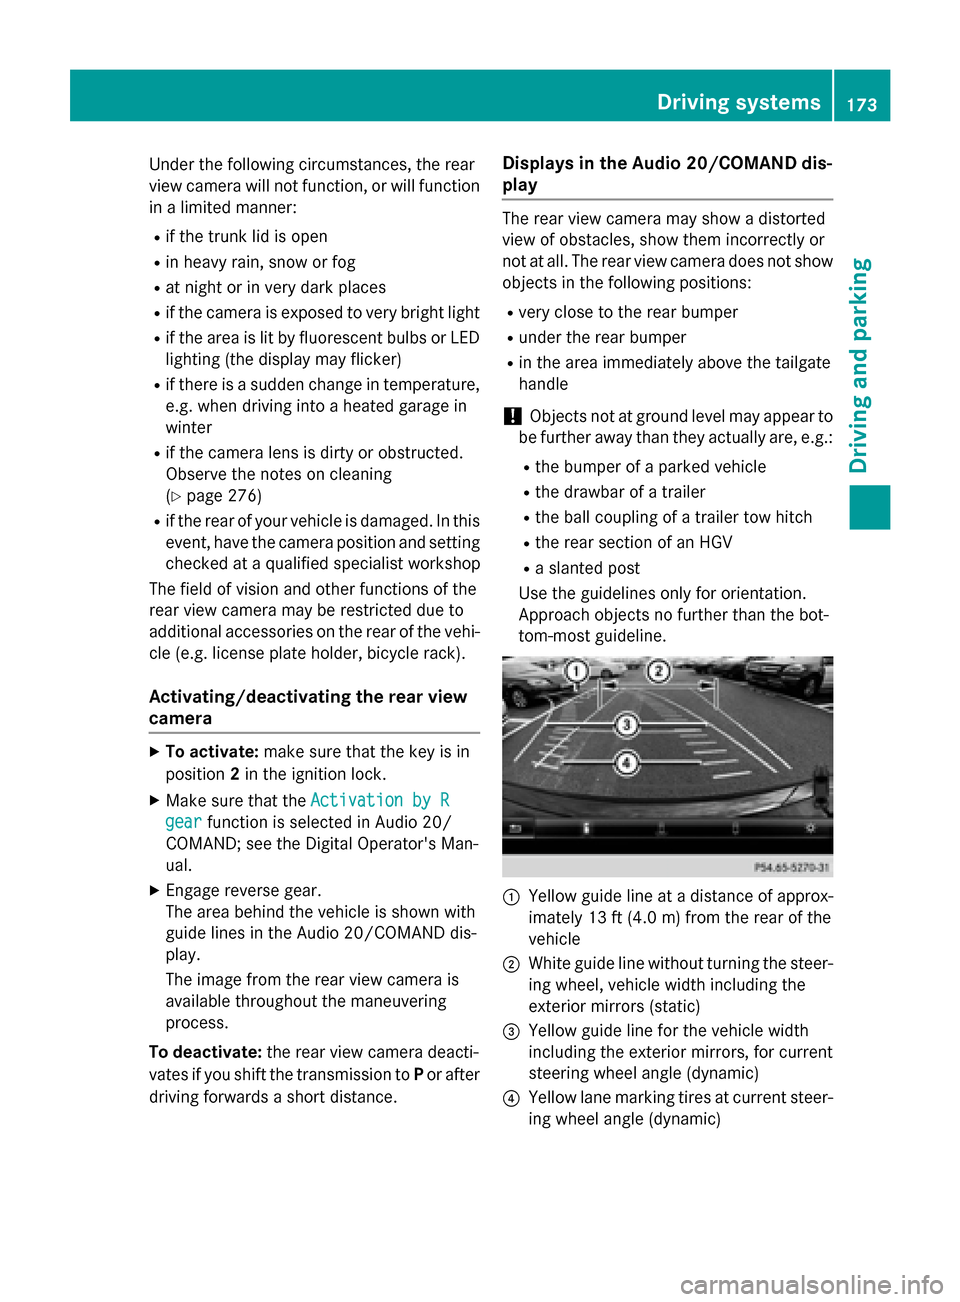
Use the guidelines only for orientation.
Approach objects no further than the bot-
tom-most guideline. :
Yellow guide line at a distance of approx-
imately 13 ft (4.0 m) from the rear of the
vehicle
; White guide line without turning the steer-
ing wheel, vehicle width including the
exterior mirrors (static)
= Yellow guide line for the vehicle width
including the exterior mirrors, for current
steering wheel angle (dynamic)
? Yellow lane marking tires at current steer-
ing wheel angle (dynamic) Driving systems
173Driving and parking Z
Page 176 of 338
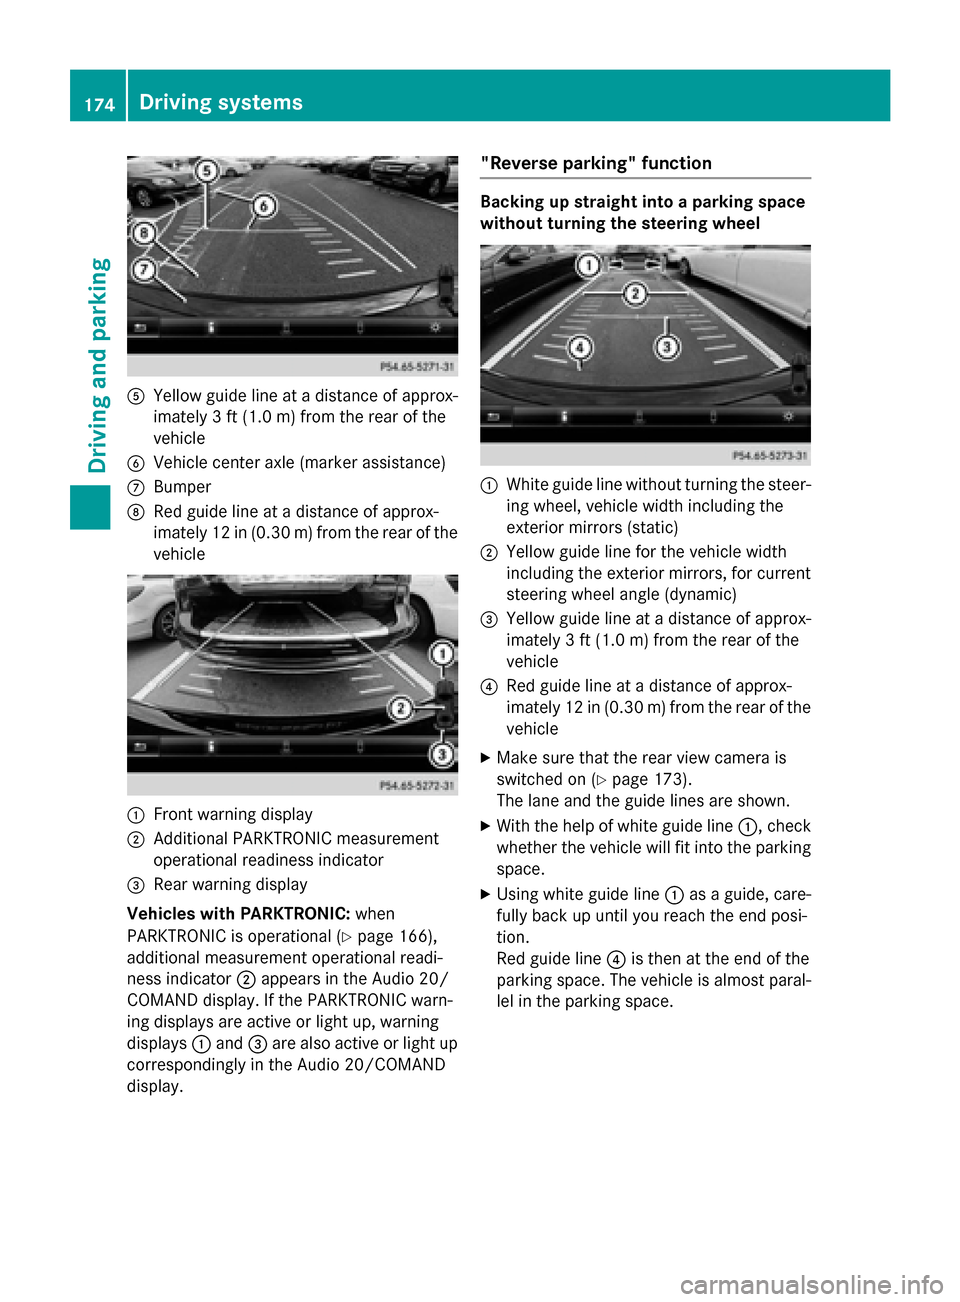
A
Yellow guide line at a distance of approx-
imately 3 ft (1.0 m) from the rear of the
vehicle
B Vehicle center axle (marker assistance)
C Bumper
D Red guide line at a distance of approx-
imately 12 in (0.30 m) from the rear of the
vehicle :
Front warning display
; Additional PARKTRONIC measurement
operational readiness indicator
= Rear warning display
Vehicles with PARKTRONIC: when
PARKTRONIC is operational (Y page 166),
additional measurement operational readi-
ness indicator ;appears in the Audio 20/
COMAND display. If the PARKTRONIC warn-
ing displays are active or light up, warning
displays :and =are also active or light up
correspondingly in the Audio 20/COMAND
display. "Reverse parking" function Backing up straight into a parking space
without turning the steering wheel
:
White guide line without turning the steer-
ing wheel, vehicle width including the
exterior mirrors (static)
; Yellow guide line for the vehicle width
including the exterior mirrors, for current
steering wheel angle (dynamic)
= Yellow guide line at a distance of approx-
imately 3 ft (1.0 m) from the rear of the
vehicle
? Red guide line at a distance of approx-
imately 12 in (0.30 m) from the rear of the
vehicle
X Make sure that the rear view camera is
switched on (Y page 173).
The lane and the guide lines are shown.
X With the help of white guide line :, check
whether the vehicle will fit into the parking space.
X Using white guide line :as a guide, care-
fully back up until you reach the end posi-
tion.
Red guide line ?is then at the end of the
parking space. The vehicle is almost paral-
lel in the parking space. 174
Driving systemsDriving and parking
Page 177 of 338
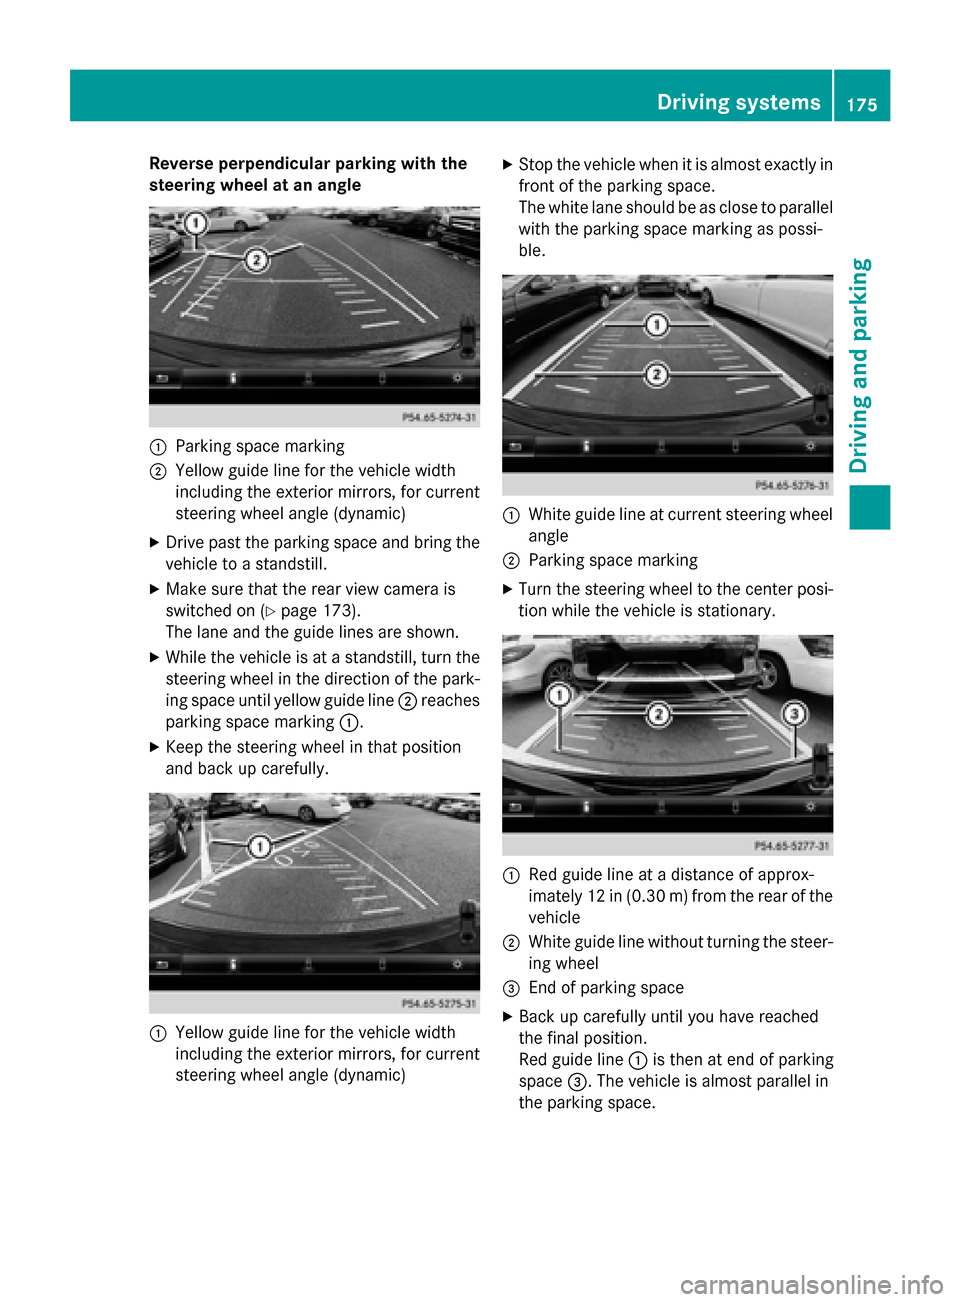
Reverse perpendicular parking with the
steering wheel at an angle :
Parking space marking
; Yellow guide line for the vehicle width
including the exterior mirrors, for current
steering wheel angle (dynamic)
X Drive past the parking space and bring the
vehicle to a standstill.
X Make sure that the rear view camera is
switched on (Y page 173).
The lane and the guide lines are shown.
X While the vehicle is at a standstill, turn the
steering wheel in the direction of the park-ing space until yellow guide line ;reaches
parking space marking :.
X Keep the steering wheel in that position
and back up carefully. :
Yellow guide line for the vehicle width
including the exterior mirrors, for current
steering wheel angle (dynamic) X
Stop the vehicle when it is almost exactly in
front of the parking space.
The white lane should be as close to parallel
with the parking space marking as possi-
ble. :
White guide line at current steering wheel
angle
; Parking space marking
X Turn the steering wheel to the center posi-
tion while the vehicle is stationary. :
Red guide line at a distance of approx-
imately 12 in (0.30 m) fromthe rear of the
vehicle
; White guide line without turning the steer-
ing wheel
= End of parking space
X Back up carefully until you have reached
the final position.
Red guide line :is then at end of parking
space =. The vehicle is almost parallel in
the parking space. Driving systems
175Driving and parking Z
Page 179 of 338

The following information is displayed:
R length of the journey since the last break.
R the attention level determined by ATTEN-
TION ASSIST ( Attention Level
Attention Level), dis-
played in a bar display in five levels from
high to low
R If ATTENTION ASSIST is unable to calculate
the attention level and cannot issue a warn-
ing, the System Suspended System Suspended message
appears. The bar display then changes the
display, e.g. if you are driving at a speed
below 37 mph (60 km/h) or above 124 mph
(200 km/h).
Activating ATTENTION ASSIST X
Activate ATTENTION ASSIST using the on-
board computer (Y page 194).
The system determines the attention level
of the driver depending on the setting
selected:
Selection Standard
Standard: the sensitivity with
which the system determines the attention
level is set to normal.
Selection Sensitive Sensitive: the sensitivity is set
higher. The attention level detected by Atten- tion Assist is adapted accordingly and the
driver is warned earlier.
When ATTENTION ASSIST is deactivated, the é symbol appears in the multifunction
display in the assistance graphic display.
When ATTENTION ASSIST has been deactiva-
ted, it is automatically reactivated after the
engine has been stopped. The sensitivity
selected corresponds to the last selection
activated (standard/sensitive).
Warning in the multifunction display If fatigue or increasing lapses in concentra-
tion are detected, a warning appears in the
multifunction display:
ATTENTION ASSIST ATTENTION ASSIST
Take a Break! Take a Break!.
In addition to the message shown in the mul-
tifunction display, you will then hear a warn-
ing tone. X
If necessary, take a break.
X Confirm the message by pressing the a
button on the steering wheel.
On long journeys, take regular breaks in good
time to allow yourself to rest properly. If you
do not take a break and ATTENTION ASSIST
still detects increasing lapses in concentra-
tion, you will be warned again after
15 minutes at the earliest. This will only hap-
pen if ATTENTION ASSIST still detects typical indicators of fatigue or increasing lapses in
concentration.
If a warning is output in the multifunction dis-
play, a service station search is performed in
COMAND. You can select a service station
and navigation to this service station will then
begin. This function can be activated and
deactivated in COMAND. Blind Spot Assist
General notes Blind Spot Assist monitors the areas on either
side of the vehicle that are not visible to the
driver with two lateral, rear-facing radar sen-
sors. A warning display in the exterior mirrors draws your attention to vehicles detected in
the monitored area. If you then switch on thecorresponding turn signal to change lanes,
you will also receive a visual and audible col-
lision warning.
Blind Spot Assist supports you from a speed
of approximately 20 mph (30 km/h).
Important safety notes G
WARNING
Blind Spot Assist does not react to:
R vehicles overtaken too closely on the side,
placing them in the blind spot area
R vehicles which approach with a large speed
differential and overtake your vehicle
As a result, Blind Spot Assist may not give
warnings in such situations. There is a risk of an accident. Driving systems
177Driving and parking
Z
Page 187 of 338
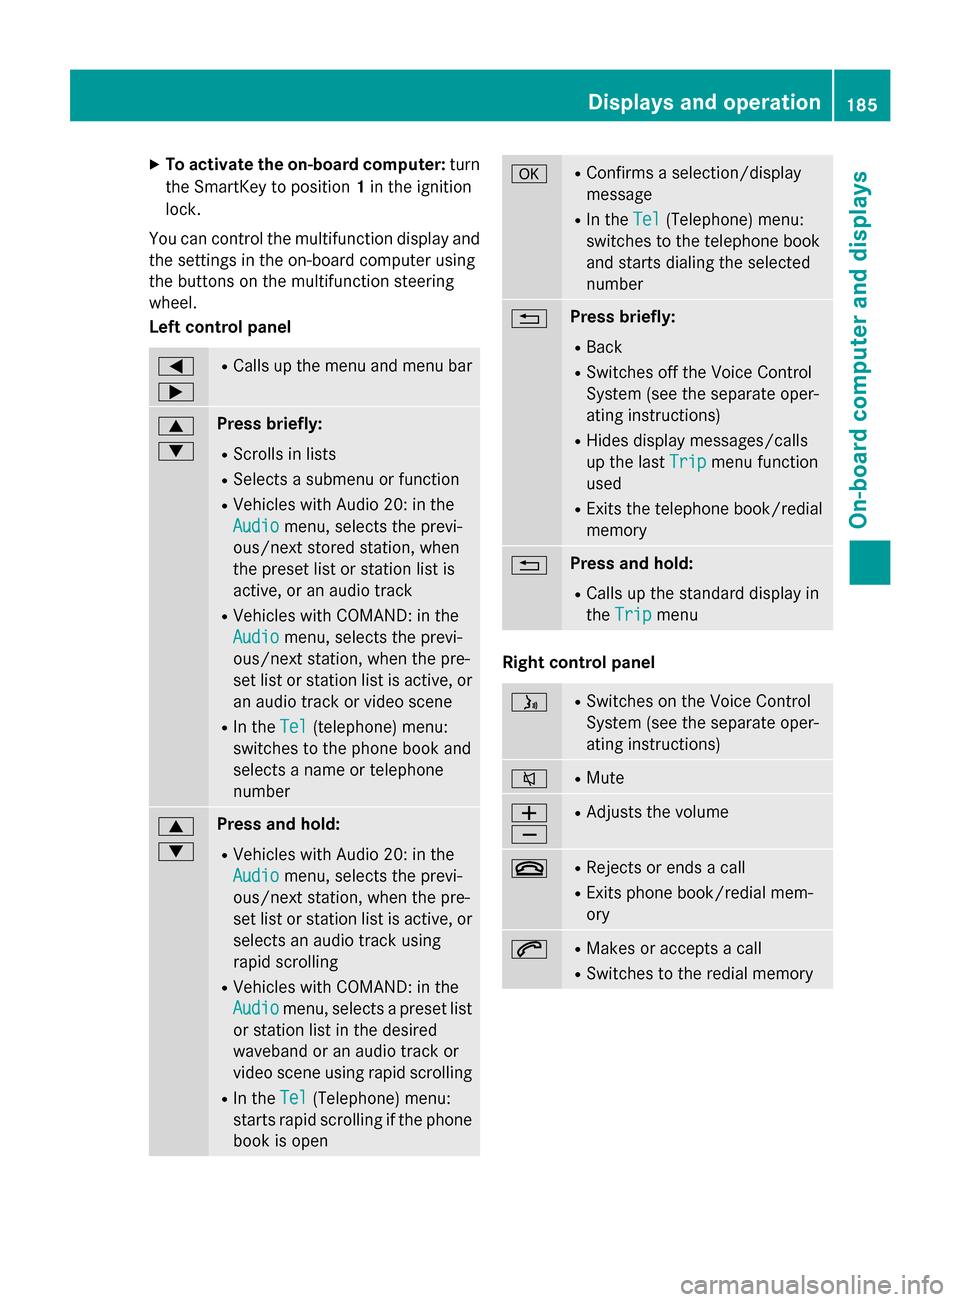
X
To activate the on-board computer: turn
the SmartKey to position 1in the ignition
lock.
You can control the multifunction display and
the settings in the on-board computer using
the buttons on the multifunction steering
wheel.
Left control panel =
; R
Calls up the menu and menu bar 9
: Press briefly:
R Scrolls in lists
R Selects a submenu or function
R Vehicles with Audio 20: in the
Audio Audio menu, selects the previ-
ous/next stored station, when
the preset list or station list is
active, or an audio track
R Vehicles with COMAND: in the
Audio Audio menu, selects the previ-
ous/next station, when the pre-
set list or station list is active, or
an audio track or video scene
R In the Tel Tel(telephone) menu:
switches to the phone book and
selects a name or telephone
number 9
: Press and hold:
R Vehicles with Audio 20: in the
Audio Audio menu, selects the previ-
ous/next station, when the pre-
set list or station list is active, or
selects an audio track using
rapid scrolling
R Vehicles with COMAND: in the
Audio Audio menu, selects a preset list
or station list in the desired
waveband or an audio track or
video scene using rapid scrolling
R In the Tel Tel(Telephone) menu:
starts rapid scrolling if the phone book is open a R
Confirms a selection/display
message
R In the Tel Tel(Telephone) menu:
switches to the telephone book
and starts dialing the selected
number % Press briefly:
R Back
R Switches off the Voice Control
System (see the separate oper-
ating instructions)
R Hides display messages/calls
up the last Trip Tripmenu function
used
R Exits the telephone book/redial
memory % Press and hold:
R Calls up the standard display in
the Trip Trip menu Right control panel
ó R
Switches on the Voice Control
System (see the separate oper-
ating instructions) 8 R
Mute W
X R
Adjusts the volume ~ R
Rejects or ends a call
R Exits phone book/redial mem-
ory 6 R
Makes or accepts a call
R Switches to the redial memory Displays and operation
185On-board computer and displays Z
Page 188 of 338
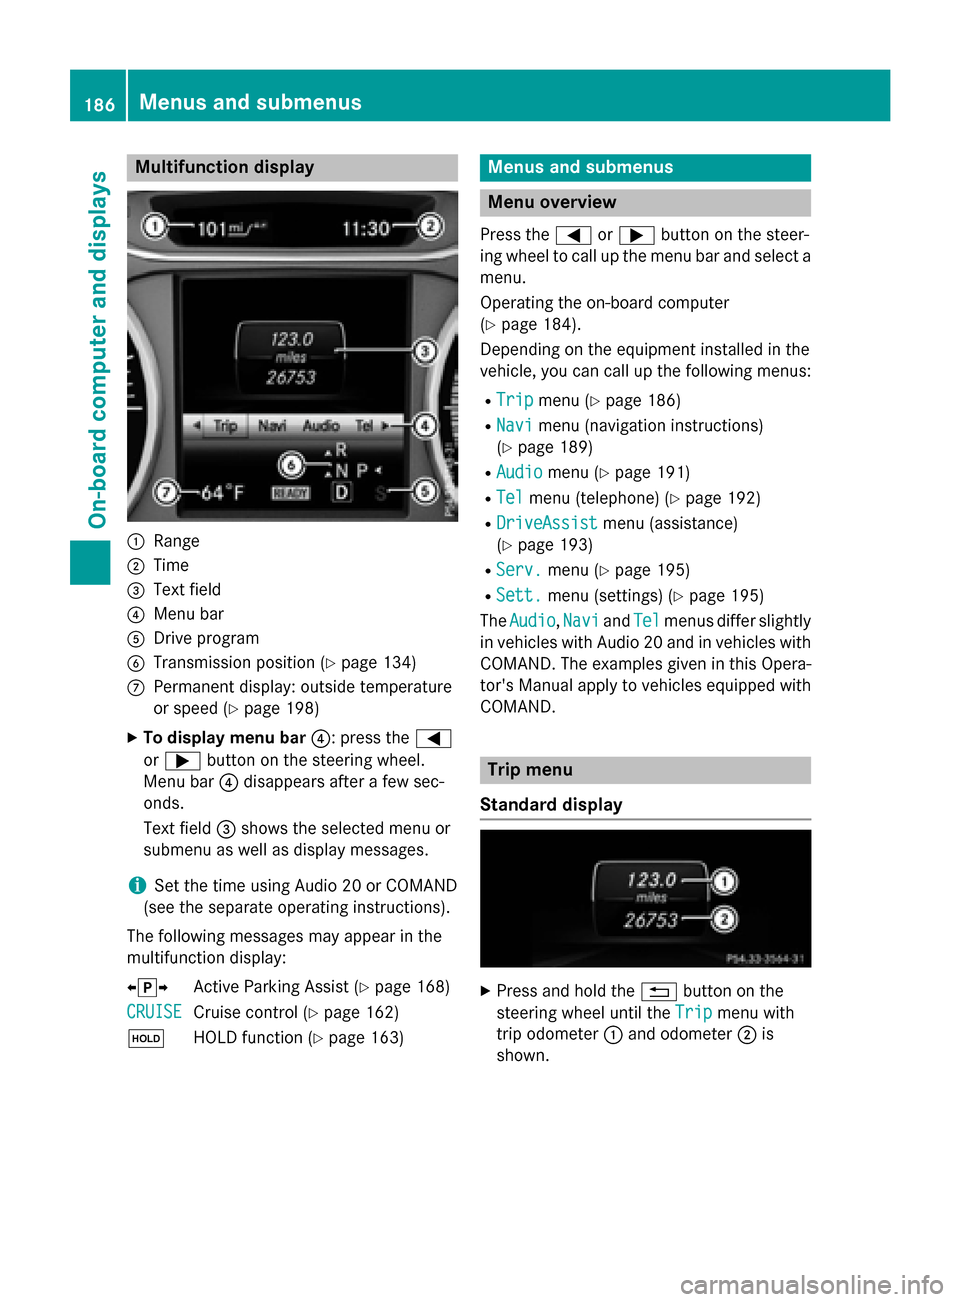
Multifunction display
:
Range
; Time
= Text field
? Menu bar
A Drive program
B Transmission position (Y page 134)
C Permanent display: outside temperature
or speed (Y page 198)
X To display menu bar ?: press the=
or ; button on the steering wheel.
Menu bar ?disappears after a few sec-
onds.
Text field =shows the selected menu or
submenu as well as display messages.
i Set the time using Audio 20 or COMAND
(see the separate operating instructions).
The following messages may appear in the
multifunction display:
XjY Active Parking Assist (Y page 168)
CRUISE
CRUISE Cruise control (Y
page 162)
ë HOLD function (Y page 163) Menus and submenus
Menu overview
Press the =or; button on the steer-
ing wheel to call up the menu bar and select a
menu.
Operating the on-board computer
(Y page 184).
Depending on the equipment installed in the
vehicle, you can call up the following menus:
R Trip Trip menu (Y page 186)
R Navi
Navi menu (navigation instructions)
(Y page 189)
R Audio
Audio menu (Y page 191)
R Tel
Tel menu (telephone) (Y page 192)
R DriveAssist
DriveAssist menu (assistance)
(Y page 193)
R Serv.
Serv. menu (Y page 195)
R Sett.
Sett. menu (settings) (Y page 195)
The Audio
Audio, Navi
NaviandTel
Tel menus differ slightly
in vehicles with Audio 20 and in vehicles with
COMAND. The examples given in this Opera-
tor's Manual apply to vehicles equipped with
COMAND. Trip menu
Standard display X
Press and hold the %button on the
steering wheel until the Trip
Trip menu with
trip odometer :and odometer ;is
shown. 186
Menus and submenusOn-board computer and displays
Page 189 of 338
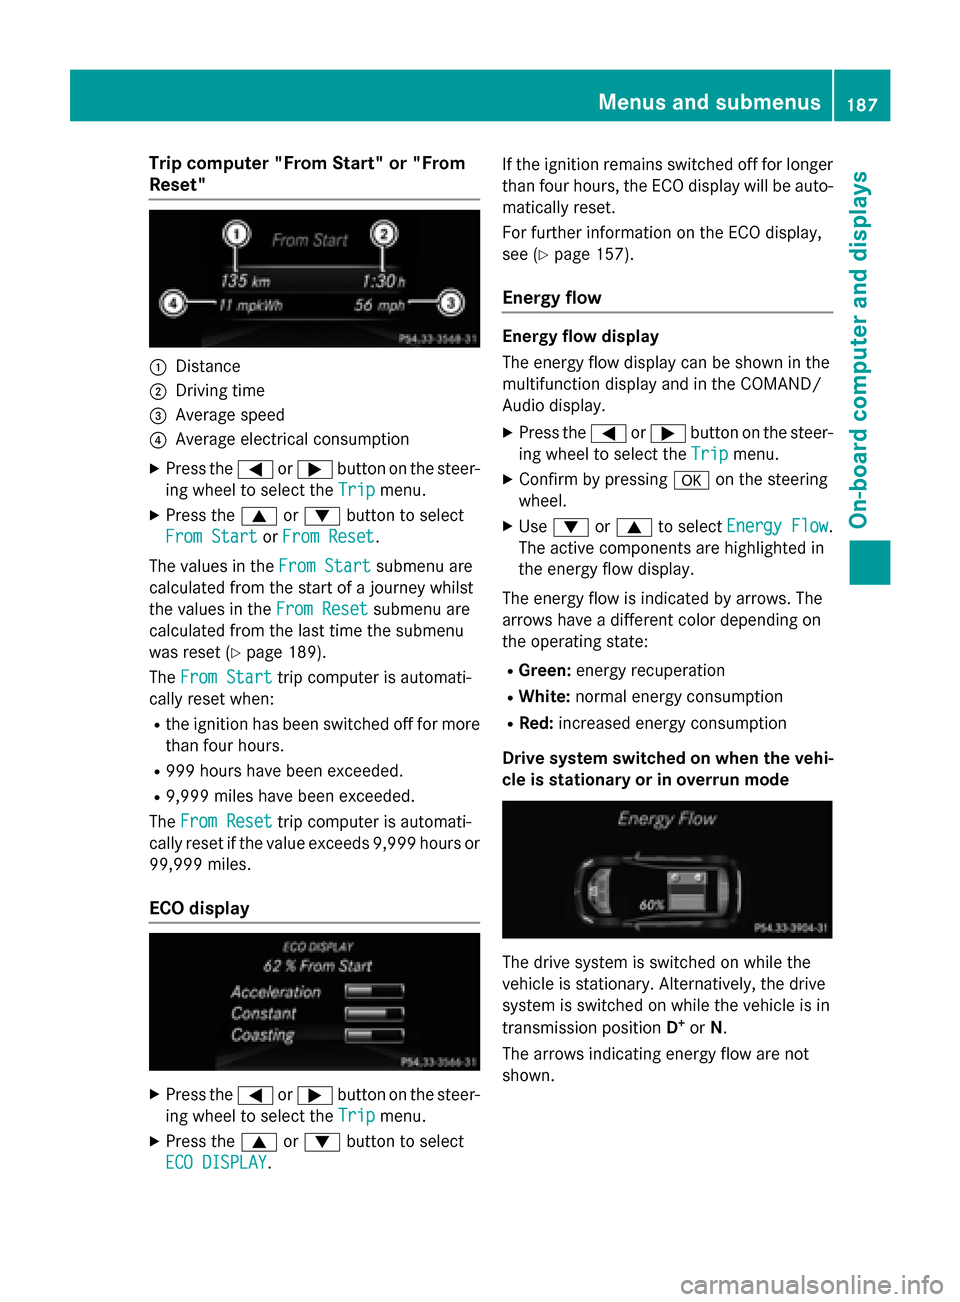
Trip computer "From Start" or "From
Reset" :
Distance
; Driving time
= Average speed
? Average electrical consumption
X Press the =or; button on the steer-
ing wheel to select the Trip
Tripmenu.
X Press the 9or: button to select
From Start
From Start orFrom Reset
From Reset.
The values in the From Start
From Startsubmenu are
calculated from the start of a journey whilst
the values in the From Reset From Resetsubmenu are
calculated from the last time the submenu
was reset (Y page 189).
The From Start From Start trip computer is automati-
cally reset when:
R the ignition has been switched off for more
than four hours.
R 999 hours have been exceeded.
R 9,999 miles have been exceeded.
The From Reset
From Reset trip computer is automati-
cally reset if the value exceeds 9,999 hours or 99,999 miles.
ECO display X
Press the =or; button on the steer-
ing wheel to select the Trip
Tripmenu.
X Press the 9or: button to select
ECO DISPLAY
ECO DISPLAY. If the ignition remains switched off for longer
than four hours, the ECO display will be auto-
matically reset.
For further information on the ECO display,
see (Y page 157).
Energy flow Energy flow display
The energy flow display can be shown in the
multifunction display and in the COMAND/
Audio display.
X Press the =or; button on the steer-
ing wheel to select the Trip Tripmenu.
X Confirm by pressing aon the steering
wheel.
X Use : or9 to select Energy Flow
Energy Flow .
The active components are highlighted in
the energy flow display.
The energy flow is indicated by arrows. The
arrows have a different color depending on
the operating state: R Green: energy recuperation
R White: normal energy consumption
R Red: increased energy consumption
Drive system switched on when the vehi-
cle is stationary or in overrun mode The drive system is switched on while the
vehicle is stationary. Alternatively, the drive
system is switched on while the vehicle is in
transmission position D+
or N.
The arrows indicating energy flow are not
shown. Menus and submenus
187On-board computer and displays Z