2015 MERCEDES-BENZ B-Class ELECTRIC steering
[x] Cancel search: steeringPage 97 of 338
Automatic anti-glare mirrors
G
WARNING
Electrolyte may escape if the glass in an auto- matic anti-glare mirror breaks. The electrolyte
is harmful and causes irritation. It must not
come into contact with your skin, eyes, res-
piratory organs or clothing or be swallowed.
There is a risk of injury.
If you come into contact with the electrolyte,
observe the following:
R Rinse off the electrolyte from your skin
immediately with water.
R Immediately rinse the electrolyte out of
your eyes thoroughly with clean water.
R If the electrolyte is swallowed, immediately
rinse your mouth out thoroughly. Do not
induce vomiting.
R If electrolyte comes into contact with your
skin or hair or is swallowed, seek medical
attention immediately.
R Immediately change out of clothing which
has come into contact with electrolyte.
R If an allergic reaction occurs, seek medical
attention immediately.
The "Automatic anti-glare mirrors" function is
only available if the vehicle is equipped with
the "Mirrors package".
The rear-view mirror and the exterior mirror
on the driver's side automatically go into anti-
glare mode if:
R the ignition is switched on and
R incident light from headlamps strikes the
sensor in the rear-view mirror
The mirrors do not go into anti-glare mode if
reverse gear is engaged or the interior lighting is switched on. Parking position for the exterior mir-
ror on the front-passenger side
General notes The "Parking position of the exterior mirror on
the front-passenger side" function is only
available if the vehicle is equipped with the
"Mirrors package".
Setting and storing the parking position Using reverse gear
You can position the front-passenger side
exterior mirror in such a way that you can see
the rear wheel on that side as soon as you
engage reverse gear. You can store this posi-
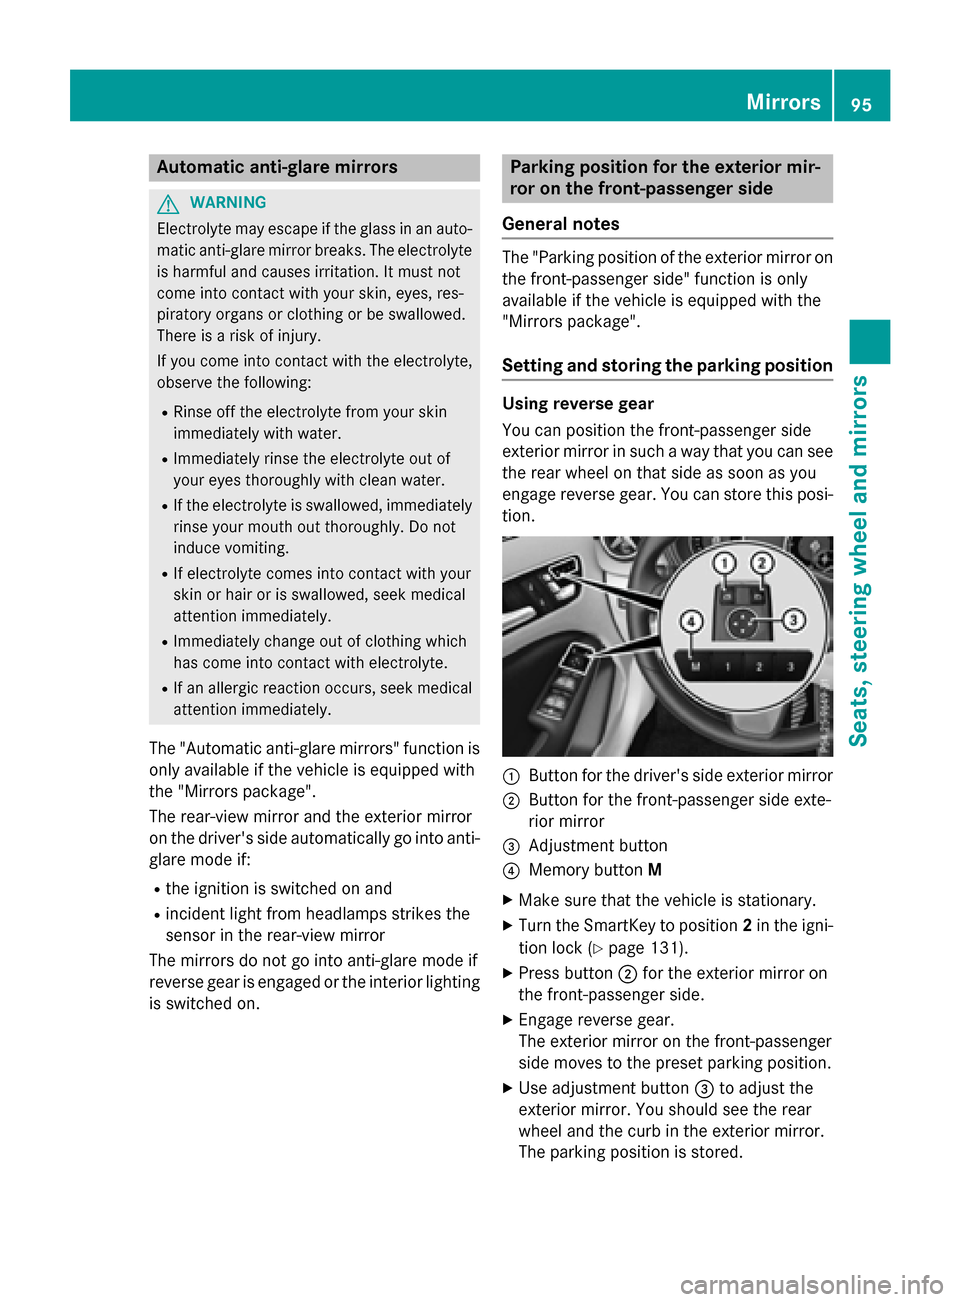
tion. :
Button for the driver's side exterior mirror
; Button for the front-passenger side exte-
rior mirror
= Adjustment button
? Memory button M
X Make sure that the vehicle is stationary.
X Turn the SmartKey to position 2in the igni-
tion lock (Y page 131).
X Press button ;for the exterior mirror on
the front-passenger side.
X Engage reverse gear.
The exterior mirror on the front-passenger
side moves to the preset parking position.
X Use adjustment button =to adjust the
exterior mirror. You should see the rear
wheel and the curb in the exterior mirror.
The parking position is stored. Mirrors
95Seats, steering wheel and mirrors Z
Page 98 of 338
i
If you shift the transmission to another
position, the exterior mirror on the front-
passenger side returns to the driving posi-
tion.
Using the memory button
You can position the front-passenger side
exterior mirror in such a way that you can see
the rear wheel on that side as soon as you
engage reverse gear. This setting can be
stored using memory button M?.
X Make sure that the vehicle is stationary.
X Turn the SmartKey to position 2in the igni-
tion lock (Y page 131).
X Press button ;for the exterior mirror on
the front-passenger side.
X Use adjustment button =to adjust the
exterior mirror. You should see the rear
wheel and the curb in the exterior mirror.
X Press memory button M? and one of the
arrows on adjustment button =within
three seconds.
The parking position is stored if the exterior
mirror does not move.
X If the mirror moves out of position, repeat
the steps.
Calling up a stored parking position set- ting X
Turn the SmartKey to position 2in the igni-
tion lock (Y page 131).
X Adjust the exterior mirror on the front-
passenger side with the corresponding but-
ton (Y page 94).
X Engage reverse gear.
The exterior mirror on the front-passenger
side moves to the stored parking position. The exterior mirror on the front-passenger
side moves back to its original position:
R as soon as you exceed a speed of 9 mph
(15 km/h)
R about ten seconds after you have disen-
gaged reverse gear
R if you press button :for the exterior mir-
ror on the driver's side Memory function
Important safety notes
G
WARNING
If you use the memory function on the driver's side while driving, you could lose control of
the vehicle as a result of the adjustments
being made. There is a risk of an accident.
Only use the memory function on the driver's
side when the vehicle is stationary. G
WARNING
When the memory function adjusts the seat,
you and other vehicle occupants – particularly children – could become trapped. There is a
risk of injury.
While the memory function is making adjust-
ments, make sure that no one has any body
parts in the sweep of the seat. If somebody
becomes trapped, immediately release the
memory function position button. The adjust- ment process is stopped. G
WARNING
Children could become trapped if they acti-
vate the memory function, particularly when
unattended. There is a risk of injury.
When leaving the vehicle, always take the
SmartKey with you and lock the vehicle. Never leave children unsupervised in the vehicle.
The memory function can be used at any time,
e.g. even when the SmartKey isn't in the igni-
tion lock. 96
Memory functionSeats, steering wheel and mirrors
Page 99 of 338
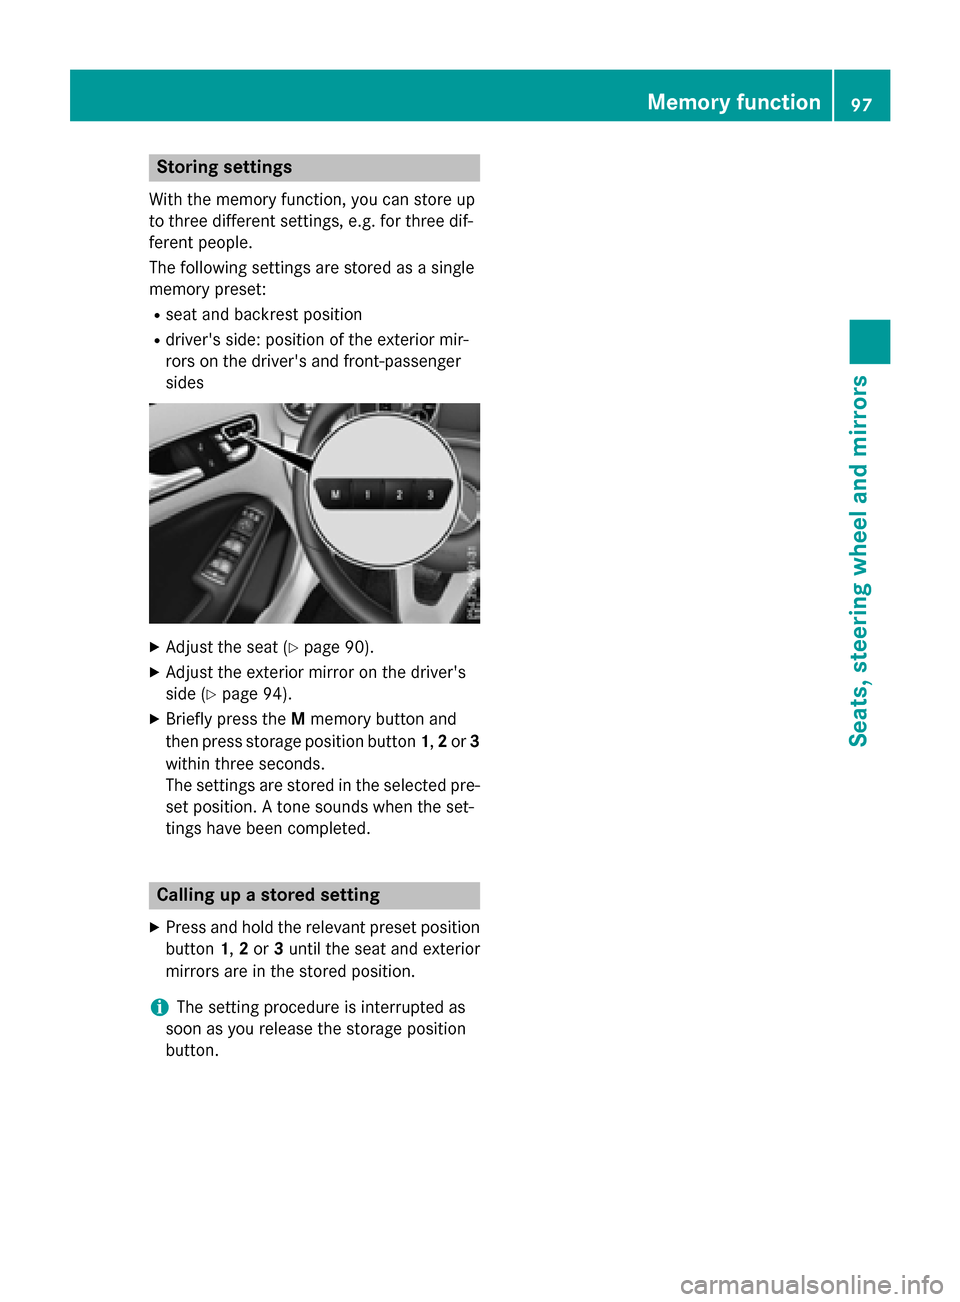
Storing settings
With the memory function, you can store up
to three different settings, e.g. for three dif-
ferent people.
The following settings are stored as a single
memory preset:
R seat and backrest position
R driver's side: position of the exterior mir-
rors on the driver's and front-passenger
sides X
Adjust the seat (Y page 90).
X Adjust the exterior mirror on the driver's
side (Y page 94).
X Briefly press the Mmemory button and
then press storage position button 1,2or 3
within three seconds.
The settings are stored in the selected pre- set position. A tone sounds when the set-
tings have been completed. Calling up a stored setting
X Press and hold the relevant preset position
button 1,2or 3until the seat and exterior
mirrors are in the stored position.
i The setting procedure is interrupted as
soon as you release the storage position
button. Memory function
97Seats, steering wheel and mirrors Z
Page 105 of 338
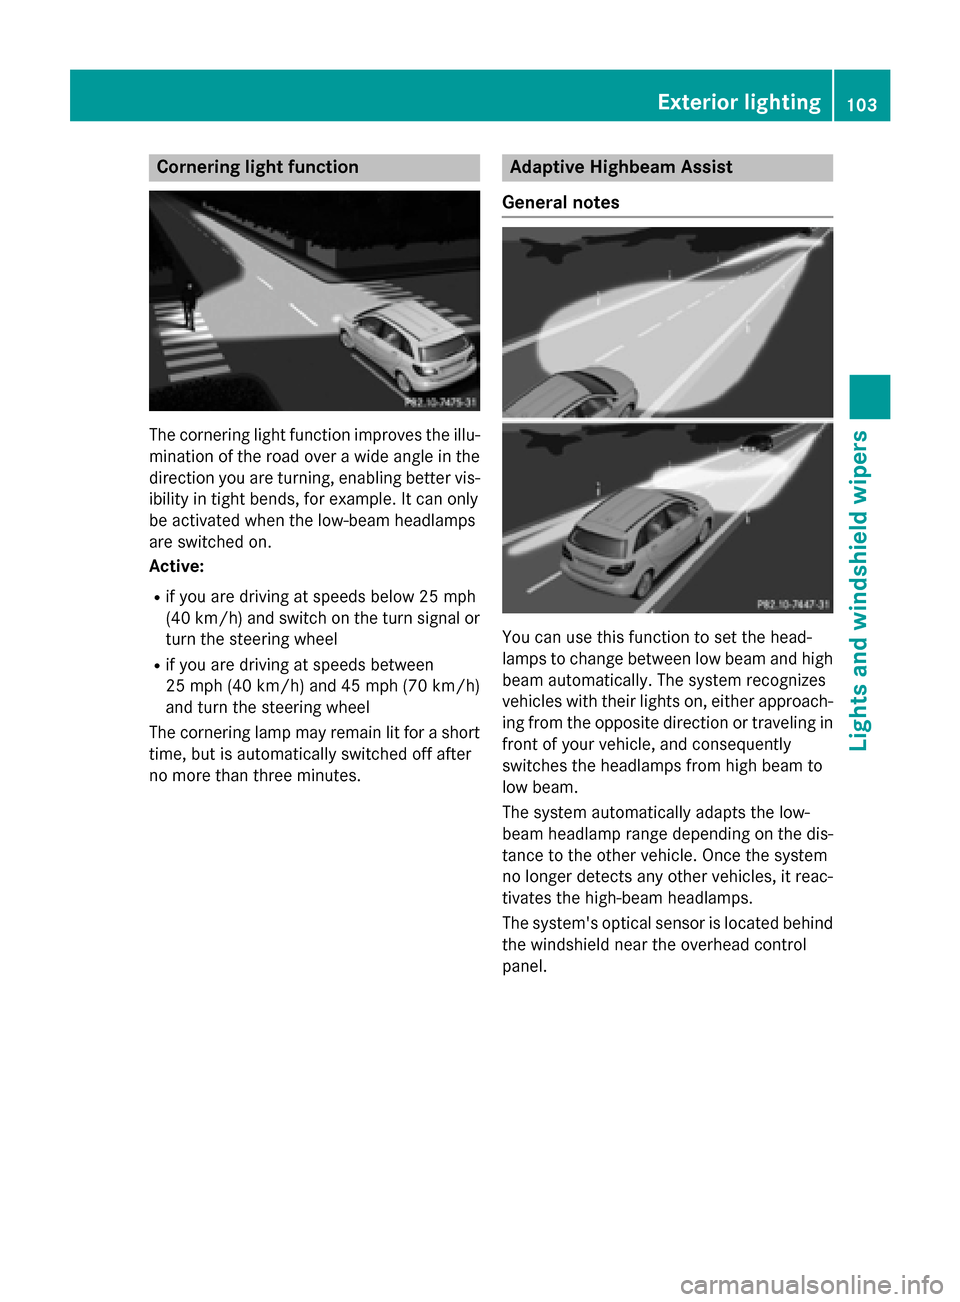
Cornering light function
The cornering light function improves the illu-
mination of the road over a wide angle in the direction you are turning, enabling better vis-
ibility in tight bends, for example. It can only
be activated when the low-beam headlamps
are switched on.
Active:
R if you are driving at speeds below 25 mph
(40 km/h) and switch on the turn signal or
turn the steering wheel
R if you are driving at speeds between
25 mph (40 km/ h)and 45 mph (70 km/h)
and turn the steering wheel
The cornering lamp may remain lit for a short
time, but is automatically switched off after
no more than three minutes. Adaptive Highbeam Assist
General notes You can use this function to set the head-
lamps to change between low beam and high beam automatically. The system recognizes
vehicles with their lights on, either approach-
ing from the opposite direction or traveling in front of your vehicle, and consequently
switches the headlamps from high beam to
low beam.
The system automatically adapts the low-
beam headlamp range depending on the dis-
tance to the other vehicle. Once the system
no longer detects any other vehicles, it reac-
tivates the high-beam headlamps.
The system's optical sensor is located behind
the windshield near the overhead control
panel. Exterior lighting
103Lights and windshield wipers Z
Page 132 of 338
Useful information
i This Operator's Manual describes all
models and all standard and optional equip- ment of your vehicle available at the time of
publication of the Operator's Manual.
Country-specific differences are possible.
Please note that your vehicle may not be
equipped with all features described. This
also applies to safety-related systems and
functions.
i Read the information on qualified special-
ist workshops (Y page 25). Notes on breaking-in a new vehicle
The sensor system of some driving and driv-
ing safety systems adjusts automatically
while a certain distance is being driven after
the vehicle has been delivered or after
repairs. Full system effectiveness is not
reached until the end of this teach-in proce-
dure.
New and replaced brake pads and discs only
reach their optimum braking effect after sev-
eral hundred kilometers of driving. Compen-
sate for this by applying greater force to the
brake pedal. Driving
Important safety notes
G
WARNING
Objects in the driver's footwell can restrict the pedal travel or obstruct a depressed pedal.
The operating and road safety of the vehicle is
jeopardized. There is a risk of an accident.
Make sure that all objects in the vehicle are
stowed correctly, and that they cannot enter
the driver's footwell. Install the floormats
securely and as specified in order to ensure
sufficient clearance for the pedals. Do not use loose floormats and do not place floormats on
top of one another. G
WARNING
Unsuitable footwear can hinder correct usage of the pedals, e.g.:
R shoes with thick soles
R shoes with high heels
R slippers
There is a risk of an accident.
Wear suitable footwear to ensure correct
usage of the pedals. G
WARNING
If you switch off the ignition while driving,
safety-relevant functions are only available
with limitations, or not at all. This could affect, for example, the power steering and the brake
boosting effect. You will require considerably
more effort to steer and brake. There is a risk of an accident.
Do not switch off the ignition while driving. G
WARNING
If the parking brake has not been fully
released when driving, the parking brake can:
R overheat and cause a fire
R lose its hold function.
There is a risk of fire and an accident. Release
the parking brake fully before driving off.
! Before driving away, you must ensure
that, for your own safety and to avoid dam-
age, the charging cable has been removed
from the vehicle socket. Otherwise, you
cannot shift the transmission out of posi-
tion P.
The braking performance of the electric
motor using recuperative braking is, in some
operating modes, either reduced or not effec-
tive:
R when the condition of charge of the high-
voltage battery increases
R if the high-voltage battery is not yet at a
normal operating temperature
R when driving close to the maximum speed
R when the vehicle is almost stationary 130
DrivingDriving and parking
Page 136 of 338
drop down. You can open the doors from the
inside at any time.
It is only possible to move the DIRECT SELECT
selector lever from position Pto the desired
selector lever position if you depress the
brake pedal. The parking lock is then deacti-
vated and the electrical parking brake is
released automatically. If the brake pedal is
not depressed, the DIRECT SELECT lever can still be moved but the parking lock remains
engaged.
Make sure that no charging cable is plugged
in. The parking lock cannot be released if a
charging cable is plugged in. Hill start assist
Hill start assist will aid you when pulling away
on a hill. It holds the vehicle for a short time
after you have removed your foot from the
brake pedal. This gives you enough time to
move your foot from the brake pedal to the
accelerator pedal and depress it before the
vehicle begins to roll. G
WARNING
After a short time, hill start assist will no lon-
ger brake your vehicle and it could roll away.
There is a risk of an accident and injury.
Therefore, quickly move your foot from the
brake pedal to the accelerator pedal. Never
leave the vehicle when it is held by hill start
assist.
Hill start assist is not active if: R you are pulling away on a level road or on a
downhill gradient.
R the DIRECT SELECT lever is in position N.
R the electric parking brake is applied.
R ESP ®
is malfunctioning.
Further information on holding the vehicle
stationary on uphill gradients (Y page 137). Transmission
Important safety notes
Shift the DIRECT SELECT lever to position P
when the drive system is switched off and the
vehicle is stationary. Park position Pis
engaged and the electric parking brake is
applied automatically:
If the DIRECT SELECT lever cannot be
engaged in park position P, the parking brake
is engaged automatically.
Observe the important safety notes on
switching ESP ®
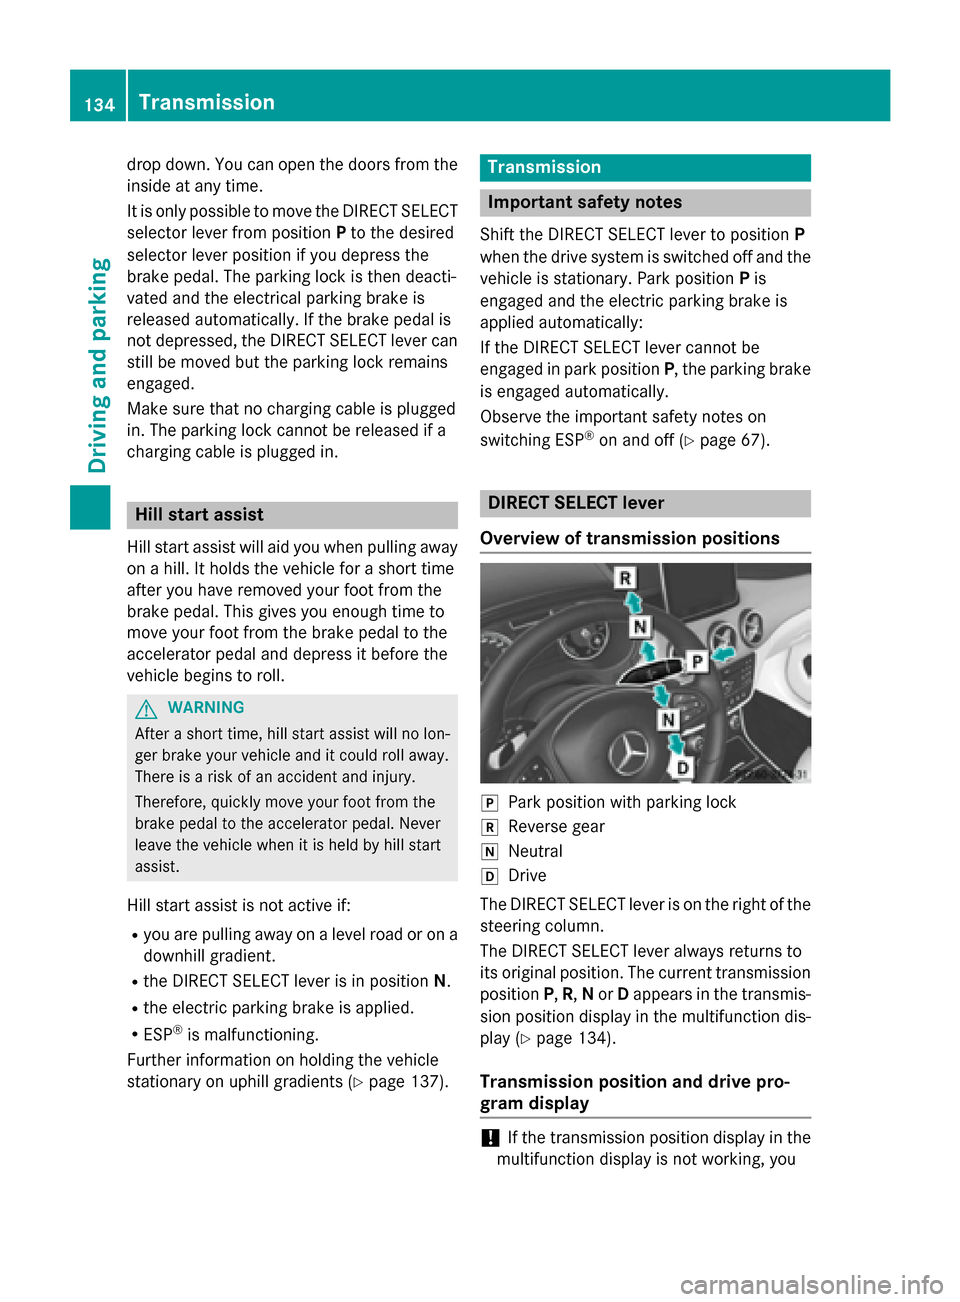
on and off (Y page 67). DIRECT SELECT lever
Overview of transmission positions j
Park position with parking lock
k Reverse gear
i Neutral
h Drive
The DIRECT SELECT lever is on the right of the
steering column.
The DIRECT SELECT lever always returns to
its original position. The current transmission position P,R, Nor Dappears in the transmis-
sion position display in the multifunction dis- play (Y page 134).
Transmission position and drive pro-
gram display !
If the transmission position display in the
multifunction display is not working, you 134
TransmissionDriving and parking
Page 140 of 338
Drive program
Sis characterized by the fol-
lowing:
R the vehicle exhibits sporty driving charac-
teristics.
R the entire power output can be utilized by
depressing the accelerator pedal.
Drive program E+is characterized by the fol-
lowing:
R reduced torque and significantly reduced
power. This supports an especially efficient
and even driving style and results in a
reduction in speed to approximately
70 mph (110 km/h).
R the vehicle pulling away more gently in
forward gear unless the accelerator pedal
is depressed fully.
R the wheels are less likely to spin.
R particularly efficient overrun.
R full power output by using kickdown.
R the performance of air-conditioning system
and heating are reduced. Steering wheel paddle shifters
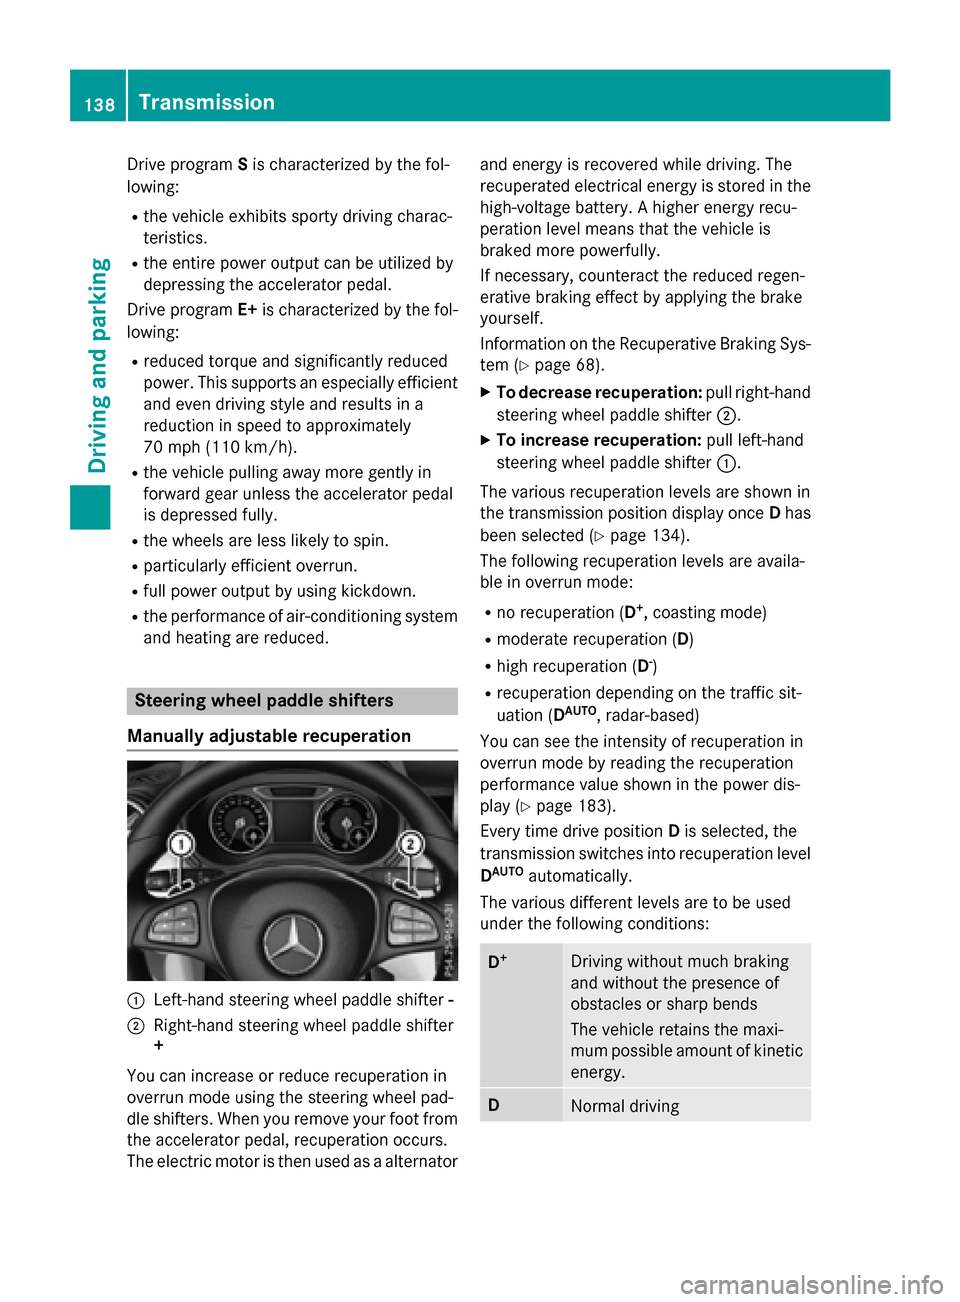
Manually adjustable recuperation :
Left-hand steering wheel paddle shifter -
; Right-hand steering wheel paddle shifter
+
You can increase or reduce recuperation in
overrun mode using the steering wheel pad-
dle shifters. When you remove your foot from
the accelerator pedal, recuperation occurs.
The electric motor is then used as a alternator and energy is recovered while driving. The
recuperated electrical energy is stored in the
high-voltage battery. A higher energy recu-
peration level means that the vehicle is
braked more powerfully.
If necessary, counteract the reduced regen-
erative braking effect by applying the brake
yourself.
Information on the Recuperative Braking Sys-
tem (Y page 68).
X To decrease recuperation: pull right-hand
steering wheel paddle shifter ;.
X To increase recuperation: pull left-hand
steering wheel paddle shifter :.
The various recuperation levels are shown in
the transmission position display once Dhas
been selected (Y page 134).
The following recuperation levels are availa-
ble in overrun mode:
R no recuperation (D +
, coasting mode)
R moderate recuperation (D)
R high recuperation (D -
)
R recuperation depending on the traffic sit-
uation (D AUTO
, radar-based)
You can see the intensity of recuperation in
overrun mode by reading the recuperation
performance value shown in the power dis-
play (Y page 183).
Every time drive position Dis selected, the
transmission switches into recuperation level
D AUTO
automatically.
The various different levels are to be used
under the following conditions: D
+ Driving without much braking
and without the presence of
obstacles or sharp bends
The vehicle retains the maxi-
mum possible amount of kinetic
energy. D
Normal driving138
TransmissionDriving an
d parking
Page 141 of 338
D
- Sporty driving or driving on a
downhill gradient
The brake pedal does not need
to be used as often because the
extent of the deceleration is
greater than in D.
Energy use when decelerating is
considerably higher than when
the vehicle is braked with the
brake pedal. D
AUTO
(radar-
based) The intensity of recuperation is
automatically adjusted to the
current traffic situation.
Default setting
In levels
Dand D-
, deceleration can be con-
trolled in an infinitely variable manner using
the accelerator pedal.
The braking performance of the electric
motor using recuperative braking is, in some
operating modes, either reduced or not effec-
tive:
R when the condition of charge of the high-
voltage battery increases
R if the high-voltage battery is not yet at a
normal operating temperature
R when driving close to the maximum speed
R when the vehicle is almost stationary
R in transmission position N
R during and after ESP stability control
If you do not make an additional effort to
apply the brake yourself, the braking effect
may not be sufficient. If necessary, counter-
act the reduced regenerative braking effect
by applying the brake yourself.
Radar-based recuperation The vehicle uses the sensors of COLLISION
PREVENTION ASSIST PLUS during radar-
based recuperation (D
AUTO
). The sensors
detect the distance to the vehicle ahead and
its speed. The intensity of recuperation is then automatically adjusted to the current
traffic situation.
The range can then be increased by storing
energy efficiently. Adjustment is infinitely var-
iable from overrun mode (no recuperation) to maximum recuperation.
Maintain sufficient distance to the vehicle in
front. Mercedes-Benz recommends that you
activate COLLISION PREVENTION ASSIST
PLUS as a visual and acoustic aid.
Examples of radar-based recuperation:
R Approaching a slower vehicle, a decelerat-
ing vehicle or when following a vehicle
downhill. Your vehicle decelerates slightly
and increases recuperation.
R Driving when no vehicle is detected in front
or when a vehicle is detected in the far dis- tance or an accelerating vehicle is detec-
ted. Your vehicle switches to overrun mode
at higher speeds.
R Driving on a steep downhill slope. Acceler-
ation downhill is reduced and recuperation is increased. This is comparable with shift-
ing down when driving downhill.
X To activate radar-based recuperation:
pull steering wheel paddle shifter :or;
towards you and hold for about one second.
X To deactivate radar-based recupera-
tion: briefly pull steering wheel paddle
shifter :or; towards you.
If you change between radar-based and man- ual recuperation, the following levels are acti-
vated depending on the selection via the
steering wheel paddle shifters: ;
Steering
wheel paddle
shifter + selects
D+
(overrun) :
Steering
wheel paddle
shifter - selects
D-
(maximum
recuperation) Transmission
139Driving and parking Z