2015 MERCEDES-BENZ B-Class ELECTRIC light
[x] Cancel search: lightPage 80 of 338
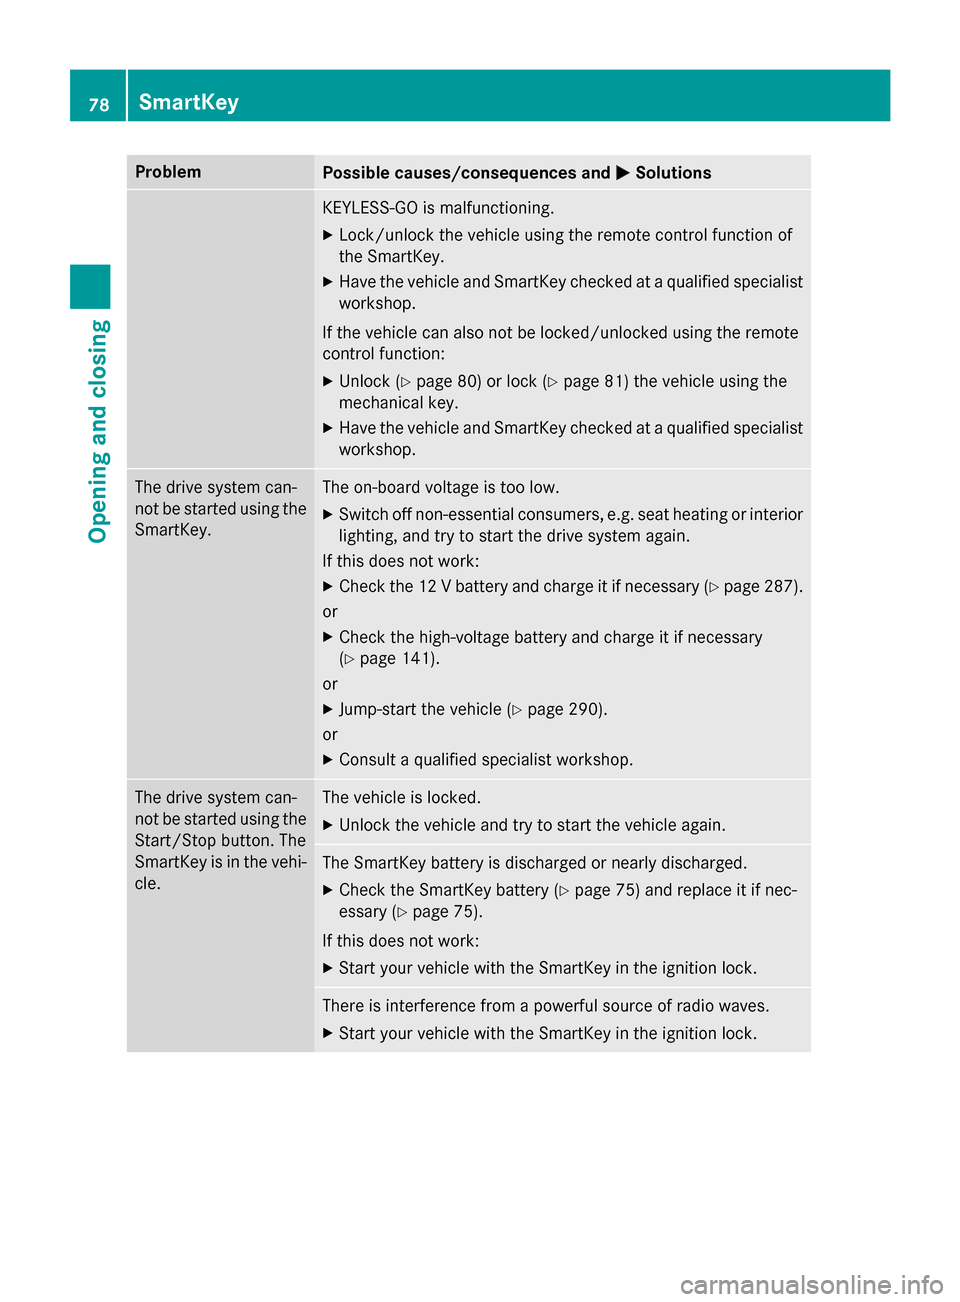
Problem
Possible causes/consequences and
M
MSolutions KEYLESS-GO is malfunctioning.
X Lock/unlock the vehicle using the remote control function of
the SmartKey.
X Have the vehicle and SmartKey checked at a qualified specialist
workshop.
If the vehicle can also not be locked/unlocked using the remote
control function:
X Unlock (Y page 80) or lock (Y page 81) the vehicle using the
mechanical key.
X Have the vehicle and SmartKey checked at a qualified specialist
workshop. The drive system can-
not be started using the
SmartKey. The on-board voltage is too low.
X Switch off non-essential consumers, e.g. seat heating or interior
lighting, and try to start the drive system again.
If this does not work:
X Check the 12 V battery and charge it if necessary (Y page 287).
or
X Check the high-voltage battery and charge it if necessary
(Y page 141).
or
X Jump-start the vehicle (Y page 290).
or
X Consult a qualified specialist workshop. The drive system can-
not be started using the
Start/Stop button. The
SmartKey is in the vehi-
cle. The vehicle is locked.
X Unlock the vehicle and try to start the vehicle again. The SmartKey battery is discharged or nearly discharged.
X Check the SmartKey battery (Y page 75) and replace it if nec-
essary (Y page 75).
If this does not work:
X Start your vehicle with the SmartKey in the ignition lock. There is interference from a powerful source of radio waves.
X Start your vehicle with the SmartKey in the ignition lock. 78
SmartKeyOpening and closing
Page 85 of 338
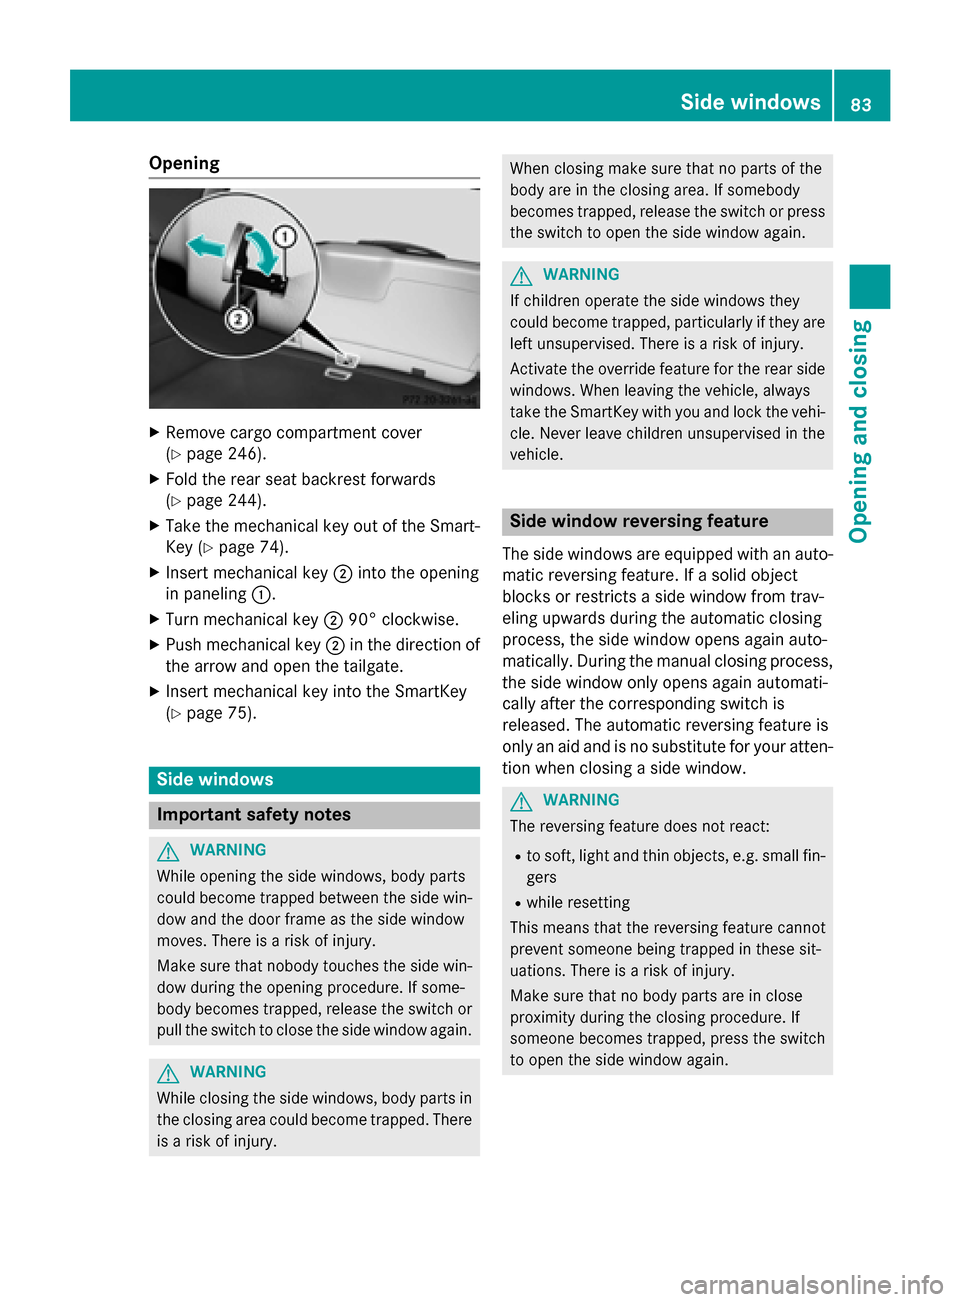
Opening
X
Remove cargo compartment cover
(Y page 246).
X Fold the rear seat backrest forwards
(Y page 244).
X Take the mechanical key out of the Smart-
Key (Y page 74).
X Insert mechanical key ;into the opening
in paneling :.
X Turn mechanical key ;90° clockwise.
X Push mechanical key ;in the direction of
the arrow and open the tailgate.
X Insert mechanical key into the SmartKey
(Y page 75). Side windows
Important safety notes
G
WARNING
While opening the side windows, body parts
could become trapped between the side win- dow and the door frame as the side window
moves. There is a risk of injury.
Make sure that nobody touches the side win-
dow during the opening procedure. If some-
body becomes trapped, release the switch or pull the switch to close the side window again. G
WARNING
While closing the side windows, body parts in the closing area could become trapped. There is a risk of injury. When closing make sure that no parts of the
body are in the closing area. If somebody
becomes trapped, release the switch or press
the switch to open the side window again. G
WARNING
If children operate the side windows they
could become trapped, particularly if they are left unsupervised. There is a risk of injury.
Activate the override feature for the rear side
windows. When leaving the vehicle, always
take the SmartKey with you and lock the vehi-
cle. Never leave children unsupervised in the
vehicle. Side window reversing feature
The side windows are equipped with an auto- matic reversing feature. If a solid object
blocks or restricts a side window from trav-
eling upwards during the automatic closing
process, the side window opens again auto-
matically. During the manual closing process,
the side window only opens again automati-
cally after the corresponding switch is
released. The automatic reversing feature is
only an aid and is no substitute for your atten- tion when closing a side window. G
WARNING
The reversing feature does not react:
R to soft, light and thin objects, e.g. small fin-
gers
R while resetting
This means that the reversing feature cannot
prevent someone being trapped in these sit-
uations. There is a risk of injury.
Make sure that no body parts are in close
proximity during the closing procedure. If
someone becomes trapped, press the switch
to open the side window again. Side windows
83Opening and closing Z
Page 87 of 338
Observe the complete closing procedure
when the convenience closing feature is oper-
ating. Make sure that no body parts are in
close proximity during the closing procedure.
Vehicles with KEYLESS-GO, the KEYLESS-
GO start function, Exclusive Package or
AMG Exclusive Package: when you lock the
vehicle, you can close the side windows at the
same time.
i Notes on the automatic reversing feature
for the side windows (Y page 83).
Using the SmartKey X
Vehicles with Exclusive Package or
AMG Exclusive Package but without
KEYLESS-GO and the KEYLESS-GO start
function: for the following operations,
point the tip of the SmartKey at the door
handle on the driver's door. The SmartKey
must be close to the driver's door handle.
i Vehicles with KEYLESS-GO or the KEY-
LESS-GO start function: the SmartKey
must be in close proximity to the vehicle.
X Press and hold the &button until the
side windows are fully closed.
X To interrupt convenience closing:
release the &button.
Using KEYLESS-GO The driver's door and the door at which the
handle is used, must both be closed. The
SmartKey must be outside the vehicle. The
gap between the SmartKey and the corre-
sponding door handle should not be greater
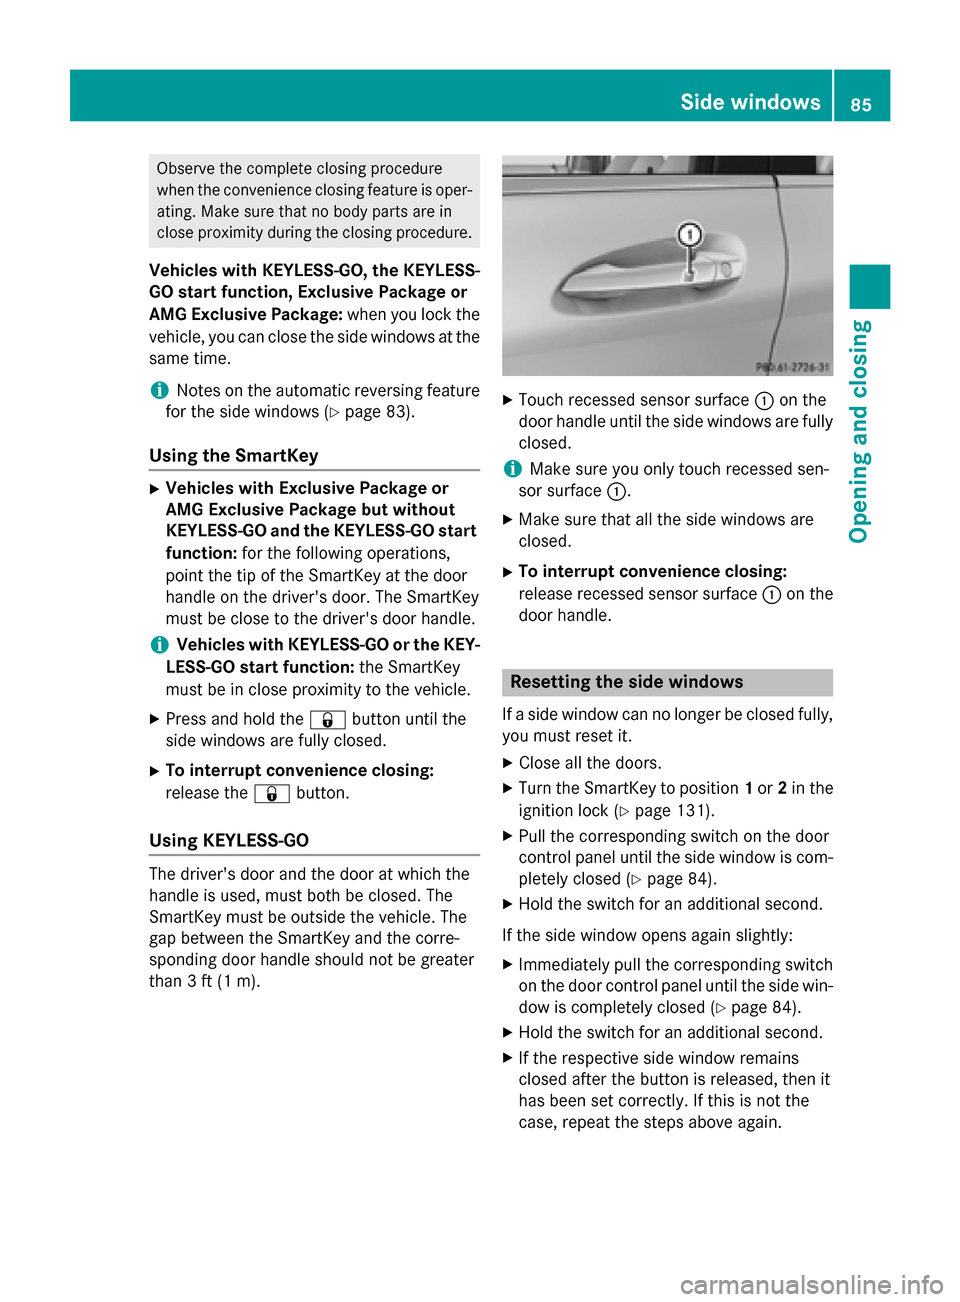
than 3 ft (1 m). X
Touch recessed sensor surface :on the
door handle until the side windows are fully
closed.
i Make sure you only touch recessed sen-
sor surface :.
X Make sure that all the side windows are
closed.
X To interrupt convenience closing:
release recessed sensor surface :on the
door handle. Resetting the side windows
If a side window can no longer be closed fully, you must reset it.
X Close all the doors.
X Turn the SmartKey to position 1or 2in the
ignition lock (Y page 131).
X Pull the corresponding switch on the door
control panel until the side window is com-
pletely closed (Y page 84).
X Hold the switch for an additional second.
If the side window opens again slightly: X Immediately pull the corresponding switch
on the door control panel until the side win-
dow is completely closed (Y page 84).
X Hold the switch for an additional second.
X If the respective side window remains
closed after the button is released, then it
has been set correctly. If this is not the
case, repeat the steps above again. Side windows
85Opening and closing Z
Page 88 of 338
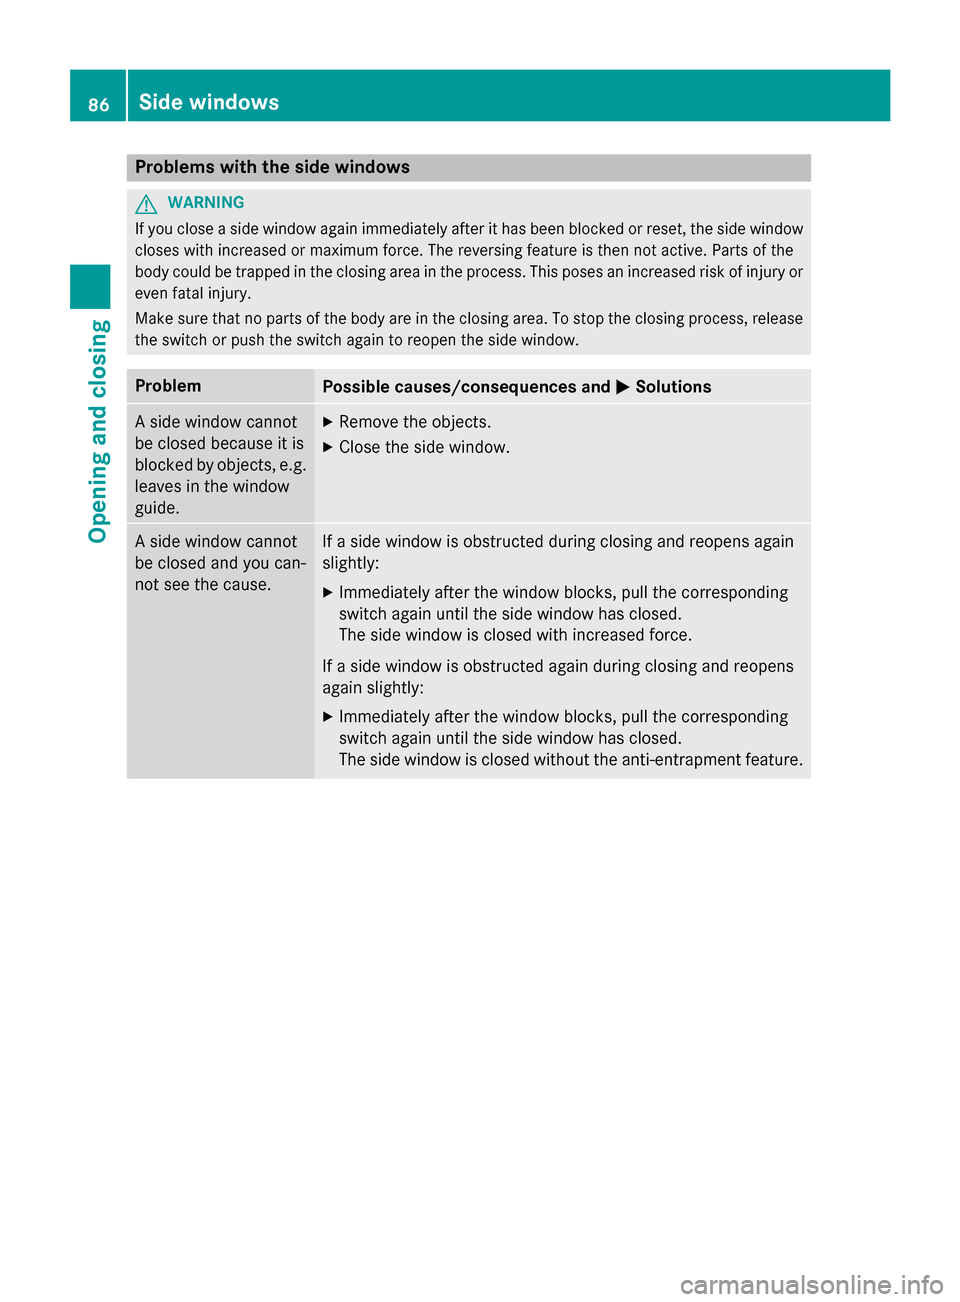
Problems with the side windows
G
WARNING
If you close a side window again immediately after it has been blocked or reset, the side window
closes with increased or maximum force. The reversing feature is then not active. Parts of the
body could be trapped in the closing area in the process. This poses an increased risk of injury or even fatal injury.
Make sure that no parts of the body are in the closing area. To stop the closing process, releasethe switch or push the switch again to reopen the side window. Problem
Possible causes/consequences and
M MSolutions A side window cannot
be closed because it is
blocked by objects, e.g.
leaves in the window
guide. X
Remove the objects.
X Close the side window. A side window cannot
be closed and you can-
not see the cause. If a side window is obstructed during closing and reopens again
slightly:
X Immediately after the window blocks, pull the corresponding
switch again until the side window has closed.
The side window is closed with increased force.
If a side window is obstructed again during closing and reopens
again slightly: X Immediately after the window blocks, pull the corresponding
switch again until the side window has closed.
The side window is closed without the anti-entrapment feature. 86
Side windowsOpening and closing
Page 90 of 338
Useful information
i This Operator's Manual describes all
models and all standard and optional equip- ment of your vehicle available at the time of
publication of the Operator's Manual.
Country-specific differences are possible.
Please note that your vehicle may not be
equipped with all features described. This
also applies to safety-related systems and
functions.
i Read the information on qualified special-
ist workshops (Y page 25). Correct driver's seat position
G
WARNING
You could lose control of your vehicle if you do the following while driving:
R adjust the driver's seat, head restraint,
steering wheel or mirrors
R fasten the seat belt
There is a risk of an accident.
Adjust the driver's seat, head restraint, steer-
ing wheel and mirror and fasten your seat belt before starting the vehicle's drive system. X
Observe the safety guidelines on seat
adjustment (Y page 89).
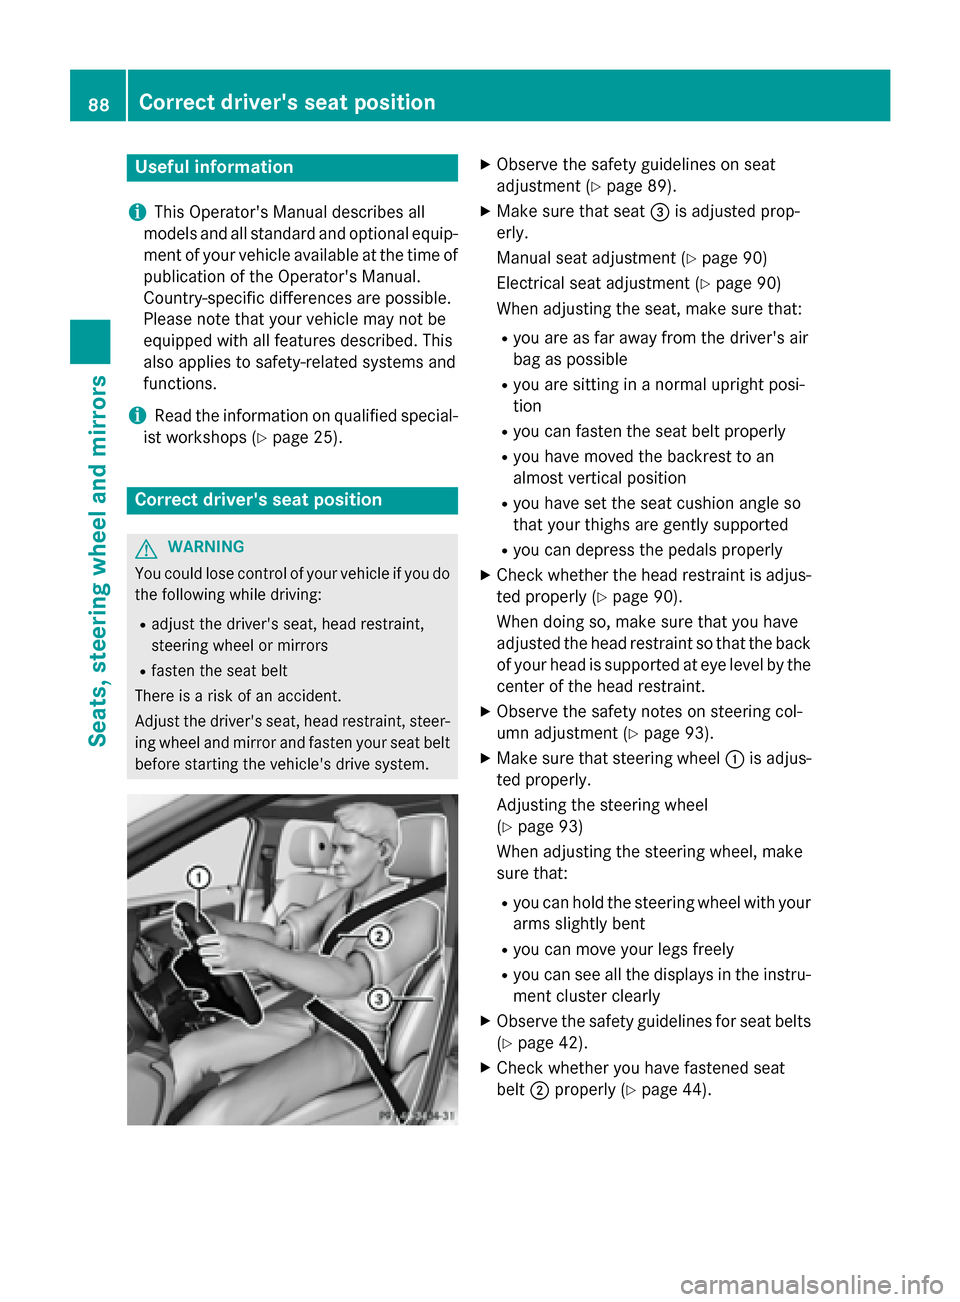
X Make sure that seat =is adjusted prop-
erly.
Manual seat adjustment (Y page 90)
Electrical seat adjustment (Y page 90)
When adjusting the seat, make sure that:
R you are as far away from the driver's air
bag as possible
R you are sitting in a normal upright posi-
tion
R you can fasten the seat belt properly
R you have moved the backrest to an
almost vertical position
R you have set the seat cushion angle so
that your thighs are gently supported
R you can depress the pedals properly
X Check whether the head restraint is adjus-
ted properly (Y page 90).
When doing so, make sure that you have
adjusted the head restraint so that the back of your head is supported at eye level by the
center of the head restraint.
X Observe the safety notes on steering col-
umn adjustment (Y page 93).
X Make sure that steering wheel :is adjus-
ted properly.
Adjusting the steering wheel
(Y page 93)
When adjusting the steering wheel, make
sure that:
R you can hold the steering wheel with your
arms slightly bent
R you can move your legs freely
R you can see all the displays in the instru-
ment cluster clearly
X Observe the safety guidelines for seat belts
(Y page 42).
X Check whether you have fastened seat
belt ;properly (Y page 44). 88
Correct driver's seat positionSeats, steering wheel and mirrors
Page 92 of 338
rials, e.g. blankets, coats, bags, seat cov-
ers, child seats or booster seats.
! Make sure that there are no objects in the
footwell under or behind the seats when
moving the seats back. There is a risk that
the seats and/or the objects could be dam-
aged.
i Further related subjects:
R cargo compartment enlargement (fold-
ing down the rear seats) (Y page 244)Adjusting the seats manually
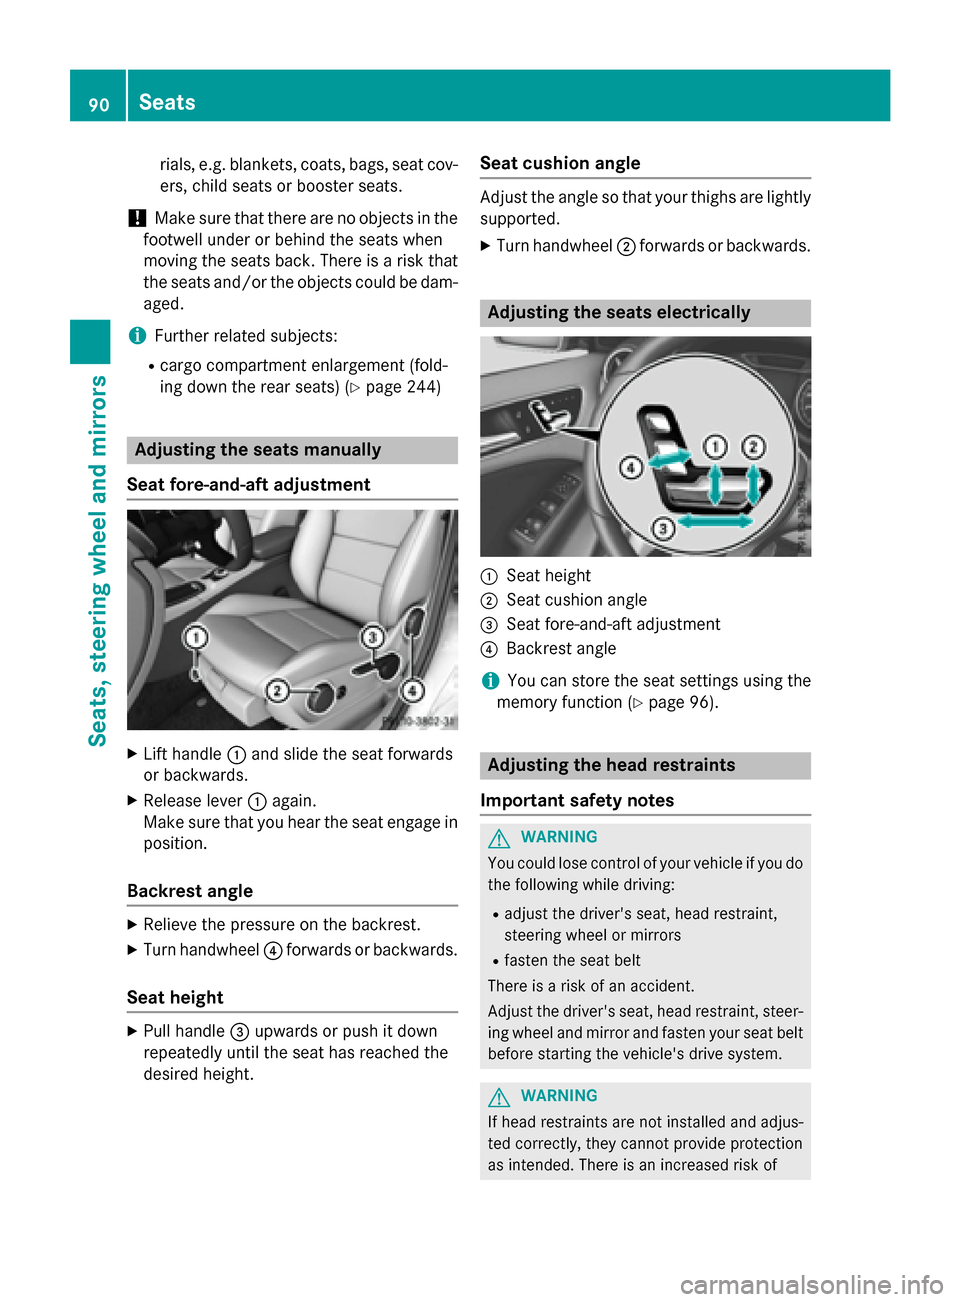
Seat fore-and-aft adjustment X
Lift handle :and slide the seat forwards
or backwards.
X Release lever :again.
Make sure that you hear the seat engage in
position.
Backrest angle X
Relieve the pressure on the backrest.
X Turn handwheel ?forwards or backwards.
Seat height X
Pull handle =upwards or push it down
repeatedly until the seat has reached the
desired height. Seat cushion angle Adjust the angle so that your thighs are lightly
supported.
X Turn handwheel ;forwards or backwards. Adjusting the seats electrically
:
Seat height
; Seat cushion angle
= Seat fore-and-aft adjustment
? Backrest angle
i You can store the seat settings using the
memory function (Y page 96). Adjusting the head restraints
Important safety notes G
WARNING
You could lose control of your vehicle if you do the following while driving:
R adjust the driver's seat, head restraint,
steering wheel or mirrors
R fasten the seat belt
There is a risk of an accident.
Adjust the driver's seat, head restraint, steer-
ing wheel and mirror and fasten your seat belt before starting the vehicle's drive system. G
WARNING
If head restraints are not installed and adjus-
ted correctly, they cannot provide protection
as intended. There is an increased risk of 90
SeatsSeats, steering wheel and mirrors
Page 95 of 338
Problems with the seat heating
Problem
Possible causes/consequences and
M
MSolutions The seat heating has
switched off prema-
turely or cannot be
switched on. The on-board voltage is too low because too many electrical con-
sumers are switched on.
X Switch off electrical consumers that you do not need, such as
the rear window defroster or interior lighting.
Once the battery is sufficiently charged, the seat heating will
switch back on automatically. Steering wheel
Important safety notes
G
WARNING
You could lose control of your vehicle if you do the following while driving:
R adjust the driver's seat, head restraint,
steering wheel or mirrors
R fasten the seat belt
There is a risk of an accident.
Adjust the driver's seat, head restraint, steer-
ing wheel and mirror and fasten your seat belt before starting the vehicle's drive system. G
WARNING
Children could injure themselves if they
adjust the steering wheel. There is a risk of
injury.
When leaving the vehicle, always take the
SmartKey with you and lock the vehicle. Never leave children unsupervised in the vehicle. Adjusting the steering wheel
G
WARNING
If the steering wheel is unlocked while the
vehicle is in motion, it could change position
unexpectedly. This could cause you to lose
control of the vehicle. There is a risk of an
accident. Before starting off, make sure the steering
wheel is locked. Never unlock the steering
wheel while the vehicle is in motion.
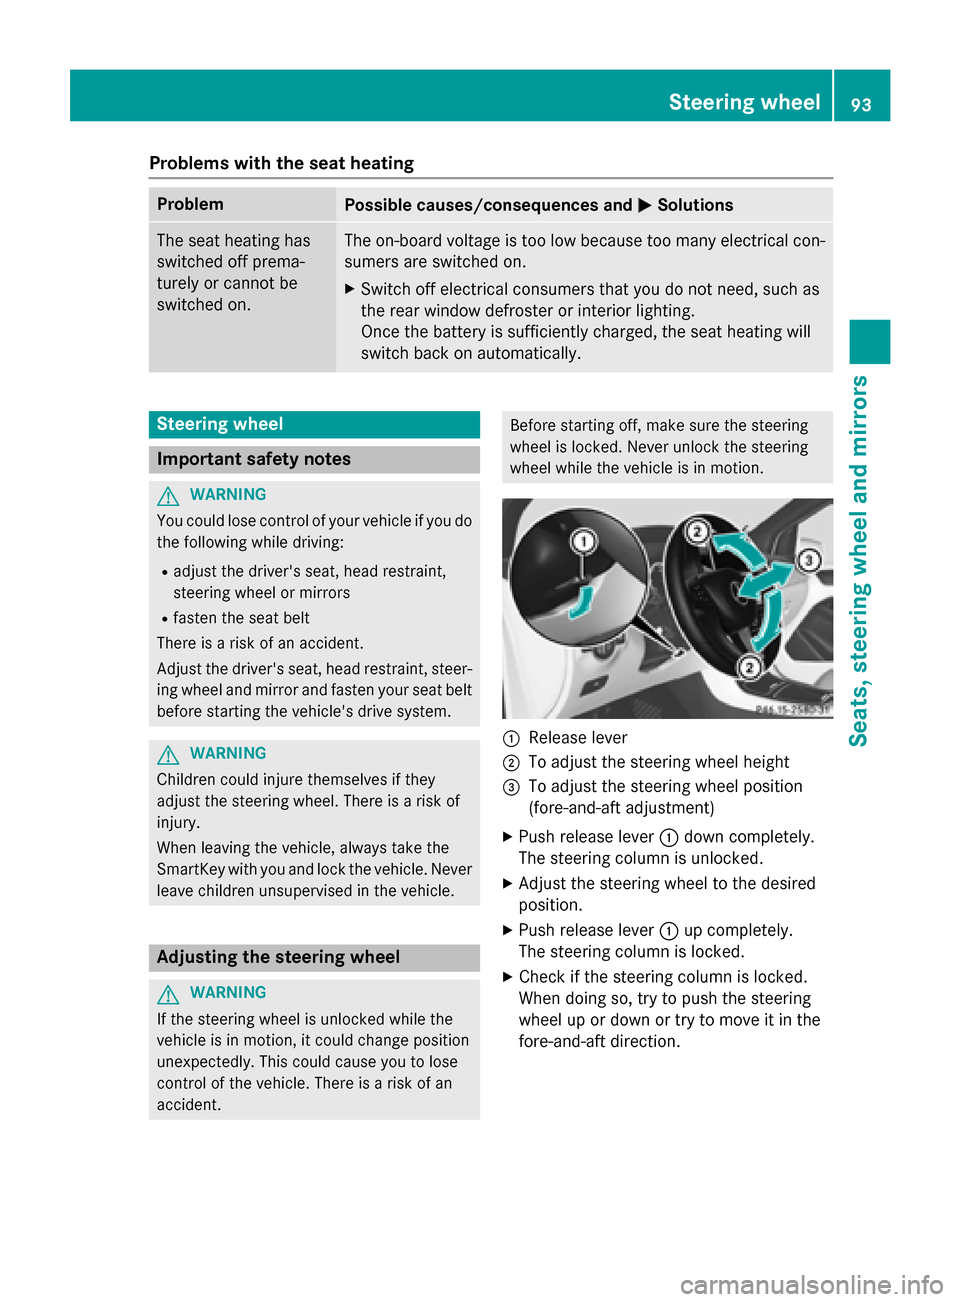
:
Release lever
; To adjust the steering wheel height
= To adjust the steering wheel position
(fore-and-aft adjustment)
X Push release lever :down completely.
The steering column is unlocked.
X Adjust the steering wheel to the desired
position.
X Push release lever :up completely.
The steering column is locked.
X Check if the steering column is locked.
When doing so, try to push the steering
wheel up or down or try to move it in the
fore-and-aft direction. Steering wheel
93Seats, steering wheel and mirrors Z
Page 96 of 338
Mirrors
Rear-view mirror
X
Anti-glare mode: flick anti-glare lever :
forwards or back. Exterior mirrors
Adjusting the exterior mirrors G
WARNING
You could lose control of your vehicle if you do the following while driving:
R adjust the driver's seat, head restraint,
steering wheel or mirrors
R fasten the seat belt
There is a risk of an accident.
Adjust the driver's seat, head restraint, steer-
ing wheel and mirror and fasten your seat belt before starting the vehicle's drive system. G
WARNING
The exterior mirror on the front-passenger
side reduces the size of the image. Visible
objects are actually closer than they appear.
This means that you could misjudge the dis-
tance from road users traveling behind, e.g.
when changing lane. There is a risk of an acci-
dent.
For this reason, always make sure of the
actual distance from the road users traveling
behind by glancing over your shoulder. X
Turn the SmartKey to position 1or 2in the
ignition lock (Y page 131).
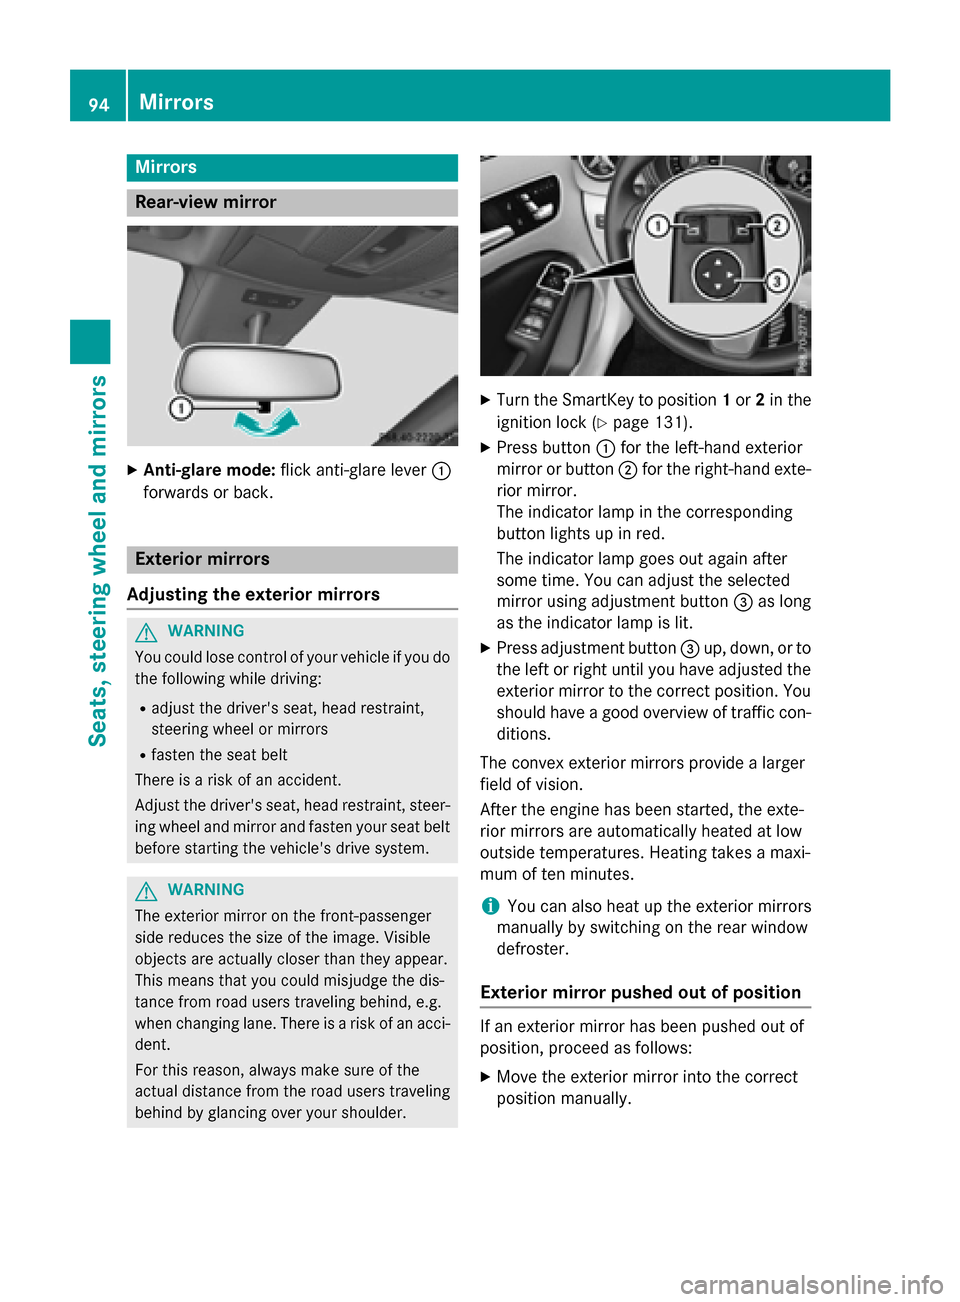
X Press button :for the left-hand exterior
mirror or button ;for the right-hand exte-
rior mirror.
The indicator lamp in the corresponding
button lights up in red.
The indicator lamp goes out again after
some time. You can adjust the selected
mirror using adjustment button =as long
as the indicator lamp is lit.
X Press adjustment button =up, down, or to
the left or right until you have adjusted the
exterior mirror to the correct position. You
should have a good overview of traffic con- ditions.
The convex exterior mirrors provide a larger
field of vision.
After the engine has been started, the exte-
rior mirrors are automatically heated at low
outside temperatures. Heating takes a maxi-
mum of ten minutes.
i You can also heat up the exterior mirrors
manually by switching on the rear window
defroster.
Exterior mirror pushed out of position If an exterior mirror has been pushed out of
position, proceed as follows:
X Move the exterior mirror into the correct
position manually. 94
MirrorsSeats, steering wheel and mirrors