2015 MERCEDES-BENZ B-Class ELECTRIC mirror
[x] Cancel search: mirrorPage 179 of 338

The following information is displayed:
R length of the journey since the last break.
R the attention level determined by ATTEN-
TION ASSIST ( Attention Level
Attention Level), dis-
played in a bar display in five levels from
high to low
R If ATTENTION ASSIST is unable to calculate
the attention level and cannot issue a warn-
ing, the System Suspended System Suspended message
appears. The bar display then changes the
display, e.g. if you are driving at a speed
below 37 mph (60 km/h) or above 124 mph
(200 km/h).
Activating ATTENTION ASSIST X
Activate ATTENTION ASSIST using the on-
board computer (Y page 194).
The system determines the attention level
of the driver depending on the setting
selected:
Selection Standard
Standard: the sensitivity with
which the system determines the attention
level is set to normal.
Selection Sensitive Sensitive: the sensitivity is set
higher. The attention level detected by Atten- tion Assist is adapted accordingly and the
driver is warned earlier.
When ATTENTION ASSIST is deactivated, the é symbol appears in the multifunction
display in the assistance graphic display.
When ATTENTION ASSIST has been deactiva-
ted, it is automatically reactivated after the
engine has been stopped. The sensitivity
selected corresponds to the last selection
activated (standard/sensitive).
Warning in the multifunction display If fatigue or increasing lapses in concentra-
tion are detected, a warning appears in the
multifunction display:
ATTENTION ASSIST ATTENTION ASSIST
Take a Break! Take a Break!.
In addition to the message shown in the mul-
tifunction display, you will then hear a warn-
ing tone. X
If necessary, take a break.
X Confirm the message by pressing the a
button on the steering wheel.
On long journeys, take regular breaks in good
time to allow yourself to rest properly. If you
do not take a break and ATTENTION ASSIST
still detects increasing lapses in concentra-
tion, you will be warned again after
15 minutes at the earliest. This will only hap-
pen if ATTENTION ASSIST still detects typical indicators of fatigue or increasing lapses in
concentration.
If a warning is output in the multifunction dis-
play, a service station search is performed in
COMAND. You can select a service station
and navigation to this service station will then
begin. This function can be activated and
deactivated in COMAND. Blind Spot Assist
General notes Blind Spot Assist monitors the areas on either
side of the vehicle that are not visible to the
driver with two lateral, rear-facing radar sen-
sors. A warning display in the exterior mirrors draws your attention to vehicles detected in
the monitored area. If you then switch on thecorresponding turn signal to change lanes,
you will also receive a visual and audible col-
lision warning.
Blind Spot Assist supports you from a speed
of approximately 20 mph (30 km/h).
Important safety notes G
WARNING
Blind Spot Assist does not react to:
R vehicles overtaken too closely on the side,
placing them in the blind spot area
R vehicles which approach with a large speed
differential and overtake your vehicle
As a result, Blind Spot Assist may not give
warnings in such situations. There is a risk of an accident. Driving systems
177Driving and parking
Z
Page 181 of 338
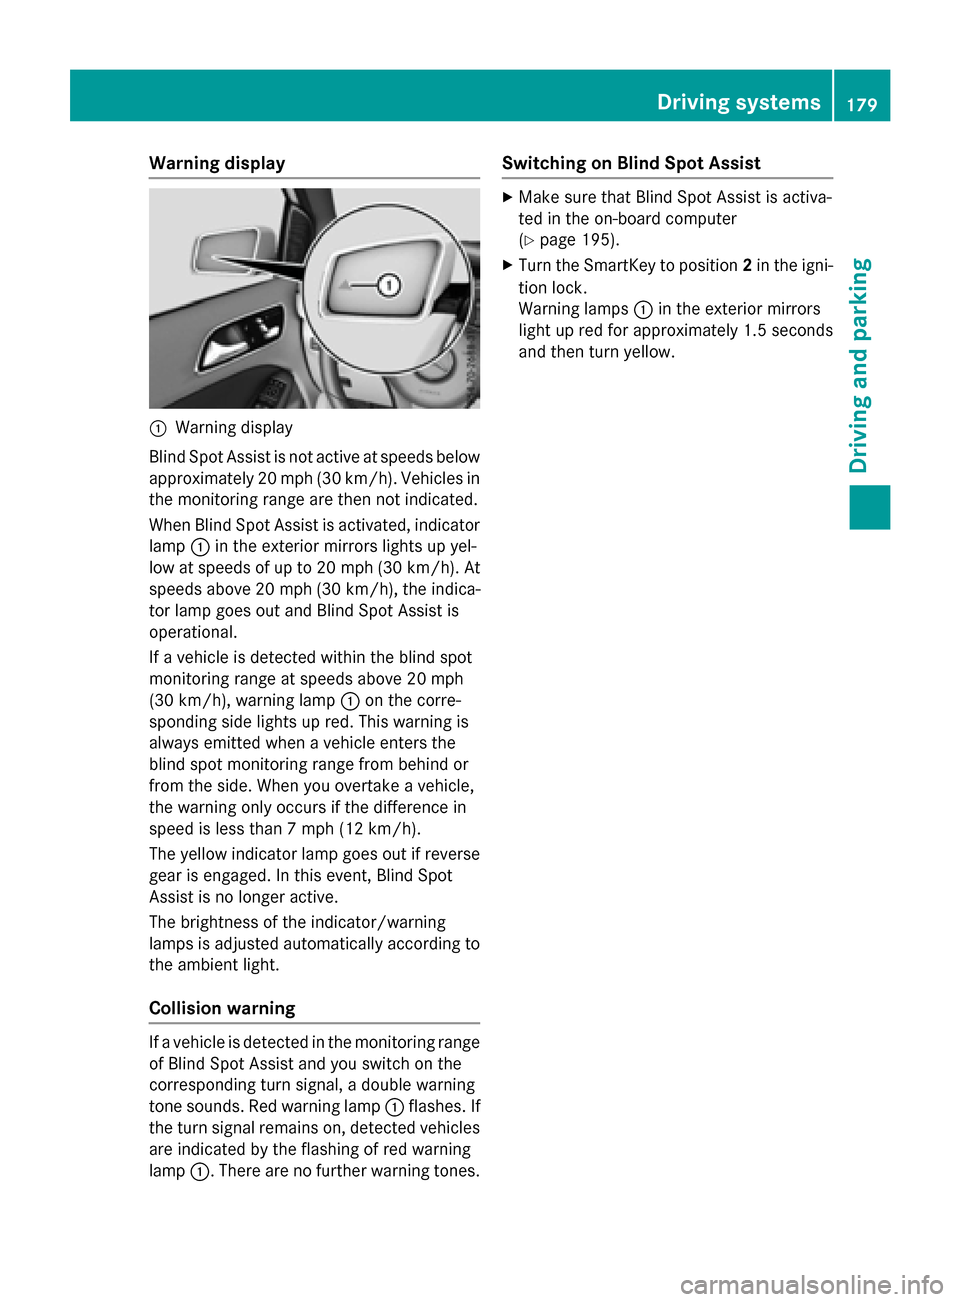
Warning display
:
Warning display
Blind Spot Assist is not active at speeds below approximately 20 mph (30 km/h). Vehicles in the monitoring range are then not indicated.
When Blind Spot Assist is activated, indicator
lamp :in the exterior mirrors lights up yel-
low at speeds of up to 20 mph (30 km/h). At speeds above 20 mph (30 km/h), the indica-
tor lamp goes out and Blind Spot Assist is
operational.
If a vehicle is detected within the blind spot
monitoring range at speeds above 20 mph
(30 km/h), warning lamp :on the corre-
sponding side lights up red. This warning is
always emitted when a vehicle enters the
blind spot monitoring range from behind or
from the side. When you overtake a vehicle,
the warning only occurs if the difference in
speed is less than 7 mph (12 km/h).
The yellow indicator lamp goes out if reverse gear is engaged. In this event, Blind Spot
Assist is no longer active.
The brightness of the indicator/warning
lamps is adjusted automatically according to
the ambient light.
Collision warning If a vehicle is detected in the monitoring range
of Blind Spot Assist and you switch on the
corresponding turn signal, a double warning
tone sounds. Red warning lamp :flashes. If
the turn signal remains on, detected vehicles
are indicated by the flashing of red warning
lamp :. There are no further warning tones. Switching on Blind Spot Assist X
Make sure that Blind Spot Assist is activa-
ted in the on-board computer
(Y page 195).
X Turn the SmartKey to position 2in the igni-
tion lock.
Warning lamps :in the exterior mirrors
light up red for approximately 1.5 seconds
and then turn yellow. Driving systems
179Driving and parking Z
Page 217 of 338
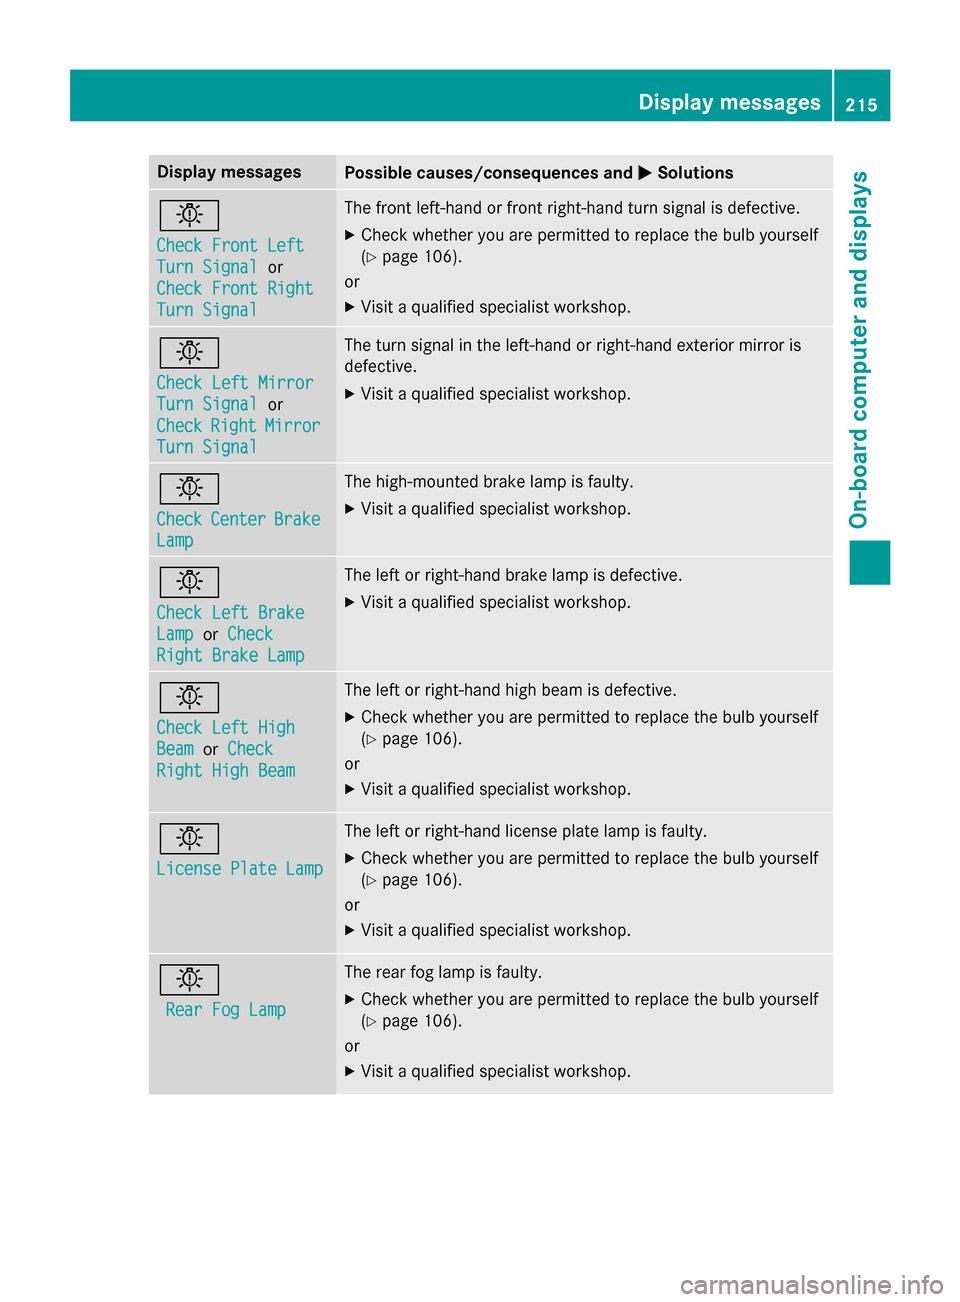
Display messages
Possible causes/consequences and
M
MSolutions b
Check Front Left Check Front Left
Turn Signal Turn Signal
or
Check Front Right
Check Front Right
Turn Signal Turn Signal The front left-hand or front right-hand turn signal is defective.
X Check whether you are permitted to replace the bulb yourself
(Y page 106).
or
X Visit a qualified specialist workshop. b
Check Left Mirror Check Left Mirror
Turn Signal Turn Signal
or
Check
Check Right
RightMirror
Mirror
Turn Signal
Turn Signal The turn signal in the left-hand or right-hand exterior mirror is
defective.
X Visit a qualified specialist workshop. b
Check Check
Center
Center Brake
Brake
Lamp
Lamp The high-mounted brake lamp is faulty.
X
Visit a qualified specialist workshop. b
Check Left Brake Check Left Brake
Lamp Lamp
orCheck
Check
Right Brake Lamp
Right Brake Lamp The left or right-hand brake lamp is defective.
X Visit a qualified specialist workshop. b
Check Left High Check Left High
Beam Beam
orCheck
Check
Right High Beam
Right High Beam The left or right-hand high beam is defective.
X Check whether you are permitted to replace the bulb yourself
(Y page 106).
or
X Visit a qualified specialist workshop. b
License Plate Lamp License Plate Lamp The left or right-hand license plate lamp is faulty.
X Check whether you are permitted to replace the bulb yourself
(Y page 106).
or
X Visit a qualified specialist workshop. b
Rear Fog Lamp Rear Fog Lamp The rear fog lamp is faulty.
X Check whether you are permitted to replace the bulb yourself
(Y page 106).
or
X Visit a qualified specialist workshop. Display
messages
215On-board computer and displays Z
Page 253 of 338
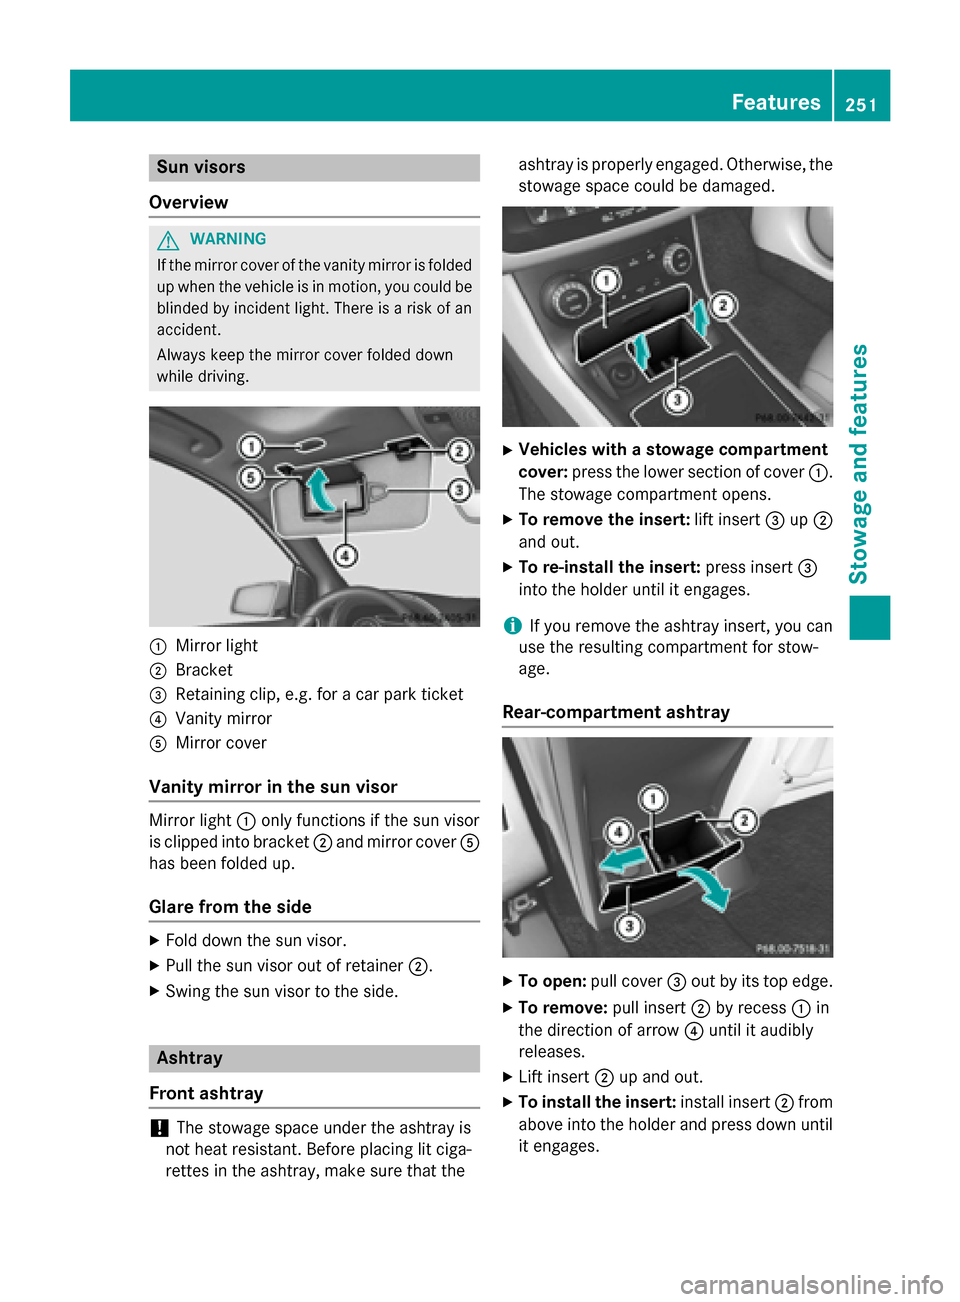
Sun visors
Overview G
WARNING
If the mirror cover of the vanity mirror is folded up when the vehicle is in motion, you could be
blinded by incident light. There is a risk of an
accident.
Always keep the mirror cover folded down
while driving. :
Mirror light
; Bracket
= Retaining clip, e.g. for a car park ticket
? Vanity mirror
A Mirror cover
Vanity mirror in the sun visor Mirror light
:only functions if the sun visor
is clipped into bracket ;and mirror cover A
has been folded up.
Glare from the side X
Fold down the sun visor.
X Pull the sun visor out of retainer ;.
X Swing the sun visor to the side. Ashtray
Front ashtray !
The stowage space under the ashtray is
not heat resistant. Before placing lit ciga-
rettes in the ashtray, make sure that the ashtray is properly engaged. Otherwise, the
stowage space could be damaged. X
Vehicles with a stowage compartment
cover: press the lower section of cover :.
The stowage compartment opens.
X To remove the insert: lift insert=up;
and out.
X To re-install the insert: press insert=
into the holder until it engages.
i If you remove the ashtray insert, you can
use the resulting compartment for stow-
age.
Rear-compartment ashtray X
To open: pull cover =out by its top edge.
X To remove: pull insert;by recess :in
the direction of arrow ?until it audibly
releases.
X Lift insert ;up and out.
X To install the insert: install insert;from
above into the holder and press down until it engages. Features
251Stowage and features Z
Page 263 of 338
The data you receive contains the following
information:
R the location where the speed limit was
exceeded
R the time at which the speed limit was
exceeded
R the selected speed limit which was excee-
ded
Geo fencing Geo fencing allows you to select areas which
the vehicle should not enter or leave. You will
be informed if the vehicle crosses the boun-
daries of the selected areas. You can select
the way in which you receive this information beforehand. Possible options include text
message, e-mail or an automated call.
The area can be determined as either a circle
or a polygon with a maximum of ten corners.
You can specify up to ten areas simultane-
ously. Different settings are possible for each area.
These settings can be called up under "Own-
ers Online" at http://www.mbusa.com.
Alternatively, you can trigger an MB Info call
and inform the customer service representa-
tive that you wish to activate geo fencing.
Currently inactive areas can be activated by
text message.
Triggering the vehicle alarm With this function, you can trigger the vehi-
cle's panic alarm via text message. An alarm
sounds and the exterior lighting flashes.
Depending on the setting, the panic alarm
lasts five or ten seconds. Afterwards, the
alarm switches off. Garage door opener
General notes The HomeLink
®
garage door opener integra-
ted in the rear-view mirror allows you to oper- ate up to three different door and gate sys-
tems.
Use the integrated garage door opener only
on garage doors that:
R have safety stop and reverse features and
R meet current U.S. federal safety standards
Once programed, the integrated garage door opener in the rear-view mirror will assume the
function of the garage door system's remote
control. Please also read the operating
instructions for the garage door system.
When programming a garage door opener,
park the vehicle outside the garage. Do not
run the engine while programming.
Certain garage door drives are incompatible
with the integrated garage door opener. If you
have difficulty programing the integrated
garage door opener, contact an authorized
Mercedes-Benz Center.
Alternatively, you can call the following tele-
phone assistance services:
R USA: Mercedes-Benz Customer Assistance
Center at 1-800-FOR-MERCedes
R Canada: Customer Service at
1-800-387-0100
R HomeLink ®
hotline 1-800-355-3515 (free
of charge)
More information on HomeLink ®
and/or
compatible products is also available online
at http://www.homelink.com.
Notes on the declaration of conformity
(Y page 24).
USA: FCC ID: CB2HMIHL4
Canada: IC: 279B-HMIHL4
Important safety notes G
WARNING
When you operate or program the garage door with the integrated garage door opener, per-
sons in the range of movement of the garage
door can become trapped or struck by the
garage door. There is a risk of injury. Features
261Stowage and features
Z
Page 264 of 338
When using the integrated garage door
opener, always make sure that nobody is
within the range of movement of the garage
door.
G
WARNING
Combustion engines emit poisonous exhaust
gases such as carbon monoxide. Inhaling
these exhaust gases leads to poisoning. There is a risk of fatal injury. Therefore never leave
the engine running in enclosed spaces with-
out sufficient ventilation.
Programming Programming buttons
Pay attention to the "Important safety notes"
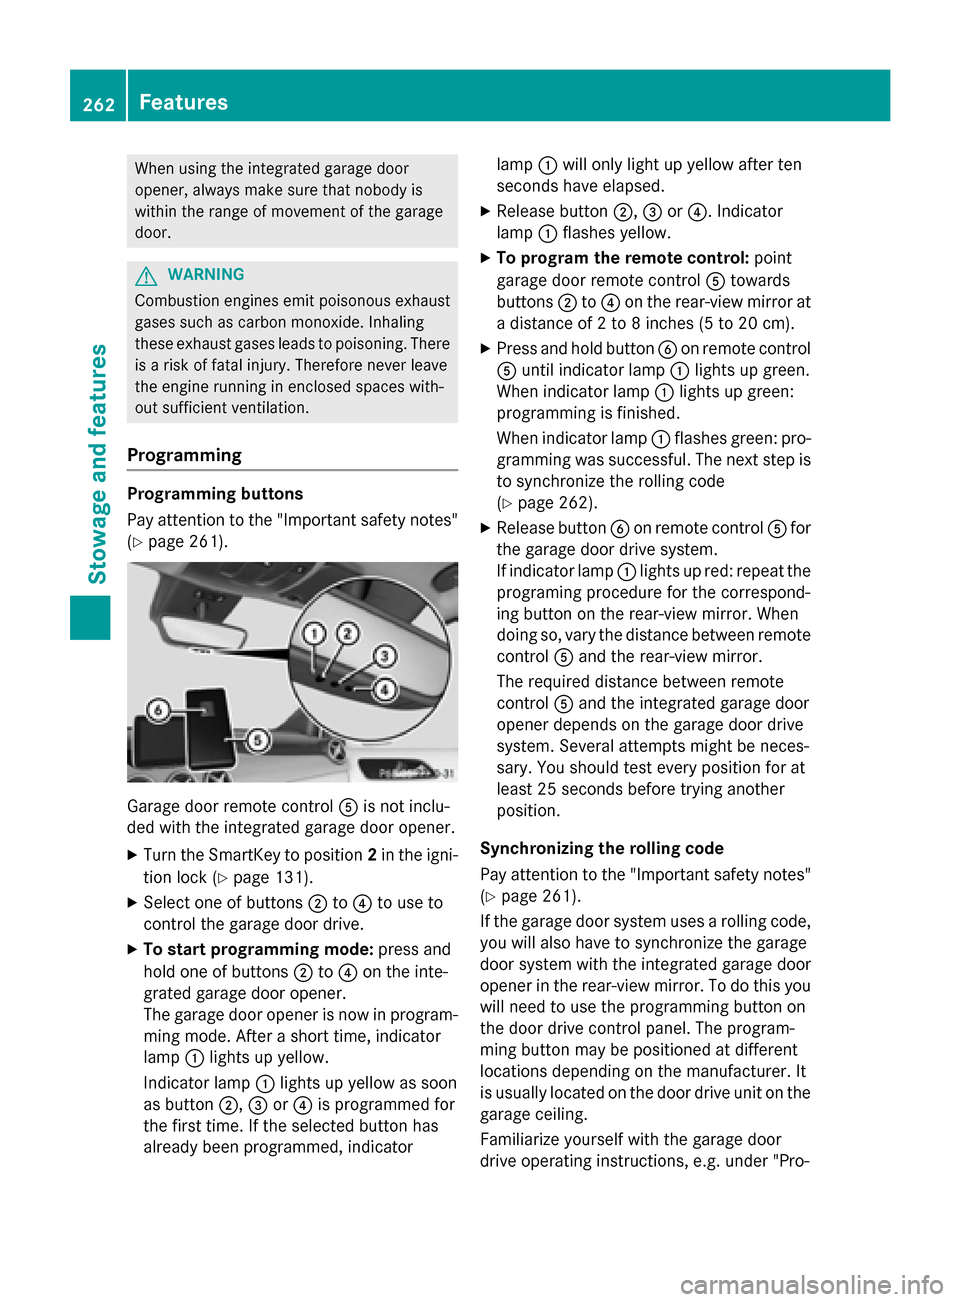
(Y page 261). Garage door remote control
Ais not inclu-
ded with the integrated garage door opener.
X Turn the SmartKey to position 2in the igni-
tion lock (Y page 131).
X Select one of buttons ;to? to use to
control the garage door drive.
X To start programming mode: press and
hold one of buttons ;to? on the inte-
grated garage door opener.
The garage door opener is now in program-
ming mode. After a short time, indicator
lamp :lights up yellow.
Indicator lamp :lights up yellow as soon
as button ;,=or? is programmed for
the first time. If the selected button has
already been programmed, indicator lamp
:will only light up yellow after ten
seconds have elapsed.
X Release button ;,=or?. Indicator
lamp :flashes yellow.
X To program the remote control: point
garage door remote control Atowards
buttons ;to? on the rear-view mirror at
a distance of 2 to 8 inches (5 to 20 cm).
X Press and hold button Bon remote control
A until indicator lamp :lights up green.
When indicator lamp :lights up green:
programming is finished.
When indicator lamp :flashes green: pro-
gramming was successful. The next step is to synchronize the rolling code
(Y page 262).
X Release button Bon remote control Afor
the garage door drive system.
If indicator lamp :lights up red: repeat the
programing procedure for the correspond-
ing button on the rear-view mirror. When
doing so, vary the distance between remote control Aand the rear-view mirror.
The required distance between remote
control Aand the integrated garage door
opener depends on the garage door drive
system. Several attempts might be neces-
sary. You should test every position for at
least 25 seconds before trying another
position.
Synchronizing the rolling code
Pay attention to the "Important safety notes"
(Y page 261).
If the garage door system uses a rolling code,
you will also have to synchronize the garage
door system with the integrated garage door
opener in the rear-view mirror. To do this you
will need to use the programming button on
the door drive control panel. The program-
ming button may be positioned at different
locations depending on the manufacturer. It
is usually located on the door drive unit on the garage ceiling.
Familiarize yourself with the garage door
drive operating instructions, e.g. under "Pro- 262
FeaturesStowage and features
Page 265 of 338
gramming of additional remote controls",
before carrying out the following steps.
Your vehicle must be within reach of the
garage door or gate opener drive. Make sure
that neither your vehicle nor any persons/
objects are present within the sweep of the
door or gate.
X Turn the SmartKey to position 2in the igni-
tion lock (Y page 131).
X Get out of the vehicle.
X Press the programming button on the door
drive unit.
Usually, you now have 30 seconds to ini-
tiate the next step.
X Get into the vehicle.
X Press previously programmed button ;,
= or? on the integrated garage door
opener until the door closes.
The rolling code synchronization is then
complete.
Notes on programming the remote con-
trol
Canadian radio frequency laws require a
"break" (or interruption) of the transmission
signals after broadcasting for a few seconds. Therefore, these signals may not last long
enough for the integrated garage door
opener. The signal is not recognized during
programming. Comparable with Canadian
law, some U.S. garage door openers also fea-
ture a "break".
Proceed as follows:
R if you live in Canada
R if you have difficulties programming the
garage door opener (regardless of where
you live) when using the programming
steps
X Press and hold one of buttons ;to? on
the integrated garage door opener.
After a short time, indicator lamp :lights
up yellow.
X Release the button.
Indicator lamp :flashes yellow. X
Press button Bof garage door remote
control Afor two seconds, then release it
for two seconds.
X Press button Bagain for two seconds.
X Repeat this sequence on button Bof
remote control Auntil indicator lamp :
lights up green.
When indicator lamp :lights up green:
programming is finished.
When indicator lamp :flashes green: pro-
gramming was successful. The next step is to synchronize the rolling code.
X Release button Bof remote control Aof
the garage door drive.
If indicator lamp :lights up red: repeat the
programming process for the correspond-
ing button on the rear-view mirror. When
doing so, vary the distance between remote
control Aand the rear-view mirror.
The required distance between remote
control Aand the integrated garage door
opener depends on the garage door drive
system. Several attempts might be neces-
sary. You should test every position for at
least 25 seconds before trying another
position.
Problems when programming
If you are experiencing problems programing
the integrated garage door opener on the
rear-view mirror, take note of the following
instructions:
R Check the transmitter frequency used by
garage door drive remote control Aand
whether it is supported. The transmitter
frequency can usually be found on the back
of the garage door drive remote control.
The integrated garage door opener is com-
patible with devices that have units which
operate in the frequency range of 280 to
433 MHz.
R Replace the batteries in garage door
remote control A. This increases the like-
lihood that garage door remote control A
will transmit a strong and precise signal to the integrated garage door opener. Features
263Stowage and features Z
Page 266 of 338
R
When programming, hold remote control
A at varying distances and angles from the
button which you are programming. Try var- ious angles at a distance between 2and
12 inches (5to 30 cm) or at the same angle
but at varying distances.
R If another remote control is available for the
same garage door drive, repeat the same
programming steps with this remote con-
trol. Before performing these steps, make
sure that new batteries have been installed in garage door drive remote control A.
R Note that some remote controls only trans-
mit for a limited amount of time (the indi-
cator lamp on the remote control goes out). Press button Bon remote control Aagain
before transmission ends.
R Align the antenna cable of the garage door
opener unit. This can improve signal recep- tion/transmission.
Opening/closing the garage door After it has been programmed, the integrated
garage door opener performs the function of
the garage door system remote control.
Please also read the operating instructions
for the garage door system.
X Turn the SmartKey to position 2in the igni-
tion lock (Y page 131).
X Press button ;,=or? which you have
programmed to operate the garage door.
Garage door system with a fixed code: indi-
cator lamp :lights up green.
Garage door system with a rolling code:
indicator lamp :flashes green.
The transmitter will transmit a signal as
long as the button is pressed. The trans-
mission is halted after a maximum of ten
seconds and indicator lamp :lights up
yellow.
X Press button ;,=or? again if neces-
sary. Clearing the memory Make sure that you clear the memory of the
integrated garage door opener before selling
the vehicle.
X Turn the SmartKey to position 2in the igni-
tion lock (Y page 131).
X Press and hold buttons ;and ?.
The indicator lamp initially lights up yellow
and then green.
X Release buttons ;and ?.
The memory of the integrated garage door
opener in the rear-view mirror is cleared. Compass
Calling up the compass :
Rear-view mirror
; Compass display
= Opening
The compass displays in which compass
direction the vehicle is currently traveling: N N,
NE
NE, E
E,SE
SE, S
S,SW
SW, W
Wor NW
NW.
To receive a correct compass display reading, the magnetic field zone must be set and the
compass calibrated. 264
FeaturesStowage and features