2015 MERCEDES-BENZ B-Class ELECTRIC check engine
[x] Cancel search: check enginePage 133 of 338
R
in transmission position N
R during and after ESP stability control
If you do not make an additional effort to
apply the brake yourself, the braking effect
may not be sufficient. If necessary, counter-
act the reduced regenerative braking effect
by applying the brake yourself.
Before commencing your journey, ensure that the charging cable required for charging the
high-voltage battery is in the vehicle. Key positions
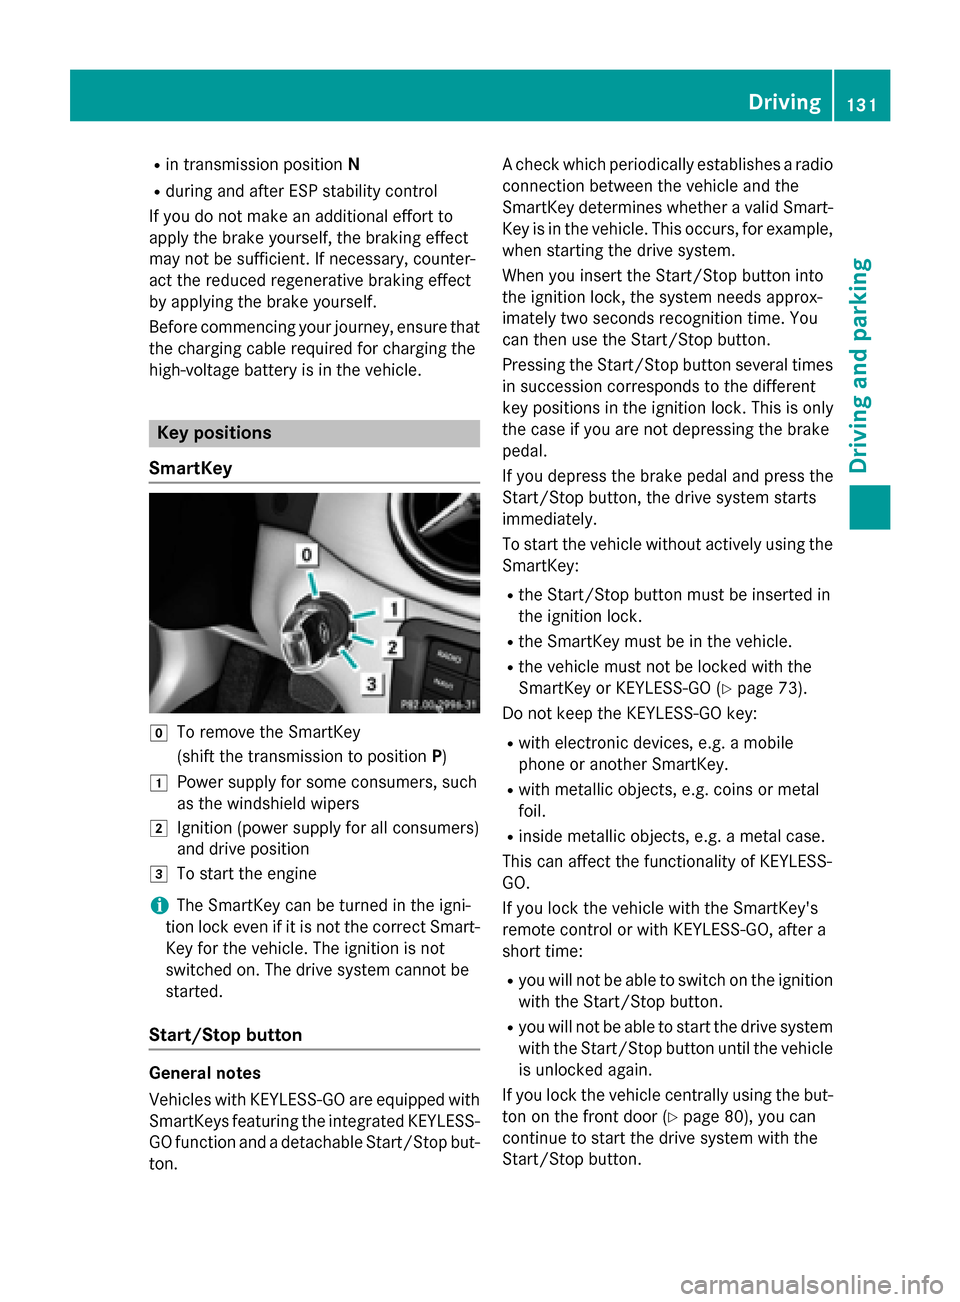
SmartKey g
To remove the SmartKey
(shift the transmission to position P)
1 Power supply for some consumers, such
as the windshield wipers
2 Ignition (power supply for all consumers)
and drive position
3 To start the engine
i The SmartKey can be turned in the igni-
tion lock even if it is not the correct Smart- Key for the vehicle. The ignition is not
switched on. The drive system cannot be
started.
Start/Stop button General notes
Vehicles with KEYLESS-GO are equipped with
SmartKeys featuring the integrated KEYLESS- GO function and a detachable Start/Stop but-
ton. A check which periodically establishes a radio
connection between the vehicle and the
SmartKey determines whether a valid Smart- Key is in the vehicle. This occurs, for example,
when starting the drive system.
When you insert the Start/Stop button into
the ignition lock, the system needs approx-
imately two seconds recognition time. You
can then use the Start/Stop button.
Pressing the Start/Stop button several times
in succession corresponds to the different
key positions in the ignition lock. This is only
the case if you are not depressing the brake
pedal.
If you depress the brake pedal and press the
Start/Stop button, the drive system starts
immediately.
To start the vehicle without actively using the SmartKey:
R the Start/Stop button must be inserted in
the ignition lock.
R the SmartKey must be in the vehicle.
R the vehicle must not be locked with the
SmartKey or KEYLESS-GO (Y page 73).
Do not keep the KEYLESS-GO key:
R with electronic devices, e.g. a mobile
phone or another SmartKey.
R with metallic objects, e.g. coins or metal
foil.
R inside metallic objects, e.g. a metal case.
This can affect the functionality of KEYLESS-
GO.
If you lock the vehicle with the SmartKey's
remote control or with KEYLESS-GO, after a
short time:
R you will not be able to switch on the ignition
with the Start/Stop button.
R you will not be able to start the drive system
with the Start/Stop button until the vehicle is unlocked again.
If you lock the vehicle centrally using the but-
ton on the front door (Y page 80), you can
continue to start the drive system with the
Start/Stop button. Driving
131Driving and parking Z
Page 142 of 338
In particular, the function of the radar sensors
can be impaired in the case of:
R there is dirt on the sensors or anything else
covering the sensors
R there is snow or heavy rain
R there is interference by other radar sources
R there are strong radar reflections, for
example in parking garages
R a narrow vehicle traveling in front, e.g. a
motorbike
R a vehicle traveling in front on a different line
relative to the center of your vehicle
Following damage to the front end of the vehi-
cle, have the configuration and operation of
the radar sensors checked at a qualified spe-
cialist workshop. This also applies to colli-
sions at slow speeds where there is no visible
damage to the front of the vehicle.
If the radar sensors are not available, the sys-
tem switches automatically to level Dwith
moderate recuperation. Have the radar sen-
sors checked at a qualified specialist work-
shop.
Automatic adjustment of recuperation
on downhill gradients The vehicle can detect steep downhill gradi-
ents. To reduce acceleration downhill and to
charge the high-voltage battery, recuperation is increased steplessly. This is comparable to
the engine brake in a combustion engine
when you downshift a gear on a downhill gra- dient.
Automatic adjustment of recuperation on
downhill gradients is available in level DAUTO
or on vehicles without steering wheel paddle
shifters in level D.
Intelligent recuperation The vehicle uses the map and camera data of
Traffic Sign Assist in addition to the sensors
of COLLISION PREVENTION ASSIST PLUS
during radar-based recuperation (D AUTO
). The
rate of recuperation is then automatically adjusted to the current traffic situation, tak-
ing the current and future maximum speed
into account. High-voltage battery
Important safety notes
G
DANGER
The vehicle's high voltage electrical system is under high voltage. If you modify components
in the vehicle's high-voltage electrical system or touch damaged components, you may be
electrocuted. The components in the vehi-
cle's high-voltage electrical system may be
damaged in an accident, although the damage
is not visible. There is a risk of fatal injury.
Following an accident, do not touch any high- voltage components and never modify the
vehicle's high-voltage electrical system. Have
the vehicle towed away after an accident and the vehicle's high-voltage electrical system
checked by a qualified specialist workshop. G
WARNING
In the event of a vehicle fire, the internal pres- sure of the high-voltage battery can exceed a
critical value. In this case flammable gas
escapes through a ventilation valve on the
underbody. The gas can ignite. There is a risk of injury.
Leave the danger zone immediately. Secure
the danger area at a suitable distance, whilst
observing legal requirements. G
DANGER
If you use incorrectly installed mains sockets or adapters, extension cables or similar to
connect the charging cable to a mains socket,
this could lead to fires or an electric shock.
There is a risk of fatal injury. 140
High-voltage batteryDriving and parking
Page 150 of 338
computer are different, the high-voltage bat-
tery is charged using the lower value.
If the vehicle requires more time than usual to
charge the high-voltage battery, check:
R the settings of the maximum charge cur-
rent on the controls of the charging cable
R the settings of the maximum charge cur-
rent in the menu of the on-board computer
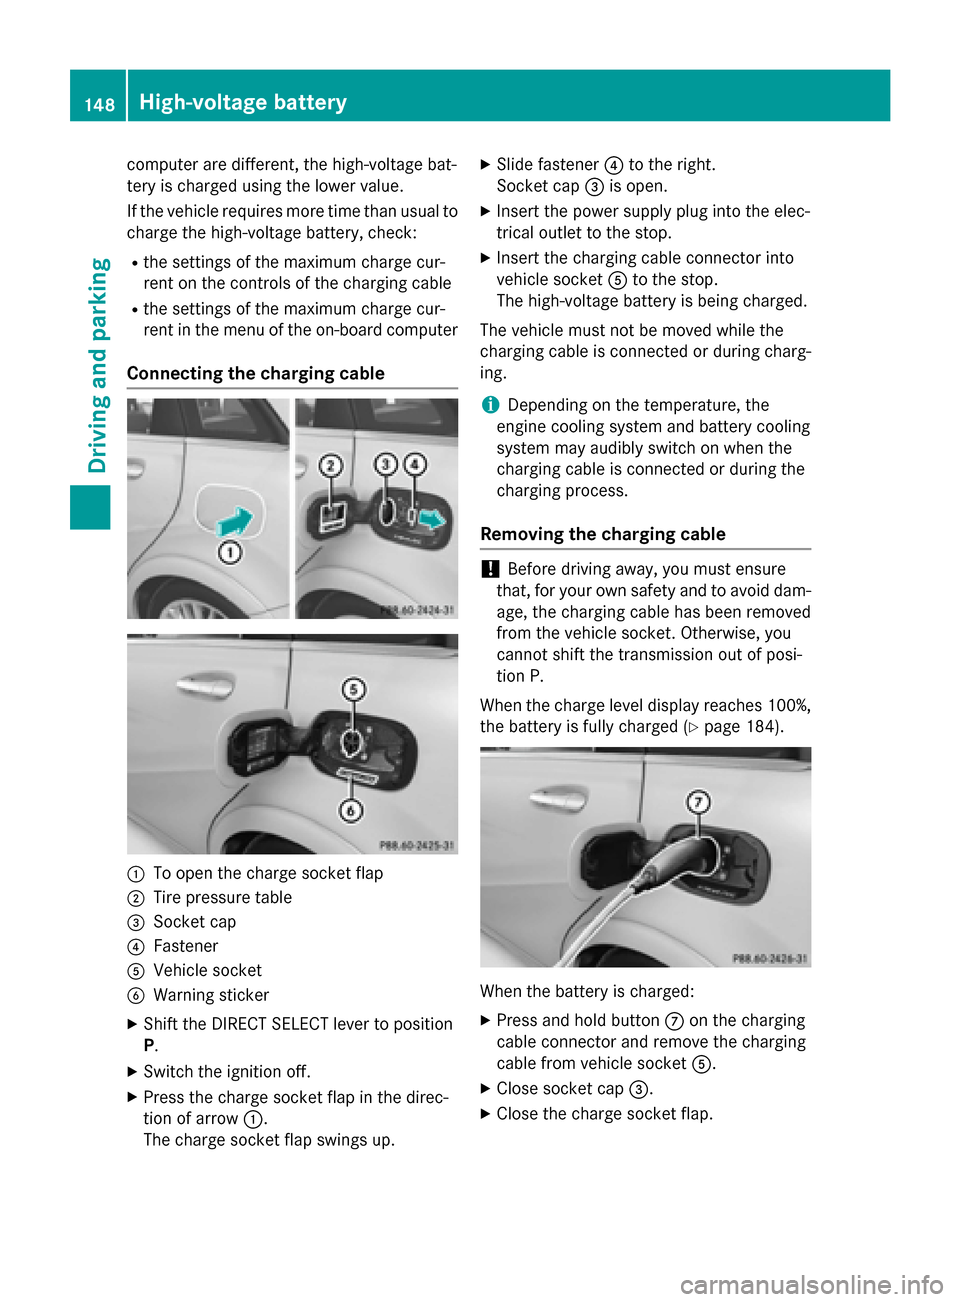
Connecting the charging cable :
To open the charge socket flap
; Tire pressure table
= Socket cap
? Fastener
A Vehicle socket
B Warning sticker
X Shift the DIRECT SELECT lever to position
P.
X Switch the ignition off.
X Press the charge socket flap in the direc-
tion of arrow :.
The charge socket flap swings up. X
Slide fastener ?to the right.
Socket cap =is open.
X Insert the power supply plug into the elec-
trical outlet to the stop.
X Insert the charging cable connector into
vehicle socket Ato the stop.
The high-voltage battery is being charged.
The vehicle must not be moved while the
charging cable is connected or during charg-
ing.
i Depending on the temperature, the
engine cooling system and battery cooling
system may audibly switch on when the
charging cable is connected or during the
charging process.
Removing the charging cable !
Before driving away, you must ensure
that, for your own safety and to avoid dam- age, the charging cable has been removed
from the vehicle socket. Otherwise, you
cannot shift the transmission out of posi-
tion P.
When the charge level display reaches 100%, the battery is fully charged (Y page 184). When the battery is charged:
X Press and hold button Con the charging
cable connector and remove the charging
cable from vehicle socket A.
X Close socket cap =.
X Close the charge socket flap. 148
High-voltage batteryDriving and parking
Page 161 of 338
Do not depress the brake pedal continuously
while the vehicle is in motion, e.g. causing the
brakes to rub by constantly applying light
pressure to the pedal. This results in exces-
sive and premature wear to the brake pads.
Heavy and light loads G
WARNING
If you rest your foot on the brake pedal while
driving, the braking system can overheat. This increases the stopping distance and can even
cause the braking system to fail. There is a
risk of an accident.
Never use the brake pedal as a footrest. Never
depress the brake pedal and the accelerator
pedal at the same time.
! Depressing the brake pedal constantly
results in excessive and premature wear to
the brake pads.
If the brakes have been subjected to a heavy load, do not stop the vehicle immediately.
Drive on for a short while. This allows the air-
flow to cool the brakes more quickly.
Wet roads If you have driven for a long time in heavy rain
without braking, there may be a delayed reac- tion from the brakes when braking for the firsttime. This may also occur after the vehicle has
been washed or driven through deep water.
You have to depress the brake pedal more
firmly. Maintain a greater distance from the
vehicle in front.
After driving on a wet road or having the vehi-
cle washed, brake firmly while paying atten-
tion to the traffic conditions. This will warm up
the brake discs, thereby drying them more
quickly and protecting them against corro-
sion.
Limited braking performance on salt-
treated roads If you drive on salted roads, a layer of salt
residue may form on the brake discs and brake pads. This can result in a significantly
longer braking distance.
R In order to prevent any salt build-up, apply
the brakes occasionally while paying atten- tion to the traffic conditions.
R Carefully depress the brake pedal and the
beginning and end of a journey.
R Maintain a greater distance to the vehicle
ahead.
Servicing the brakes !
If the red brake warning lamp lights up in
the instrument cluster and you hear a warn- ing tone while the engine is running, the
brake fluid level may be too low. Observe
additional warning messages in the multi-
function display.
The brake fluid level may be too low due to brake pad wear or leaking brake lines.
Have the brake system checked immedi-
ately. This work should be carried out at a
qualified specialist workshop.
! A function or performance test should
only be carried out on a 2-axle dynamom-
eter. If you are planning to have the vehicle tested on such a dynamometer, contact an
authorized Mercedes-Benz Center to
obtain further information first. Otherwise,
you could damage the drive train or the
brake system.
! As the ESP ®
system operates automati-
cally, the engine and the ignition must be
switched off (the SmartKey must be in posi-
tion 0or 1in the ignition lock) if:
R the electric parking brake is tested on a
brake dynamometer (for a maximum of
ten second s)
R the vehicle is towed with the front axle
raised.
Braking triggered automatically by ESP ®
may seriously damage the brake system.
All checks and maintenance work on the
brake system must be carried out at a quali- Driving
tips
159Driving an d parking Z
Page 163 of 338
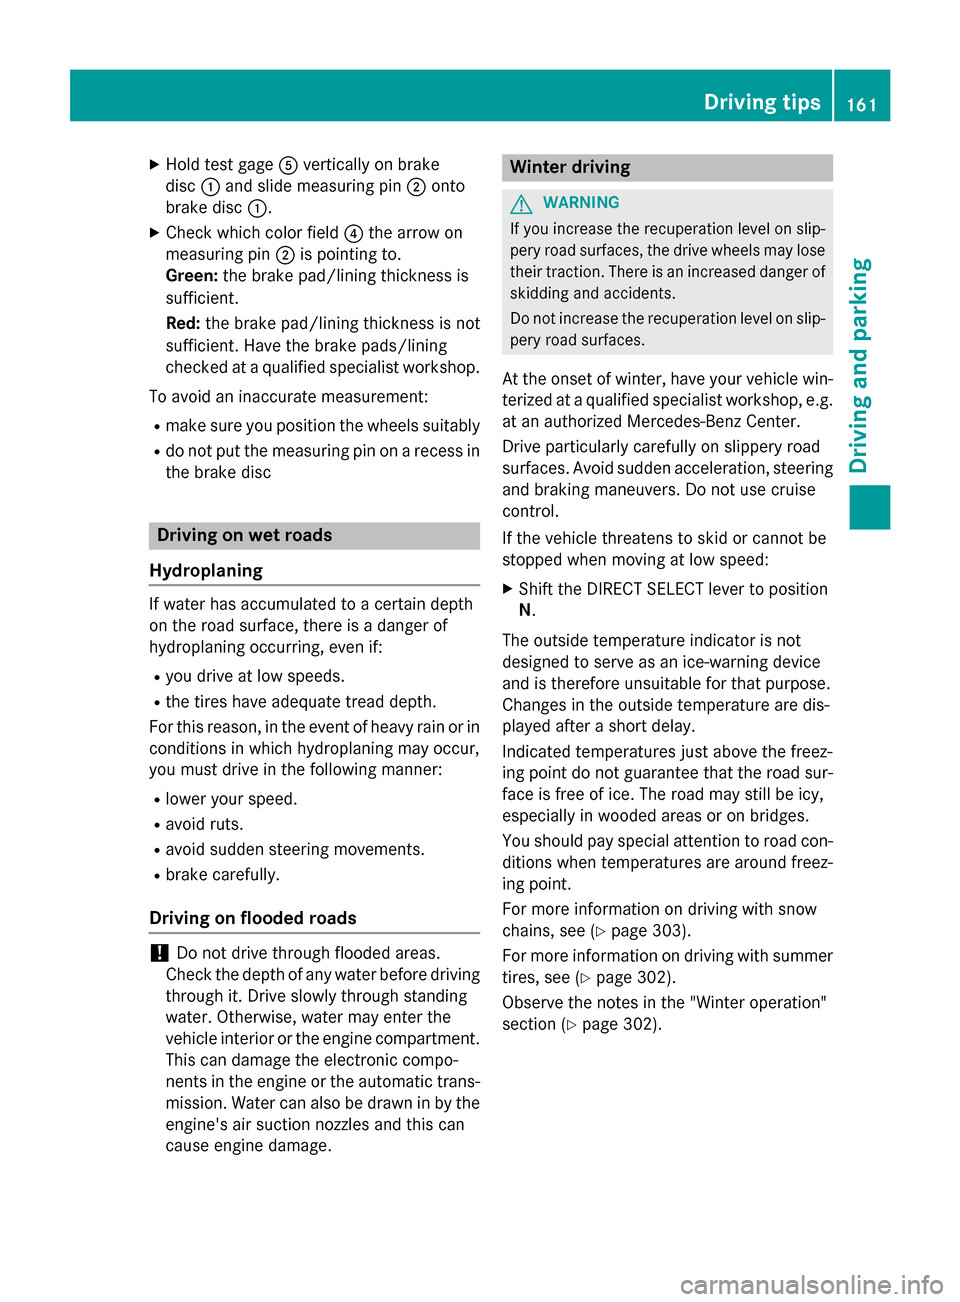
X
Hold test gage Avertically on brake
disc :and slide measuring pin ;onto
brake disc :.
X Check which color field ?the arrow on
measuring pin ;is pointing to.
Green: the brake pad/lining thickness is
sufficient.
Red: the brake pad/lining thickness is not
sufficient. Have the brake pads/lining
checked at a qualified specialist workshop.
To avoid an inaccurate measurement:
R make sure you position the wheels suitably
R do not put the measuring pin on a recess in
the brake disc Driving on wet roads
Hydroplaning If water has accumulated to a certain depth
on the road surface, there is a danger of
hydroplaning occurring, even if:
R
you drive at low speeds.
R the tires have adequate tread depth.
For this reason, in the event of heavy rain or in conditions in which hydroplaning may occur,
you must drive in the following manner:
R lower your speed.
R avoid ruts.
R avoid sudden steering movements.
R brake carefully.
Driving on flooded roads !
Do not drive through flooded areas.
Check the depth of any water before driving through it. Drive slowly through standing
water. Otherwise, water may enter the
vehicle interior or the engine compartment.
This can damage the electronic compo-
nents in the engine or the automatic trans- mission. Water can also be drawn in by the
engine's air suction nozzles and this can
cause engine damage. Winter driving
G
WARNING
If you increase the recuperation level on slip- pery road surfaces, the drive wheels may lose
their traction. There is an increased danger of skidding and accidents.
Do not increase the recuperation level on slip-
pery road surfaces.
At the onset of winter, have your vehicle win- terized at a qualified specialist workshop, e.g.
at an authorized Mercedes-Benz Center.
Drive particularly carefully on slippery road
surfaces. Avoid sudden acceleration, steering
and braking maneuvers. Do not use cruise
control.
If the vehicle threatens to skid or cannot be
stopped when moving at low speed:
X Shift the DIRECT SELECT lever to position
N.
The outside temperature indicator is not
designed to serve as an ice-warning device
and is therefore unsuitable for that purpose.
Changes in the outside temperature are dis-
played after a short delay.
Indicated temperatures just above the freez-
ing point do not guarantee that the road sur-
face is free of ice. The road may still be icy,
especially in wooded areas or on bridges.
You should pay special attention to road con-
ditions when temperatures are around freez-
ing point.
For more information on driving with snow
chains, see (Y page 303).
For more information on driving with summer tires, see (Y page 302).
Observe the notes in the "Winter operation"
section (Y page 302). Driving tips
161Driving and parking Z
Page 227 of 338
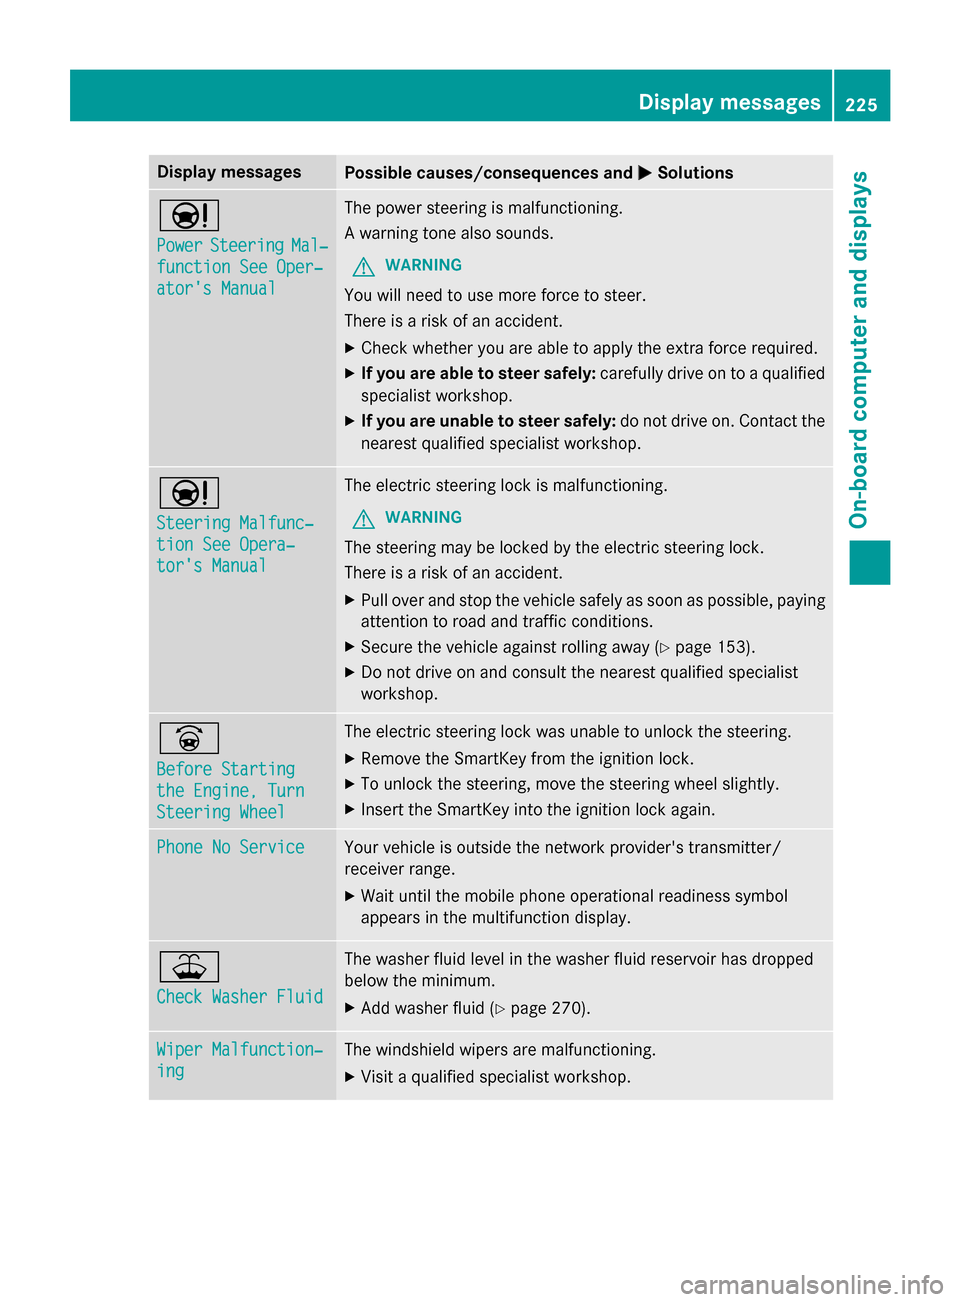
Display messages
Possible causes/consequences and
M
MSolutions Ð
Power Power
Steering
Steering Mal‐
Mal‐
function See Oper‐
function See Oper‐
ator's Manual ator's Manual The power steering is malfunctioning.
A warning tone also sounds.
G WARNING
You will need to use more force to steer.
There is a risk of an accident. X Check whether you are able to apply the extra force required.
X If you are able to steer safely: carefully drive on to a qualified
specialist workshop.
X If you are unable to steer safely: do not drive on. Contact the
nearest qualified specialist workshop. Ð
Steering Malfunc‐ Steering Malfunc‐
tion See Opera‐ tion See Opera‐
tor's Manual tor's Manual The electric steering lock is malfunctioning.
G WARNING
The steering may be locked by the electric steering lock.
There is a risk of an accident. X Pull over and stop the vehicle safely as soon as possible, paying
attention to road and traffic conditions.
X Secure the vehicle against rolling away (Y page 153).
X Do not drive on and consult the nearest qualified specialist
workshop. _
Before Starting Before Starting
the Engine, Turn the Engine, Turn
Steering Wheel Steering Wheel The electric steering lock was unable to unlock the steering.
X Remove the SmartKey from the ignition lock.
X To unlock the steering, move the steering wheel slightly.
X Insert the SmartKey into the ignition lock again. Phone No Service
Phone No Service Your vehicle is outside the network provider's transmitter/
receiver range.
X Wait until the mobile phone operational readiness symbol
appears in the multifunction display. ¥
Check Washer Fluid Check Washer Fluid The washer fluid level in the washer fluid reservoir has dropped
below the minimum.
X Add washer fluid (Y page 270). Wiper Malfunction‐ Wiper Malfunction‐
ing ing The windshield wipers are malfunctioning.
X Visit a qualified specialist workshop. Display
messages
225On-board computer and displays Z
Page 271 of 338
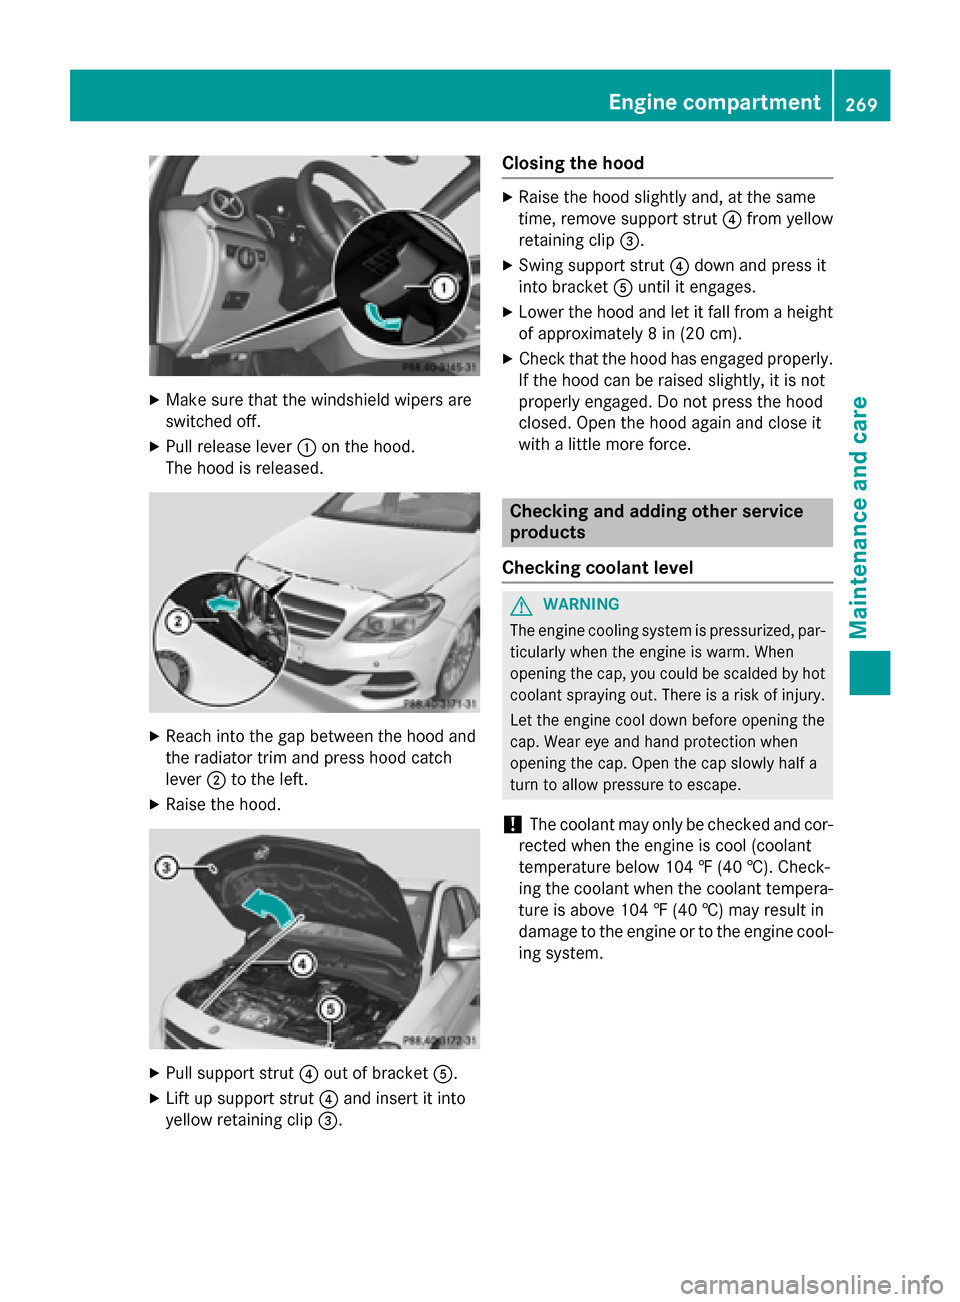
X
Make sure that the windshield wipers are
switched off.
X Pull release lever :on the hood.
The hood is released. X
Reach into the gap between the hood and
the radiator trim and press hood catch
lever ;to the left.
X Raise the hood. X
Pull support strut ?out of bracket A.
X Lift up support strut ?and insert it into
yellow retaining clip =. Closing the hood X
Raise the hood slightly and, at the same
time, remove support strut ?from yellow
retaining clip =.
X Swing support strut ?down and press it
into bracket Auntil it engages.
X Lower the hood and let it fall from a height
of approximately 8 in (20 cm).
X Check that the hood has engaged properly.
If the hood can be raised slightly, it is not
properly engaged. Do not press the hood
closed. Open the hood again and close it
with a little more force. Checking and adding other service
products
Checking coolant level G
WARNING
The engine cooling system is pressurized, par- ticularly when the engine is warm. When
opening the cap, you could be scalded by hotcoolant spraying out. There is a risk of injury.
Let the engine cool down before opening the
cap. Wear eye and hand protection when
opening the cap. Open the cap slowly half a
turn to allow pressure to escape.
! The coolant may only be checked and cor-
rected when the engine is cool (coolant
temperature below 104 ‡ (40 †). Check-
ing the coolant when the coolant tempera-
ture is above 104 ‡ (40 †) may result in
damage to the engine or to the engine cool- ing system. Engine compartment
269Maintenance and care Z
Page 272 of 338
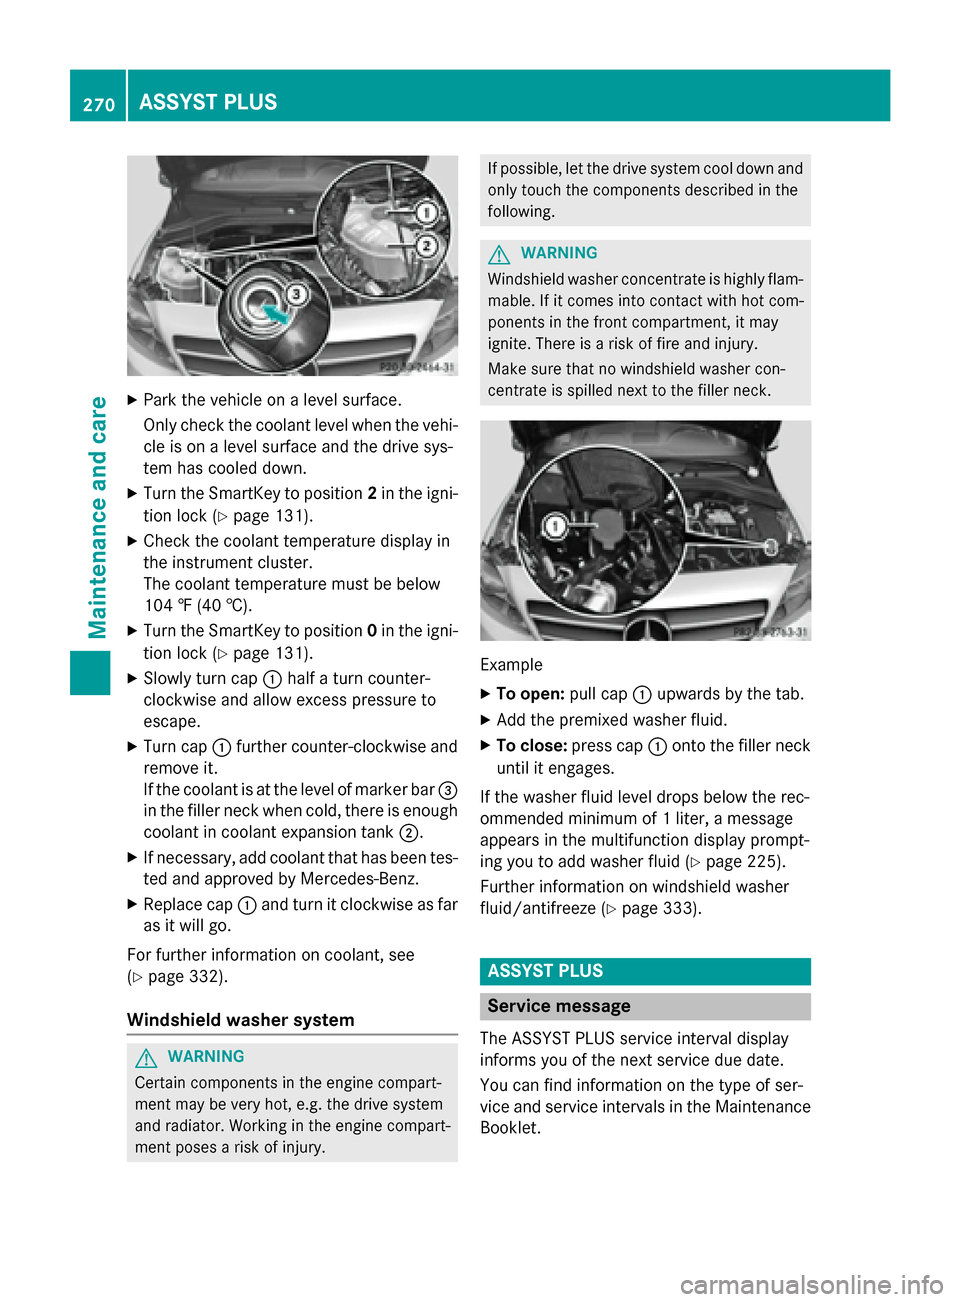
X
Park the vehicle on a level surface.
Only check the coolant level when the vehi-
cle is on a level surface and the drive sys-
tem has cooled down.
X Turn the SmartKey to position 2in the igni-
tion lock (Y page 131).
X Check the coolant temperature display in
the instrument cluster.
The coolant temperature must be below
104 ‡ (40 †).
X Turn the SmartKey to position 0in the igni-
tion lock (Y page 131).
X Slowly turn cap :half a turn counter-
clockwise and allow excess pressure to
escape.
X Turn cap :further counter-clockwise and
remove it.
If the coolant is at the level of marker bar =
in the filler neck when cold, there is enough coolant in coolant expansion tank ;.
X If necessary, add coolant that has been tes-
ted and approved by Mercedes-Benz.
X Replace cap :and turn it clockwise as far
as it will go.
For further information on coolant, see
(Y page 332).
Windshield washer system G
WARNING
Certain components in the engine compart-
ment may be very hot, e.g. the drive system
and radiator. Working in the engine compart-
ment poses a risk of injury. If possible, let the drive system cool down and
only touch the components described in the
following. G
WARNING
Windshield washer concentrate is highly flam- mable. If it comes into contact with hot com-
ponents in the front compartment, it may
ignite. There is a risk of fire and injury.
Make sure that no windshield washer con-
centrate is spilled next to the filler neck. Example
X To open: pull cap:upwards by the tab.
X Add the premixed washer fluid.
X To close: press cap :onto the filler neck
until it engages.
If the washer fluid level drops below the rec-
ommended minimum of 1 liter, a message
appears in the multifunction display prompt-
ing you to add washer fluid (Y page 225).
Further information on windshield washer
fluid/antifreeze (Y page 333). ASSYST PLUS
Service message
The ASSYST PLUS service interval display
informs you of the next service due date.
You can find information on the type of ser-
vice and service intervals in the Maintenance
Booklet. 270
ASSYST PLUSMaintenance and care