2015 MERCEDES-BENZ B-Class ELECTRIC warning light
[x] Cancel search: warning lightPage 247 of 338
X
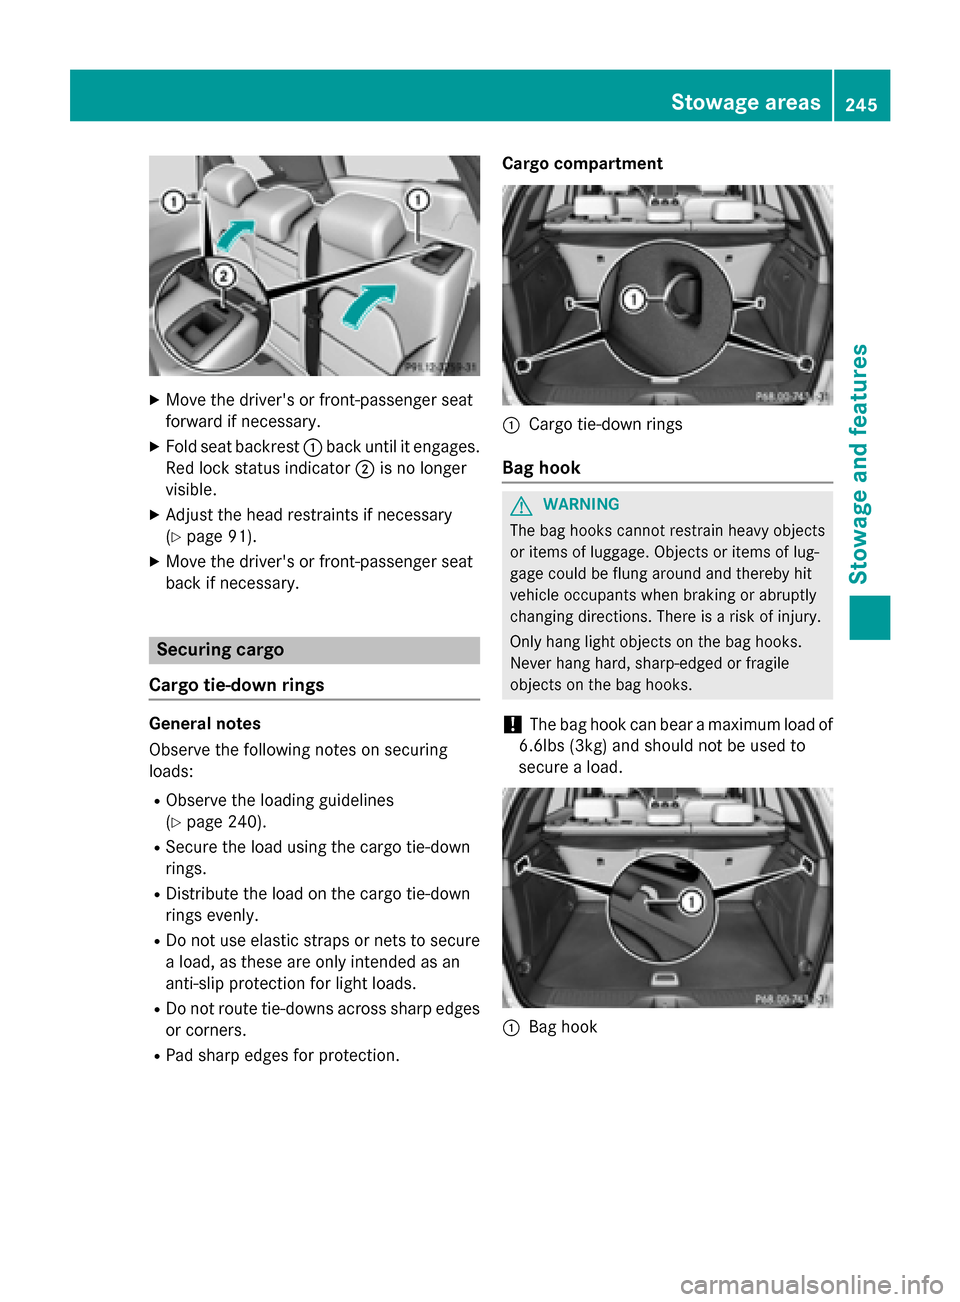
Move the driver's or front-passenger seat
forward if necessary.
X Fold seat backrest :back until it engages.
Red lock status indicator ;is no longer
visible.
X Adjust the head restraints if necessary
(Y page 91).
X Move the driver's or front-passenger seat
back if necessary. Securing cargo
Cargo tie-down rings General notes
Observe the following notes on securing
loads:
R Observe the loading guidelines
(Y page 240).
R Secure the load using the cargo tie-down
rings.
R Distribute the load on the cargo tie-down
rings evenly.
R Do not use elastic straps or nets to secure
a load, as these are only intended as an
anti-slip protection for light loads.
R Do not route tie-downs across sharp edges
or corners.
R Pad sharp edges for protection. Cargo compartment
:
Cargo tie-down rings
Bag hook G
WARNING
The bag hooks cannot restrain heavy objects
or items of luggage. Objects or items of lug-
gage could be flung around and thereby hit
vehicle occupants when braking or abruptly
changing directions. There is a risk of injury.
Only hang light objects on the bag hooks.
Never hang hard, sharp-edged or fragile
objects on the bag hooks.
! The bag hook can bear a maximum load of
6.6lbs (3kg) and should not be used to
secure a load. :
Bag hook Stowage areas
245Stowage and features Z
Page 248 of 338
Cargo compartment cover
Important safety notes G
WARNING
On its own, the cargo compartment cover
cannot secure or restrain heavy objects,
items of luggage and heavy loads. You could
be hit by an unsecured load during sudden
changes in direction, braking or in the event of an accident. There is an increased risk of
injury or even fatal injury.
Always store objects so that they cannot be
flung around. Secure objects, luggage or
loads against slipping or tipping over, e.g. by
using tie downs, even if you are using the
cargo compartment cover.
! When loading the vehicle, make sure that
you do not stack the load in the cargo com-
partment higher than the lower edge of the side windows. Do not place heavy objects
on top of the cargo compartment cover.
! When removing and installing the cargo
compartment cover, ensure that its end
caps do not scrape the light-colored parts
of the vehicle.
The cargo compartment cover is located
behind the rear bench seat backrest.
Extending/retracting the cargo com-
partment cover X
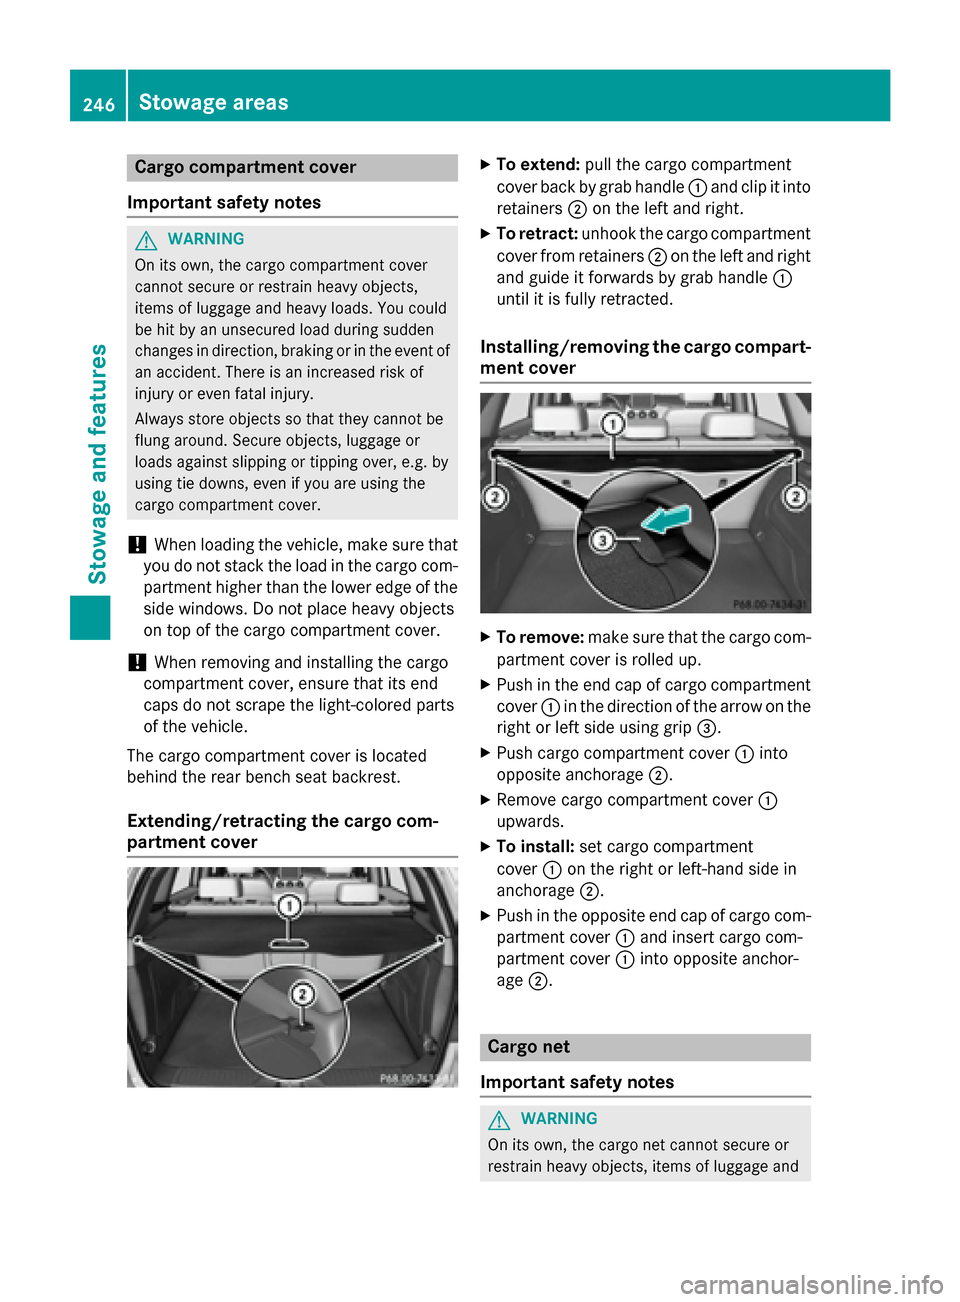
To extend: pull the cargo compartment
cover back by grab handle :and clip it into
retainers ;on the left and right.
X To retract: unhook the cargo compartment
cover from retainers ;on the left and right
and guide it forwards by grab handle :
until it is fully retracted.
Installing/removing the cargo compart-
ment cover X
To remove: make sure that the cargo com-
partment cover is rolled up.
X Push in the end cap of cargo compartment
cover :in the direction of the arrow on the
right or left side using grip =.
X Push cargo compartment cover :into
opposite anchorage ;.
X Remove cargo compartment cover :
upwards.
X To install: set cargo compartment
cover :on the right or left-hand side in
anchorage ;.
X Push in the opposite end cap of cargo com-
partment cover :and insert cargo com-
partment cover :into opposite anchor-
age ;. Cargo net
Important safety notes G
WARNING
On its own, the cargo net cannot secure or
restrain heavy objects, items of luggage and 246
Stowage areasStowage and features
Page 251 of 338
floor away so that it engages in the guide on
the upper level.
Cargo compartment floor ;engages in
the upper position.
i Carry out this step using both hands.
X To lower: raise cargo compartment
floor ;slightly using handle :and pull it
towards you.
X Lower cargo compartment floor ;again
slowly. Whilst doing so, press the cargo
compartment floor into the lower level.
Cargo compartment floor ;engages in
the lower position. Roof carrier
Important safety notes G
WARNING
When you load the roof, the center of gravity
of the vehicle rises and the driving character- istics change. If you exceed the maximum roof
load, the driving characteristics, as well as
steering and braking, will be greatly impaired. There is a risk of an accident.
Never exceed the maximum roof load and
adjust your driving style.
You will find information on the maximum roof
load in the "Technical data" section
(Y page 334).
An incorrectly secured roof carrier or roof
load may become detached from the vehicle.
You must therefore ensure that you observe
the roof carrier manufacturer's installation
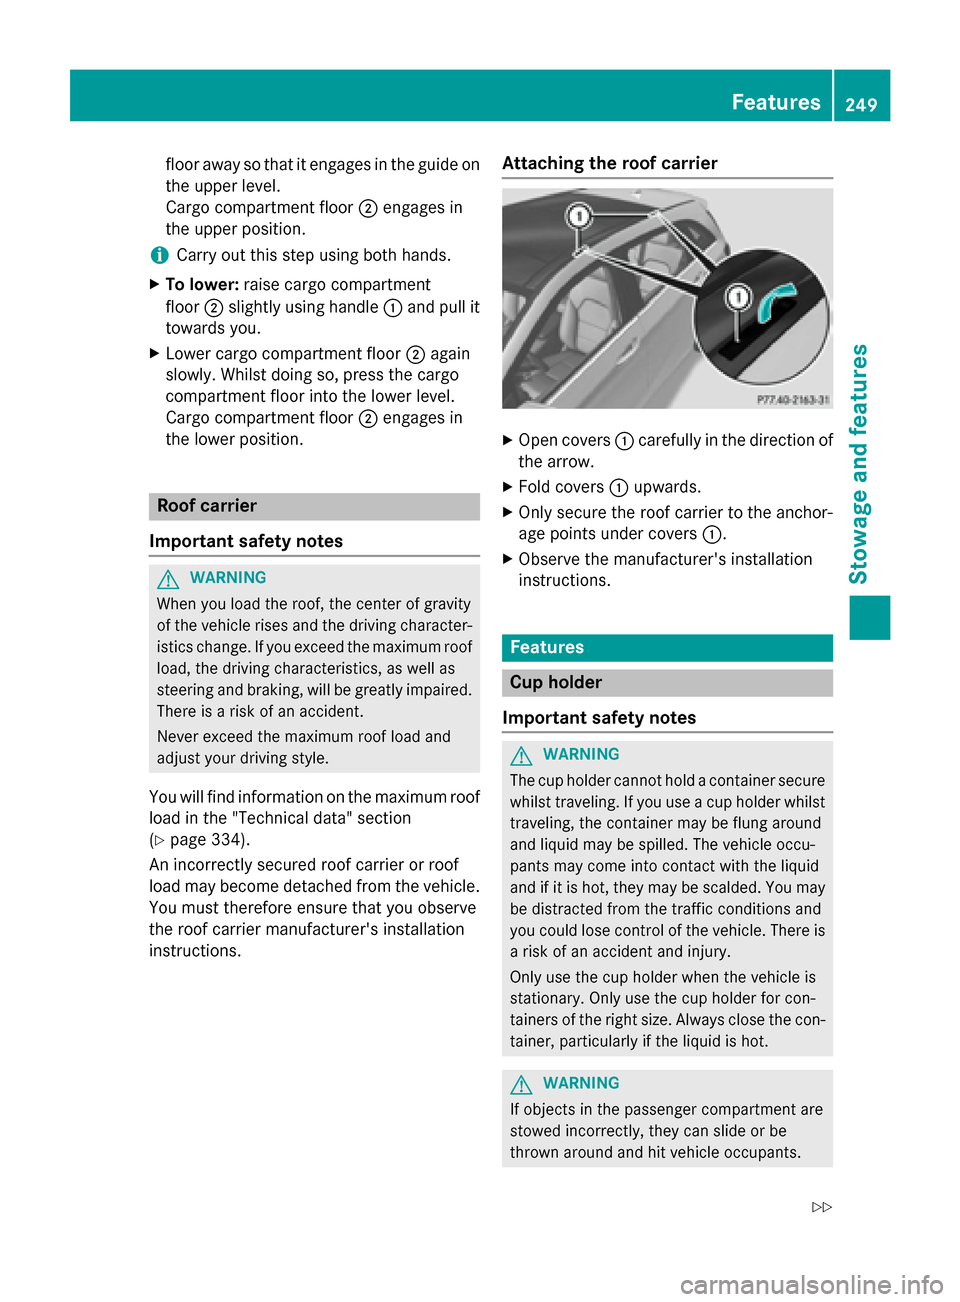
instructions. Attaching the roof carrier X
Open covers :carefully in the direction of
the arrow.
X Fold covers :upwards.
X Only secure the roof carrier to the anchor-
age points under covers :.
X Observe the manufacturer's installation
instructions. Features
Cup holder
Important safety notes G
WARNING
The cup holder cannot hold a container secure whilst traveling. If you use a cup holder whilsttraveling, the container may be flung around
and liquid may be spilled. The vehicle occu-
pants may come into contact with the liquid
and if it is hot, they may be scalded. You may
be distracted from the traffic conditions and
you could lose control of the vehicle. There is a risk of an accident and injury.
Only use the cup holder when the vehicle is
stationary. Only use the cup holder for con-
tainers of the right size. Always close the con-
tainer, particularly if the liquid is hot. G
WARNING
If objects in the passenger compartment are
stowed incorrectly, they can slide or be
thrown around and hit vehicle occupants. Features
249Stowage and features
Z
Page 253 of 338
Sun visors
Overview G
WARNING
If the mirror cover of the vanity mirror is folded up when the vehicle is in motion, you could be
blinded by incident light. There is a risk of an
accident.
Always keep the mirror cover folded down
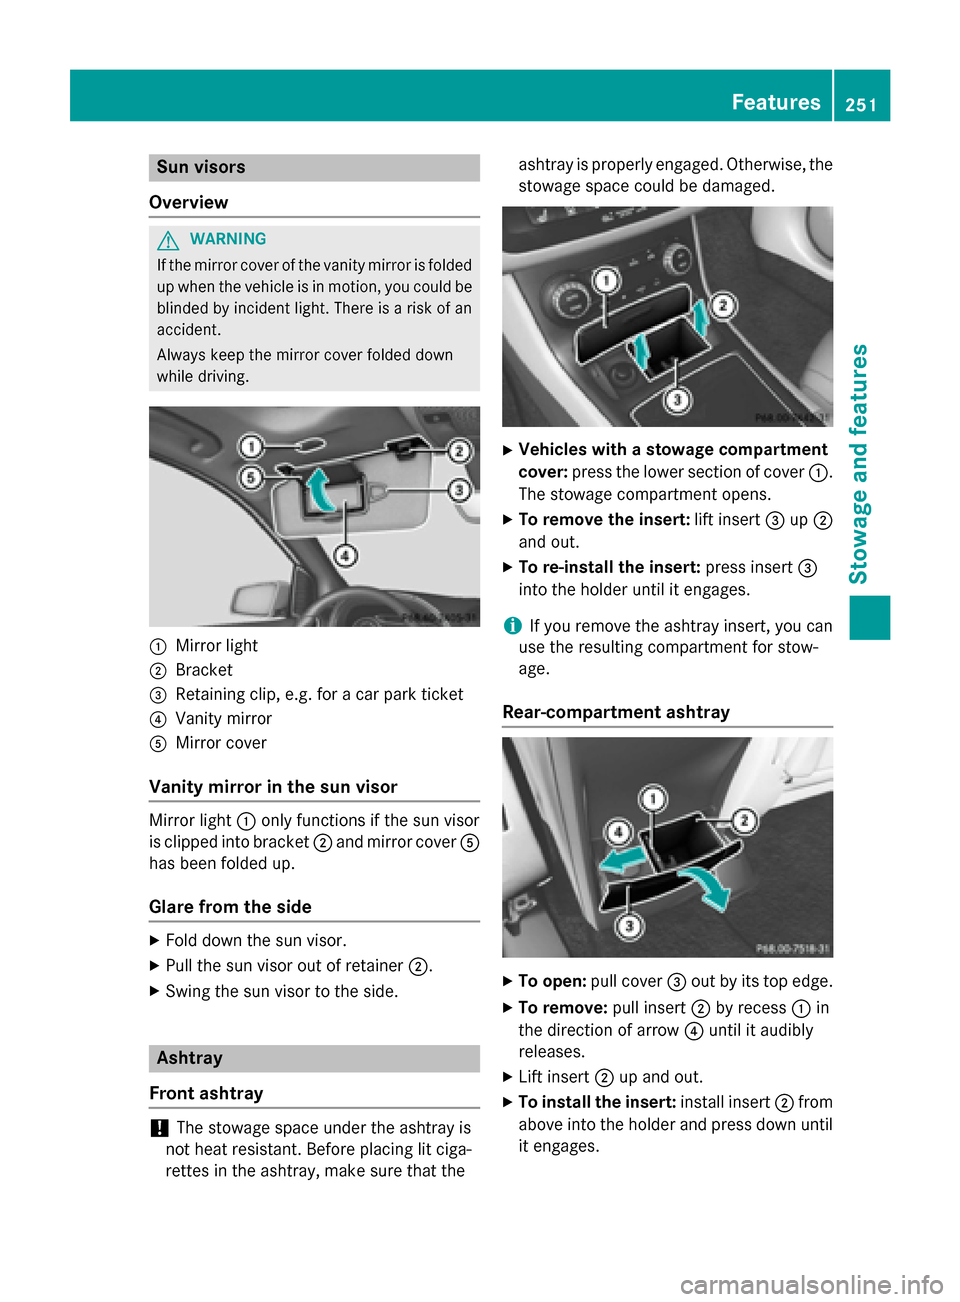
while driving. :
Mirror light
; Bracket
= Retaining clip, e.g. for a car park ticket
? Vanity mirror
A Mirror cover
Vanity mirror in the sun visor Mirror light
:only functions if the sun visor
is clipped into bracket ;and mirror cover A
has been folded up.
Glare from the side X
Fold down the sun visor.
X Pull the sun visor out of retainer ;.
X Swing the sun visor to the side. Ashtray
Front ashtray !
The stowage space under the ashtray is
not heat resistant. Before placing lit ciga-
rettes in the ashtray, make sure that the ashtray is properly engaged. Otherwise, the
stowage space could be damaged. X
Vehicles with a stowage compartment
cover: press the lower section of cover :.
The stowage compartment opens.
X To remove the insert: lift insert=up;
and out.
X To re-install the insert: press insert=
into the holder until it engages.
i If you remove the ashtray insert, you can
use the resulting compartment for stow-
age.
Rear-compartment ashtray X
To open: pull cover =out by its top edge.
X To remove: pull insert;by recess :in
the direction of arrow ?until it audibly
releases.
X Lift insert ;up and out.
X To install the insert: install insert;from
above into the holder and press down until it engages. Features
251Stowage and features Z
Page 254 of 338
Cigarette lighter
G
WARNING
You can burn yourself if you touch the hot
heating element or the socket of the cigarette lighter.
In addition, flammable materials can ignite if:
R the hot cigarette lighter falls
R a child holds the hot cigarette lighter to
objects, for example
There is a risk of fire and injury.
Always hold the cigarette lighter by the knob.
Always make sure that the cigarette lighter is
out of reach of children. Never leave children unsupervised in the vehicle.
Your attention must always be focused on the traffic conditions. Only use the cigarette
lighter when road and traffic conditions per-
mit. X
Turn the SmartKey to position 2in the igni-
tion lock (Y page 131).
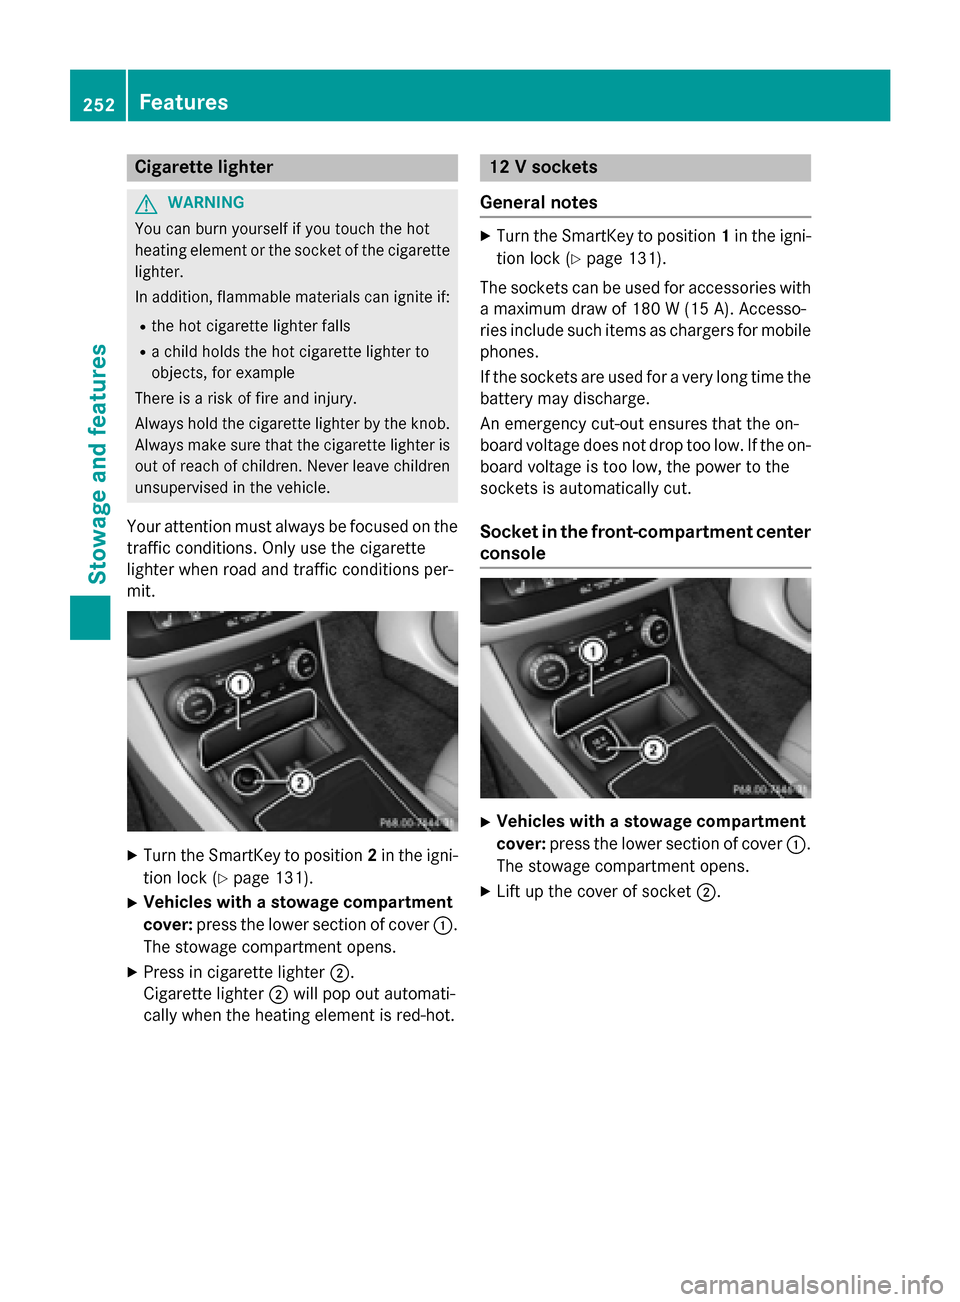
X Vehicles with a stowage compartment
cover: press the lower section of cover :.
The stowage compartment opens.
X Press in cigarette lighter ;.
Cigarette lighter ;will pop out automati-
cally when the heating element is red-hot. 12 V sockets
General notes X
Turn the SmartKey to position 1in the igni-
tion lock (Y page 131).
The sockets can be used for accessories with a maximum draw of 180 W (15A). Accesso-
ries include such items as chargers for mobile
phones.
If the sockets are used for a very long time the battery may discharge.
An emergency cut-out ensures that the on-
board voltage does not drop too low. If the on-
board voltage is too low, the power to the
sockets is automatically cut.
Socket in the front-co mpartment center
console X
Vehicles with a stowage compartment
cover: press the lower section of cover :.
The stowage compartment opens.
X Lift up the cover of socket ;.252
FeaturesSto
wage an d features
Page 256 of 338
A malfunction in the system has been detec-
ted if one of the following occurs:
R The indicator lamp in the SOS button does
not come on during the system self-test.
R The indicator lamp in the FRoadside
Assistance button does not light up during
self-diagnosis of the system.
R The indicator lamp in the ïMB Info call
button does not light up during self-diag-
nosis of the system.
R The indicator lamp in one or more of the
following buttons continues to light up red
after the system self-diagnosis:
- SOS button
- F Roadside Assistance call button
- ï MB Info call button
R The Inoperative
Inoperative or theService Not Service Not
Activated
Activated message appears in the multi-
function display after the system self-diag-
nosis.
If a malfunction is indicated as outlined
above, the system may not operate as expec-
ted. In the event of an emergency, help will
have to be summoned by other means.
Have the system checked at the nearest
authorized Mercedes-Benz Center or contact the following service hotlines:
Mercedes-Benz Customer Assistance Center
at 1-800-FOR-MERCede s (1-800-367-6372)
or 1-866-990-9007 Emergency call Important safety notes
G
WARNING
It can be dangerous to remain in the vehicle,
even if you have pressed the SOS button in an emergency if:
R you see smoke inside or outside of the vehi-
cle, e.g. if there is a fire after an accident
R the vehicle is on a dangerous section of
road
R the vehicle is not visible or cannot easily be
seen by other road users, particularly whendark or in poor visibility conditions
There is a risk of an accident and injury.
Leave the vehicle immediately in this or simi-
lar situations as soon as it is safe to do so.
Move to a safe location along with other vehi-
cle occupants. In such situations, secure the
vehicle in accordance with national regula-
tions, e. g. with a warning triangle.
General notes
Observe the notes on system activation
(Y page 253).
An emergency call is dialed automatically if an
air bag or Emergency Tensioning Device is
triggered. You cannot end an automatically
triggered emergency call yourself.
An emergency call can also be initiated man- ually.
As soon as the emergency call has been ini-
tiated, the indicator lamp in the SOS button
flashes. The Connecting Call Connecting Call message
appears in the multifunction display.
The audio output is muted.
Once the connection has been made, the
Call Connected Call Connected message appears in the
multifunction display. 254
FeaturesSto
wage an d features
Page 263 of 338
The data you receive contains the following
information:
R the location where the speed limit was
exceeded
R the time at which the speed limit was
exceeded
R the selected speed limit which was excee-
ded
Geo fencing Geo fencing allows you to select areas which
the vehicle should not enter or leave. You will
be informed if the vehicle crosses the boun-
daries of the selected areas. You can select
the way in which you receive this information beforehand. Possible options include text
message, e-mail or an automated call.
The area can be determined as either a circle
or a polygon with a maximum of ten corners.
You can specify up to ten areas simultane-
ously. Different settings are possible for each area.
These settings can be called up under "Own-
ers Online" at http://www.mbusa.com.
Alternatively, you can trigger an MB Info call
and inform the customer service representa-
tive that you wish to activate geo fencing.
Currently inactive areas can be activated by
text message.
Triggering the vehicle alarm With this function, you can trigger the vehi-
cle's panic alarm via text message. An alarm
sounds and the exterior lighting flashes.
Depending on the setting, the panic alarm
lasts five or ten seconds. Afterwards, the
alarm switches off. Garage door opener
General notes The HomeLink
®
garage door opener integra-
ted in the rear-view mirror allows you to oper- ate up to three different door and gate sys-
tems.
Use the integrated garage door opener only
on garage doors that:
R have safety stop and reverse features and
R meet current U.S. federal safety standards
Once programed, the integrated garage door opener in the rear-view mirror will assume the
function of the garage door system's remote
control. Please also read the operating
instructions for the garage door system.
When programming a garage door opener,
park the vehicle outside the garage. Do not
run the engine while programming.
Certain garage door drives are incompatible
with the integrated garage door opener. If you
have difficulty programing the integrated
garage door opener, contact an authorized
Mercedes-Benz Center.
Alternatively, you can call the following tele-
phone assistance services:
R USA: Mercedes-Benz Customer Assistance
Center at 1-800-FOR-MERCedes
R Canada: Customer Service at
1-800-387-0100
R HomeLink ®
hotline 1-800-355-3515 (free
of charge)
More information on HomeLink ®
and/or
compatible products is also available online
at http://www.homelink.com.
Notes on the declaration of conformity
(Y page 24).
USA: FCC ID: CB2HMIHL4
Canada: IC: 279B-HMIHL4
Important safety notes G
WARNING
When you operate or program the garage door with the integrated garage door opener, per-
sons in the range of movement of the garage
door can become trapped or struck by the
garage door. There is a risk of injury. Features
261Stowage and features
Z
Page 264 of 338
When using the integrated garage door
opener, always make sure that nobody is
within the range of movement of the garage
door.
G
WARNING
Combustion engines emit poisonous exhaust
gases such as carbon monoxide. Inhaling
these exhaust gases leads to poisoning. There is a risk of fatal injury. Therefore never leave
the engine running in enclosed spaces with-
out sufficient ventilation.
Programming Programming buttons
Pay attention to the "Important safety notes"
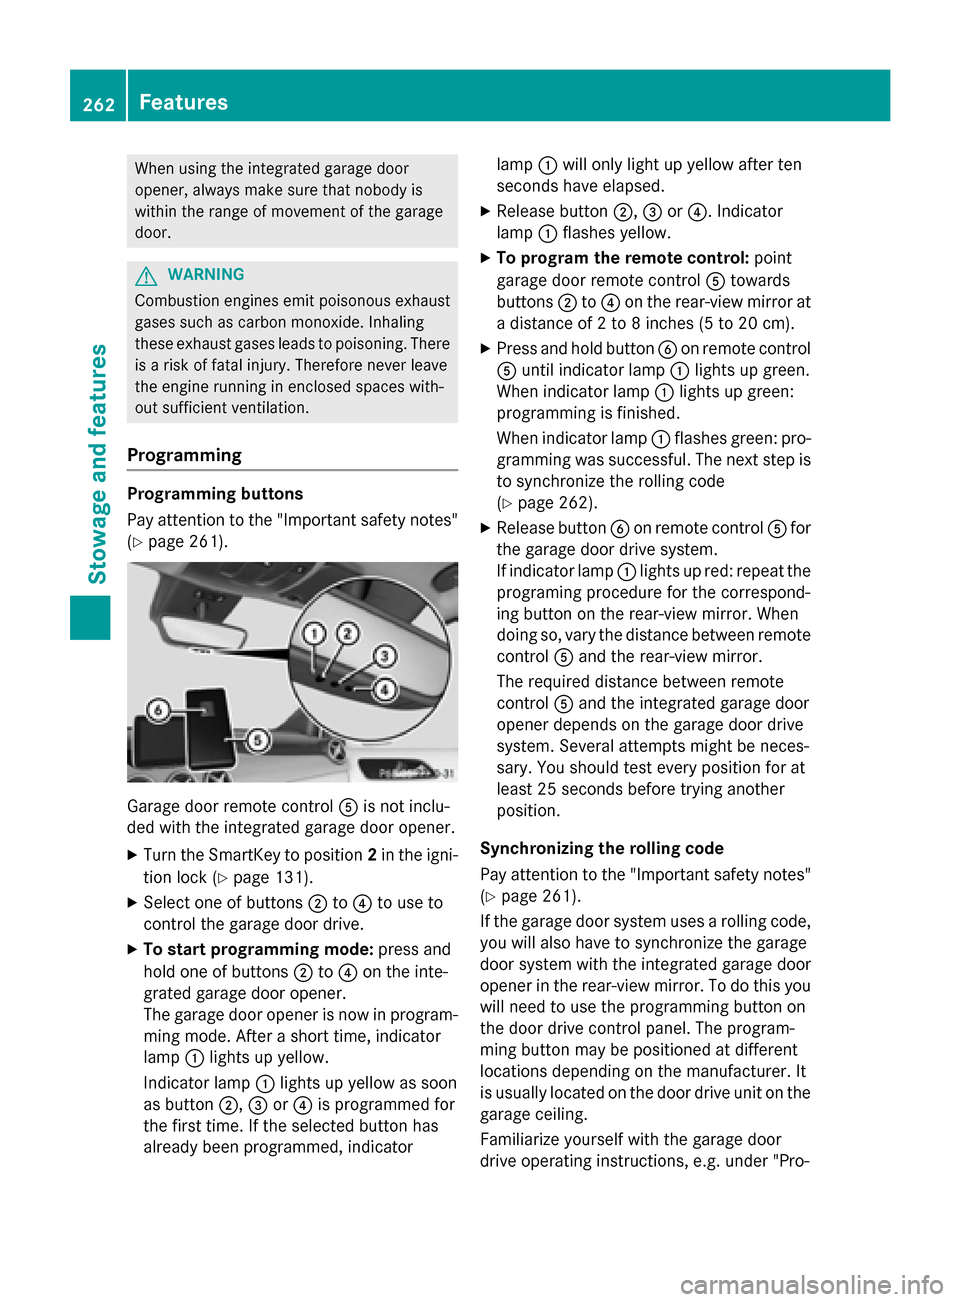
(Y page 261). Garage door remote control
Ais not inclu-
ded with the integrated garage door opener.
X Turn the SmartKey to position 2in the igni-
tion lock (Y page 131).
X Select one of buttons ;to? to use to
control the garage door drive.
X To start programming mode: press and
hold one of buttons ;to? on the inte-
grated garage door opener.
The garage door opener is now in program-
ming mode. After a short time, indicator
lamp :lights up yellow.
Indicator lamp :lights up yellow as soon
as button ;,=or? is programmed for
the first time. If the selected button has
already been programmed, indicator lamp
:will only light up yellow after ten
seconds have elapsed.
X Release button ;,=or?. Indicator
lamp :flashes yellow.
X To program the remote control: point
garage door remote control Atowards
buttons ;to? on the rear-view mirror at
a distance of 2 to 8 inches (5 to 20 cm).
X Press and hold button Bon remote control
A until indicator lamp :lights up green.
When indicator lamp :lights up green:
programming is finished.
When indicator lamp :flashes green: pro-
gramming was successful. The next step is to synchronize the rolling code
(Y page 262).
X Release button Bon remote control Afor
the garage door drive system.
If indicator lamp :lights up red: repeat the
programing procedure for the correspond-
ing button on the rear-view mirror. When
doing so, vary the distance between remote control Aand the rear-view mirror.
The required distance between remote
control Aand the integrated garage door
opener depends on the garage door drive
system. Several attempts might be neces-
sary. You should test every position for at
least 25 seconds before trying another
position.
Synchronizing the rolling code
Pay attention to the "Important safety notes"
(Y page 261).
If the garage door system uses a rolling code,
you will also have to synchronize the garage
door system with the integrated garage door
opener in the rear-view mirror. To do this you
will need to use the programming button on
the door drive control panel. The program-
ming button may be positioned at different
locations depending on the manufacturer. It
is usually located on the door drive unit on the garage ceiling.
Familiarize yourself with the garage door
drive operating instructions, e.g. under "Pro- 262
FeaturesStowage and features