Page 1 of 25
1
2
5
21
22
Quick Guide Quick Guide
This Quick Guide is provided as a simple explanation of how to operate some of the
features equipped on your Mazda3.
Essential Safety Equipment
Before Driving
When Driving
Interior Features
Maintenance and Care
The meaning for each of the symbols used in the Quick Guide is as follows:
Detailed explanation pertaining to some information.
24If Trouble Arises
�/�C�\�F�C���A���'�(�����'�'�������.�A�'�F�K�V�K�Q�P���A�3�W�K�E�M�)�W�K�F�G���K�P�F�D��������������������������������������������������
Page 2 of 25
1
Essential Safety Equipment
Power operation
To raise a head restraint, pull it up to the desired position.
Head Restraints Seat Operation
The following seat adjustment functions for the manual and power seats are
available.
Seat Slide
Height Adjustment
For details, refer to Section 2, “Seats”.
Seat Recline
Lumbar Support Adjustment
(Driver's Seat)
To lower the head restraint, press the stop-catch release, then push the head
restraint down.
Adjust the head restraint so that the centre is even with the top of the passenger's
ears.
Front outboard seat Rear outboard seat Rear centre seat
�/�C�\�F�C���A���'�(�����'�'�������.�A�'�F�K�V�K�Q�P���A�3�W�K�E�M�)�W�K�F�G���K�P�F�D��������������������������������������������������
Page 3 of 25
 Request switch
Lock release
lever
Exterior aerial
Locking only
(Hatchback)
Operational range80 cm (31 in) 80 cm (31 in)
Request switch
Before Driving
Operational Range
The advanced keyless system")
Request switch
Lock release
lever
Exterior aerial
Locking only
(Hatchback)
Operational range80 cm (31 in) 80 cm (31 in)
Request switch
Before Driving
Operational Range
The advanced keyless system operates only when the driver is in the vehicle or
within operational range while the key is being carried.
All doors and the liftgate/boot lid can be locked/unlocked by pressing the request
switch on the front doors while the key is being carried.
(Hatchback)
Locking, Unlocking with Request Switch
Steering Wheel Adjustment
1. Stop the vehicle, and then pull down the lock release
lever under the steering column.
3. Attempt to push the steering wheel up and down
to make sure it's locked before driving. 2. Tilt the steering wheel and/or adjust the steering
column length to the desired positions, then push
the lever up to lock the column.
2
Front doors (Lock/Unlock) Liftgate (Hatchback Lock only)
For details, refer to Section 3, “Advanced Keyless Entry System”,
“Doors and Locks” or “Steering Wheel”.
The request switch on the liftgate can only be used to lock all doors and the
liftgate.
�/�C�\�F�C���A���'�(�����'�'�������.�A�'�F�K�V�K�Q�P���A�3�W�K�E�M�)�W�K�F�G���K�P�F�D��������������������������������������������������
Page 4 of 25
 3
Before Driving
ON/OFF button
Indicator light
Left rear window
Right rear window
Front
passengers
window
Drivers window
Master control switches
Close
Open
Mirror switch
Centre position
Outside Mi")
3
Before Driving
ON/OFF button
Indicator light
Left rear window
Right rear window
Front
passenger's
window
Driver's window
Master control switches
Close
Open
Mirror switch
Centre position
Outside Mirrors
1. Rotate the mirror switch to the left or
right to choose the left or right side
mirror.
2. Press the mirror switch in the appropriate
direction.
For details, refer to Section 3, “Mirrors” or “Windows”.
Rearview Mirror
Auto-dimming mirror
The auto-dimming mirror automatically reduces
glare of headlights from vehicles at the rear when
the ignition is switched ON.
Press the ON/OFF button to cancel the automatic
dimming function. The indicator light will turn off.
To reactivate the automatic dimming function, press the
ON/OFF button. The indicator light will illuminate.
Operation of the Power Windows
Each passenger window can also be operated using the master control switches on
the driver's door.
To open the window to the desired position, lightly hold down the switch.
To close the window to the desired position, lightly pull up the switch.
�/�C�\�F�C���A���'�(�����'�'�������.�A�'�F�K�V�K�Q�P���A�3�W�K�E�M�)�W�K�F�G���K�P�F�D��������������������������������������������������
Page 5 of 25
 4
Before Driving
Open
Close
Remote fuel-filler
flap release
Fuel Requirements and Capacities
Premium unleaded fuel
(Conforming to EN 228
and within E10)
*1
Fuel-Filler Flap
To open, pull the rem")
4
Before Driving
Open
Close
Remote fuel-filler
flap release
Fuel Requirements and Capacities
Premium unleaded fuel
(Conforming to EN 228
and within E10)
*1
Fuel-Filler Flap
To open, pull the remote fuel-filler flap
release.*1 EuropeFuel
For details, refer to Section 3, “Fuel and Emission”.
Research Octane
Number Capacity
95 or above
51.0 L (13.5 US gal, 11.2
Imp gal)
Fuel-Filler Flap and Cap
Fuel-Filler Cap
To remove the fuel-filler cap, turn it anticlockwise.
Attach the removed cap to the inner side of the
fuel flap.
To close the fuel-filler cap, turn it clockwise
until a click is heard.MZR 1.6, SKYACTIV-G 1.5, SKYACTIV-G 2.0
The vehicle will operate efficiently on diesel
fuel with specification EN590 or the equivalent.
When refuelling, always add at least 10 L (2.6 US gal, 2.2 Imp gal) of fuel.Fuel
Capacity
51.0 L (13.5 US gal, 11.2
Imp gal) SKYACTIV-D 2.290 or above Regular unleaded fuel
92 or above
�/�C�\�F�C���A���'�(�����'�'�������.�A�'�F�K�V�K�Q�P���A�3�W�K�E�M�)�W�K�F�G���K�P�F�D��������������������������������������������������
Page 6 of 25
 When Driving
5
Indicator light
Push button start
Starting the Engine
For details, refer to Section 4, “Start/Stop Engine”.
(SKYACTIV-D 2.2)
• The starter does not rotate until the glow indi")
When Driving
5
Indicator light
Push button start
Starting the Engine
For details, refer to Section 4, “Start/Stop Engine”.
(SKYACTIV-D 2.2)
• The starter does not rotate until the glow indicator light turns off.
• When starting the engine, do not release the clutch pedal (manual transaxle) or
the brake pedal (automatic transaxle) until the glow indicator light in the
instrument cluster turns off and the engine starts, after pressing the push button
start.
1. Make sure the parking brake is on.
2. Continue to press the brake pedal firmly until
the engine has completely started.
3. (Manual transaxle)
Continue to press the clutch pedal firmly until
the engine has completely started.
(Automatic transaxle)
Put the vehicle in park (P). If you must restart the
engine while the vehicle is moving, shift into
neutral (N).
4. Press the push button start after both the KEY indicator
light (green) in the instrument cluster and the push button
start indicator light (green) illuminate.
• If the clutch pedal (manual transaxle) or the brake pedal (automatic transaxle) is
released before the engine starts, depress the clutch pedal (manual transaxle) or
the brake pedal (automatic transaxle) again and press the push button start to
start the engine.
• If the ignition is left switched ON for a long period of time without the engine
running after the glow plugs are warmed up, the glow plugs may warm up again
which will illuminate the glow indicator light.
�/�C�\�F�C���A���'�(�����'�'�������.�A�'�F�K�V�K�Q�P���A�3�W�K�E�M�)�W�K�F�G���K�P�F�D��������������������������������������������������
Page 7 of 25
 6
When Driving
Automatic transaxleAutomatic transaxle
Engine stop Restart
Neutral position
(Manual transaxle)
For details, refer to Section 4, “Start/Stop Engine”.
Operation of i-stop Function")
6
When Driving
Automatic transaxleAutomatic transaxle
Engine stop Restart
Neutral position
(Manual transaxle)
For details, refer to Section 4, “Start/Stop Engine”.
Operation of i-stop Function
The i-stop (idling stop) function automatically stops the engine when the vehicle is stopped at a
traffic light or stuck in traffic after the engine has been warmed up (SKYACTIV-G 1.5,
SKYACTIV-G 2.0) or other times when the engine is not cold (SKYACTIV-D 2.2), and then
restarts the engine automatically to resume driving. The system provides improved fuel economy,
reduced exhaust gas emissions, and eliminates idling noise while the engine is stopped.
(Manual transaxle)
2. Depress the brake pedal and then the clutch pedal, and bring the vehicle to a
complete stop.
3. After bringing the vehicle to a stop, shift the lever to the neutral position while depressing
the clutch pedal. The engine automatically stops after the clutch pedal is released. The
i-stop indicator light (green) also illuminates while the i-stop function is operating.
(Automatic transaxle)
2. The i-stop function operates when the brake pedal is depressed while driving the
vehicle (except for driving in reverse) and the vehicle is stopped. The i-stop
indicator light (green) also illuminates while the i-stop function is operating.
With the selector lever in the N or P position, the engine will not restart even if the
brake pedal is released. If the brake pedal is depressed again, the engine will restart.
1. (Except European model)
1. (Except European model) The i-stop indicator light (green) illuminates when the i-stop conditions are met
while the vehicle is being driven.
4. To restart the engine, depress the clutch pedal (i-stop indicator light (green) turns
off). The i-stop indicator light (green) illuminates if the i-stop function conditions
are met again while driving (except European model).
The i-stop indicator light (green) illuminates when the i-stop conditions are met
while the vehicle is being driven.
3. When the brake pedal is released while the shift lever is in the D/M position (not
second gear fixed mode), the engine restarts automatically and the i-stop indicator
light (green) turns off. The i-stop indicator light (green) illuminates if the i-stop
function conditions are met again while driving (except European model)
�/�C�\�F�C���A���'�(�����'�'�������.�A�'�F�K�V�K�Q�P���A�3�W�K�E�M�)�W�K�F�G���K�P�F�D��������������������������������������������������
Page 8 of 25
 7
When Driving
For details, refer to Section 4, “Start/Stop Engine”.
i-stop OFF Switch
The i-stop function can be turned off by
pressing the switch until the beep sounds and
the i-stop warni")
7
When Driving
For details, refer to Section 4, “Start/Stop Engine”.
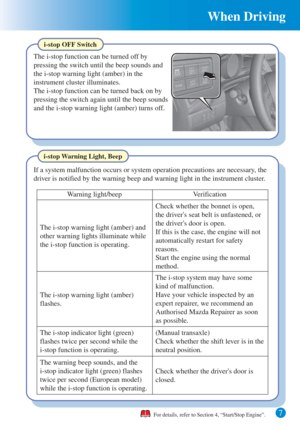
i-stop OFF Switch
The i-stop function can be turned off by
pressing the switch until the beep sounds and
the i-stop warning light (amber) in the
instrument cluster illuminates.
The i-stop function can be turned back on by
pressing the switch again until the beep sounds
and the i-stop warning light (amber) turns off.
i-stop Warning Light, Beep
If a system malfunction occurs or system operation precautions are necessary, the
driver is notified by the warning beep and warning light in the instrument cluster.
Warning light/beep Verification
The i-stop warning light (amber) and
other warning lights illuminate while
the i-stop function is operating.
The i-stop warning light (amber)
flashes. The i-stop system may have some
kind of malfunction.
The i-stop indicator light (green)
flashes twice per second while the
i-stop function is operating. (Manual transaxle)
Check whether the shift lever is in the
neutral position. Have your vehicle inspected by an
expert repairer, we recommend an
Authorised Mazda Repairer as soon
as possible. Check whether the bonnet is open,
the driver's seat belt is unfastened, or
the driver's door is open.
If this is the case, the engine will not
automatically restart for safety
reasons.
Start the engine using the normal
method.
The warning beep sounds, and the
i-stop indicator light (green) flashes
twice per second (European model)
while the i-stop function is operating.Check whether the driver's door is
closed.
�/�C�\�F�C���A���'�(�����'�'�������.�A�'�F�K�V�K�Q�P���A�3�W�K�E�M�)�W�K�F�G���K�P�F�D��������������������������������������������������


 1
2
5
21
22
Quick Guide Quick Guide
This Quick Guide is provided as a simple explanation of how to operate some of the
features equipped on your Mazda3.
Essential Safety Equipment
Before Driving")
 1
Essential Safety Equipment
Power operation
To raise a head restraint, pull it up to the desired position.
Head Restraints Seat Operation
The following seat adjustment functions for the manual an")