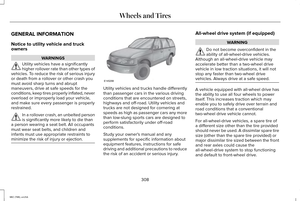
Page 209 of 490
Setting the Gap Distance
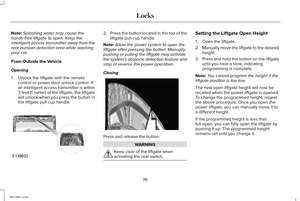
Note:
It is your responsibility to select a gap
appropriate to the driving conditions. Gap decrease.
A
Gap increase.
B You can decrease or increase the distance
between your vehicle and the vehicle in front
of you by pressing the gap control. The selected gap appears in the information
display as shown by the bars in the graphic.
Four gap distance settings are available.
Adaptive cruise control, distance between vehicle settings Dynamic behavior
Distance gap
Time gap, seconds
Graphic display, bars indic-
ated between vehicles
Set speed
yd (m)
mph ( km/h)
Sport.
31 yd (28 m)
1
1
62 mph (100 km/h)
Normal.
43 yd (39 m)
1.4
2
62 mph (100 km/h)
Normal.
55 yd (50 m)
1.8
3
62 mph (100 km/h)
Comfort.
67 yd (61 m)
2.2
4
62 mph (100 km/h)
206
MKC (TME), enUSA Cruise ControlE145978 E164805
Page 210 of 490

Each time you start the vehicle, the system
selects the last chosen gap for the current
driver.
Disengaging the System
Press the brake pedal or press CNCL. The
last set speed will display in grey but will not
erase.
Overriding the System WARNING
Whenever you press the accelerator
pedal and override the system, the
system will not automatically apply the
brakes to maintain separation from any
vehicle ahead. While you press the accelerator pedal, you
override the set speed and gap distance.
When you override the system,
the green indicator light
illuminates and the lead vehicle
graphic does not show in the information
display. The system resumes operation when you
release the accelerator pedal. The vehicle
speed decreases to the set speed, or a lower
speed if following a slower vehicle.
Changing the Set Speed
•
Accelerate or brake to the desired speed,
then press and release
SET+.
• Press and hold
SET+ or SET- until the
desired set speed shows on the
information display. The vehicle speed
gradually changes to the selected speed.
• Press and release SET+ or SET-. The set
speed will change in approximately 1 mph
(2 km/h) increments.
The system may apply the brakes to slow
the vehicle to the new set speed. The set
speed will display continuously in the
information display while the system is active.
Resuming the Set Speed
Note: Only use resume if you are aware of
the set speed and intend to return to it. Press and release
RES. The vehicle returns
to the previously set speed. The set speed
shows continuously in the information display
while the system is active.
Low Speed Automatic Cancellation
The system is not functional at vehicle
speeds below 12 mph (20 km/h). An audible
alarm will sound and the automatic braking
releases if the vehicle drops below this
speed.
Hilly Condition Usage
Note: An audible alarm will sound and the
system will shut down if it applies brakes for
an extended period of time. This allows the
brakes to cool. The system functions
normally again when the brakes have
cooled.
207
MKC (TME), enUSA Cruise ControlE144529
Page 211 of 490

You should select a lower gear when the
system is active in situations such as
prolonged downhill driving on steep grades,
for example in mountainous areas. The
system needs additional engine braking in
these situations to reduce the load on the
vehicle
’s regular brake system to prevent it
from overheating.
Switching the System Off
Note: The set speed memory erases when
you switch off the system.
Press and release OFF or turn off the ignition.
Detection Issues
The radar sensor has a limited field of vision.
It may not detect vehicles at all or detect a
vehicle later than expected in some
situations. The lead vehicle graphic will not
illuminate if the system does not detect a
vehicle in front of you. Detection issues can occur:
When driving on a different line
than the vehicle in front.
A
With vehicles that edge into your
lane. The system can only detect
these vehicles once they move
fully into your lane.
B
There may be issues with the
detection of vehicles in front when
driving into and coming out of a
bend or curve in the road.
C
In these cases the system may brake late or
unexpectedly. You should stay alert and take
action when necessary.
If something hits the front end of your vehicle
or damage occurs, the radar-sensing zone
may change. This could cause missed or
false vehicle detections. See an authorized
dealer to have the radar checked for proper
coverage and operation.
208
MKC (TME), enUSA Cruise ControlE71621
Page 212 of 490

System Not Available
Conditions that can cause the system to
deactivate or prevent the system from
activating when requested include:
•
A blocked sensor.
• High brake temperature.
• A failure in the system or a related
system. Blocked Sensor WARNINGS
Do not use the system when towing a
trailer with aftermarked trailer brake
controls. Aftermarket trailer brakes will not
function properly when you switch the
system on because the brakes are
electronically controlled. Failing to do so may
result in loss of vehicle control, which could
result in serious injury. Do not use tire sizes other than those
recommended because this can affect
the normal operation of the system. Failing
to do so may result in a loss of vehicle
control, which could result in serious injury. A message displays if something obstructs
the radar signals from the sensor. The sensor
is located behind a cover near the driver side
of the lower grille. The system cannot detect
a vehicle ahead and will not function when
something obstructs the radar signals. The
following table lists possible causes and
actions for this message displaying.
209
MKC (TME), enUSA Cruise ControlE145632
Page 213 of 490

Action
Cause
Clean the grille surface in front of the radar or remove the objectcausing the obstruction.
The surface of the radar in the grille is dirty or obstructed in some
way.
Wait a short time. It may take several minutes for the radar to detectthat it is free from obstruction.
The surface of the radar in the grille is clean but the message remains
in the display.
Do not use the system in these conditions because it may not detectany vehicles ahead.
Heavy rain or snow is interfering with the radar signals.
Do not use the system in these conditions because it may not detectany vehicles ahead.
Swirling water, or snow or ice on the surface of the road may interfere
with the radar signals.
Wait a short time or switch to normal cruise control.
You are in a desert or remote area with no other vehicles and no
roadside objects.
Due to the nature of radar technology, it is
possible to get a blockage warning and not
be blocked. This can happen, for example,
when driving in sparse rural or desert
environments. A false blocked condition will
either self clear or clear after a key cycle. Switching to Normal Cruise Control WARNING
Normal cruise control will not brake
due to slower vehicles. Always be
aware of which mode you have selected and
apply the brakes when necessary. You can manually change from adaptive
cruise control to normal cruise control
through the information display.
210
MKC (TME), enUSA Cruise Control
Page 214 of 490
The cruise control indicator light
replaces the adaptive cruise
control indicator light if you select
normal cruise control. The gap setting does
not display, the system does not
automatically respond to lead vehicles and
automatic braking is not active. The system
remembers the last setting when you start
your vehicle.
211
MKC (TME), enUSA Cruise ControlE71340
Page 215 of 490

DRIVER ALERT (If Equipped)
WARNING
The driver alert system is designed to
aid you. It is not intended to replace
your attention and judgment. You are still
responsible to drive with due care and
attention. Note:
The system will store the on or off
setting in the information display menu
through ignition cycles.
Note: If enabled in the menu, the system will
be active at speeds above 40 mph (64 km/h).
When below the activation speed, the
information display will inform you that the
system is unavailable.
Note: The system works as long as one lane
marking can be detected by the camera.
Note: If the camera is blocked or if the
windshield is damaged, the system may not
function.
Note: The system may not be available in
poor weather or other low visibility
conditions. The system automatically monitors your
driving behavior using various inputs
including the front camera sensor.
If the system detects that your driving
alertness is reduced below a certain
threshold, the system will alert you using a
chime and a message in the information
display.
Using Driver Alert
Switching the system on and off
You may switch the system on or off through
the information display by selecting Settings
then Driver Assist then Driver Alert in the
menu. When activated, the system will
monitor your alertness level based upon your
driving behavior in relation to the lane
markings, and other factors.
System Warnings
Note:
Note: The system will not issue
warnings below approximately 40 mph (64
km/h). The warning system is in two stages. At first
the system issues a temporary warning that
you need to take a rest. This message will
only appear for a short time. If the system
detects further reduction in driving alertness,
another warning may be issued which will
remain in the information display for a longer
time. Press OK on the steering wheel control
to clear the warning
System Display
When active the system will run automatically
in the background and only issue a warning
if required. You can view the status at any
time using the information display.
See
General Information (page 112).
The alertness level is shown by six steps in
a colored bar. 212
MKC (TME), enUSA Driving AidsE131358
Page 216 of 490

The current assessment of your alertness is
within a typical range.
The current assessment of your alertness
indicates that you should rest as soon as
safely possible.
The status bar will travel from left to right as
the calculated alertness level decreases. As
the rest icon is approached the color turns
from green to yellow to red. The yellow
position indicates the first warning is active
and the red position indicates the second
warning is active.
Note:
If you have recently received a
warning; you should consider resting, even
if the current assessment is with the typical
range. Note:
If the camera sensor cannot track the
road lane markings or if your vehicle speed
drops below approximately 40 mph (64
km/h), the alertness level will change to grey
for a short time and the information display
will inform you that the system is unavailable.
Resetting the System
You can reset the system by either:
• Switching the ignition off and on.
• Stopping the vehicle and then opening
and closing the driver’ s door.
LANE KEEPING SYSTEM (If Equipped) WARNING
The system is designed to aid the
driver. It is not intended to replace the
driver’ s attention and judgment. The driver
is still responsible to drive with due care and
attention. Note:
The system works above 40 mph (64
km/h). Note:
The system works as long as the
camera can detect one lane marking.
Note: The system may not function if the
camera is blocked or there is damage to the
windshield.
Note: When Aid mode is on and the system
detects no steering activity for a short period,
the system will alert you to put your hands
on the steering wheel. The system may
detect a light grip or touch on the steering
wheel as hands off driving.
The system detects unintentional drifting
toward the outside of the lane and alerts or
aids you to stay in the lane through the
steering system and instrument cluster
display. The system automatically detects
and tracks the road lane markings using a
camera mounted behind the interior rear
view mirror.
Switching the System On and Off
Note: The system on or off setting is stored
until it is manually changed, unless a MyKey®
is detected. If the system detects a MyKey®,
it defaults to on and the mode is set to alert.
213
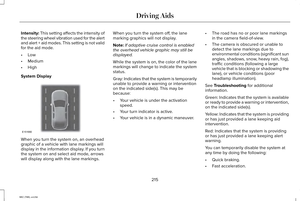
MKC (TME), enUSA Driving AidsE131359