Page 302 of 878

3022-5. Driving information
Winter driving tips Carry out the necessary preparations and inspections before driving the
vehicle in winter. Always drive the ve hicle in a manner appropriate to the
prevailing weather conditions.
■ Pre-winter preparations
● Use fluids that are appropria te to the prevailing outside tempera-
tures.
• Engine oil
• Engine coolant
• Power control unit coolant
• Washer fluid
● Have a service technician inspect the condition of the 12-volt bat-
tery.
● Have the vehicle fitted with four snow tires or purchase a set of
tire chains for the front tires. Ensure that all tires are the same size and brand, and that chains match
the size of the tires.
■ Before driving the vehicle
Perform the following accord ing to the driving conditions:
● Do not try to forcibly open a w indow or move a wiper that is fro-
zen. Pour warm water over the frozen area to melt the ice. Wipe
away the water immediately to prevent it from freezing.
● To ensure proper operation of the climate control system fan,
remove any snow that has accumu lated on the air inlet vents in
front of the windshield.
● Check for and remove any exce ss ice or snow that may have
accumulated on the exterior lights, vehicle's roof, chassis, around
the tires or on the brakes.
● Remove any snow or mud from the bottom of your shoes before
getting in the vehicle.
Page 314 of 878
3142-5. Driving information
Positions for towing hitch receiver and hitch ball
Weight carrying ball position:
45.1 in. (1145 mm)
Connecting trailer lights
Use the wire harness stored in the
rear end under body.
Page 315 of 878

3152-5. Driving information
2
When driving ■
Auto current cut-off function
In case of over current, the auto cut-off function stops the power flowing to the
trailer lights to prevent damage to the vehicle’s electrical system.
This function is activated when the rated current of any of the following trailer light
circuit components is exceeded: ●
Tail lights: maximum 7.8 A ●
Stop/turn signal light (right): maximum 4.5 A●
Stop/turn signal light (left): maximum 4.5 A■
When the auto current cut function is activated
If a trailer light does not come on due to the activation of the auto current cut func-
tion, the light system will need to be reset.
Follow the reset procedure shown below. ●
If a tail light does not come on, turn off the headlight switch.●
If the right-side stop/turn signal light does not come on, put the turn signal in the
off position or remove foot from the brake pedal.●
If the left-side stop/turn signal light does not come on, put the turn signal in the
off position or remove foot from the brake pedal.
If the emergency flashers do not operate, press the emergency flasher switch to
turn them off.
After the light system is reset, operate the light switches again to see if the lights
operate normally.
If the lights do not operate normally, have the vehicle inspected by your Lexus
dealer.
Page 316 of 878

3162-5. Driving information
Trailer towing tips
Your vehicle will handle differently when towing a trailer. Help to avoid an
accident, death or serious injury, keep the following in mind when towing:
● Speed limits for towing a trailer va ry by state or province. Do not
exceed the posted towing speed limit.
● Lexus recommends that the vehicle-trailer speed limit is 65 mph (104
km/h) on a flat, straight, dry road. Do not exceed this limit, the posted
towing speed limit or the speed limit for your trailer as set forth in your
trailer owner’s manual, whichever is lowest. Instability of the towing
vehicle-trailer combination (trailer sway) increases as speed increases.
Exceeding speed limits may cause loss of control.
● Before starting out, check the trailer lights, tires and the vehicle-trailer
connections. Recheck after driving a short distance.
● Practice turning, stopping and reversing with th e trailer attached in an
area away from traffic until you be come accustomed to the feel of the
vehicle-trailer combination.
● Reversing with a trailer attached is difficult and requires practice. Grip
the bottom of the steering wheel and move your hand to the left to
move the trailer to the left. Move yo ur hand to the right to move the
trailer to the right. (This is gene rally opposite to reversing without a
trailer attached.) Avoid sharp or prolonged turning. Have someone
guide you when reversing to redu ce the risk of an accident.
● As stopping distance is increased when towing a trailer, vehicle-to-
vehicle distance should be increas ed. For each 10 mph (16 km/h) of
speed, allow at least one vehicle and trailer length.
● Avoid sudden braking as you may skid, resulting in the trailer jackknif-
ing and a loss of vehicle control. Th is is especially true on wet or slip-
pery surfaces.
● Avoid jerky starts or sudden acceleration.
Page 319 of 878

3192-5. Driving information
2
When driving ■
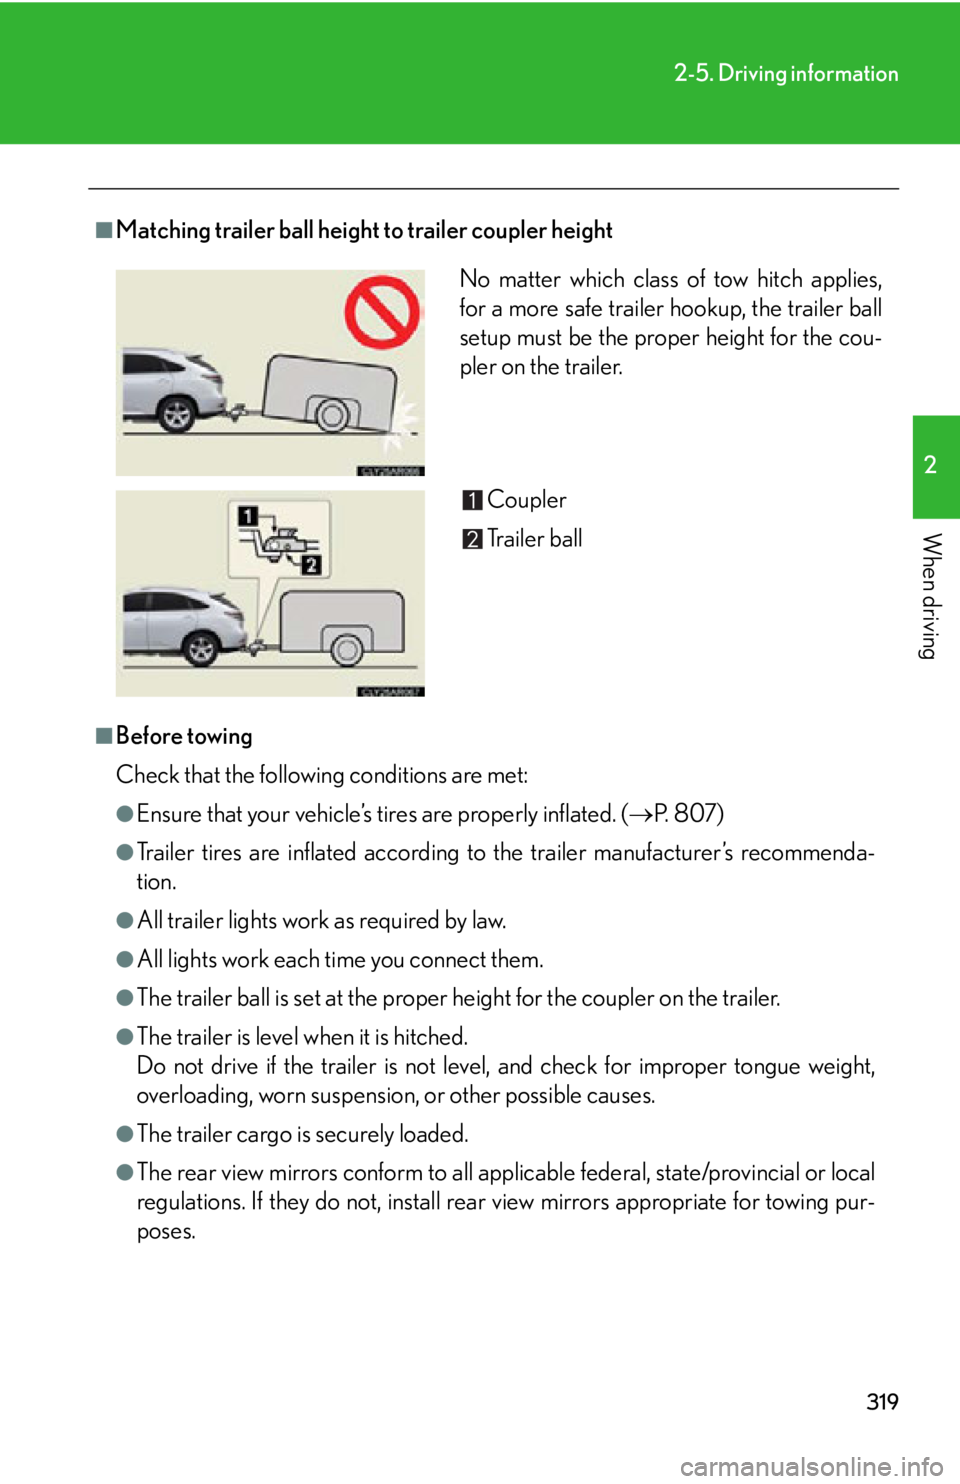
Matching trailer ball height to trailer coupler height
■
Before towing
Check that the following conditions are met: ●
Ensure that your vehicle’s ti res are properly inflated. ( P. 8 0 7 )●
Trailer tires are inflated according to the trailer manufacturer’s recommenda-
tion.●
All trailer lights work as required by law.●
All lights work each time you connect them.●
The trailer ball is set at the proper height for the coupler on the trailer.●
The trailer is level when it is hitched.
Do not drive if the trailer is not level, and check for improper tongue weight,
overloading, worn suspension , or other possible causes.
●
The trailer cargo is securely loaded.
●
The rear view mirrors conform to all applicable federal, state/provincial or local
regulations. If they do not, install rear view mirrors appropriate for towing pur-
poses. No matter which class of tow hitch applies,
for a more safe trailer hookup, the trailer ball
setup must be the proper height for the cou-
pler on the trailer.
Coupler
Trailer ball
Page 322 of 878

3222-5. Driving information
CAUTION■
Hitch
Trailer hitch assemblies have different weight capacities established by the hitch
manufacturer. Even though the vehicle may be physically capable of towing a
higher weight, the operator must determin e the maximum weight rating of the par-
ticular hitch assembly and never exceed the maximum weight rating specified for
the trailer-hitch. Exceeding the maximum weight rating se t by the trailer-hitch man-
ufacturer can cause an accident resulting in death or serious personal injuries.■
When towing a trailer
Lexus recommends trailers with brakes that conform to any applicable federal and
state/provincial regulations. ●
If the gross trailer weight exceeds unbraked TWR, trailer brakes are required.
Lexus recommends trailers with brakes that conform to all applicable federal and
state/provincial regulations.●
Never tap into your vehicle’s hydraulic system, as this will lower the vehicle’s brak-
ing effectiveness.●
Never tow a trailer without using a safety chain securely attached to both the
trailer and the vehicle. If damage occurs to the coupling unit or hitch ball, there is
danger of the trailer wand ering into another lane.
NOTICE■
When installing a trailer hitch
Use only the position recommended by your Lexus dealer. Do not install the trailer
hitch on the bumper; this may cause body damage.■
Do not directly splice trailer lights
Do not directly splice trailer lights. Direct ly splicing trailer li ghts may damage your
vehicle’s electrical system and cause a malfunction.
Page 327 of 878

Interior features
3
327Hands-free system for
mobile phones ...................... 547
Using the hands-free system
(for mobile phones)............. 552
Making a phone call .............. 560
Setting a mobile phone......... 565
Security and system
setup ......................................... 571
Using the phone book........... 575
3-5. Using the interior lights
Interior lights list .................... 582
• Interior lights ....................... 583
• Personal lights ..................... 583
3-6. Using the storage
features
List of storage features ........ 585
• Glove box .............................. 586
• Bottle holders/
door pockets ......................... 587
• Cup holders ......................... 588
• Console box ......................... 590
• Coin holder ........................... 592
• Auxiliary boxes .................... 592
• Under tray ............................. 594 3-7. Other interior features
Sun visors ................................. 595
Vanity mirrors ......................... 596
Clock .......................................... 597
Outside temperature
display..................................... 598
Multi-display light
control .................................... 600
Power outlets ........................... 601
Heated steering wheel ........ 604
Seat heaters and
ventilators ............................. 605
Armrest .................................... 607
Coat hooks .............................. 608
Assist grips ............................... 609
Floor mat ................................... 610
Luggage compartment
features .................................... 612
Garage door opener .............. 616
Compass .................................. 622
Safety Connect ....................... 626
Page 332 of 878
3323-1. Lexus Display Audio system
Display settings
Changing between day mode and night mode
When the headlights are turned on, the screen dims.
However, the screen can be switch ed to day mode by selecting “Day
Mode”.
If the screen is set in day mode with th e headlight switch turned on, this condi-
tion is memorized even with the “POWER” switch is turned off. You can adjust the contrast and brightness of the screen and also turn the
display off.
To display the “Display Settings” sc reen, press the “MENU” button on the
Lexus Display Audio controller and then select “Display” on the “Menu”
screen.
Turn off screen The screen is turned off. To turn
it on, press the “AUDIO” or
“MENU” button on the Lexus
Display Audio controller.
Changes to day mode.
( P. 3 3 2 )
Adjust screen contrast/
brightness ( P. 333)
Adjust screen contrast/
brightness of rear view moni-
tor camera ( P. 333)