Page 114 of 878

1141-5. Opening and closing the windows and moon roof
■
Door lock linked window operation ●
The power windows can be opened and closed using the mechanical key.
( P. 7 8 1 )●
The power windows can be opened using the wireless remote control.
( P. 6 9 )■
When the 12-volt battery is disconnected
The window lock switch is disabled. If necessary, press the window lock switch after
reconnecting the battery.■
Customization
Settings (e.g. linked door lock operation) can be changed.
(Customizable features P. 825)
CAUTION■
Closing the windows
Observe the following precautions.
Failing to do so may result in death or serious injury. ●
Check to make sure that all passengers do not have any part of their body in a
position where it could be caught when a window is being operated.●
Do not allow children to operate the power windows.
Closing a power window on someone can cause death or serious injury.
The driver is responsible for instructin g children not to operate the power win-
dows.■
Jam protection function ●
Never use any part of your body to intent ionally activate the jam protection func-
tion.●
The jam protection function may not work if something gets caught just before
the window fully closes. Also, the jam protection does not operate when the
power window switch is pulled up continually to close the windows.
Page 116 of 878
1161-5. Opening and closing the windows and moon roof
■
The moon roof can be operated when
The “POWER” switch is in ON mode. ■
Operating the moon roof after turning the hybrid system off
The moon roof can be operated for ap proximately 45 seconds even after the
“POWER” switch is turned to ACCESSORY mode or turned off. It cannot, how-
ever, be operated once either front door is opened. ■
Jam protection function
If an object is detected between the moon roof and the frame while the moon roof is
closing or tilting down, travel is stopped and the moon roof opens slightly.■
Sunshade
The sunshade can be opened and closed manually. However, the sunshade will
open automatically when the moon roof is opened. ■
Door lock linked moon roof operation ●
The moon roof can be opened and closed using the mechanical key. ( P. 7 8 1 )●
The moon roof can be opened using the wireless remote control. ( P. 6 9 )
Page 220 of 878

2202-3. Operating the lights and windshield wipers
■
Automatic light off system ●
When the headlights are on: The headlights and tail lights turn off 30 seconds
after a door is opened and closed if the “POWER” switch is turned to ACCES-
SORY mode or turned off. (The lights turn off immediately if on the key is
pressed after all the doors are locked.)●
When only the tail lights ar e on: The tail lights turn off automatically if the
“POWER” switch is turned to ACCESSORY mode or turned off and the
driver’s door is opened.
To turn the lights on again, turn the “POWER” switch to ON mode, or turn the light
switch off once and then back to or .
If any of the doors is kept open, the ligh ts automatically turn off after 20 minutes.■
Automatic headlight leveling system (if equipped)
The level of the headlights is automatica lly adjusted according to the number of
passengers and the loading condition of the vehicle to ensure that the headlights do
not interfere with other road users. ■
Light reminder buzzer (headlights)
A buzzer sounds when the “POWER” switch is turned off or turned to ACCES-
SORY mode and the driver's door is open ed while the headlights are turned on.■
Illuminated entry system
If the wireless remote control switch is used to unlock the vehicle when the light
switch is in and the surrounding area is dark, the parking light turns on.■
Customization
Settings (e.g. light sensor sensitivity) can be changed.
(Customizable features P. 825)
NOTICE■
To prevent 12-volt battery discharge
Do not leave the lights on longer than necessary when the hybrid system is off.
Page 420 of 878
4203-3. Using the Lexus Display Audio system
■
About Bluetooth ®
■
Compatible models
Portable audio players must correspond to the specifications. ●
Bluetooth ®
specifications:
Ver. 1.1, or higher (Recommended: Ver. 2.1 + EDR or higher)●
Profiles:
• A2DP (Advanced Audio Distribution Profile) Ver. 1.0, or higher
(Recommended: Ver. 1.2 or higher)
This is a profile to transmit stereo audio or high quality sounds to the head-
phone.
• AVRCP (Audio/Video Remote Control Profile) Ver. 1.0 or higher
(Recommended: Ver. 1.4 or higher)
This is a profile to remote control the A/V equipment.
However, please note that some function s may be limited depending on the type of
portable audio player. Bluetooth is a registered trademark of
Bluetooth SIG. Inc.
Page 520 of 878

5203-4. Using the audio system
■
About Bluetooth ®
■
Compatible models ●
Bluetooth ®
specifications:
Ver. 1.1, or higher (Recommended: Ver. 1.2 or higher)●
Following profiles:
• A2DP (Advanced Audio Distribution Profil e) Ver. 1.0, or higher (Conformed:
Ve r. 1 . 2 )
• AVRCP (Audio/Video Remote Control Profile) Ver. 1.0 or higher (Con-
formed: Ver. 1.3)
Portable players must correspond to the above specifications in order to be con-
nected to the Bluetooth ®
audio system. However, please note that some functions
may be limited depending on the type of portable player.■
Certification for the Bluetooth ®
audio system
FCC ID: AJDK018
IC ID: 775E-K018
This device complies with Part 15 of FCC Rules and Industry Canada licence-
exempt RSS standard(s). Operation is subject to the following two conditions: (1)
this device may not cause interference, and (2) this device must accept any inter-
ference, including interference that may cause undesired operation of this device.
Le présent appareil est conforme aux la partie 15 des règles de la FCC et CNR
d’Industrie Canada applicables aux appareils radio exempts de licence. L’exploita-
tion est autorisée aux deux conditions suivantes : (1) l’appareil ne doit pas produire
de brouillage, et (2) l’utilisateur de l’appareil doit accepter tout brouillage
radioélectrique subi, même si le brouilla ge est susceptible d’en compromettre le
fonctionnement. Bluetooth is a registered trademark of
Bluetooth SIG. Inc.
Page 616 of 878
6163-7. Other interior features
Garage door opener The garage door opener (HomeLink
Universal Transceiver) is manufactured
under license from HomeLink
.
Programming the HomeLink
(for U.S.A. owners)
The HomeLink
compatible transceiver in your vehicle has 3 buttons
which can be programmed to operate 3 different devices. Refer to the
programming method below appropriate for the device.
Indicator
Buttons
■ Programming the HomeLink
Point the remote control transmit-
ter for the device 1 to 3 in. (25 to
75 mm) from the HomeLink
control buttons.
Keep the HomeLink
indicator
light in view while programming.The garage door opener can be pr ogrammed to operate garage doors,
gates, entry doors, door locks, home lighting systems, security systems, and
other devices.
STEP 1
Page 617 of 878

6173-7. Other interior features
3
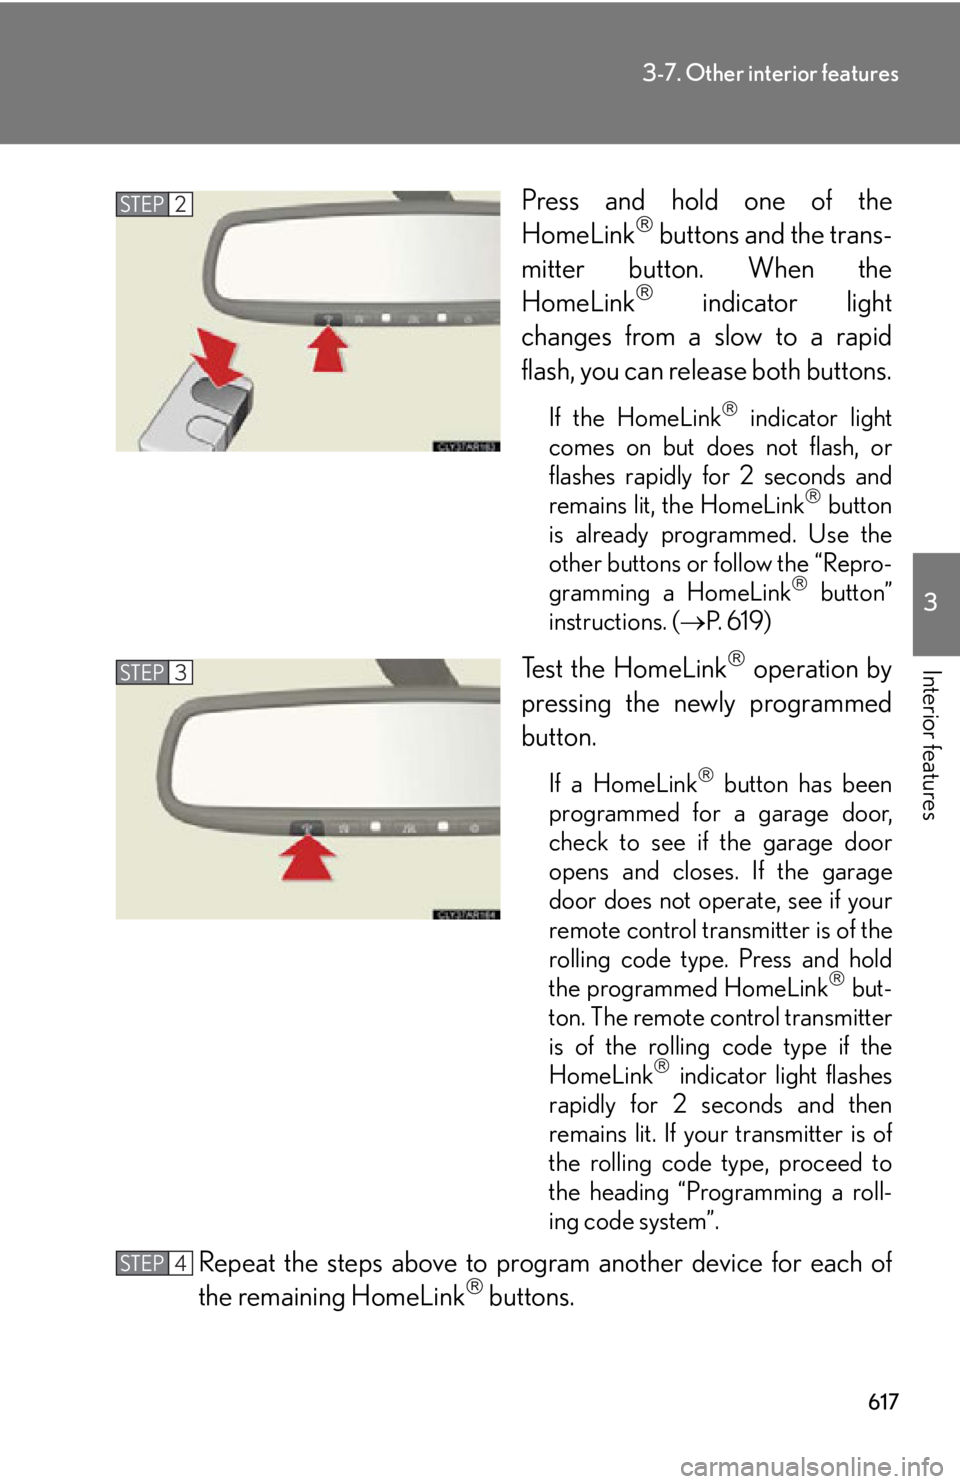
Interior features Press and hold one of the
HomeLink
buttons and the trans-
mitter button. When the
HomeLink
indicator light
changes from a slow to a rapid
flash, you can release both buttons. If the HomeLink
indicator light
comes on but does not flash, or
flashes rapidly for 2 seconds and
remains lit, the HomeLink
button
is already programmed. Use the
other buttons or follow the “Repro-
gramming a HomeLink
button”
instructions. ( P. 6 1 9 )
Test the HomeLink
operation by
pressing the newly programmed
button. If a HomeLink
button has been
programmed for a garage door,
check to see if the garage door
opens and closes. If the garage
door does not operate, see if your
remote control transmitter is of the
rolling code type. Press and hold
the programmed HomeLink
but-
ton. The remote control transmitter
is of the rolling code type if the
HomeLink
indicator light flashes
rapidly for 2 seconds and then
remains lit. If your transmitter is of
the rolling code type, proceed to
the heading “Programming a roll-
ing code system”.
Repeat the steps above to program another device for each of
the remaining HomeLink
buttons.STEP 2
STEP 3
STEP 4
Page 618 of 878

6183-7. Other interior features
■ Programming a Rolling Code system (for U.S.A. owners)
If your device is Rolling Code eq uipped, follow the steps under the
heading “Programming the HomeLink
” before proceeding with the
steps listed below.
Locate the learn button on th e ceiling mounted garage door
opener motor. The exact location and color of the button may
vary by brand of garage door opener motor. Refer to the operation manual supplied with the garage door opener
for the location of the learn button.
Press the learn button. Following this step, you have 30 se conds in which to initiate step 3
below.
Press and hold the vehi cle’s programmed HomeLink
button for
2 seconds and release it. Repeat this step once again. The garage
door may open. If the garage door opens, the programming process is complete. If the
door does not open, press and release the button a third time. This third
press and release will complete the programming process by opening
the garage door.
The ceiling mounted garage door op ener motor should now recognize
the HomeLink
signal and operate the garage door.
Repeat the steps above to prog ram another rolling code system
for any of the remaining HomeLink
buttons.
■ Programming an entry gate (for U .S.A. owners)/Programming all
devices in the Canadian market
Place your transmitter 1 to 3 in. (25 to 75 mm) away from the sur-
face of the HomeLink
.
Keep the HomeLink
indicator light in view while programming.
Press and hold the selected HomeLink
button.
Repeatedly press and release (cyc le) the device’s remote control
button for two seconds each until step 4 is completed.
When the indicator light on the HomeLink
compatible trans-
ceiver starts to flash rapidly, release the buttons.STEP 1
STEP 2
STEP 3
STEP 4
STEP 1
STEP 2
STEP 3
STEP 4