Page 9 of 94
9
GS350_QG_OM30E50U_(U)
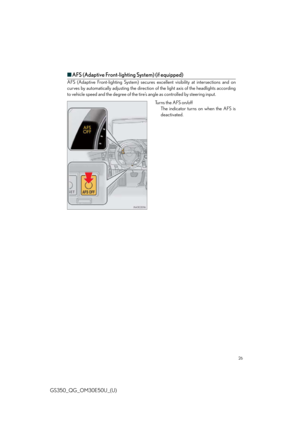
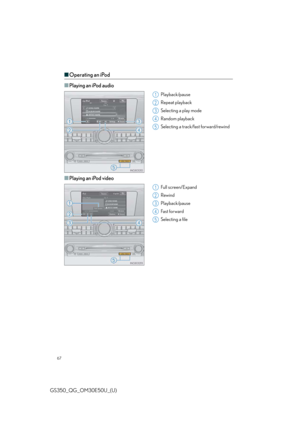
OverviewInstrument Panel
Intuitive parking assist switch P.36
Rear sunshade switch*
Remote Touch P.45
Seat ventilator switches P.74
Shift lever*
Driving mode select switch P.40
Snow mode switch*
Seat heater switch P.74
Seat heater switch P.74
Page 10 of 94
10
GS350_QG_OM30E50U_(U)
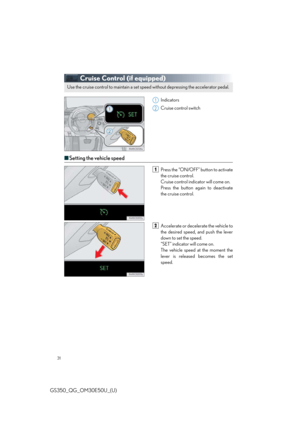
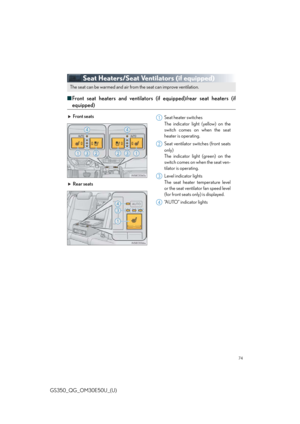
OverviewRoof
: If equipped
*: Refer to “OWNER’S MANUAL”.
Moon roof switches*
Personal lights*
“SOS” button P.83
Garage door opener switches P.81
Interior light*Vanity lights*
Page 11 of 94
11
GS350_QG_OM30E50U_(U)
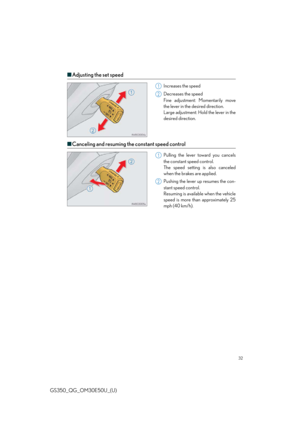
Floor mat installation
Insert the retaining hooks (clips) into
the floor mat eyelets.
Turn the upper knob of each retaining
hook (clip) to secure the floor mats in
place.
*: Always align the marks.
The shape of the retaining hook s (clips) may differ from that shown in the illustration.
Use only floor mats designed specifically fo r vehicles of the same model and model year
as your vehicle. Fix them secu rely in place onto the carpet.
1
*
2
Page 12 of 94
12
GS350_QG_OM30E50U_(U)
Smart Access System with Push-button Start
■Entering the vehicle
Grip the driver’s door handle to unlock the
door. Grip the passenger’s door handle to
unlock all the doors.
Make sure to touch the sensor on the
back of the handle.
The doors cannot be unlocked for 3 sec-
onds after the doors are locked.
■Exiting the vehicle
Touch the lock sensor (the indentation on
the upper part of the door handle) to lock
all the doors. Check that the door is securely locked.
■Opening the trunk
Press the button.
If the vehicle is equipped with power
trunk opener and closer, the trunk lid
automatically opens fully.
The following operations can be performed simply by carrying the electronic key on your
person, for example in your pocket. (The driver should always carry the electronic key.)
For details on starting the engine, see page 16.
For details on what to do when the electronic key does not operate properly, see page 91.
Page 13 of 94
13
GS350_QG_OM30E50U_(U)
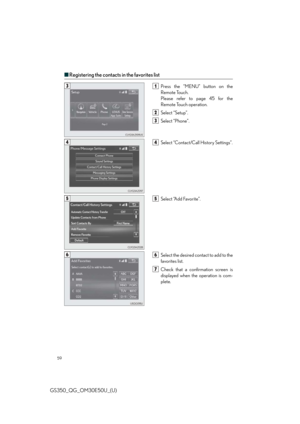
Front Seats
■Adjustment procedure
Ty p e A
Ty p e B Ty p e C
Seat position adjustment switch
Seatback angle adjustment switch
Seat cushion (front) angle adjustment
switch
Vertical height adjustment switch
Seatback upper angle adjustment
switch (if equipped) Lumbar support adjustment switch
Pelvic support adjustment switch (if
equipped)
Seat cushion length
adjustment switch
(if equipped)
Seatback side support adjustment
switch (if equipped)
1
2
3
4
5
6
7
8
9
Page 14 of 94
14
GS350_QG_OM30E50U_(U)
Driving Position Memory
■Driving position memory
■
Recording procedure
Check that the shift lever is in P.
Turn the engine switch to IGNITION ON mode.
Adjust the driver’s seat, steering wheel, and outside rear view mirrors to the desired
positions. While pressing the “SET” button, or within 3
seconds after the “SET” button is pressed,
press button “1”, “2” or “3” until the buzzer
sounds.If the selected button has already been
preset, the previously recorded position
will be overwritten.
■Recall procedure
Check that the shift lever is in P.
Turn the engine switch to IGNITION ON mode.
Press one of the buttons for the driving
position you want to recall until the buzzer
sounds.
This feature automatically adjusts the front seats, steering wheel and outside rear view
mirrors to suit your preferences.
1
2
3
4
1
2
3
Page 15 of 94
15
GS350_QG_OM30E50U_(U)
■Memory recall function (driver’s side only)
Each electronic key can be registered to recall your preferred driving position.
■Registering procedure
Check that the shift lever is in P.
Turn the engine switch to IGNITION ON mode.
Recall the driving position that you want to record.
While pressing the recalled button, press
and hold the door lock switch (either lock
or unlock) until the buzzer sounds. If the button could not be registered, the
buzzer sounds continuously for approxi-
mately 3 seconds.1
2
3
4
Page 16 of 94
16
GS350_QG_OM30E50U_(U)
Engine (Ignition) Switch
■Starting the engine
Check that the par king brake is set.
Check that the shift lever is set in P.
Firmly depress the brake pedal.
will be displaye d on the multi-
information display. If it is not displayed,
the engine cannot be started.
Press the engine switch.
The engine will crank until it starts or
for up to 30 seconds, whichever is less.
Continue depressing the brake pedal
until the engine is completely started.
The engine can be started from any
engine switch mode.
Performing the following operations when carrying the electronic key on your person
starts the engine or changes engine switch modes.
1
2
3
4


 9
GS350_QG_OM30E50U_(U)
OverviewInstrument Panel
Intuitive parking assist switch P.36
Rear sunshade switch*
Remote Touch P.45
Seat ventilator switches P.74
Shift lever*
Driving mode select sw")
 10
GS350_QG_OM30E50U_(U)
OverviewRoof
: If equipped
*: Refer to “OWNER’S MANUAL”.
Moon roof switches*
Personal lights*
“SOS” button P.83
Garage door opener switches P.81
Interior light")
 11
GS350_QG_OM30E50U_(U)
Floor mat installation
Insert the retaining hooks (clips) into
the floor mat eyelets.
Turn the upper knob of each retaining
hook (clip) to secure the floor mats in
place.
*: A")
 12
GS350_QG_OM30E50U_(U)
Smart Access System with Push-button Start
■Entering the vehicle
Grip the driver’s door handle to unlock the
door. Grip the passenger’s door handle to
unlock all the doo")
 13
GS350_QG_OM30E50U_(U)
Front Seats
■Adjustment procedure
Ty p e A
Ty p e B Ty p e C
Seat position adjustment switch
Seatback angle adjustment switch
Seat cushion (front) angle adjustment
switch")
 14
GS350_QG_OM30E50U_(U)
Driving Position Memory
■Driving position memory
■
Recording procedure
Check that the shift lever is in P.
Turn the engine switch to IGNITION ON mode.
Adjust the driver’")
 15
GS350_QG_OM30E50U_(U)
■Memory recall function (driver’s side only)
Each electronic key can be registered to recall your preferred driving position.
■Registering procedure
Check that the shift")
 16
GS350_QG_OM30E50U_(U)
Engine (Ignition) Switch
■Starting the engine
Check that the par king brake is set.
Check that the shift lever is set in P.
Firmly depress the brake pedal.
will be displaye")