Page 5 of 94
5
GS350_QG_OM30E50U_(U)
OverviewInstrument Panel
Windshield wiper and washer switch P.27
Multi-information display P.21
Headlight switch Turn signal lever
Fog light switch
*
P.25
P.19
Inside lock buttons*
Trunk opener*
Hood lock release lever*
Driving position memoryswitches
P.14
See P.8
See P.7
Window lock switch*
Outside rear view mirror switches
*
Power window switches*
Door lock switches*
PCS OFF switch*
Tire pressure warning reset switch P.44
AFS OFF switch P.26
Page 7 of 94
7
GS350_QG_OM30E50U_(U)
OverviewInstrument Panel
Odometer/trip meter and trip meter reset button*
Instrument panel light control switches*
Headlight cleaner switch*
VSC OFF switch*
HUD (Head-up display) switches P.23
Heated steering wheel switch*
BSM (Blind Spot Monitor) main switch P.37
Page 14 of 94
14
GS350_QG_OM30E50U_(U)
Driving Position Memory
■Driving position memory
■
Recording procedure
Check that the shift lever is in P.
Turn the engine switch to IGNITION ON mode.
Adjust the driver’s seat, steering wheel, and outside rear view mirrors to the desired
positions. While pressing the “SET” button, or within 3
seconds after the “SET” button is pressed,
press button “1”, “2” or “3” until the buzzer
sounds.If the selected button has already been
preset, the previously recorded position
will be overwritten.
■Recall procedure
Check that the shift lever is in P.
Turn the engine switch to IGNITION ON mode.
Press one of the buttons for the driving
position you want to recall until the buzzer
sounds.
This feature automatically adjusts the front seats, steering wheel and outside rear view
mirrors to suit your preferences.
1
2
3
4
1
2
3
Page 34 of 94
34
GS350_QG_OM30E50U_(U)
■Adjusting the set speed
Increases the speed
Decreases the speed
Fine adjustment: Momentarily move
the lever in the desired direction.
Large adjustment: Hold the lever in the
desired direction.
■ Changing the vehicle-to-vehicle distance
Pressing the button changes the vehicle-to-
vehicle distance as follows:
Long
Medium
Short
The vehicle-to-vehicle distance is set
automatically to long mode when the
engine switch is turned to IGNITION
ON mode.
If a vehicle is running ahead of you, the
preceding vehicle mark will be also dis-
played.
1
2
Preceding vehicle mark
1
2
3
The vehicle-to-vehicle distance control mode maintains the preset cruising speed as long
as no vehicle is detected ahead.
Page 44 of 94
44
GS350_QG_OM30E50U_(U)
Tire Pressure Warning System
■The tire inflation pressure display function (if equipped)
The tire pressure detected by the tire pres-
sure warning system can be displayed on
the multi-information display.
■Initializing the tire pressure warning system
Press and hold the tire pressure warning
reset switch until the tire pressure warning
light blinks slowly 3 times.
Your vehicle is equipped with a tire pressure warning system that uses tire pressure warn-
ing valves and transmitters to detect low tire inflation pressure before serious problems
arise.
Page 62 of 94

62
GS350_QG_OM30E50U_(U)
Audio System
■Audio control screen
Follow the procedure below to display the audio control screen.
Press the “MENU” button on the
Remote Touch.
Please refer to page 45 for the
Remote Touch operation.
The “Menu” screen will be displayed.
Using the Remote Touch, select
“Radio” or “Media” and select each tab.
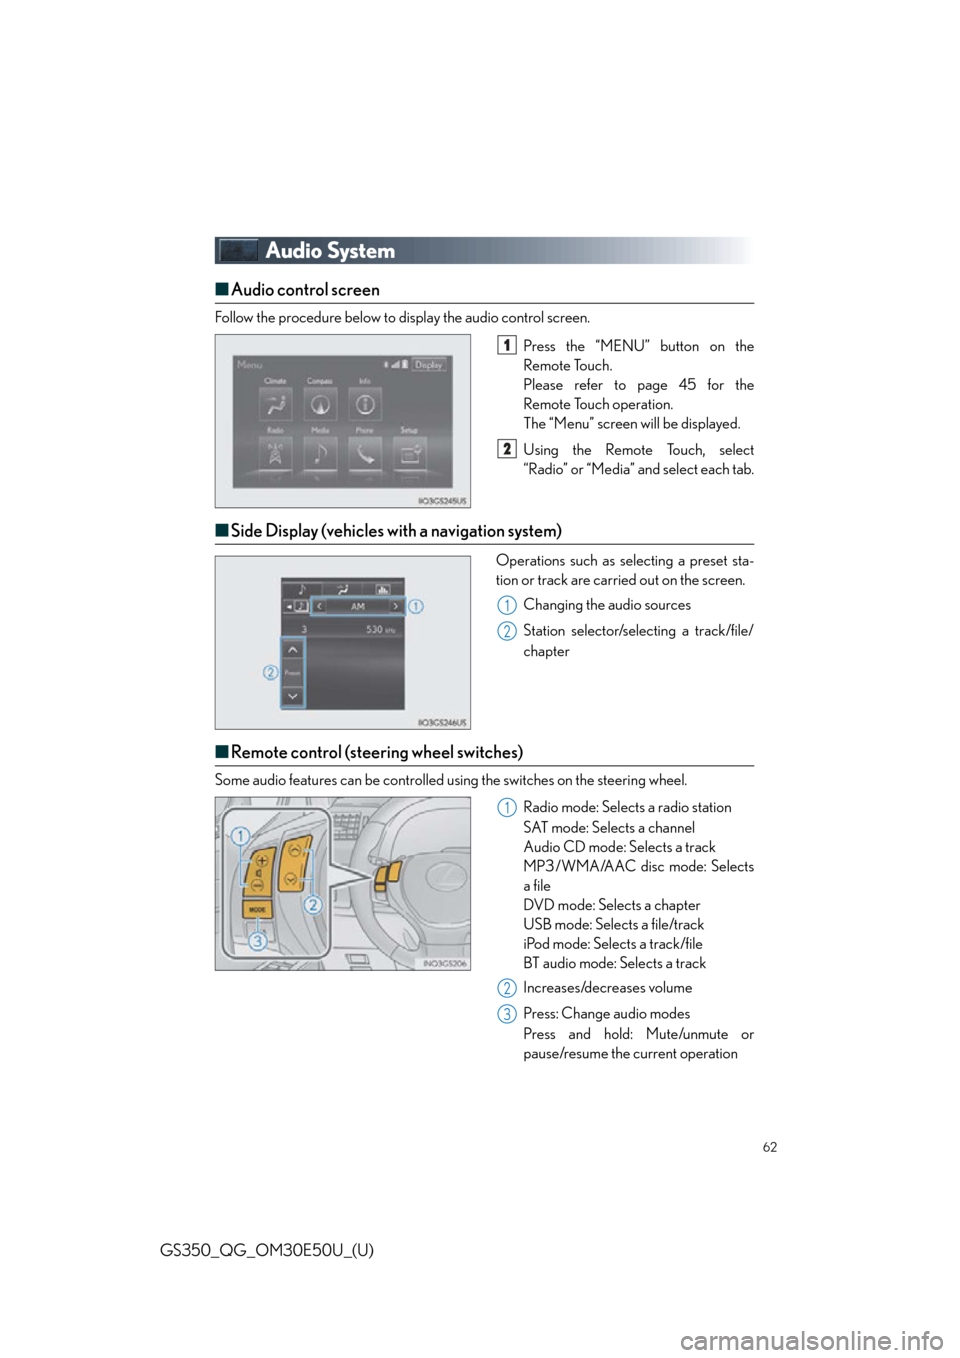
■Side Display (vehicles with a navigation system)
Operations such as selecting a preset sta-
tion or track are carried out on the screen.
Changing the audio sources
Station selector/selecting a track/file/
chapter
■Remote control (steering wheel switches)
Some audio features can be controlled using the switches on the steering wheel.
Radio mode: Selects a radio station
SAT mode: Selects a channel
Audio CD mode: Selects a track
MP3/WMA/AAC disc mode: Selects
a file
DVD mode: Selects a chapter
USB mode: Selects a file/track
iPod mode: Selects a track/file
BT audio mode: Selects a track
Increases/decreases volume
Press: Change audio modes
Press and hold: Mute/unmute or
pause/resume the current operation
1
2
1
2
1
2
3
Page 64 of 94
64
GS350_QG_OM30E50U_(U)
■Radio
Tuning to preset stations/channels
Scanning for receivable stations
Using HD Radio
TM Te c h n o l o g y ( f o r
U.S.A., if equipped)
Cache radio operation buttons
Press: Selects a preset station
Press and hold: Seeks for a station
Adjusting the frequency
■Entering station presets
Tune in the desired station.
Select “add new”.
Select “Yes” on the confirmation screen.
Select “OK” after settin g the new preset station.
Radio mode has a mix preset function, which ca n store up to 36 stations (6 stations per
page x 6 pages) from any of the AM, FM or SAT bands.
1
2
3
4
5
6
1
2
3
4
Page 78 of 94
78
GS350_QG_OM30E50U_(U)
Phone
Radio
CommandAction
“Redial”Places a call to the phone number of the latest outgo-
ing call
“Call Back”Places a call to the phone number of latest incoming
call
“Show Recent Calls”Displays the call history screen
“Dial ”Places a call to the said phone number
“Call ”Place a call to the said phone type of the contact from
the phone book
CommandAction
“Tune to AM”Changes the radio to the specified AM frequency
“Tune to FM”Changes the radio to the specified FM frequency
“Play station”Changes the radio to an FM station of the specified
genre
“Tune to FM
HD ”Changes the radio to the specified HD radio station
“Tune to preset ”Changes the radio to the specified preset radio sta-
tion
“Tune to ” Changes the radio to the satellite radio channel with
the specified name
“Tune to channel ” Changes the radio to the specified satellite radio
channel number
“Play satellite station”Changes the radio to a sate llite radio channel of the
specified genre