Page 427 of 492

751
Maintenance
Tire replacement
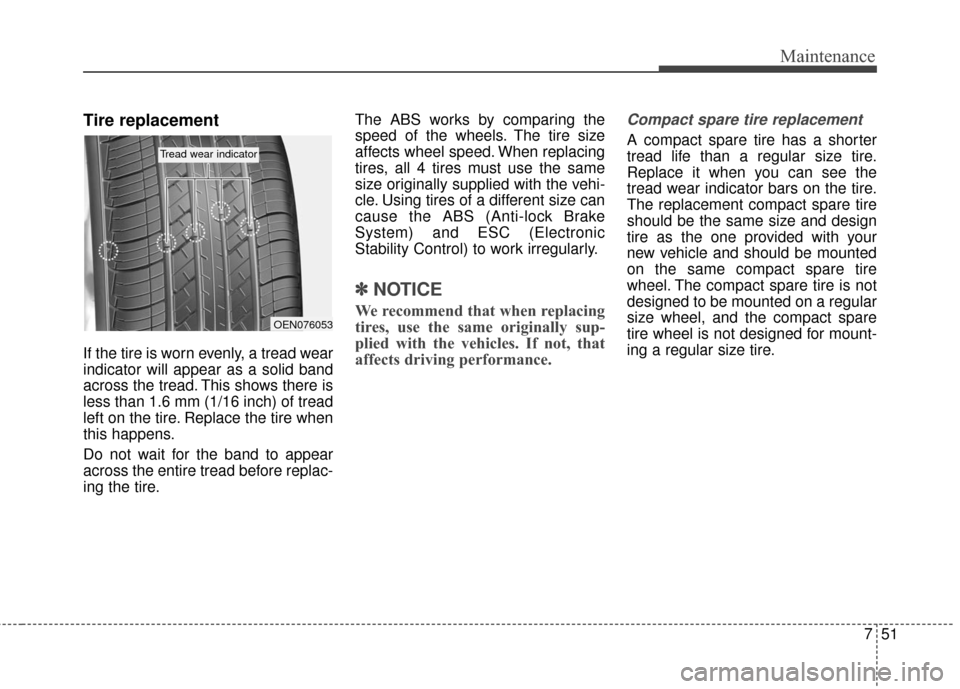
If the tire is worn evenly, a tread wear
indicator will appear as a solid band
across the tread. This shows there is
less than 1.6 mm (1/16 inch) of tread
left on the tire. Replace the tire when
this happens.
Do not wait for the band to appear
across the entire tread before replac-
ing the tire.The ABS works by comparing the
speed of the wheels. The tire size
affects wheel speed. When replacing
tires, all 4 tires must use the same
size originally supplied with the vehi-
cle. Using tires of a different size can
cause the ABS (Anti-lock Brake
System) and ESC (Electronic
Stability Control) to work irregularly.
✽ ✽
NOTICE
We recommend that when replacing
tires, use the same originally sup-
plied with the vehicles. If not, that
affects driving performance.
Compact spare tire replacement
A compact spare tire has a shorter
tread life than a regular size tire.
Replace it when you can see the
tread wear indicator bars on the tire.
The replacement compact spare tire
should be the same size and design
tire as the one provided with your
new vehicle and should be mounted
on the same compact spare tire
wheel. The compact spare tire is not
designed to be mounted on a regular
size wheel, and the compact spare
tire wheel is not designed for mount-
ing a regular size tire.
OEN076053
Tread wear indicator
Page 440 of 492
Maintenance
64
7
3. Pull the suspected fuse straight
out. Use the fuse puller provided
on the engine compartment fuse
panel cover.
4. Check the removed fuse; replace it if it is blown.
Spare fuses are provided in theengine compartment fuse panel.
5. Push in a new fuse of the same rating, and make sure it fits tightly
in the clips.
If it fits loosely, consult an authorized
Kia dealer.
If you do not have a spare, use a fuse of the same rating from a circuityou may not need for operating thevehicle, such as the power outletfuse.
If the headlights or other electrical
components do not work and the
fuses are OK, check the fuse panel
in the engine compartment. If a fuse
is blown, it must be replaced.
Fuse switch
Always, put the fuse switch at the ON
position.
If you move the switch to the OFF
position, some items such as audio
and digital clock must be reset and
transmitter (or smart key) may not
work properly.
OPS073015
OPS073017
Page 441 of 492

765
Maintenance
✽
✽NOTICE
If you need to park your vehicle for
prolonged periods more than 1
month, move the transportation fuse
switch to the OFF position to pre-
vent the battery being discharged.
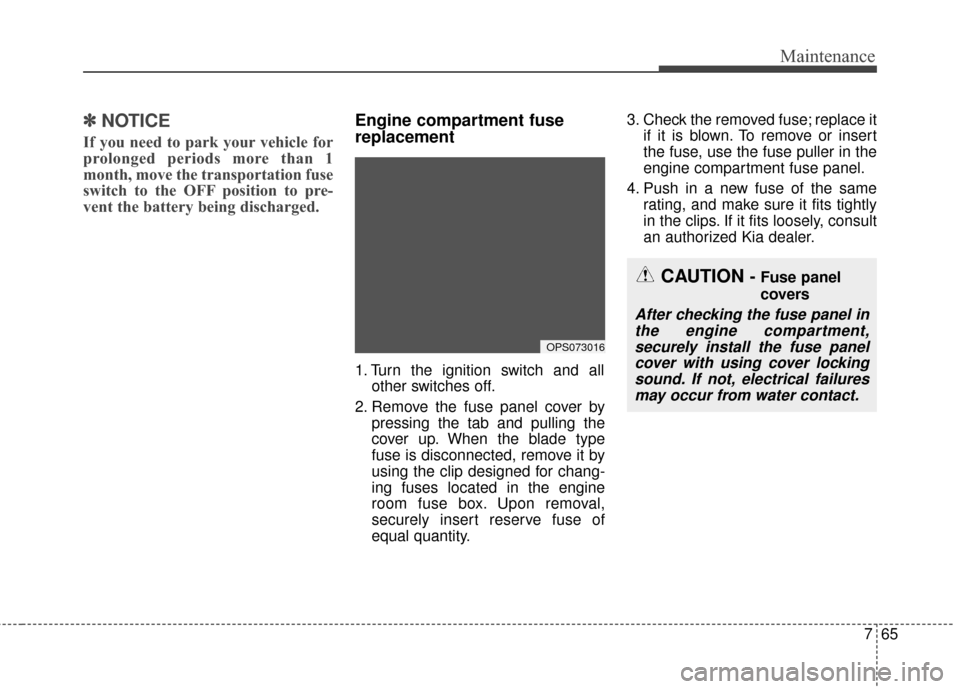
Engine compartment fuse
replacement
1. Turn the ignition switch and all
other switches off.
2. Remove the fuse panel cover by pressing the tab and pulling the
cover up. When the blade type
fuse is disconnected, remove it by
using the clip designed for chang-
ing fuses located in the engine
room fuse box. Upon removal,
securely insert reserve fuse of
equal quantity. 3. Check the removed fuse; replace it
if it is blown. To remove or insert
the fuse, use the fuse puller in the
engine compartment fuse panel.
4. Push in a new fuse of the same rating, and make sure it fits tightly
in the clips. If it fits loosely, consult
an authorized Kia dealer.
OPS073016
CAUTION - Fuse panel
covers
After checking the fuse panel inthe engine compartment,securely install the fuse panelcover with using cover lockingsound. If not, electrical failuresmay occur from water contact.
Page 445 of 492

769
Maintenance
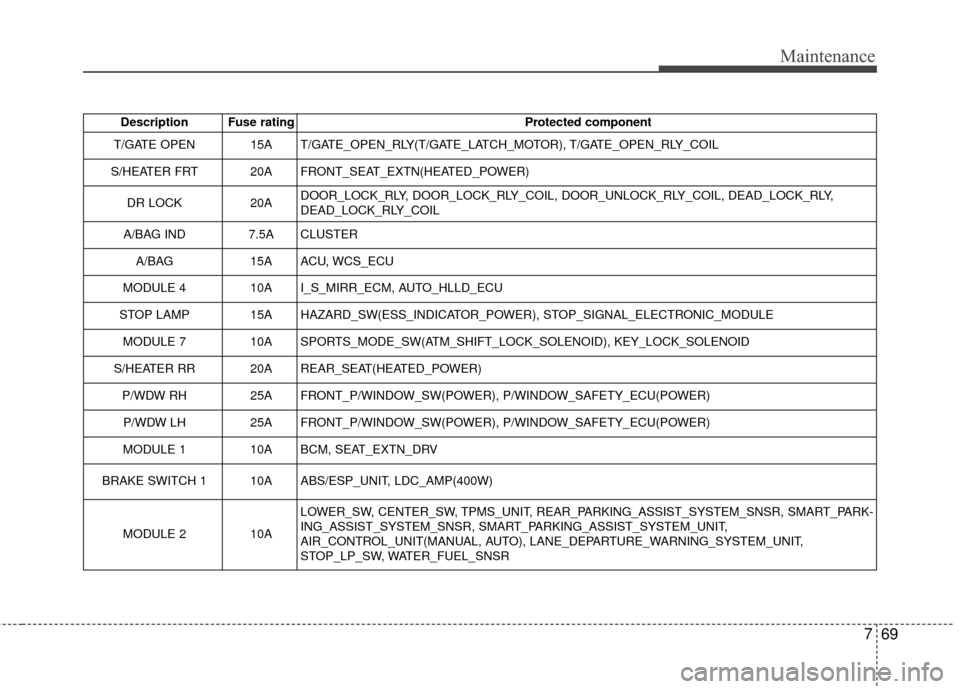
Description Fuse ratingProtected component
T/GATE OPEN 15A T/GATE_OPEN_RLY(T/GATE_LATCH_MOTOR), T/GATE_OPEN_RLY_COIL
S/HEATER FRT 20A FRONT_SEAT_EXTN(HEATED_POWER)
DR LOCK 20ADOOR_LOCK_RLY, DOOR_LOCK_RLY_COIL, DOOR_UNLOCK_RLY_COIL, DEAD_LOCK_RLY,
DEAD_LOCK_RLY_COIL
A/BAG IND 7.5A CLUSTER
A/BAG 15A ACU, WCS_ECU
MODULE 4 10A I_S_MIRR_ECM, AUTO_HLLD_ECU
STOP LAMP 15A HAZARD_SW(ESS_INDICATOR_POWER), STOP_SIGNAL_ELECTRONIC_MODULE MODULE 7 10A SPORTS_MODE_SW(ATM_SHIFT_LOCK_SOLENOID), KEY_LOCK_SOLENOID
S/HEATER RR 20A REAR_SEAT(HEATED_POWER) P/WDW RH 25A FRONT_P/WINDOW_SW(POWER), P/WINDOW_SAFETY_ECU(POWER)
P/WDW LH 25A FRONT_P/WINDOW_SW(POWER), P/WINDOW_SAFETY_ECU(POWER)
MODULE 1 10A BCM, SEAT_EXTN_DRV
BRAKE SWITCH 110AABS/ESP_UNIT, LDC_AMP(400W)
MODULE 210A
LOWER_SW, CENTER_SW, TPMS_UNIT, REAR_PARKING_ASSIST_SYSTEM_SNSR, SMART_PARK-
ING_ASSIST_SYSTEM_SNSR, SMART_PARKING_ASSIST_SYSTEM_UNIT,
AIR_CONTROL_UNIT(MANUAL, AUTO), LANE_DEPARTURE_WARNING_SYSTEM_UNIT,
STOP_LP_SW, WATER_FUEL_SNSR
Page 450 of 492
Maintenance
74
7
Description Fuse rating Protected component
B+ 1 50A SMART_JUNCTION_BLOCK(B+1)
B+ 2 50A SMART_JUNCTION_BLOCK(B+2)
B+ 3 50A SMART_JUNCTION_BLOCK(B+3)
IG2 40A IGN_SW(IG2), BUTTON_START_RLY(IG2), START_RLY
MDPS 80A MDPS_UNIT
ALT 125A ALTERNATOR
TCU 20A TRANSMISSION_CONTROL_UNIT
DEICER 20A DEICER
ECU 4 15A ECU(BATT_DIRECT)
ECU 5 15A ECU(BATT_DIRECT)
A/CON 10A A/CON_RLY
C/FAN 40A COOLING_FAN_MOTOR, SUB_FUEL_PUMP, SUB_FUEL_VALVE
INVERTER50AOIL_PUMP_INVERTER
ABS 140AABS/ESP_UNIT(MOTOR)
ABS 230AABS/ESP_UNIT(SOLENOID)
Page 451 of 492

775
Maintenance
LIGHT BULBS
Use only the bulbs of the specifiedwattage.
If you don’t have necessary tools, the correct bulbs and the expertise,
consult an authorized Kia dealer. In
many cases, it is difficult to replace
vehicle light bulbs because other
parts of the vehicle must be
removed before you can get to the
bulb. This is especially true if you
have to remove the headlight
assembly to get to the bulb(s).
Removing/installing the headlight
assembly can result in damage to
the vehicle.
Do not install additional bulb or LED. If you install that, the lamp
may not be operated properly and
fuse box or electric wiring system
may have problem.Headlight, position light, turn
signal light, side marker light
and front fog light bulb
replacementWARNING - Lights
Prior to working on the light,
firmly apply the parking brake,
ensure that the ignition switch
is turned to the LOCK position
and turn off the lights to avoid
sudden movement of the vehi-
cle and burning your fingers or
receiving an electric shock.
CAUTION
- Light replacement
Be sure to replace the burned- out bulb with one of the samewattage rating. Otherwise, itmay cause damage to the fuseor electric wiring system.
OPS073020
■ Type A
OPS073021
■Type B
Page 454 of 492

Maintenance
78
7
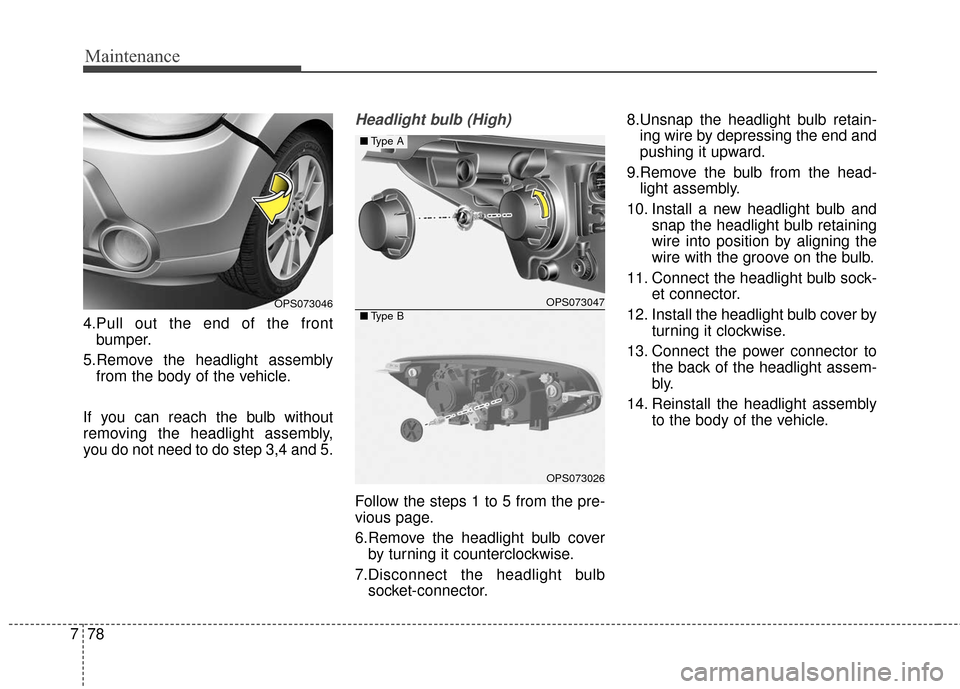
4.Pull out the end of the front
bumper.
5.Remove the headlight assembly from the body of the vehicle.
If you can reach the bulb without
removing the headlight assembly,
you do not need to do step 3,4 and 5.
Headlight bulb (High)
Follow the steps 1 to 5 from the pre-
vious page.
6.Remove the headlight bulb cover by turning it counterclockwise.
7.Disconnect the headlight bulb socket-connector. 8.Unsnap the headlight bulb retain-
ing wire by depressing the end and
pushing it upward.
9.Remove the bulb from the head- light assembly.
10. Install a new headlight bulb and snap the headlight bulb retaining
wire into position by aligning the
wire with the groove on the bulb.
11. Connect the headlight bulb sock- et connector.
12. Install the headlight bulb cover by turning it clockwise.
13. Connect the power connector to the back of the headlight assem-
bly.
14. Reinstall the headlight assembly to the body of the vehicle.
OPS073047
OPS073026
■Type A
■Type BOPS073046
Page 455 of 492
779
Maintenance
Headlight bulb (Low)
Follow the steps 1 to 5 from the pre-
vious page.
6.Remove the headlight bulb coverby turning it counterclockwise.
7.Remove the bulb from the assem- bly by turning it counterclockwise. 8.Insert a new bulb by inserting it into
the housing and rotating in until it
locks into place.
9.Install the headlight bulb cover by turning it clockwise.
Front turn signal/position light
OPS073047
OPS073023
■ Type A
■Type B
Low
High
■Type A
■Type BOPS073049
Turn signal
OPS073024
Turn signal
PositionOPS073048