Page 357 of 492
What to do in an emergency
10
6
Always move the vehicle complete-
ly off the road and onto the shoul-
der before trying to change a tire.
The jack should be used on a firm
level ground. If you cannot find a
firm, level place off the road, call a
towing service company for assis-
tance.
Be sure to use the correct front and rear jacking positions on the vehi-
cle; never use the bumpers or any
other part of the vehicle for jack
support.
Do not allow anyone to remain in the vehicle while it is on the jack.
Make sure any children present are in a secure place away from
the road and from the vehicle to be
raised with the jack.Removing and storing the
spare tire (if equipped)
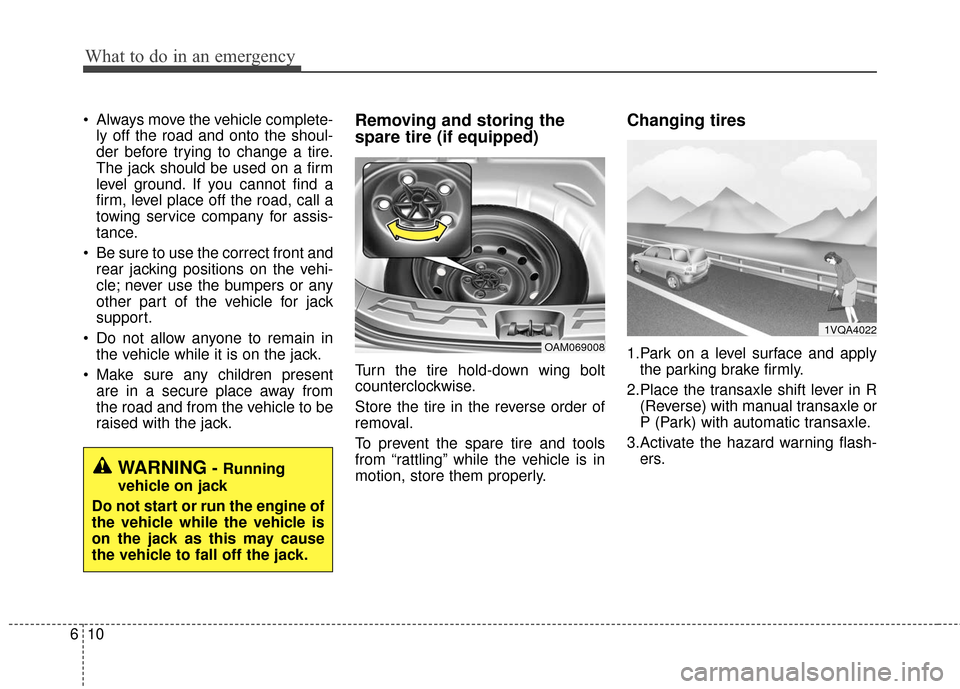
Turn the tire hold-down wing bolt
counterclockwise.
Store the tire in the reverse order of
removal.
To prevent the spare tire and tools
from “rattling” while the vehicle is in
motion, store them properly.
Changing tires
1.Park on a level surface and applythe parking brake firmly.
2.Place the transaxle shift lever in R (Reverse) with manual transaxle or
P (Park) with automatic transaxle.
3.Activate the hazard warning flash- ers.OAM069008
1VQA4022
WARNING- Running
vehicle on jack
Do not start or run the engine of
the vehicle while the vehicle is
on the jack as this may cause
the vehicle to fall off the jack.
Page 358 of 492
611
What to do in an emergency
4.Remove the wheel lug nut wrench,jack, jack handle, and spare tire
from the vehicle.
5.Block both the front and rear of the wheel that is diagonally opposite
from the jack position. To prevent vehicle movement while
changing a tire, always set the
parking brake fully, and always
block the wheel diagonally oppo-
site the wheel being changed.
We recommend that the wheels of the vehicle be blocked, and that no
person remain in a vehicle that is
being jacked.
6.Loosen the wheel lug nuts counter-clockwise one turn each, but do
not remove any nut until the tire
has been raised off the ground.
1VQA4023OPS063004
Page 359 of 492
What to do in an emergency
12
6
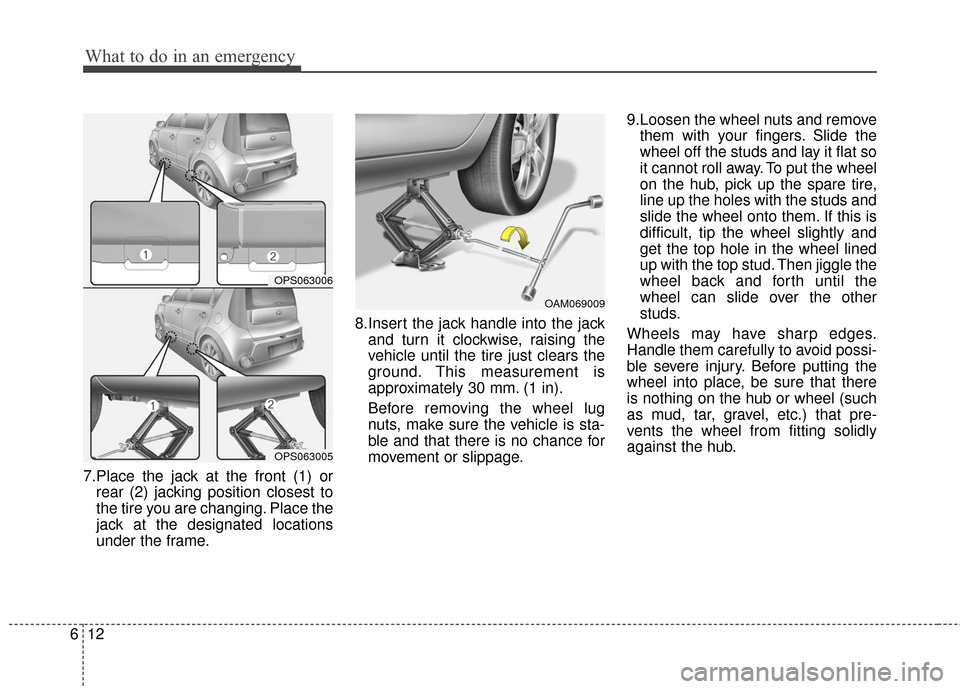
7.Place the jack at the front (1) or
rear (2) jacking position closest to
the tire you are changing. Place the
jack at the designated locations
under the frame. 8.Insert the jack handle into the jack
and turn it clockwise, raising the
vehicle until the tire just clears the
ground. This measurement is
approximately 30 mm. (1 in).
Before removing the wheel lug
nuts, make sure the vehicle is sta-
ble and that there is no chance for
movement or slippage. 9.Loosen the wheel nuts and remove
them with your fingers. Slide the
wheel off the studs and lay it flat so
it cannot roll away. To put the wheel
on the hub, pick up the spare tire,
line up the holes with the studs and
slide the wheel onto them. If this is
difficult, tip the wheel slightly and
get the top hole in the wheel lined
up with the top stud. Then jiggle the
wheel back and forth until the
wheel can slide over the other
studs.
Wheels may have sharp edges.
Handle them carefully to avoid possi-
ble severe injury. Before putting the
wheel into place, be sure that there
is nothing on the hub or wheel (such
as mud, tar, gravel, etc.) that pre-
vents the wheel from fitting solidly
against the hub.
OAM069009
OPS063006
OPS063005
Page 360 of 492
613
What to do in an emergency
10. To install the wheel, hold it on thestuds, put the wheel nuts on the
studs and tighten them finger
tight. Jiggle the tire to be sure it is
completely seated, then tighten
the nuts as much as possible
with your fingers again.
11. Insert the wrench into the jack and lower the vehicle to the
ground by turning the wheel nut
wrench counterclockwise.
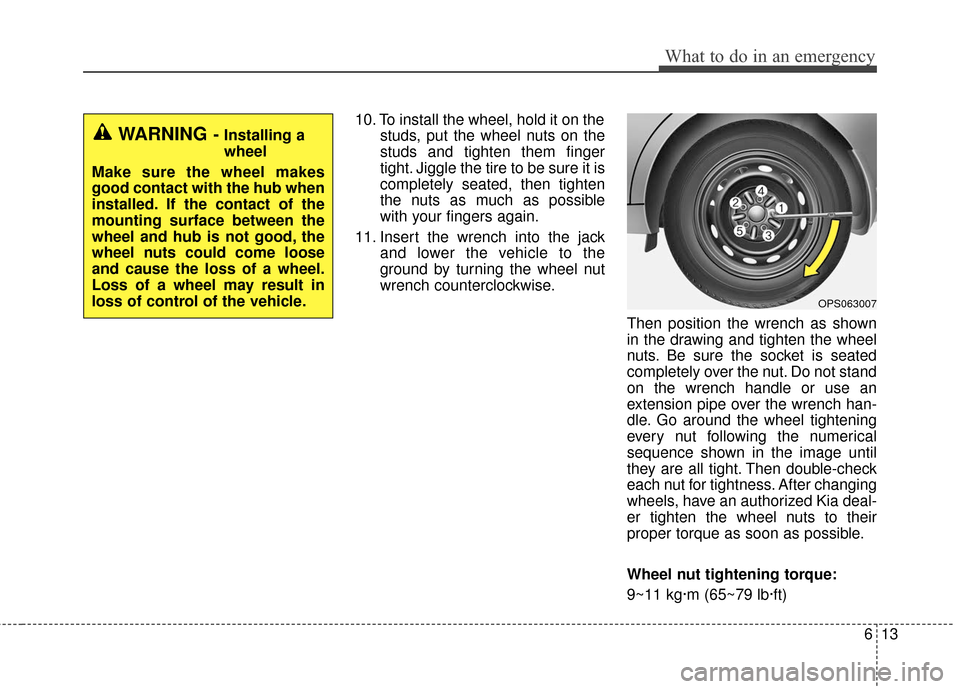
Then position the wrench as shown
in the drawing and tighten the wheel
nuts. Be sure the socket is seated
completely over the nut. Do not stand
on the wrench handle or use an
extension pipe over the wrench han-
dle. Go around the wheel tightening
every nut following the numerical
sequence shown in the image until
they are all tight. Then double-check
each nut for tightness. After changing
wheels, have an authorized Kia deal-
er tighten the wheel nuts to their
proper torque as soon as possible.
Wheel nut tightening torque:
9~11 kg·m (65~79 lb·ft)
WARNING- Installing a
wheel
Make sure the wheel makes
good contact with the hub when
installed. If the contact of the
mounting surface between the
wheel and hub is not good, the
wheel nuts could come loose
and cause the loss of a wheel.
Loss of a wheel may result in
loss of control of the vehicle.
OPS063007
Page 372 of 492
625
What to do in an emergency
TOWING
Towing service
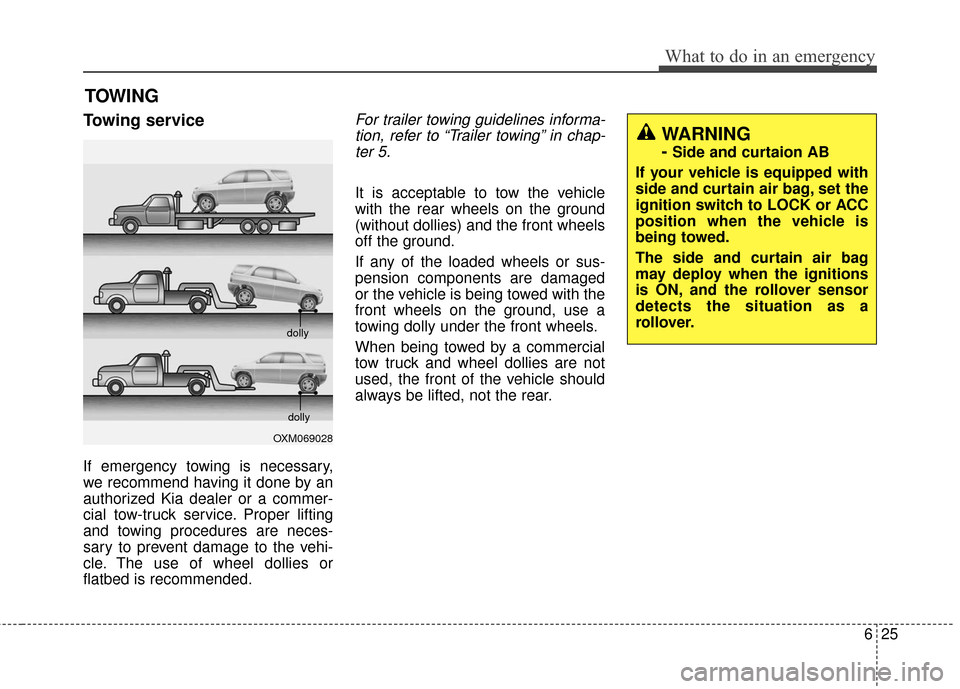
If emergency towing is necessary,
we recommend having it done by an
authorized Kia dealer or a commer-
cial tow-truck service. Proper lifting
and towing procedures are neces-
sary to prevent damage to the vehi-
cle. The use of wheel dollies or
flatbed is recommended.
For trailer towing guidelines informa-tion, refer to “Trailer towing” in chap-ter 5.
It is acceptable to tow the vehicle
with the rear wheels on the ground
(without dollies) and the front wheels
off the ground.
If any of the loaded wheels or sus-
pension components are damaged
or the vehicle is being towed with the
front wheels on the ground, use a
towing dolly under the front wheels.
When being towed by a commercial
tow truck and wheel dollies are not
used, the front of the vehicle should
always be lifted, not the rear.
OXM069028 dolly
dolly
WARNING
- Side and curtaion AB
If your vehicle is equipped with
side and curtain air bag, set the
ignition switch to LOCK or ACC
position when the vehicle is
being towed.
The side and curtain air bag
may deploy when the ignitions
is ON, and the rollover sensor
detects the situation as a
rollover.
Page 374 of 492
627
What to do in an emergency
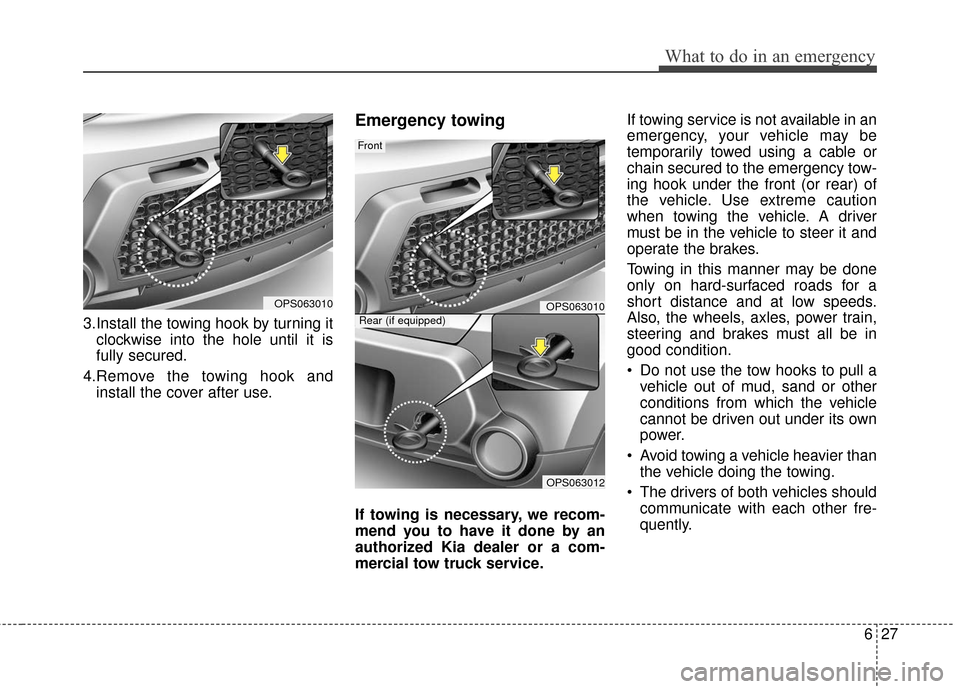
3.Install the towing hook by turning itclockwise into the hole until it is
fully secured.
4.Remove the towing hook and install the cover after use.
Emergency towing
If towing is necessary, we recom-
mend you to have it done by an
authorized Kia dealer or a com-
mercial tow truck service. If towing service is not available in an
emergency, your vehicle may be
temporarily towed using a cable or
chain secured to the emergency tow-
ing hook under the front (or rear) of
the vehicle. Use extreme caution
when towing the vehicle. A driver
must be in the vehicle to steer it and
operate the brakes.
Towing in this manner may be done
only on hard-surfaced roads for a
short distance and at low speeds.
Also, the wheels, axles, power train,
steering and brakes must all be in
good condition.
Do not use the tow hooks to pull a
vehicle out of mud, sand or other
conditions from which the vehicle
cannot be driven out under its own
power.
Avoid towing a vehicle heavier than the vehicle doing the towing.
The drivers of both vehicles should communicate with each other fre-
quently.
OPS063010OPS063010
OPS063012
Front
Rear (if equipped)
Page 375 of 492
What to do in an emergency
28
6
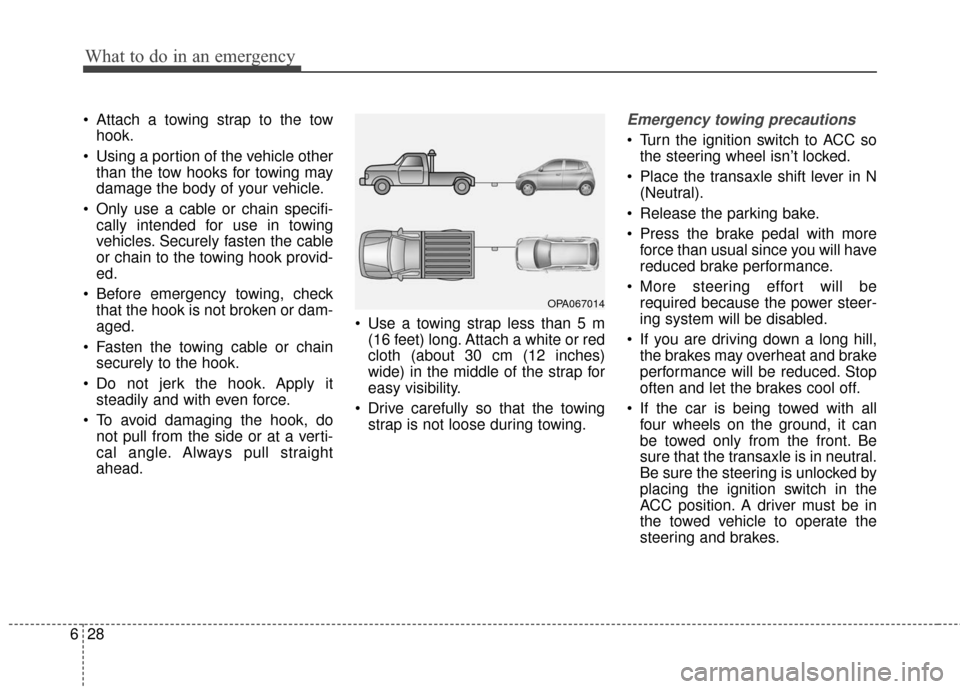
Attach a towing strap to the tow
hook.
Using a portion of the vehicle other than the tow hooks for towing may
damage the body of your vehicle.
Only use a cable or chain specifi- cally intended for use in towing
vehicles. Securely fasten the cable
or chain to the towing hook provid-
ed.
Before emergency towing, check that the hook is not broken or dam-
aged.
Fasten the towing cable or chain securely to the hook.
Do not jerk the hook. Apply it steadily and with even force.
To avoid damaging the hook, do not pull from the side or at a verti-
cal angle. Always pull straight
ahead. Use a towing strap less than 5 m
(16 feet) long. Attach a white or red
cloth (about 30 cm (12 inches)
wide) in the middle of the strap for
easy visibility.
Drive carefully so that the towing strap is not loose during towing.Emergency towing precautions
Turn the ignition switch to ACC sothe steering wheel isn’t locked.
Place the transaxle shift lever in N (Neutral).
Release the parking bake.
Press the brake pedal with more force than usual since you will have
reduced brake performance.
More steering effort will be required because the power steer-
ing system will be disabled.
If you are driving down a long hill, the brakes may overheat and brake
performance will be reduced. Stop
often and let the brakes cool off.
If the car is being towed with all four wheels on the ground, it can
be towed only from the front. Be
sure that the transaxle is in neutral.
Be sure the steering is unlocked by
placing the ignition switch in the
ACC position. A driver must be in
the towed vehicle to operate the
steering and brakes.
OPA067014
Page 383 of 492

77
Maintenance
OWNER MAINTENANCE
The following lists are vehicle checks
and inspections that should be per-
formed by the owner or an author-
ized Kia dealer at the frequencies
indicated to help ensure safe,
dependable operation of your vehi-
cle.
Any adverse conditions should be
brought to the attention of your deal-
er as soon as possible.
These Owner Maintenance Checks
are generally not covered by war-
ranties and you may be charged for
labor, parts and lubricants used.Owner maintenance schedule
When you stop for fuel:
Check the engine oil level.
Check the coolant level in thecoolant reservoir.
Check the windshield washer fluid level.
Look for low or under-inflated tires. Check if the front of the radiator
and condenser are clean and not
blocked with leaves, dirt or insects
etc. If any of the above parts are
extremely dirty or you are not sure
of their condition, take your vehicle
to an authorized Kia dealer.
While operating your vehicle:
Note any changes in the sound ofthe exhaust or any smell of
exhaust fumes in the vehicle.
Check for vibrations in the steering wheel. Notice any increased steer-
ing effort or looseness in the steer-
ing wheel, or change in its straight-
ahead position.
Notice if your vehicle constantly turns slightly or “pulls” to one side
when traveling on smooth, level
road.
When stopping, listen and check for unusual sounds, pulling to one
side, increased brake pedal travel
or “hard-to-push” brake pedal.
If any slipping or changes in the operation of your transaxle occurs,
check the transaxle fluid level.
Check the automatic transaxle P (Park) function.
Check the parking brake.
Check for fluid leaks under your vehicle (water dripping from the air
conditioning system during or after
use is normal).
WARNING
Be careful when checking your
engine coolant level when the
engine is hot. Scalding hot
coolant and steam may blow
out under pressure. This could
cause burns or other serious
injury.