2015 KIA Soul battery replacement
[x] Cancel search: battery replacementPage 87 of 492

47
Features of your vehicle
✽
✽NOTICE
If the keyless entry system is inoper-
ative due to exposure to water or liq-
uids, it will not be covered by your
manufacturer’s vehicle warranty.
Battery replacement
The transmitter uses a 3 volt lithium
battery which will normally last for
several years. When replacement is
necessary, use the following proce-
dure.
1. Insert a slim tool into the slot and
gently pry open the transmitter
center cover.
2. Replace the battery with a new battery (CR2032). When replacing
the battery, make sure the battery
is positioned battery.
3. Install the battery in the reverse order of removal. For replacement transmitters, see an
authorized Kia dealer for transmitter
reprogramming.
The transmitter is designed to give
you years of trouble-free use, how-
ever it can malfunction if exposed to
moisture or static electricity. If you
are unsure how to use your trans-
mitter or replace the battery, contact
an authorized Kia dealer.
Using the wrong battery can cause the transmitter to malfunction. Be
sure to use the correct battery.
To avoid damaging the transmitter, don't drop it, get it wet, or expose it
to heat or sunlight.
An inappropriately disposed battery can be harmful to the
environment and may cause
human health. Dispose the
battery according to your
local law(s) or regulation.
OYDDCO2005
Page 97 of 492

417
Features of your vehicle
This device complies with Industry
Canada Standard RSS-210.
Operation is subject to the following
two conditions:
1. This device may not cause harm-ful interference, and
2. This device must accept any inter- ference received, including inter-
ference that may cause undesired
operation.
✽ ✽NOTICE
Changes or modifications not
expressly approved by the party
responsible for compliance could
void the user’s authority to operate
the equipment. If the keyless entry
system is inoperative due to changes
or modifications not expressly
approved by the party responsible
for compliance, it will not be cov-
ered by your manufacturer’s vehicle
warranty.
Battery replacement
A smart key battery should last for
several years, but if the smart key is
not working properly, try replacing
the battery with a new one. If you are
unsure how to use your smart key or
replace the battery, contact an
authorized Kia dealer.
1. Remove the mechanical key.
2. Pry open the rear cover.
3. Replace the battery with a new
battery (CR2032). When replacing
the battery, make sure the battery
position.
OPS043002
CAUTION- Immobilizer
damage
Do not expose your immobilizersystem to moisture, static elec-tricity and rough handling. Thismay damage your immobilizer.
CAUTION- Immobilizer
alterations
Do not change, alter or adjustthe immobilizer system becauseit could cause the immobilizersystem to malfunction.
Page 180 of 492
Features of your vehicle
100
4
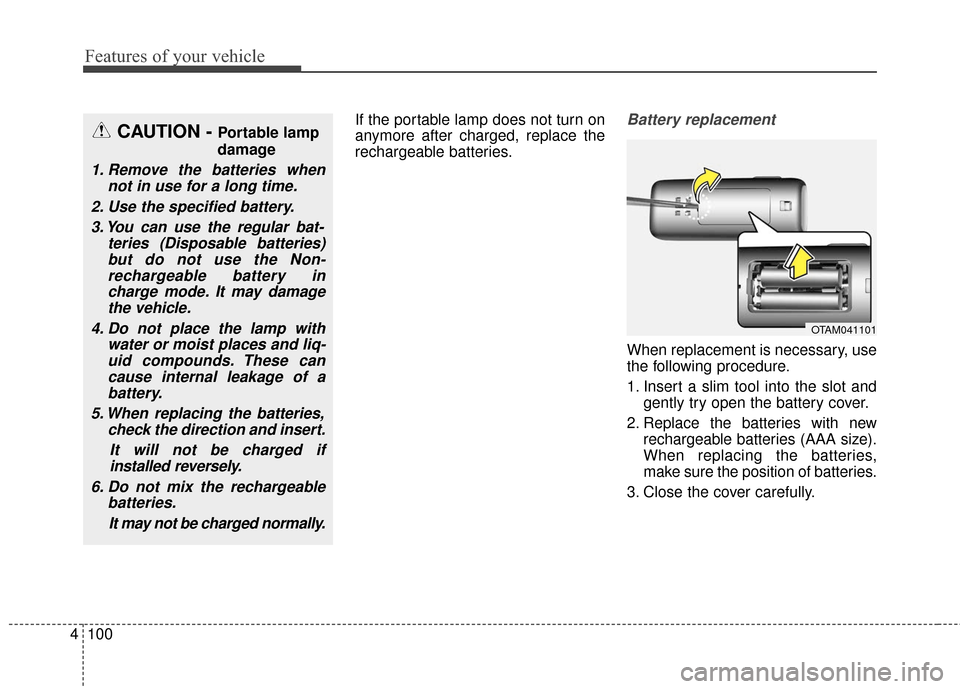
If the portable lamp does not turn on
anymore after charged, replace the
rechargeable batteries.Battery replacement
When replacement is necessary, use
the following procedure.
1. Insert a slim tool into the slot and
gently try open the battery cover.
2. Replace the batteries with new rechargeable batteries (AAA size).
When replacing the batteries,
make sure the position of batteries.
3. Close the cover carefully.
CAUTION - Portable lamp
damage
1. Remove the batteries when not in use for a long time.
2. Use the specified battery. 3. You can use the regular bat- teries (Disposable batteries)but do not use the Non-rechargeable battery incharge mode. It may damagethe vehicle.
4. Do not place the lamp with water or moist places and liq-uid compounds. These cancause internal leakage of abattery.
5. When replacing the batteries, check the direction and insert.
It will not be charged ifinstalled reversely.
6. Do not mix the rechargeable batteries.
It may not be charged normally.
OTAM041101
Page 438 of 492
Maintenance
62
7
FUSES
A vehicle’s electrical system is pro-
tected from electrical overload dam-
age by fuses.
This vehicle has 2 (or 3) fuse panels,
one located in the driver’s side panel
bolster, the other in the engine com-
partment near the battery.
If any of your vehicle’s lights, acces-
sories, or controls do not work, check
the appropriate circuit fuse. If a fuse
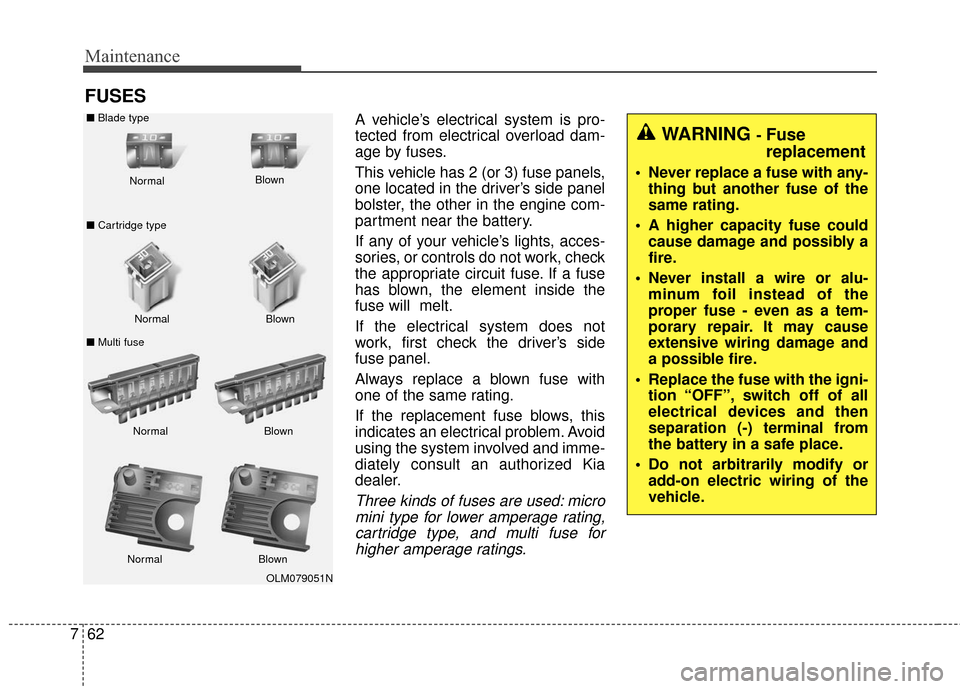
has blown, the element inside the
fuse will melt.
If the electrical system does not
work, first check the driver’s side
fuse panel.
Always replace a blown fuse with
one of the same rating.
If the replacement fuse blows, this
indicates an electrical problem. Avoid
using the system involved and imme-
diately consult an authorized Kia
dealer.
Three kinds of fuses are used: micro
mini type for lower amperage rating,cartridge type, and multi fuse forhigher amperage ratings.
WARNING - Fuse
replacement
Never replace a fuse with any- thing but another fuse of the
same rating.
A higher capacity fuse could cause damage and possibly a
fire.
Never install a wire or alu- minum foil instead of the
proper fuse - even as a tem-
porary repair. It may cause
extensive wiring damage and
a possible fire.
Replace the fuse with the igni- tion “OFF”, switch off of all
electrical devices and then
separation (-) terminal from
the battery in a safe place.
Do not arbitrarily modify or add-on electric wiring of the
vehicle.
OLM079051N
Normal
Normal
■
Blade type
■ Cartridge type
■ Multi fuse Blown
Blown
Normal Blown
Normal Blown
Page 441 of 492
765
Maintenance
✽
✽NOTICE
If you need to park your vehicle for
prolonged periods more than 1
month, move the transportation fuse
switch to the OFF position to pre-
vent the battery being discharged.
Engine compartment fuse
replacement
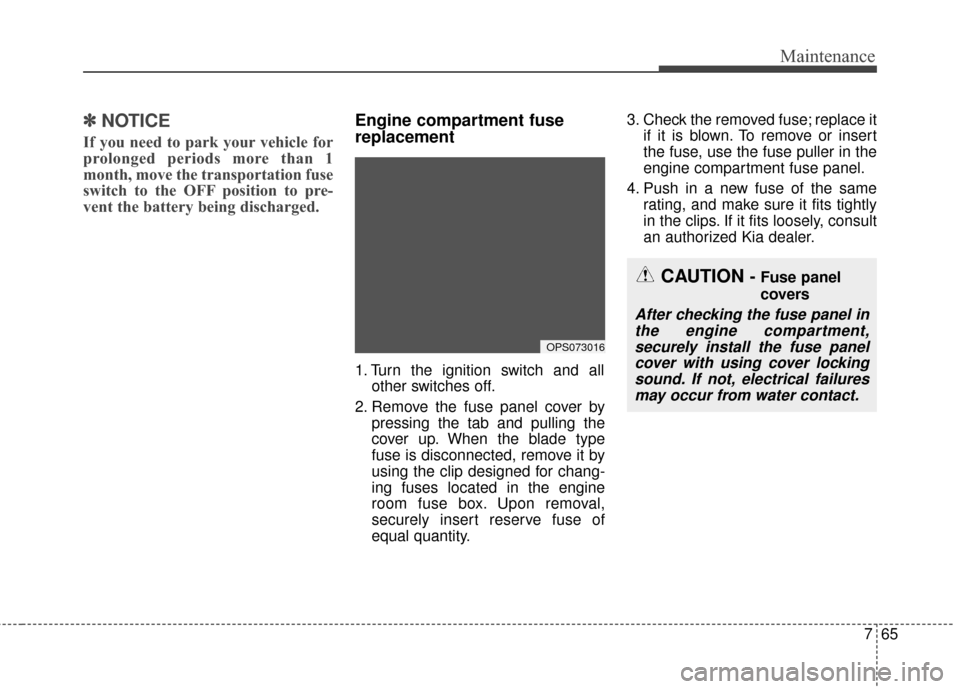
1. Turn the ignition switch and all
other switches off.
2. Remove the fuse panel cover by pressing the tab and pulling the
cover up. When the blade type
fuse is disconnected, remove it by
using the clip designed for chang-
ing fuses located in the engine
room fuse box. Upon removal,
securely insert reserve fuse of
equal quantity. 3. Check the removed fuse; replace it
if it is blown. To remove or insert
the fuse, use the fuse puller in the
engine compartment fuse panel.
4. Push in a new fuse of the same rating, and make sure it fits tightly
in the clips. If it fits loosely, consult
an authorized Kia dealer.
OPS073016
CAUTION - Fuse panel
covers
After checking the fuse panel inthe engine compartment,securely install the fuse panelcover with using cover lockingsound. If not, electrical failuresmay occur from water contact.
Page 453 of 492

777
Maintenance
Headlight (HID type)
If the light bulb is not operating, have
the vehicle checked by an authorized
Kia dealer.
✽ ✽NOTICE
HID lamps have superior perform-
ance vs. halogen bulbs. HID lamps
are estimated by the manufacturer
to last twice as long or longer than
halogen bulbs depending on their
frequency of use. They will probably
require replacement at some point
in the life of the vehicle. Cycling the
headlamps on and off more than
typical use will shorten HID lamps
life. HID lamps do not fail in the
same manner as halogen incandes-
cent lamps. If a headlamp goes out
after a period of operation but will
immediately relight when the head-
lamp switch is cycled it is likely the
HID lamp needs to be replaced. HID
lighting components are more com-
plex than conventional halogen
bulbs thus have higher replacement
cost.
1. Turn off the engine and open the
hood. Disconnect the negative
battery cable.
2. Disconnect the power connector from the back of the headlight
assembly.
3. Loosen the retaining bolts.
WARNING - HID
Headlight low beam
(if equipped)
Do not attempt to replace or
inspect the low beam (XENON
bulb) due to electric shock dan-
ger. If the low beam (XENON
bulb) is not working, have your
vehicle checked by an author-
ized Kia dealer.
OPS073051
OPS073028
Page 485 of 492
Index
2I
Active ECO system. . . . . . . . . . . . . . . . . . . . . . . . . . . . 5-42Active ECO operation . . . . . . . . . . . . . . . . . . . . . . . 5-42
Limitation of Active ECO operation . . . . . . . . . . . . 5-42
When Active ECO is activated . . . . . . . . . . . . . . . . . 5-42
Air bag - advanced supplemental restraint system . . . 3-39 Adding equipment to or modifying yourair bag-equipped vehicle . . . . . . . . . . . . . . . . . . . . 3-63
Additional safety precautions. . . . . . . . . . . . . . . . . . 3-63
Air bag warning label. . . . . . . . . . . . . . . . . . . . . . . . 3-63
Air bag warning light . . . . . . . . . . . . . . . . . . . . . . . . 3-42
Curtain air bag . . . . . . . . . . . . . . . . . . . . . . . . . . . . . 3-56
Do not Installing a child restraint on a front passenger's seat . . . . . . . . . . . . . . . . . . . . . . . . . . . 3-42
Driver's and passenger's front air bag . . . . . . . . . . . 3-51
How does the air bag system operate . . . . . . . . . . . 3-40
Inflation and non-inflation conditions of the air bag . . 3-57
Occupant Detection System (ODS) . . . . . . . . . . . . . 3-46
Side air bag. . . . . . . . . . . . . . . . . . . . . . . . . . . . . . . . 3-54
SRS care . . . . . . . . . . . . . . . . . . . . . . . . . . . . . . . . . . 3-62\
SRS components and functions . . . . . . . . . . . . . . . . 3-43
Air cleaner . . . . . . . . . . . . . . . . . . . . . . . . . . . . . . . . . . 7-36\
Filter replacement. . . . . . . . . . . . . . . . . . . . . . . . . . . 7-36
Air conditioning system . . . . . . . . . . . . . . . . . . . . . . . . . 8-5
Appearance care . . . . . . . . . . . . . . . . . . . . . . . . . . . . . . 7-87 Exterior care . . . . . . . . . . . . . . . . . . . . . . . . . . . . . . . 7-87
Interior care . . . . . . . . . . . . . . . . . . . . . . . . . . . . . . . 7-92 Audio system . . . . . . . . . . . . . . . . . . . . . . . . . . . . . . . 4-146
Antenna . . . . . . . . . . . . . . . . . . . . . . . . . . . . . . . . . 4-146
Audio remote control . . . . . . . . . . . . . . . . . . . . . . . 4-147
Aux, USB and iPod
®port . . . . . . . . . . . . . . . . . . . 4-148
Speaker lights . . . . . . . . . . . . . . . . . . . . . . . . . . . . . 4-149
Automatic climate control system . . . . . . . . . . . . . . . 4-114 Automatic heating and air conditioning. . . . . . . . . 4-115
Checking the amount of air conditionerrefrigerant and compressor lubricant . . . . . . . . . . 4-125
Climate control air filter. . . . . . . . . . . . . . . . . . . . . 4-125
Manual heating and air conditioning . . . . . . . . . . . 4-116
System operation . . . . . . . . . . . . . . . . . . . . . . . . . . 4-123
Automatic transaxle . . . . . . . . . . . . . . . . . . . . . . . . . . . 5-17 Automatic transaxle operation . . . . . . . . . . . . . . . . . 5-17
Good driving practices . . . . . . . . . . . . . . . . . . . . . . . 5-22
Battery. . . . . . . . . . . . . . . . . . . . . . . . . . . . . . . . . . . . \
. . 7-44 Battery recharging . . . . . . . . . . . . . . . . . . . . . . . . . . 7-45
For best battery service . . . . . . . . . . . . . . . . . . . . . . 7-44
Reset items . . . . . . . . . . . . . . . . . . . . . . . . . . . . . . . . 7-46
Before driving . . . . . . . . . . . . . . . . . . . . . . . . . . . . . . . . . 5-4 Before entering vehicle . . . . . . . . . . . . . . . . . . . . . . . 5-4
Before starting . . . . . . . . . . . . . . . . . . . . . . . . . . . . . . 5-5
Necessary inspections . . . . . . . . . . . . . . . . . . . . . . . . 5-4
Brake system. . . . . . . . . . . . . . . . . . . . . . . . . . . . . . . . . 5-23 Anti-lock brake system (ABS) . . . . . . . . . . . . . . . . . 5-27
A
B
Page 488 of 492
I5
Index
In case of an emergency while driving . . . . . . . . . . . . . . 6-3If the engine stalls at a crossroad or crossing . . . . . . 6-3
If the engine stalls while driving . . . . . . . . . . . . . . . . 6-3
If you have a flat tire while driving . . . . . . . . . . . . . . 6-3
Instrument cluster . . . . . . . . . . . . . . . . . . . . . . . . . . . . . 4-54 Gauges . . . . . . . . . . . . . . . . . . . . . . . . . . . . . . . . . . . 4-\
56
Instrument Cluster Control. . . . . . . . . . . . . . . . . . . . 4-55
LCD Display Control . . . . . . . . . . . . . . . . . . . . . . . . 4-55
Transaxle Shift Indicator . . . . . . . . . . . . . . . . . . . . . 4-60
Instrument panel overview . . . . . . . . . . . . . . . . . . . . . . . 2-5
Interior features. . . . . . . . . . . . . . . . . . . . . . . . . . . . . . 4-135 Cargo area cover. . . . . . . . . . . . . . . . . . . . . . . . . . . 4-142
Clothes hanger . . . . . . . . . . . . . . . . . . . . . . . . . . . . 4-140
Cup holder . . . . . . . . . . . . . . . . . . . . . . . . . . . . . . . 4-135
Floor mat anchor(s) . . . . . . . . . . . . . . . . . . . . . . . . 4-141
Luggage net holder. . . . . . . . . . . . . . . . . . . . . . . . . 4-142
Power outlet . . . . . . . . . . . . . . . . . . . . . . . . . . . . . . 4-138
Rear seat warmer . . . . . . . . . . . . . . . . . . . . . . . . . . 4-138
Seat air ventilation . . . . . . . . . . . . . . . . . . . . . . . . . 4-138
Seat warmer . . . . . . . . . . . . . . . . . . . . . . . . . . . . . . 4-136
Sunvisor . . . . . . . . . . . . . . . . . . . . . . . . . . . . . . . . . 4-136
Interior light . . . . . . . . . . . . . . . . . . . . . . . . . . . . . . . . . 4-97 Glove box lamp . . . . . . . . . . . . . . . . . . . . . . . . . . . 4-101
Interior lamp AUTO cut . . . . . . . . . . . . . . . . . . . . . . 4-97
Luggage room lamp . . . . . . . . . . . . . . . . . . . . . . . . . 4-99
Map lamp . . . . . . . . . . . . . . . . . . . . . . . . . . . . . . . . 4-97
Portable lamp usage . . . . . . . . . . . . . . . . . . . . . . . . . 4-99
Room lamp . . . . . . . . . . . . . . . . . . . . . . . . . . . . . . . . 4-98 Vanity mirror lamp . . . . . . . . . . . . . . . . . . . . . . . . . 4-101
Interior overview. . . . . . . . . . . . . . . . . . . . . . . . . . . . . . . 2-4
ISG (Idle Stop and Go) system . . . . . . . . . . . . . . . . . . 5-43 Auto start . . . . . . . . . . . . . . . . . . . . . . . . . . . . . . . . . 5-44
Auto stop . . . . . . . . . . . . . . . . . . . . . . . . . . . . . . . . . 5-43
Condition of ISG system operation . . . . . . . . . . . . . 5-45
ISG system deactivation . . . . . . . . . . . . . . . . . . . . . . 5-46
ISG system malfunction . . . . . . . . . . . . . . . . . . . . . . 5-47
Key . . . . . . . . . . . . . . . . . . . . . . . . . . . . . . . . . . . . \
. . . . . 4-4 Battery replacement . . . . . . . . . . . . . . . . . . . . . . . . . . 4-7
Immobilizer system . . . . . . . . . . . . . . . . . . . . . . . . . . 4-8
Key operations . . . . . . . . . . . . . . . . . . . . . . . . . . . . . . 4-4
Record your key number . . . . . . . . . . . . . . . . . . . . . . 4-4
Transmitter precautions . . . . . . . . . . . . . . . . . . . . . . . 4-6
Key positions . . . . . . . . . . . . . . . . . . . . . . . . . . . . . . . . . 5-6 Ignition switch position . . . . . . . . . . . . . . . . . . . . . . . 5-6
Illuminated ignition switch . . . . . . . . . . . . . . . . . . . . 5-6
Starting the engine . . . . . . . . . . . . . . . . . . . . . . . . . . . 5-7
LCD Display . . . . . . . . . . . . . . . . . . . . . . . . . . . . . . . . . 4-62 A/V Mode. . . . . . . . . . . . . . . . . . . . . . . . . . . . . . . . . 4-66
LCD Modes . . . . . . . . . . . . . . . . . . . . . . . . . . . . . . . 4-62
Service Mode . . . . . . . . . . . . . . . . . . . . . . . . . . . . . . 4-63
K
L