Page 28 of 407
315
Safety features of your vehicle
Riding in an improper position
adversely affects the front passen-
ger's seat belt warning system. It is
important for the driver to instruct the
passenger as to the proper seating
instructions as contained in this
manual.
You can find the front passenger'sseat belt warning light on the cen-
ter fascia panel.
Although the front passenger seat is not occupied, the seat belt warn-
ing light will blink for 6 seconds.
The seat belt warning light can blink when a briefcase or purse is
placed on the front passenger
seat.Seat belt - Driver's 3-point system
with emergency locking retractor
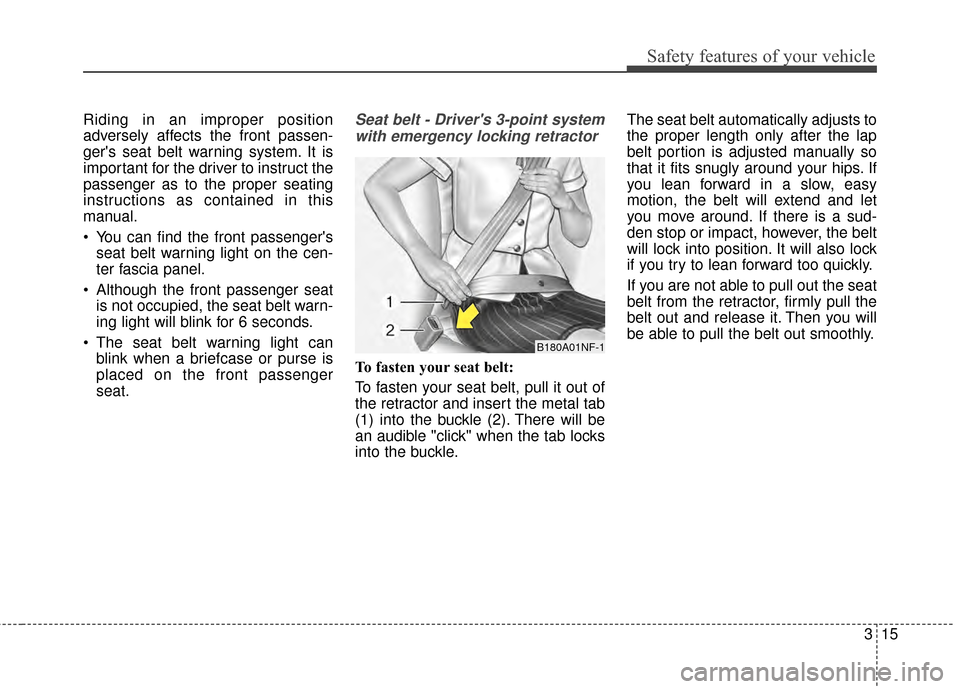
To fasten your seat belt:
To fasten your seat belt, pull it out of
the retractor and insert the metal tab
(1) into the buckle (2). There will be
an audible "click" when the tab locks
into the buckle. The seat belt automatically adjusts to
the proper length only after the lap
belt portion is adjusted manually so
that it fits snugly around your hips. If
you lean forward in a slow, easy
motion, the belt will extend and let
you move around. If there is a sud-
den stop or impact, however, the belt
will lock into position. It will also lock
if you try to lean forward too quickly.
If you are not able to pull out the seat
belt from the retractor, firmly pull the
belt out and release it. Then you will
be able to pull the belt out smoothly.
B180A01NF-1
Page 29 of 407
Safety features of your vehicle
16
3
Height adjustment
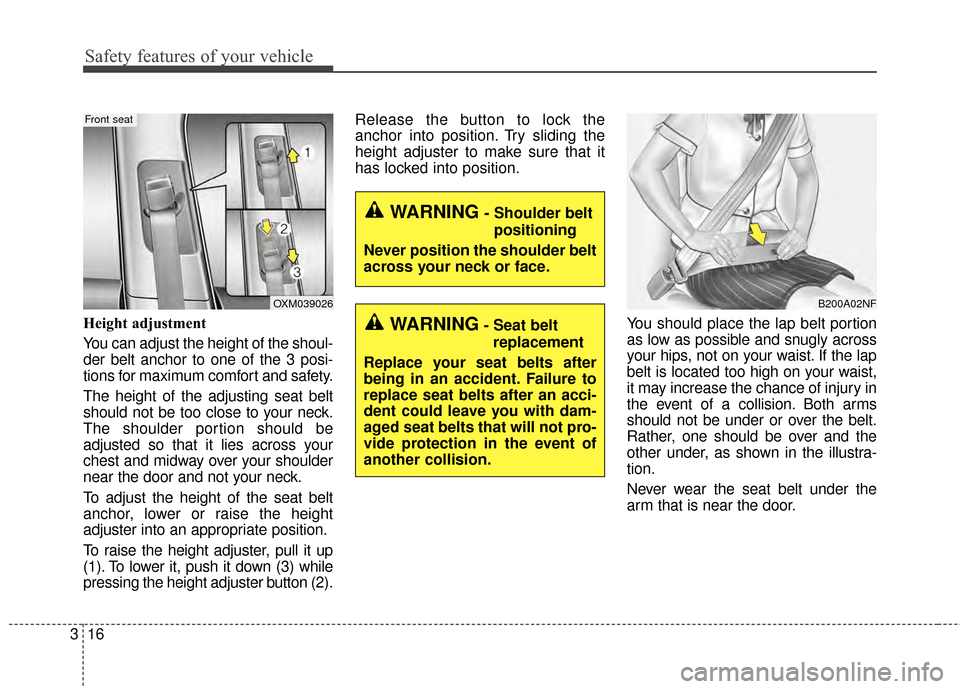
You can adjust the height of the shoul-
der belt anchor to one of the 3 posi-
tions for maximum comfort and safety.
The height of the adjusting seat belt
should not be too close to your neck.
The shoulder portion should be
adjusted so that it lies across your
chest and midway over your shoulder
near the door and not your neck.
To adjust the height of the seat belt
anchor, lower or raise the height
adjuster into an appropriate position.
To raise the height adjuster, pull it up
(1). To lower it, push it down (3) while
pressing the height adjuster button (2). Release the button to lock the
anchor into position. Try sliding the
height adjuster to make sure that it
has locked into position.
You should place the lap belt portion
as low as possible and snugly across
your hips, not on your waist. If the lap
belt is located too high on your waist,
it may increase the chance of injury in
the event of a collision. Both arms
should not be under or over the belt.
Rather, one should be over and the
other under, as shown in the illustra-
tion.
Never wear the seat belt under the
arm that is near the door.
B200A02NFOXM039026
Front seat
WARNING- Shoulder beltpositioning
Never position the shoulder belt
across your neck or face.
WARNING- Seat belt replacement
Replace your seat belts after
being in an accident. Failure to
replace seat belts after an acci-
dent could leave you with dam-
aged seat belts that will not pro-
vide protection in the event of
another collision.
Page 30 of 407
317
Safety features of your vehicle
Seat belts - Front passenger andrear seat 3-point system withcombination locking retractor
To fasten your seat belt:
Combination retractor type seat belts
are installed in the rear seat posi-
tions to help accommodate the
installation of child restraint systems.
Although a combination retractor is
also installed in the front passenger
seat position, it is strongly recom-
mended that children always be
seated in the rear seat. NEVER
place any infant restraint system in
the front seat of the vehicle.
This type of seat belt combines the
features of both an emergency lock-
ing retractor seat belt and an auto-
matic locking retractor seat belt. To
fasten your seat belt, pull it out of the
retractor and insert the metal tab into
the buckle. There will be an audible
"click" when the tab locks into the
buckle. When not securing a child
restraint, the seat belt operates in the
same way as the driver's seat belt
(Emergency Locking Retractor Type). It automatically adjusts to the proper
length only after the lap belt portion
of the seat belt is adjusted manually
so that it fits snugly around your hips.
When the seat belt is fully extended
from the retractor to allow the instal-
lation of a child restraint system, the
seat belt operation changes to allow
the belt to retract, but not to extend
(Automatic Locking Retractor Type).
Refer to “Using a child restraint sys-
tem” in this chapter.
✽ ✽
NOTICE
Although the combination retractor
provides the same level of protection
for seated passengers in either emer-
gency or automatic locking modes,
have the seated passengers use the
emergency locking feature for
improved convenience. The auto-
matic locking function is intended to
facilitate child restraint installation.
To convert from the automatic lock-
ing feature to the emergency locking
operation mode, allow the unbuck-
led seat belt to fully retract.
Do NOT fold down the left portion of
the rear seat back when the rear
center seat belt is buckled. ALWAYS
UNBUCKLE the rear center seat belt
before folding down the left portion of
the rear seat back. If the rear center
seat belt is buckled when the left por-
tion of the rear seat back is folded
down, distortion and damage to the
top portion of the seat back and seat
belt garnish may result, causing the
seat back to lock into the folded
down position.
Page 31 of 407
Safety features of your vehicle
18
3
To release the seat belt:
The seat belt is released by pressing
the release button (1) on the locking
buckle. When it is released, the belt
should automatically draw back into
the retractor.
If this does not happen, check the
belt to be sure it is not twisted, then
try again.
Stowing the rear seat belt
Routing the seat belt webbing
through the rear seat belt guides will
help keep the belts from being
trapped behind or under the seats.
After inserting the seat belt, tighten
the belt webbing by pulling it up.
CAUTION- Seat belt guide
Remove the seat belt from the
guides before using. If you pullon the seat belt when it is storedin the guides, it may damage theguides and/or belt webbing.
B210A01NF-1
OPS033015
Page 32 of 407
319
Safety features of your vehicle
3 Point rear center belt
To fasten the rear center belt
1.Insert the mini tongue (A) into theopen end of the anchor connector
(C) until an audible “click" is heard,
indicating the latch is locked. Make
sure the belt is not twisted. 2.Pull the tongue plate (B) and insert
the tongue plate (B) into the open
end of the buckle (D) until an audi-
ble “click” is heard, indicating the
latch is locked. Make sure the belt
is not twisted.
When using the rear center seat
belt, the buckle with the “CENTER”
mark must be used.
OPSE034020
ORP032074
WARNING - Rear center
seat belt
Do not separate mini tongue and
mini buckle even if there is not
an occupant.
If it is separated, It may hit the
rear seat occupants in a collision
or sudden stops.
Page 33 of 407
Safety features of your vehicle
20
3
There will be an audible “click” when
the tab locks in the buckle. The seat
belt automatically adjusts to the
proper length only after the lap belt is
adjusted manually so that it fits snug-
ly around your hips, if you lean for-
ward in a slow, easy motion, the belt
will extend and let you move around.
If there is a sudden stop or impact,
the belt will lock into position. It will
also lock if you try to lean forward too
quickly.
When using the rear seat center belt,
you must lock all tongue plates and
buckles.To unfasten the rear center belt
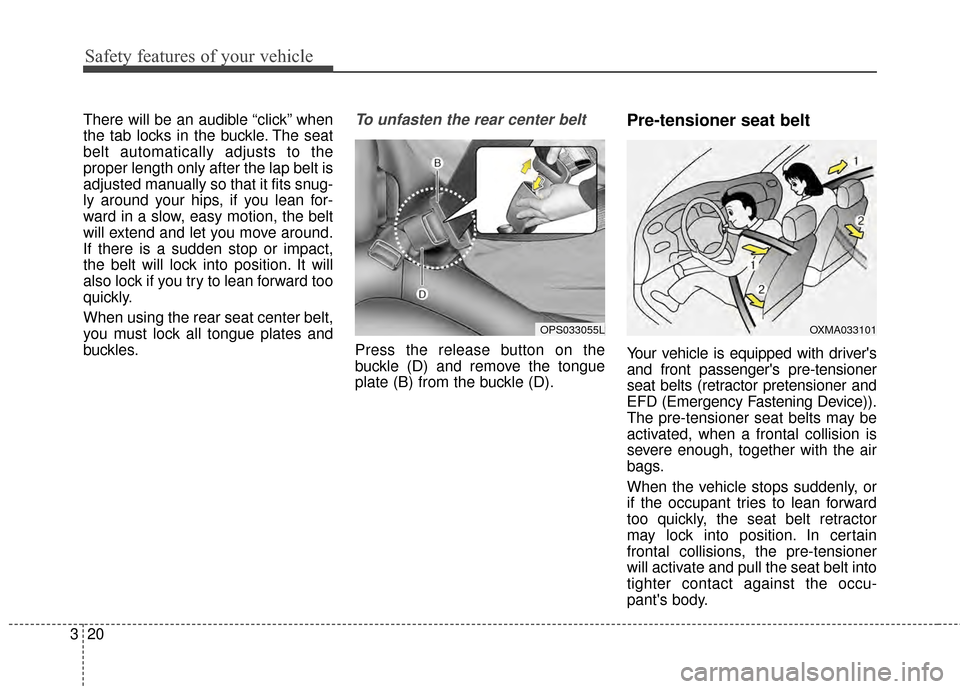
Press the release button on the
buckle (D) and remove the tongue
plate (B) from the buckle (D).
Pre-tensioner seat belt
Your vehicle is equipped with driver's
and front passenger's pre-tensioner
seat belts (retractor pretensioner and
EFD (Emergency Fastening Device)).
The pre-tensioner seat belts may be
activated, when a frontal collision is
severe enough, together with the air
bags.
When the vehicle stops suddenly, or
if the occupant tries to lean forward
too quickly, the seat belt retractor
may lock into position. In certain
frontal collisions, the pre-tensioner
will activate and pull the seat belt into
tighter contact against the occu-
pant's body.
OPS033055LOXMA033101
Page 41 of 407
Safety features of your vehicle
28
3
For safety reasons, we recommend
that the child restraint system be
used in the rear seats.
Never place a rear-facing child
restraint in the front passenger seat,
because of the danger an inflating
passenger-side air bag could impact
the rear-facing child restraint and kill
the child.
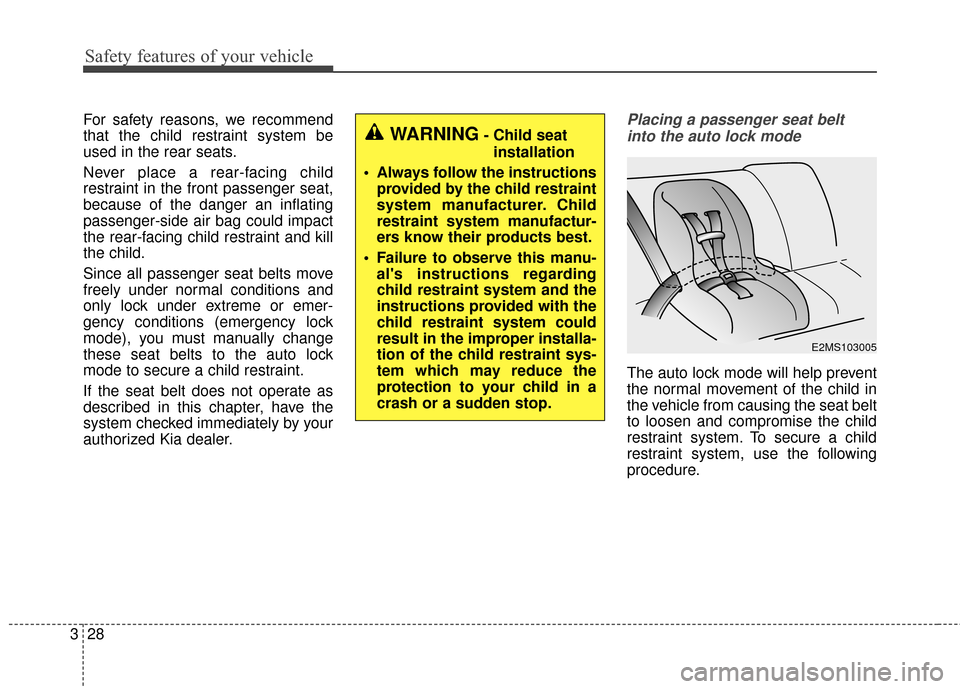
Since all passenger seat belts move
freely under normal conditions and
only lock under extreme or emer-
gency conditions (emergency lock
mode), you must manually change
these seat belts to the auto lock
mode to secure a child restraint.
If the seat belt does not operate as
described in this chapter, have the
system checked immediately by your
authorized Kia dealer.Placing a passenger seat belt
into the auto lock mode
The auto lock mode will help prevent
the normal movement of the child in
the vehicle from causing the seat belt
to loosen and compromise the child
restraint system. To secure a child
restraint system, use the following
procedure.
E2MS103005
WARNING- Child seat installation
Always follow the instructions provided by the child restraint
system manufacturer. Child
restraint system manufactur-
ers know their products best.
Failure to observe this manu- al's instructions regarding
child restraint system and the
instructions provided with the
child restraint system could
result in the improper installa-
tion of the child restraint sys-
tem which may reduce the
protection to your child in a
crash or a sudden stop.
Page 42 of 407
329
Safety features of your vehicle
To install a child restraint system on
the outboard or center rear seats, do
the following:
1. Place the child restraint system inthe seat and route the lap/shoul-
der belt around or through the
restraint, following the restraint
manufacturer’s instructions. Be
sure the seat belt webbing is not
twisted.
2. Fasten the lap/shoulder belt latch into the buckle. Listen for the dis-
tinct “click” sound.
Position the release button so that itis easy to access in case of an emer-gency.
If the vehicle headrest prevents prop-
er installation of a child seat (as
described in the child seat system
manual), the headrest of the respec-
tive seating position shall be read-
justed or entirely removed.
3. Pull the shoulder portion of theseat belt all the way out. When the
shoulder portion of the seat belt is
fully extended, it will shift the
retractor to the “Auto Lock” (child
restraint) mode.
OEN036101OEN036102