2015 KIA Soul EV door lock
[x] Cancel search: door lockPage 10 of 407
23
Your vehicle at a glance
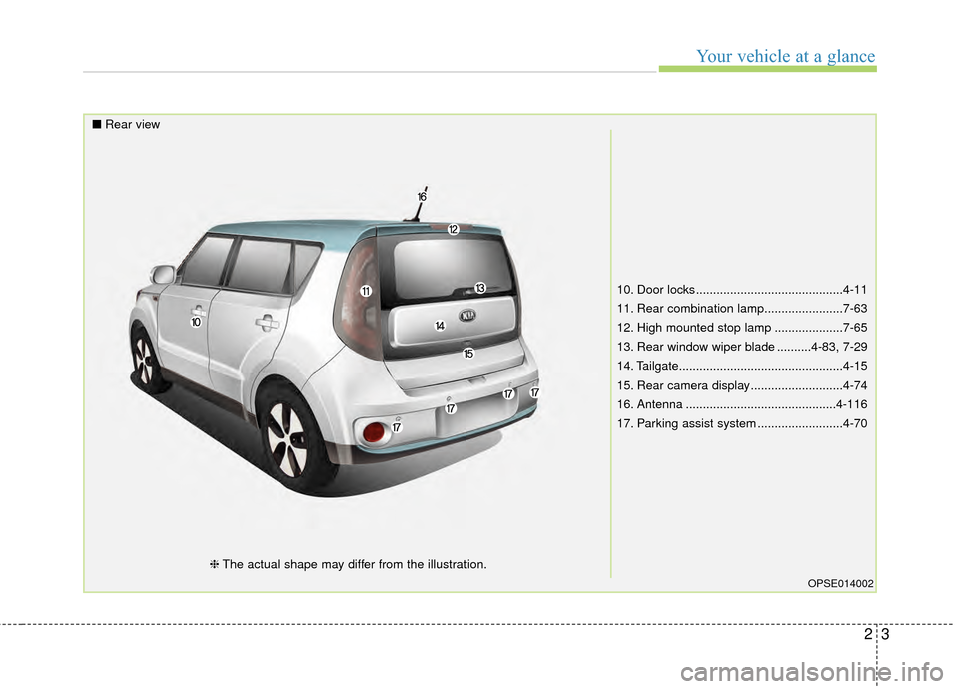
10. Door locks ...........................................4-11
11. Rear combination lamp.......................7-63
12. High mounted stop lamp ....................7-65
13. Rear window wiper blade ..........4-83, 7-29
14. Tailgate................................................4-15
15. Rear camera display ...........................4-74
16. Antenna ............................................4-116
17. Parking assist system .........................4-70
OPSE014002
■Rear view
❈The actual shape may differ from the illustration.
Page 11 of 407
Your vehicle at a glance
42
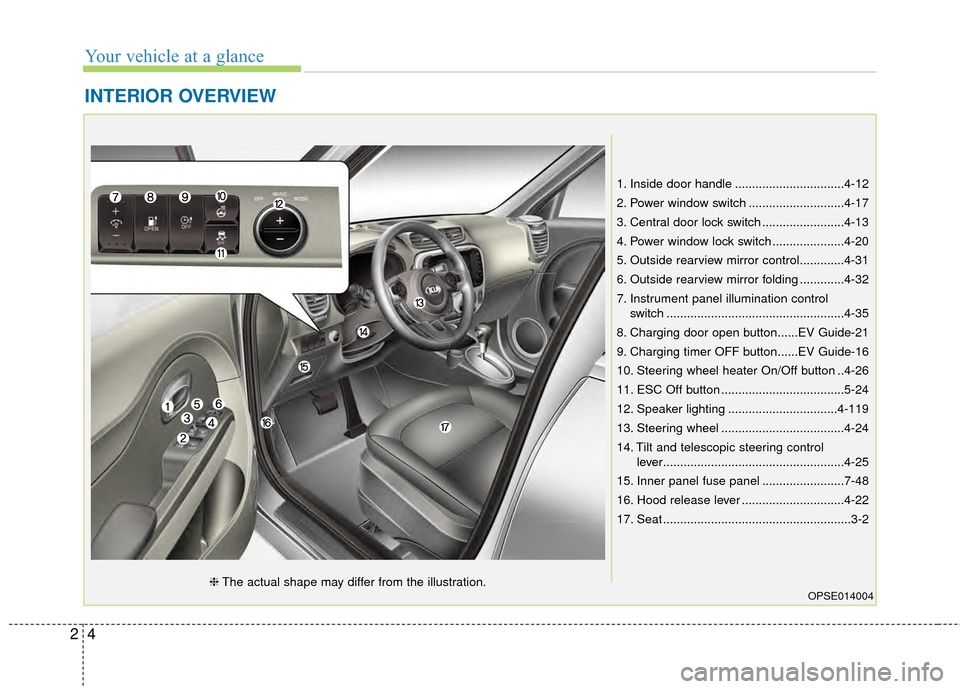
INTERIOR OVERVIEW
1. Inside door handle ................................4-12
2. Power window switch ............................4-17
3. Central door lock switch ........................4-13
4. Power window lock switch .....................4-20
5. Outside rearview mirror control.............4-31
6. Outside rearview mirror folding .............4-32
7. Instrument panel illumination controlswitch ....................................................4-35
8. Charging door open button......EV Guide-21
9. Charging timer OFF button......EV Guide-16
10. Steering wheel heater On/Off button ..4-26
11. ESC Off button ....................................5-24
12. Speaker lighting ................................4-119
13. Steering wheel ....................................4-24
14. Tilt and telescopic steering control lever.....................................................4-25
15. Inner panel fuse panel ........................7-48
16. Hood release lever ..............................4-22
17. Seat .......................................................3-2
OPSE014004❈ The actual shape may differ from the illustration.
Page 29 of 407
Safety features of your vehicle
16
3
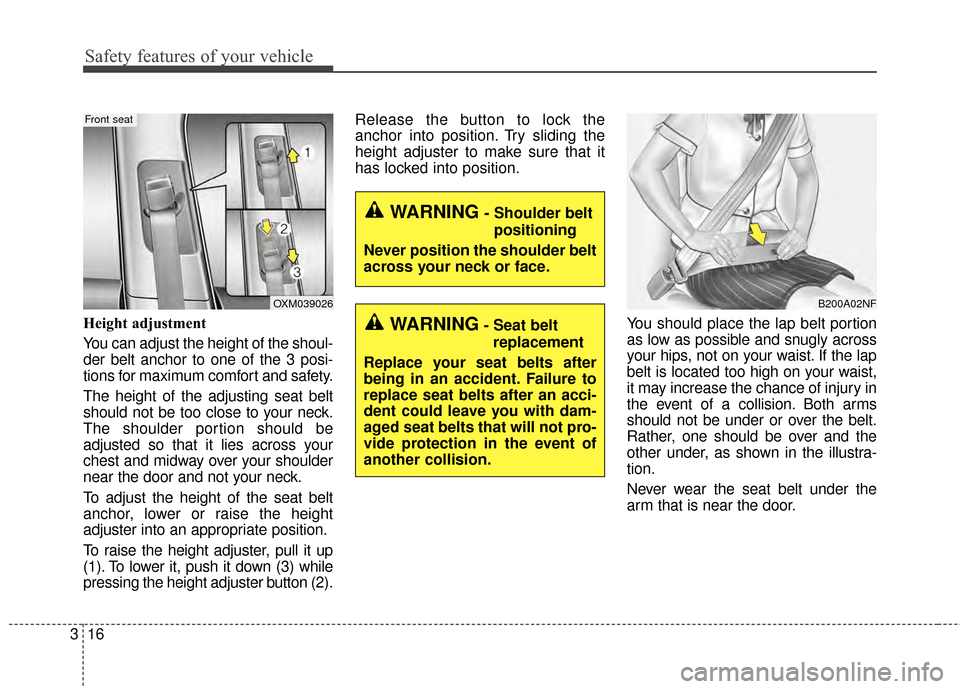
Height adjustment
You can adjust the height of the shoul-
der belt anchor to one of the 3 posi-
tions for maximum comfort and safety.
The height of the adjusting seat belt
should not be too close to your neck.
The shoulder portion should be
adjusted so that it lies across your
chest and midway over your shoulder
near the door and not your neck.
To adjust the height of the seat belt
anchor, lower or raise the height
adjuster into an appropriate position.
To raise the height adjuster, pull it up
(1). To lower it, push it down (3) while
pressing the height adjuster button (2). Release the button to lock the
anchor into position. Try sliding the
height adjuster to make sure that it
has locked into position.
You should place the lap belt portion
as low as possible and snugly across
your hips, not on your waist. If the lap
belt is located too high on your waist,
it may increase the chance of injury in
the event of a collision. Both arms
should not be under or over the belt.
Rather, one should be over and the
other under, as shown in the illustra-
tion.
Never wear the seat belt under the
arm that is near the door.
B200A02NFOXM039026
Front seat
WARNING- Shoulder beltpositioning
Never position the shoulder belt
across your neck or face.
WARNING- Seat belt replacement
Replace your seat belts after
being in an accident. Failure to
replace seat belts after an acci-
dent could leave you with dam-
aged seat belts that will not pro-
vide protection in the event of
another collision.
Page 71 of 407
Features of your vehicle
Smart key . . . . . . . . . . . . . . . . . . . . . . . . . . . . . . . . . 4-4
• Record your key number . . . . . . . . . . . . . . . . . . . . . . . 4-4
. . . . . . . . . . . . . . . . . . . . . . . . . . . . 4-4
. . . . . . . . . . . . . . . . . . . . . . . . . . 4-7
. . . . . . . . . . . . . . . . . . . . . . . . . 4-8
. . . . . . . . . . . . . . . . . . . 4-8
. . . . . . . . . . . . . . . . . . . . . . . . . . 4-10
Door locks . . . . . . . . . . . . . . . . . . . . . . . . . . . . . . . 4-11
. . . . 4-11
. . . . . . . . . . . . . . 4-13
. . . . . . . . . . . . . . . . . . 4-13
. . . . . . . . . . . . . . . . . 4-13
. . . . . . . . . . . . . . . . . 4-14
Tailgate . . . . . . . . . . . . . . . . . . . . . . . . . . . . . . . . . . 4-15\
. . . . . . . . . . . . . . . . . . . . . . . . . . 4-15
. . . . . . . . . . . . . . . . . . . . . . . . . . . 4-15
. . . . . . . . . . . . . . . 4-16
Windows . . . . . . . . . . . . . . . . . . . . . . . . . . . . . . . . . 4-17
. . . . . . . . . . . . . . . . . . . . . . . . . . . . . . 4-18
Hood. . . . . . . . . . . . . . . . . . . . . . . . . . . . . . . . . . . . \
. 4-22
. . . . . . . . . . . . . . . . . . . . . . . . . . . . 4-22
. . . . . . . . . . . . . . . . . . . . . . . . . . . . . 4-22
Steering wheel . . . . . . . . . . . . . . . . . . . . . . . . . . . . . 4-24
. . . . . . . . . . . . . . . . . . 4-24 . . . . . . . . . . . . . . . . . . . . 4-25
. . . . . . . . . . . . . . . . . . . . . . . . . 4-26
. . . . . . . . . . . . . . . . . . . . . . . . . . . . . . . . . . . . \
. . . 4-26
. . . . . . . . . . . . . . . . . . . . . . . . . . . . . . . 4-27
Mirrors . . . . . . . . . . . . . . . . . . . . . . . . . . . . . . . . . . 4-29\
. . . . . . . . . . . . . . . . . . . . . . . . 4-29
. . . . . . . . . . . . . . . . . . . . . . . 4-30
Instrument cluster . . . . . . . . . . . . . . . . . . . . . . . . . 4-34
. . . . . . . . . . . . . . . . . . . . 4-35
. . . . . . . . . . . . . . . . . . . . . . . . . 4-35
. . . . . . . . . . . . . . . . . . . . . . . . . . . . . . . . . . . . \
. 4-36
. . . . . . . . . . . . . . . . . . 4-39
LCD Display . . . . . . . . . . . . . . . . . . . . . . . . . . . . . . 4-40
. . . . . . . . . . . . . . . . . . . . . . . . . . . . . . . . . 4-40
. . . . . . . . . . . . . . . . . . . . . . . . . 4-41
. . . . . . . . . . . . . . . . . . . . . . . . . . . . . . . . . . . 4-\
42
. . . . . . . . . . . . . . . . . . . . . . . . . . . . . . . . 4-42
. . . . . . . . . . . . . . . . . . . . . . . . . . . 4-43
. . . . . . . . . . . . . . . . . . . . . . . . . . . . 4-46
Trip computer . . . . . . . . . . . . . . . . . . . . . . . . . . . . . 4-55
. . . . . . . . . . . . . . . . . . . . . . . . . . 4-55
. . . . . . . . . . . . . . . . . . . . . . . . . . . . . . . . . . . . \
4-56
. . . . . . . . . . . . . . . . . . . . . . . . . . . . . . . . . . . . \
. . 4-58
4
Page 74 of 407
Features of your vehicle
44
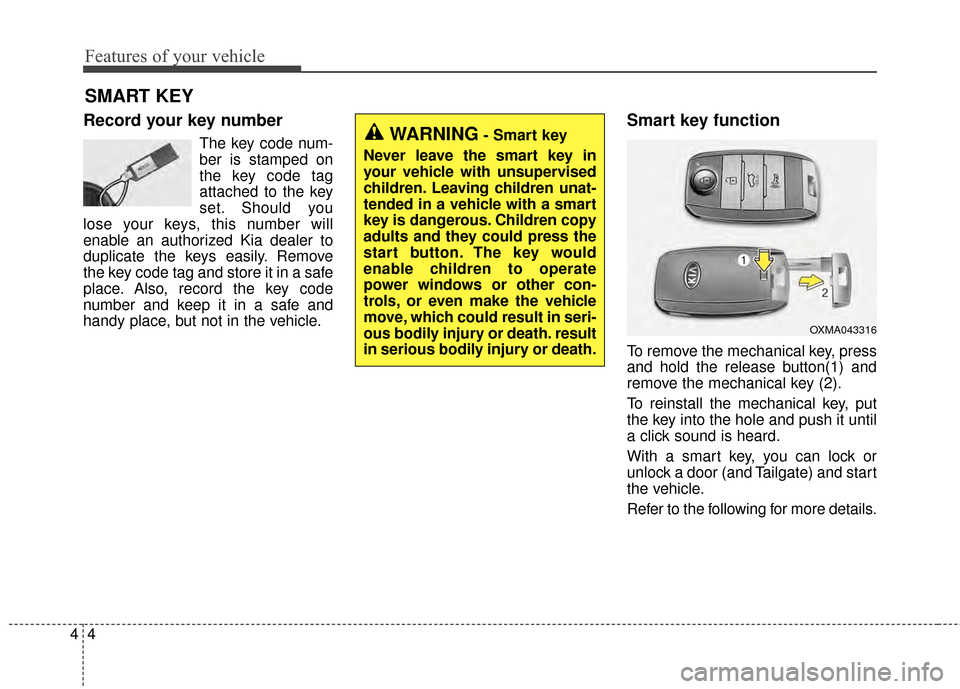
Record your key number
The key code num-
ber is stamped on
the key code tag
attached to the key
set. Should you
lose your keys, this number will
enable an authorized Kia dealer to
duplicate the keys easily. Remove
the key code tag and store it in a safe
place. Also, record the key code
number and keep it in a safe and
handy place, but not in the vehicle.
Smart key function
To remove the mechanical key, press
and hold the release button(1) and
remove the mechanical key (2).
To reinstall the mechanical key, put
the key into the hole and push it until
a click sound is heard.
With a smart key, you can lock or
unlock a door (and Tailgate) and start
the vehicle.
Refer to the following for more details.
SMART KEY
OXMA043316
WARNING- Smart key
Never leave the smart key in
your vehicle with unsupervised
children. Leaving children unat-
tended in a vehicle with a smart
key is dangerous. Children copy
adults and they could press the
start button. The key would
enable children to operate
power windows or other con-
trols, or even make the vehicle
move, which could result in seri-
ous bodily injury or death. result
in serious bodily injury or death.
Page 75 of 407
45
Features of your vehicle
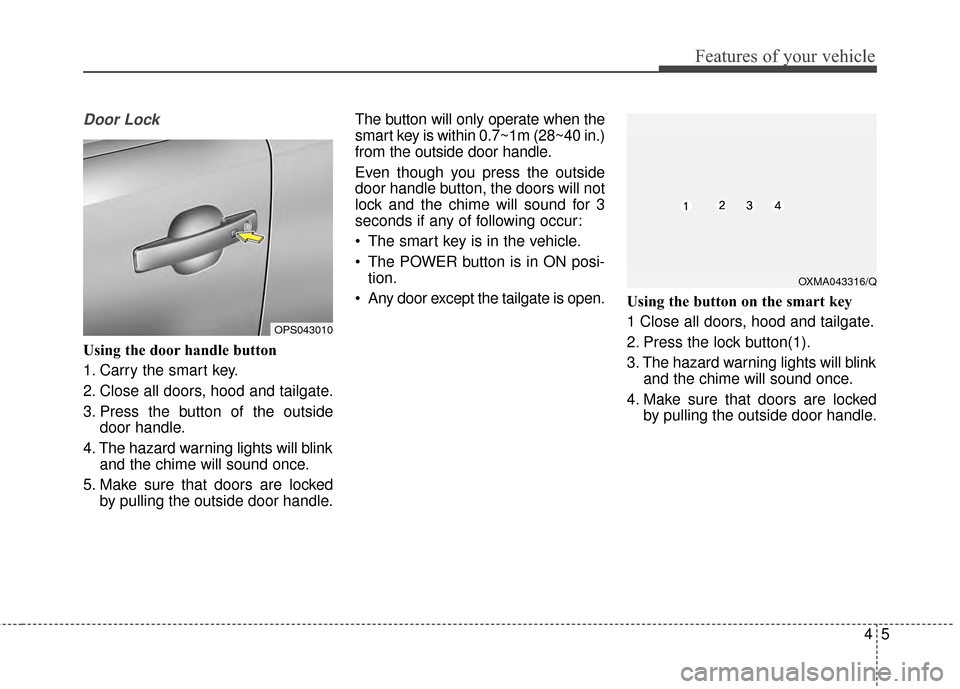
Door Lock
Using the door handle button
1. Carry the smart key.
2. Close all doors, hood and tailgate.
3. Press the button of the outsidedoor handle.
4. The hazard warning lights will blink and the chime will sound once.
5. Make sure that doors are locked by pulling the outside door handle. The button will only operate when the
smart key is within 0.7~1m (28~40 in.)
from the outside door handle.
Even though you press the outside
door handle button, the doors will not
lock and the chime will sound for 3
seconds if any of following occur:
• The smart key is in the vehicle.
The POWER button is in ON posi-
tion.
Any door except the tailgate is open. Using the button on the smart key
1 Close all doors, hood and tailgate.
2. Press the lock button(1).
3. The hazard warning lights will blink
and the chime will sound once.
4. Make sure that doors are locked by pulling the outside door handle.
OXMA043316/Q
OPS043010
Page 76 of 407
Features of your vehicle
64
Unlocking
Using the door handle button
1. Carry the smart key.
2. Press the button of the driver'soutside door handle.
3. The driver’s door will unlock. The hazard warning lights will blink and
the chime will sound two times.
4. Press the button twice within 4 seconds and all doors and the tail-
gate will unlock and the hazard
warning lights will blink and the
chime will sound two times. The button will only operate when
the smart key is within 0.7~1m
(28~40 in.) from the outside door
handle.
When the smart key is recognized in the area of 0.7~1m (28~40 in.)
from the front outside door handle,
other people can also open the
doors.
After unlocking the driver’s door or all doors, the door(s) will lock auto-
matically unless the door is
opened. Using the button on the smart key
1. Press the unlock button(2) of the
smart key.
2. The driver’s door will unlock. The hazard warning lights will blink and
the chime will sound two times.
3. Press the unlock button(2) twice within 4 seconds and all doors and
the tailgate will unlock. The hazard
warning lights will blink and the
chime will sound two times.
✽ ✽NOTICE
After pressing the button, the doors
will lock automatically unless any
door is opened within 30 seconds.
✽ ✽NOTICE
You can activate or deactivate the
Two Turn Unlock function. Refer to
"User settings" in this chapter.
Page 77 of 407
47
Features of your vehicle
Tailgate unlocking
Using the tailgate handle button
1. Carry the smart key.
2. Press the tailgate handle button.
3. When all doors are locked, thehazard warning lights will blink two
times.
Once the tailgate is opened and
then closed, the tailgate will lock
automatically.
If you are within 0.7~1 m (28~40 in.)
from the outside tailgate handle, with
your smart key in possession, the
tailgate will unlock and open when
you press the tailgate handle switch.
Using the button on the smart key
1. Press the tailgate unlock button(3) for more than 1 second.
2. When all doors are locked, the hazard warning lights will blink two
times.
Panic
1. Press the panic button(4) for morethan 1 second.
2. The horn sounds and hazard warning light flash for about 30
seconds.
Start-up
You can start the vehicle without
inserting the key. For detailed infor-
mation refer to the “POWER button”
in chapter 5.
Loss of the smart key
A maximum of 2 smart keys can be
registered to a single vehicle.
If you happen to lose your smart key,
you will not be able to start the vehi-
cle. You should immediately take the
vehicle and remaining key to your
authorized Kia dealer(tow the vehi-
cle, if necessary) to protect it from
potential theft.