2015 KIA MORNING set clock
[x] Cancel search: set clockPage 177 of 420
Features of your vehicle
104 4
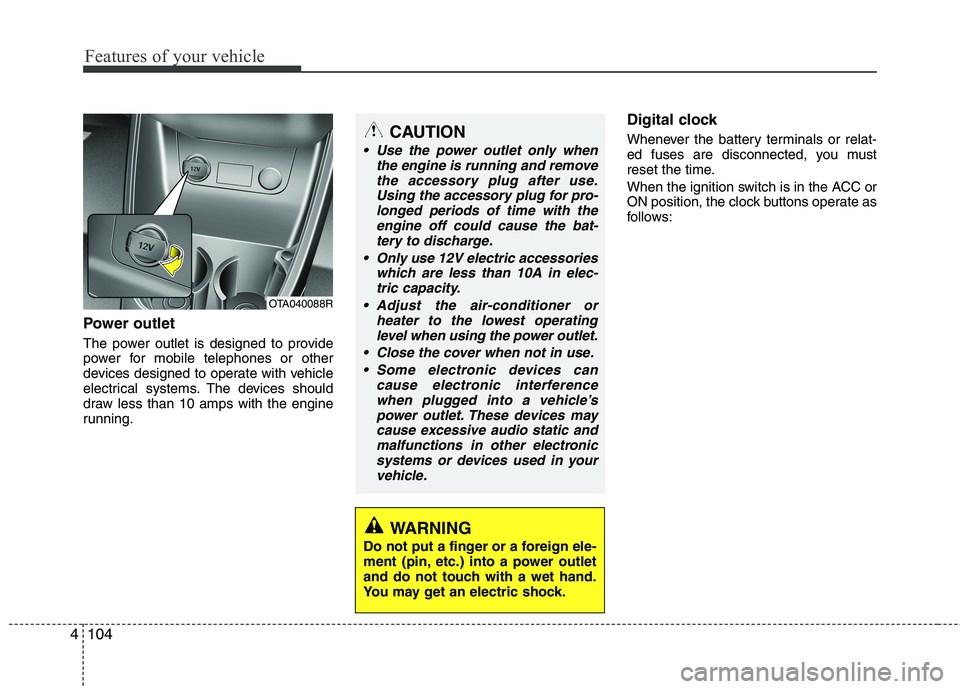
Power outlet
The power outlet is designed to provide
power for mobile telephones or other
devices designed to operate with vehicle
electrical systems. The devices should
draw less than 10 amps with the engine
running.
Digital clock
Whenever the battery terminals or relat-
ed fuses are disconnected, you must
reset the time.
When the ignition switch is in the ACC or
ON position, the clock buttons operate as
follows:CAUTION
Use the power outlet only when
the engine is running and remove
the accessory plug after use.
Using the accessory plug for pro-
longed periods of time with the
engine off could cause the bat-
tery to discharge.
Only use 12V electric accessories
which are less than 10A in elec-
tric capacity.
Adjust the air-conditioner or
heater to the lowest operating
level when using the power outlet.
Close the cover when not in use.
Some electronic devices can
cause electronic interference
when plugged into a vehicle’s
power outlet. These devices may
cause excessive audio static and
malfunctions in other electronic
systems or devices used in your
vehicle.
WARNING
Do not put a finger or a foreign ele-
ment (pin, etc.) into a power outlet
and do not touch with a wet hand.
You may get an electric shock.
OTA040088R
Page 178 of 420
![KIA MORNING 2015 Owners Manual 4105
Features of your vehicle
Setup the clock (Type A, Type B)
With audio off
1. Press the [SETUP] or [Clock] button
until the clock of the display blinks.
2. Set the clock by turning the knob(1)
and KIA MORNING 2015 Owners Manual 4105
Features of your vehicle
Setup the clock (Type A, Type B)
With audio off
1. Press the [SETUP] or [Clock] button
until the clock of the display blinks.
2. Set the clock by turning the knob(1)
and](/manual-img/2/57961/w960_57961-177.png)
4105
Features of your vehicle
Setup the clock (Type A, Type B)
With audio off
1. Press the [SETUP] or [Clock] button
until the clock of the display blinks.
2. Set the clock by turning the knob(1)
and press it.With audio on
1. Press the [SETUP] or [Clock] button
until the clock adjust mode displayed.
2. Set the clock by turning the knob(1)
and press it.
Setup the clock (Type C)
Hour:
Turn the knob to the left (H), will advance
the time displayed by one hour.
Minute:
Turn the knob to the right (M), will
advance the time displayed by one
minute.
WARNING
Do not adjust the clock whilst driv-
ing. You may lose your steering
control and cause an accident that
results in severe personal injury or
death.
OTA040203R
■Type C
OTA040095
OTA040089
■Type A
■Type B
Page 187 of 420
Features of your vehicle
114 4
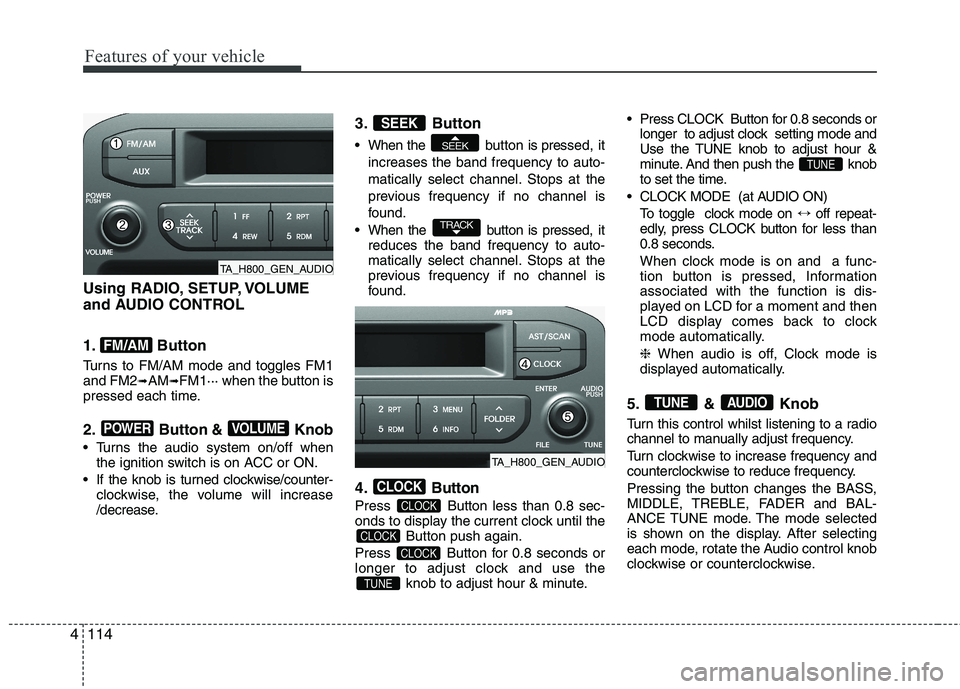
Using RADIO, SETUP, VOLUME
and AUDIO CONTROL
1. Button
Turns to FM/AM mode and toggles FM1
and FM2➟AM➟FM1··· when the button is
pressed each time.
2. Button & Knob
Turns the audio system on/off when
the ignition switch is on ACC or ON.
If the knob is turned clockwise/counter-
clockwise, the volume will increase
/decrease.
3. Button
When the button is pressed, it
increases the band frequency to auto-
matically select channel. Stops at the
previous frequency if no channel is
found.
When the button is pressed, it
reduces the band frequency to auto-
matically select channel. Stops at the
previous frequency if no channel is
found.
4. Button
Press Button less than 0.8 sec-
onds to display the current clock until the
Button push again.
Press Button for 0.8 seconds or
longer to adjust clock and use the
knob to adjust hour & minute. Press CLOCK Button for 0.8 seconds or
longer to adjust clock setting mode and
Use the TUNE knob to adjust hour &
minute. And then push the knob
to set the time.
CLOCK MODE (at AUDIO ON)
To toggle clock mode on ↔off repeat-
edly, press CLOCK button for less than
0.8 seconds.
When clock mode is on and a func-
tion button is pressed, Information
associated with the function is dis-
played on LCD for a moment and then
LCD display comes back to clock
mode automatically.
❈ When audio is off, Clock mode is
displayed automatically.
5. & Knob
Turn this control whilst listening to a radio
channel to manually adjust frequency.
Turn clockwise to increase frequency and
counterclockwise to reduce frequency.
Pressing the button changes the BASS,
MIDDLE, TREBLE, FADER and BAL-
ANCE TUNE mode. The mode selected
is shown on the display. After selecting
each mode, rotate the Audio control knob
clockwise or counterclockwise.
AUDIOTUNE
TUNE
TUNE
CLOCK
CLOCK
CLOCK
CLOCK
TRACK
SEEK
SEEK
VOLUMEPOWER
FM/AM
TA_H800_GEN_AUDIO
TA_H800_GEN_AUDIO
Page 188 of 420
4115
Features of your vehicle
To increase the BASS, rotate the knob
clockwise, whilst to decrease the BASS,
rotate the knob counterclockwise.
To increase the MIDDLE, rotate the knob
clockwise, whilst to decrease the MID-
DLE, rotate the knob counterclockwise.
To increase the TREBLE, rotate the knob
clockwise, whilst to decrease the TRE-
BLE, rotate the knob counterclockwise.
Turn the control knob clockwise to
emphasize rear speaker sound(front
speaker sound will be attenuated).
When the control knob is turned counter-
clockwise, front speaker sound will be
emphasized(rear speaker sound will be
attenuated).
Rotate the knob clockwise to emphasize
right speaker sound(left speaker sound
will be attenuated).
When the control knob is turned counter
clockwise, left speaker sound will be
emphasized(right speaker sound will be
attenuated).
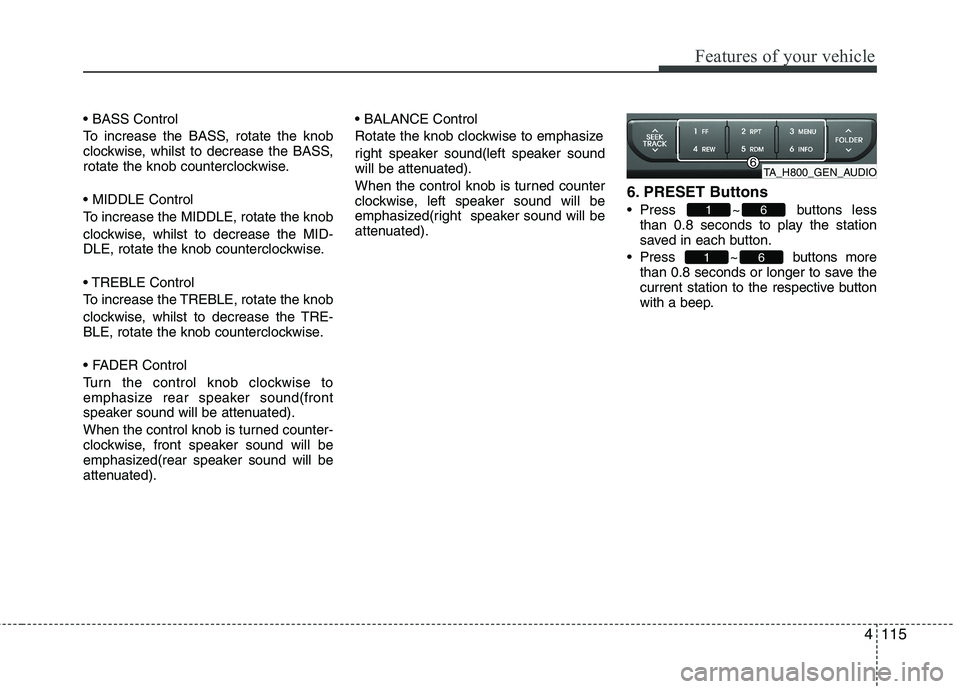
6. PRESET Buttons
Press ~ buttons less
than 0.8 seconds to play the station
saved in each button.
Press ~ buttons more
than 0.8 seconds or longer to save the
current station to the respective button
with a beep.
61
61
TA_H800_GEN_AUDIO
Page 197 of 420
Features of your vehicle
124 4
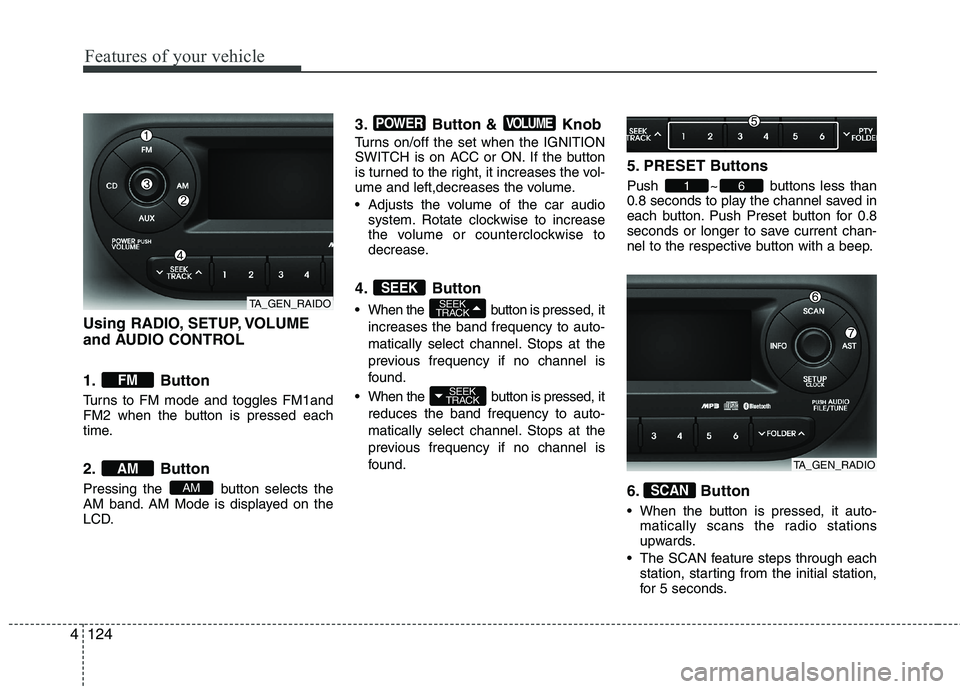
Using RADIO, SETUP, VOLUME
and AUDIO CONTROL
1. Button
Turns to FM mode and toggles FM1and
FM2 when the button is pressed each
time.
2. Button
Pressing the button selects the
AM band. AM Mode is displayed on the
LCD.
3. Button & Knob
Turns on/off the set when the IGNITION
SWITCH is on ACC or ON. If the button
is turned to the right, it increases the vol-
ume and left,decreases the volume.
Adjusts the volume of the car audio
system. Rotate clockwise to increase
the volume or counterclockwise to
decrease.
4. Button
When the button is pressed, it
increases the band frequency to auto-
matically select channel. Stops at the
previous frequency if no channel is
found.
When the button is pressed, it
reduces the band frequency to auto-
matically select channel. Stops at the
previous frequency if no channel is
found.
5. PRESET Buttons
Push ~ buttons less than
0.8 seconds to play the channel saved in
each button. Push Preset button for 0.8
seconds or longer to save current chan-
nel to the respective button with a beep.
6. Button
When the button is pressed, it auto-
matically scans the radio stations
upwards.
The SCAN feature steps through each
station, starting from the initial station,
for 5 seconds.
SCAN
61
SEEK
TRACK
SEEK
TRACKSEEK
VOLUMEPOWER
AM
AM
FM
TA_GEN_RAIDO
TA_GEN_RADIO
Page 198 of 420
4125
Features of your vehicle
Press the button again to stop
the scan feature and to listen to the
currently selected channel.
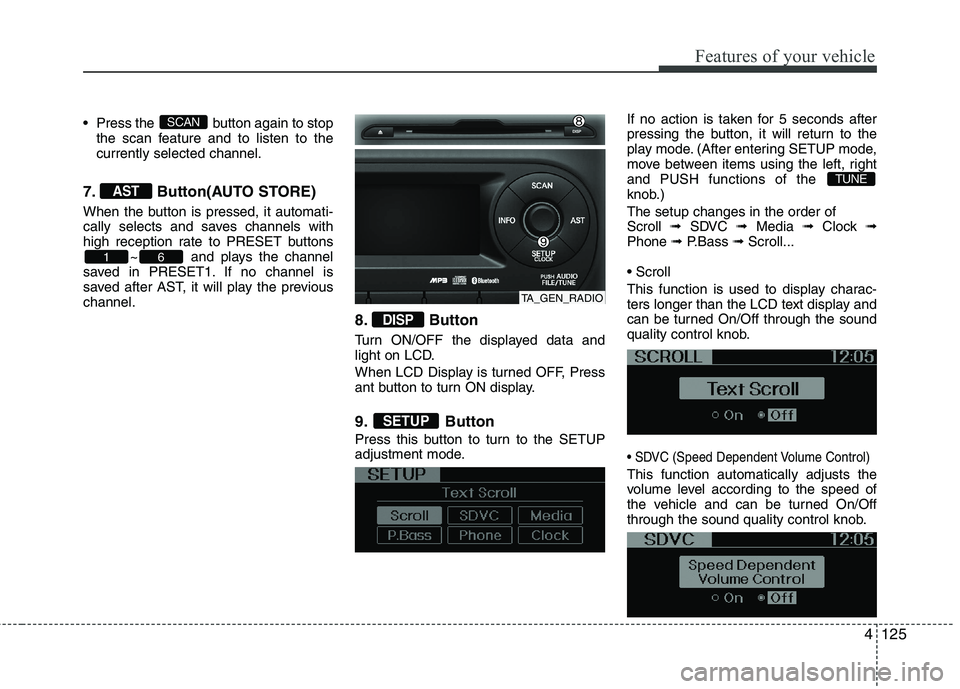
7. Button(AUTO STORE)
When the button is pressed, it automati-
cally selects and saves channels with
high reception rate to PRESET buttons
~ and plays the channel
saved in PRESET1. If no channel is
saved after AST, it will play the previous
channel.
8. Button
Turn ON/OFF the displayed data and
light on LCD.
When LCD Display is turned OFF, Press
ant button to turn ON display.
9. Button
Press this button to turn to the SETUP
adjustment mode.If no action is taken for 5 seconds after
pressing the button, it will return to the
play mode. (After entering SETUP mode,
move between items using the left, right
and PUSH functions of the
knob.)
The setup changes in the order of
Scroll ➟ SDVC ➟ Media ➟ Clock ➟
Phone ➟ P.Bass ➟ Scroll...
This function is used to display charac-
ters longer than the LCD text display and
can be turned On/Off through the sound
quality control knob.
This function automatically adjusts the
volume level according to the speed of
the vehicle and can be turned On/Off
through the sound quality control knob.
TUNE
SETUP
DISP
61
AST
SCAN
TA_GEN_RADIO
Page 199 of 420
Features of your vehicle
126 4
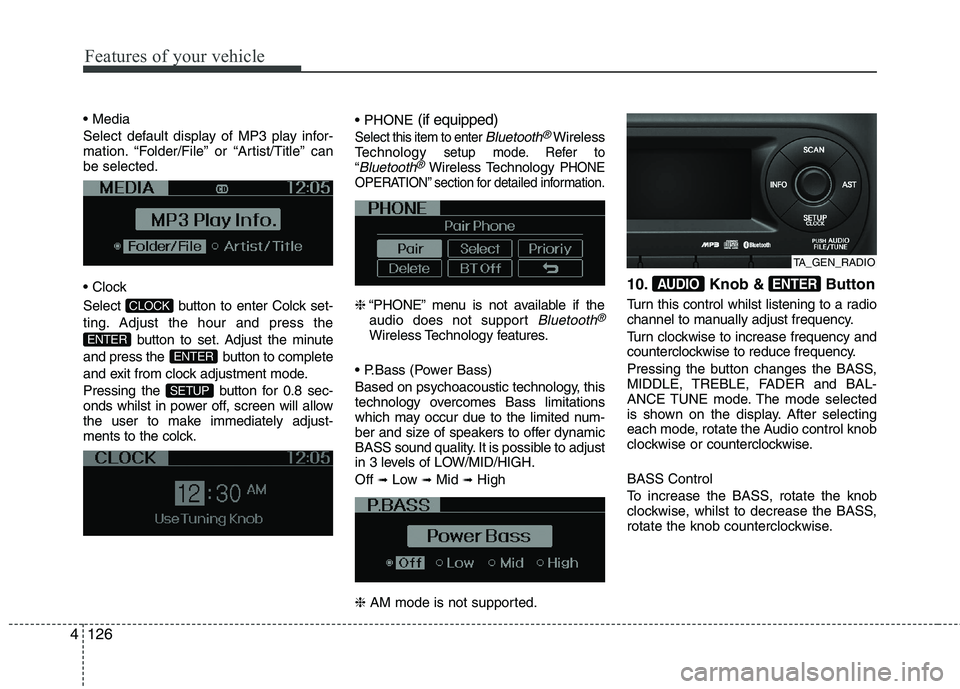
Select default display of MP3 play infor-
mation. “Folder/File” or “Artist/Title” can
be selected.
Select button to enter Colck set-
ting. Adjust the hour and press the
button to set. Adjust the minute
and press the button to complete
and exit from clock adjustment mode.
Pressing the button for 0.8 sec-
onds whilst in power off, screen will allow
the user to make immediately adjust-
ments to the colck.(if equipped)
Select this item to enter Bluetooth®Wireless
Technologysetup mode. Refer to
“Bluetooth®Wireless TechnologyPHONE
OPERATION” section for detailed information.
❈“PHONE” menu is not available if the
audio does not support Bluetooth®
Wireless Technologyfeatures.
Based on psychoacoustic technology, this
technology overcomes Bass limitations
which may occur due to the limited num-
ber and size of speakers to offer dynamic
BASS sound quality. It is possible to adjust
in 3 levels of LOW/MID/HIGH.
Off
➟Low ➟Mid ➟High
❈AM mode is not supported.
10. Knob & Button
Turn this control whilst listening to a radio
channel to manually adjust frequency.
Turn clockwise to increase frequency and
counterclockwise to reduce frequency.
Pressing the button changes the BASS,
MIDDLE, TREBLE, FADER and BAL-
ANCE TUNE mode. The mode selected
is shown on the display. After selecting
each mode, rotate the Audio control knob
clockwise or counterclockwise.
BASS Control
To increase the BASS, rotate the knob
clockwise, whilst to decrease the BASS,
rotate the knob counterclockwise.
ENTERAUDIO
SETUP
ENTER
ENTER
CLOCK
TA_GEN_RADIO
Page 216 of 420
4143
Features of your vehicle
Using RADIO, SETUP, VOLUME
and AUDIO CONTROL
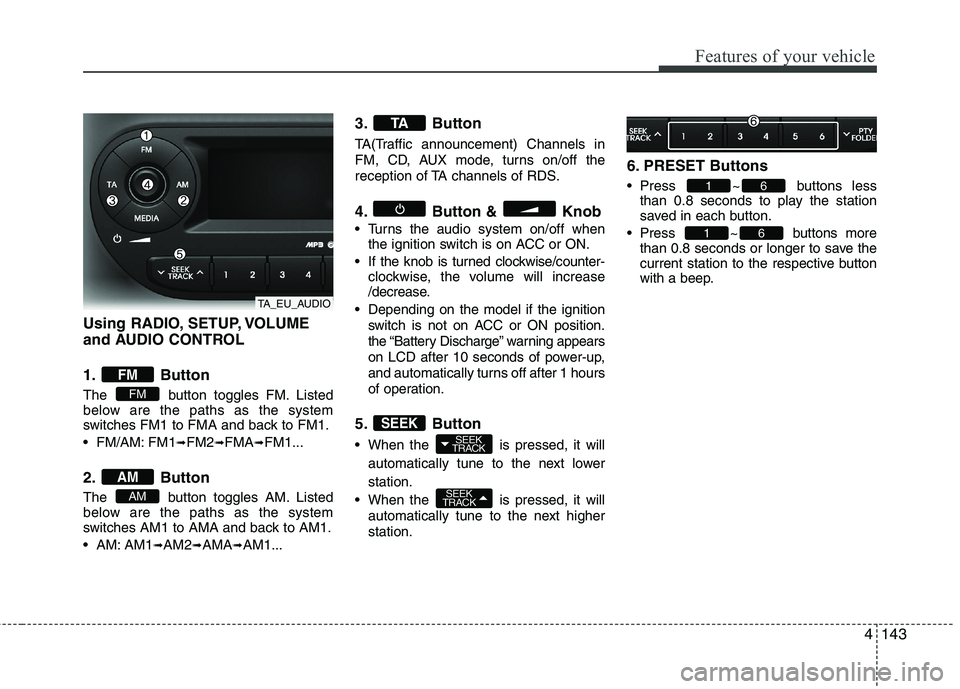
1. Button
The button toggles FM. Listed
below are the paths as the system
switches FM1 to FMA and back to FM1.
FM/AM: FM1
➟FM2➟FMA➟FM1...
2. Button
The button toggles AM. Listed
below are the paths as the system
switches AM1 to AMA and back to AM1.
AM: AM1
➟AM2➟AMA➟AM1...
3. Button
TA(Traffic announcement) Channels in
FM, CD, AUX mode, turns on/off the
reception of TA channels of RDS.
4. Button & Knob
Turns the audio system on/off when
the ignition switch is on ACC or ON.
If the knob is turned clockwise/counter-
clockwise, the volume will increase
/decrease.
Depending on the model if the ignition
switch is not on ACC or ON position.
the “Battery Discharge” warning appears
on LCD after 10 seconds of power-up,
and automatically turns off after 1 hours
of operation.
5. Button
When the is pressed, it will
automatically tune to the next lower
station.
When the is pressed, it will
automatically tune to the next higher
station.
6. PRESET Buttons
Press ~ buttons less
than 0.8 seconds to play the station
saved in each button.
Press ~ buttons more
than 0.8 seconds or longer to save the
current station to the respective button
with a beep.
61
61
SEEK
TRACK
SEEK
TRACKSEEK
TA
AM
AM
FM
FM
TA_EU_AUDIO