2015 KIA MORNING section 8
[x] Cancel search: section 8Page 302 of 420
What to do in an emergency
6 6
Jump starting procedure
1. Make sure the booster battery is 12-
volt and that its negative terminal is
grounded.
2. If the booster battery is in another
vehicle, do not allow the vehicles to
touch.
3. Turn off all unnecessary electrical
loads.
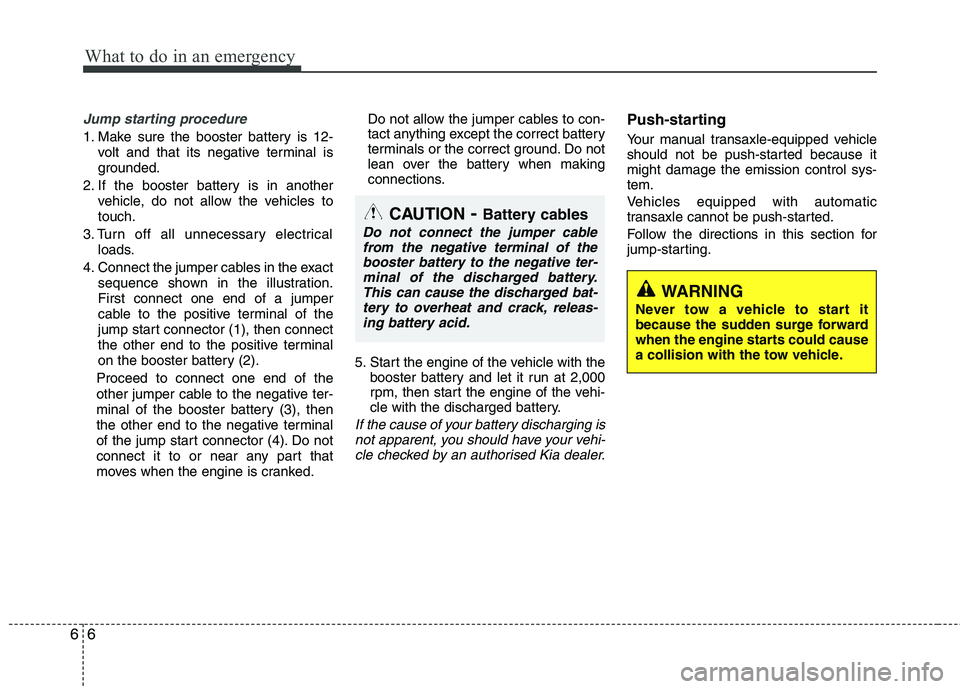
4. Connect the jumper cables in the exact
sequence shown in the illustration.
First connect one end of a jumper
cable to the positive terminal of the
jump start connector (1), then connect
the other end to the positive terminal
on the booster battery (2).
Proceed to connect one end of the
other jumper cable to the negative ter-
minal of the booster battery (3), then
the other end to the negative terminal
of the jump start connector (4). Do not
connect it to or near any part that
moves when the engine is cranked.Do not allow the jumper cables to con-
tact anything except the correct battery
terminals or the correct ground. Do not
lean over the battery when making
connections.
5. Start the engine of the vehicle with the
booster battery and let it run at 2,000
rpm, then start the engine of the vehi-
cle with the discharged battery.
If the cause of your battery discharging is
not apparent, you should have your vehi-
cle checked by an authorised Kia dealer.
Push-starting
Your manual transaxle-equipped vehicle
should not be push-started because it
might damage the emission control sys-
tem.
Vehicles equipped with automatic
transaxle cannot be push-started.
Follow the directions in this section for
jump-starting.
CAUTION- Battery cables
Do not connect the jumper cable
from the negative terminal of the
booster battery to the negative ter-
minal of the discharged battery.
This can cause the discharged bat-
tery to overheat and crack, releas-
ing battery acid.
WARNING
Never tow a vehicle to start it
because the sudden surge forward
when the engine starts could cause
a collision with the tow vehicle.
Page 313 of 420
617
What to do in an emergency
IF YOU HAVE A FLAT TYRE (WITH TYREMOBILITYKIT, IF EQUIPPED)
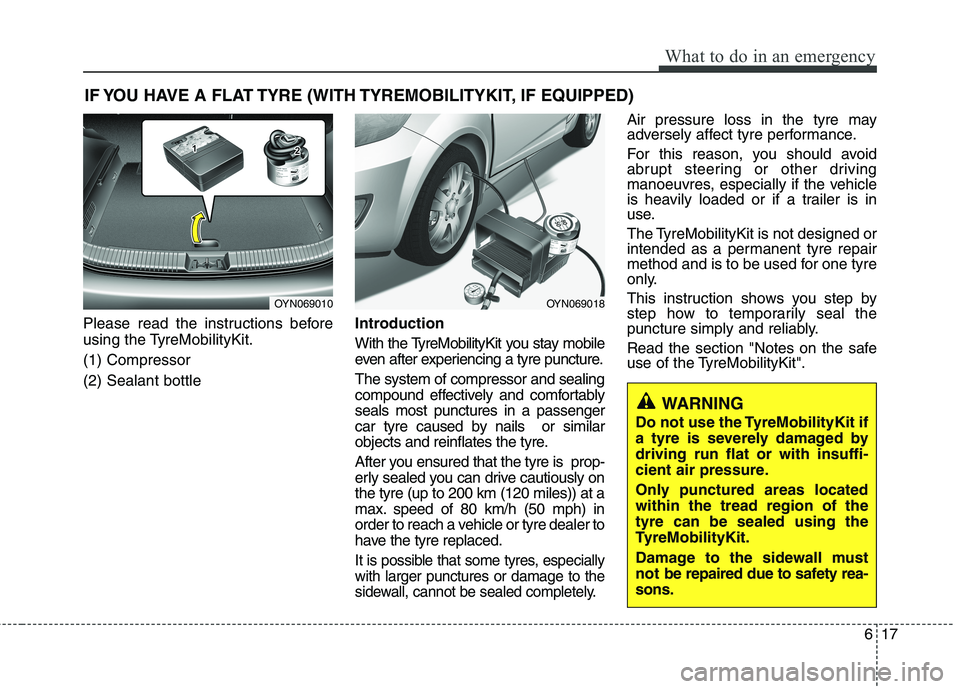
Please read the instructions before
using the TyreMobilityKit.
(1) Compressor
(2) Sealant bottleIntroduction
With the TyreMobilityKit you stay mobile
even after experiencing a tyre puncture.
The system of compressor and sealing
compound effectively and comfortably
seals most punctures in a passenger
car tyre caused by nails or similar
objects and reinflates the tyre.
After you ensured that the tyre is prop-
erly sealed you can drive cautiously on
the tyre (up to 200 km (120 miles)) at a
max. speed of 80 km/h (50 mph) in
order to reach a vehicle or tyre dealer to
have the tyre replaced.
It is possible that some tyres, especially
with larger punctures or damage to the
sidewall, cannot be sealed completely.
Air pressure loss in the tyre may
adversely affect tyre performance.
For this reason, you should avoid
abrupt steering or other driving
manoeuvres, especially if the vehicle
is heavily loaded or if a trailer is in
use.
The TyreMobilityKit is not designed or
intended as a permanent tyre repair
method and is to be used for one tyre
only.
This instruction shows you step by
step how to temporarily seal the
puncture simply and reliably.
Read the section "Notes on the safe
use of the TyreMobilityKit".
OYN069010OYN069018
WARNING
Do not use the TyreMobilityKit if
a tyre is severely damaged by
driving run flat or with insuffi-
cient air pressure.
Only punctured areas located
within the tread region of the
tyre can be sealed using the
TyreMobilityKit.
Damage to the sidewall must
not be repaired due to safety rea-
sons.
Page 327 of 420
EMERGENCY COMMODITY (IF EQUIPPED)
There are some emergency commodities
in the vehicle to help you respond to the
emergency situation.
Fire extinguisher
If there is small fire and you know how to
use the fire extinguisher, take the follow-
ing steps carefully.
1. Pull the pin at the top of the extin-
guisher that keeps the handle from
being accidentally pressed.
2. Aim the nozzle toward the base of the
fire.
3. Stand approximately 2.5 m (8 ft) away
from the fire and squeeze the handle
to discharge the extinguisher. If you
release the handle, the discharge will
stop.
4. Sweep the nozzle back and forth at the
base of the fire. After the fire appears
to be out, watch it carefully since it
may re-ignite.
First aid kit
There are some items such as scissors,
bandage and adhesive tape and etc. in
the kit to give first aid to an injured per-
son.
Triangle reflector
Place the triangle reflector on the road to
warn oncoming vehicles during emer-
gencies, such as when the vehicle is
parked by the roadside due to any prob-
lems.
Tyre pressure gauge
(If equipped)
Tyres normally lose some air in day-to-
day use, and you may have to add a few
pounds of air periodically and it is not
usually a sign of a leaking tyre, but of
normal wear. Always check tyre pressure
when the tyres are cold because tyre
pressure increases with temperature.To check the tyre pressure, take the fol-
lowing steps;
1. Unscrew the inflation valve cap that is
located on the rim of the tyre.
2. Press and hold the gauge against the
tyre valve. Some air will escape as you
begin and more will escape if you don't
press the gauge in firmly.
3. A firm non-leaking push will activate
the gauge.
4. Read the tyre pressure on the gauge
to know whether the tyre pressure is
low or high.
5. Adjust the tyre pressures to the speci-
fied pressure. Refer to “Tyres and
wheels” in section 8.
6. Reinstall the inflation valve cap.
What to do in an emergency
31 6
Page 330 of 420
73
Maintenance
MAINTENANCE SERVICES
You should exercise the utmost care to
prevent damage to your vehicle and
injury to yourself whenever performing
any maintenance or inspection proce-
dures.
Should you have any doubts concerning
the inspection or servicing of your vehi-
cle, we strongly recommend that you
have an authorised Kia dealer perform
this work.
An authorised Kia dealer has factory-
trained technicians and genuine Kia
parts to service your vehicle properly. For
expert advice and quality service, see an
authorised Kia dealer.
Inadequate, incomplete or insufficient
servicing may result in operational prob-
lems with your vehicle that could lead to
vehicle damage, an accident, or person-
al injury.Owner’s responsibility
✽ ✽
NOTICE
Maintenance Service and Record
Retention are the owner's responsibility.
You should retain documents that show
proper maintenance has been performed
on your vehicle in accordance with the
scheduled maintenance service charts
shown on the following pages. You need
this information to establish your compli-
ance with the servicing and maintenance
requirements of your vehicle warranties.
Detailed warranty information is provided
in your Warranty & Maintenance book.
Repairs and adjustments required as a
result of improper maintenance or a lack
of required maintenance are not covered.
We recommend you have your vehicle
maintained and repaired by an autho-
rised Kia dealer. An authorised Kia deal-
er meets Kia’s high service quality stan-
dards and receives technical support
from Kia in order to provide you with a
high level of service satisfaction.
Owner maintenance precautions
Improper or incomplete service may
result in problems. This section gives
instructions only for the maintenance
items that are easy to perform.
As explained earlier in this section, sev-
eral procedures can be done only by an
authorised Kia dealer with special tools.
✽ ✽
NOTICE
Improper owner maintenance during
the warranty period may affect warran-
ty coverage. For details, read the sepa-
rate Warranty & Maintenance book
provided with the vehicle. If you're
unsure about any servicing or mainte-
nance procedure, have it done by an
authorised Kia dealer.
Page 348 of 420
721
Maintenance
ENGINE OIL
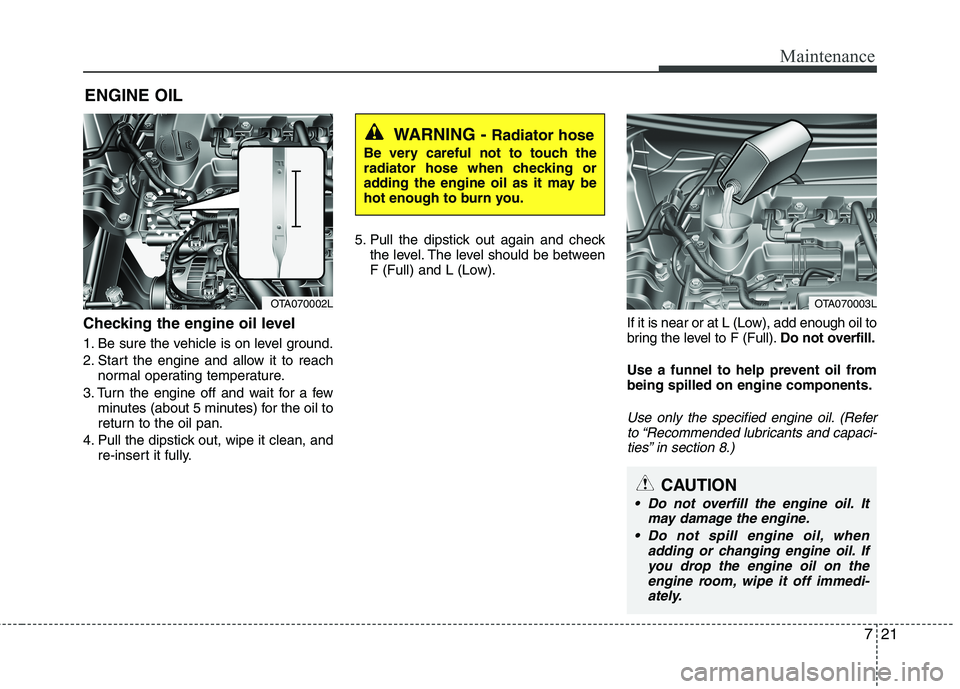
Checking the engine oil level
1. Be sure the vehicle is on level ground.
2. Start the engine and allow it to reach
normal operating temperature.
3. Turn the engine off and wait for a few
minutes (about 5 minutes) for the oil to
return to the oil pan.
4. Pull the dipstick out, wipe it clean, and
re-insert it fully.5. Pull the dipstick out again and check
the level. The level should be between
F (Full) and L (Low).
If it is near or at L (Low), add enough oil to
bring the level to F (Full).Do not overfill.
Use a funnel to help prevent oil from
being spilled on engine components.
Use only the specified engine oil. (Refer
to “Recommended lubricants and capaci-
ties” in section 8.)
WARNING - Radiator hose
Be very careful not to touch the
radiator hose when checking or
adding the engine oil as it may be
hot enough to burn you.
OTA070002LOTA070003L
CAUTION
Do not overfill the engine oil. It
may damage the engine.
Do not spill engine oil, when
adding or changing engine oil. If
you drop the engine oil on the
engine room, wipe it off immedi-
ately.
Page 349 of 420
Maintenance
22 7
Changing the engine oil and filter
Have engine oil and filter changed by an
authorised Kia dealer according to the
Maintenance Schedule at the beginning
of this section.
WARNING
Used engine oil may cause irrita-
tion or cancer of the skin if left in
contact with the skin for prolonged
periods of time. Used engine oil
contains chemicals that have
caused cancer in laboratory ani-
mals. Always protect your skin by
washing your hands thoroughly
with soap and warm water as soon
as possible after handling used oil.
Page 352 of 420
725
Maintenance
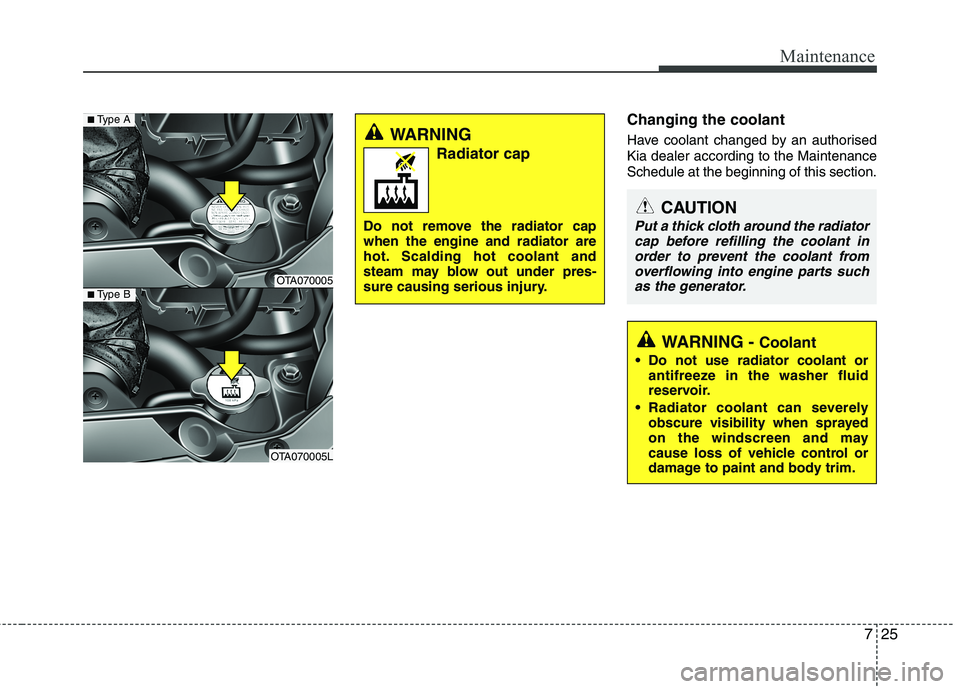
Changing the coolant
Have coolant changed by an authorised
Kia dealer according to the Maintenance
Schedule at the beginning of this section.WARNING
Radiator cap
Do not remove the radiator cap
when the engine and radiator are
hot. Scalding hot coolant and
steam may blow out under pres-
sure causing serious injury.
CAUTION
Put a thick cloth around the radiator
cap before refilling the coolant in
order to prevent the coolant from
overflowing into engine parts such
as the generator.
WARNING -Coolant
Do not use radiator coolant or
antifreeze in the washer fluid
reservoir.
Radiator coolant can severely
obscure visibility when sprayed
on the windscreen and may
cause loss of vehicle control or
damage to paint and body trim.
OTA070005
OTA070005L
■Type A
■Type B
Page 353 of 420
Maintenance
26 7
BRAKE FLUID
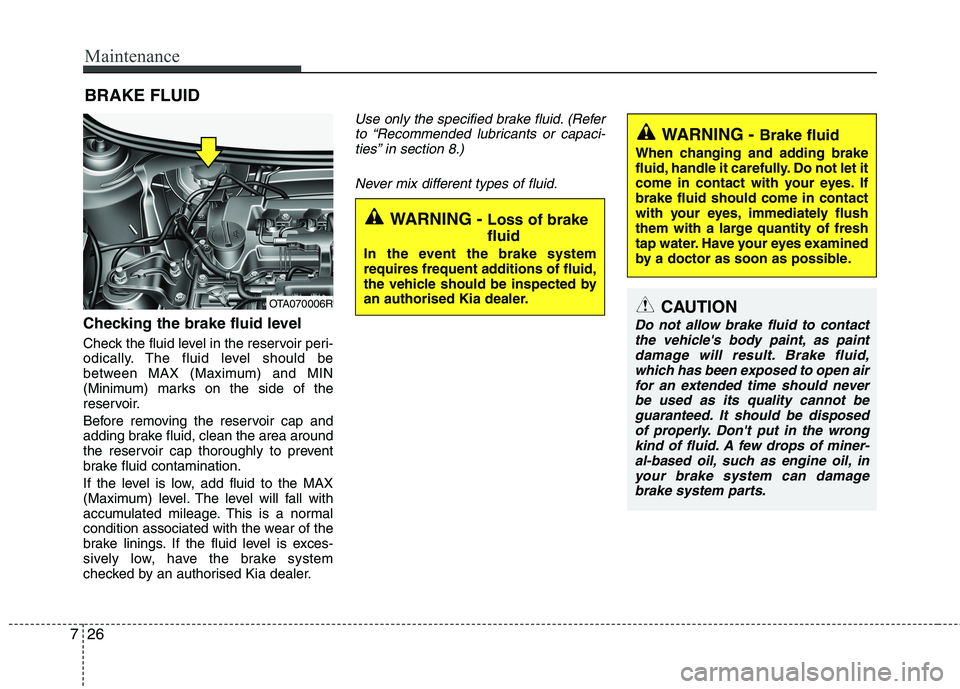
Checking the brake fluid level
Check the fluid level in the reservoir peri-
odically. The fluid level should be
between MAX (Maximum) and MIN
(Minimum) marks on the side of the
reservoir.
Before removing the reservoir cap and
adding brake fluid, clean the area around
the reservoir cap thoroughly to prevent
brake fluid contamination.
If the level is low, add fluid to the MAX
(Maximum) level. The level will fall with
accumulated mileage. This is a normal
condition associated with the wear of the
brake linings. If the fluid level is exces-
sively low, have the brake system
checked by an authorised Kia dealer.
Use only the specified brake fluid. (Refer
to “Recommended lubricants or capaci-
ties” in section 8.)
Never mix different types of fluid.
WARNING - Brake fluid
When changing and adding brake
fluid, handle it carefully. Do not let it
come in contact with your eyes. If
brake fluid should come in contact
with your eyes, immediately flush
them with a large quantity of fresh
tap water. Have your eyes examined
by a doctor as soon as possible.
WARNING - Loss of brake
fluid
In the event the brake system
requires frequent additions of fluid,
the vehicle should be inspected by
an authorised Kia dealer.
CAUTION
Do not allow brake fluid to contact
the vehicle's body paint, as paint
damage will result. Brake fluid,
which has been exposed to open air
for an extended time should never
be used as its quality cannot be
guaranteed. It should be disposed
of properly. Don't put in the wrong
kind of fluid. A few drops of miner-
al-based oil, such as engine oil, in
your brake system can damage
brake system parts.
OTA070006R