2015 Hyundai Santa Fe Sport remote control
[x] Cancel search: remote controlPage 19 of 785
Your vehicle at a glance
6 2
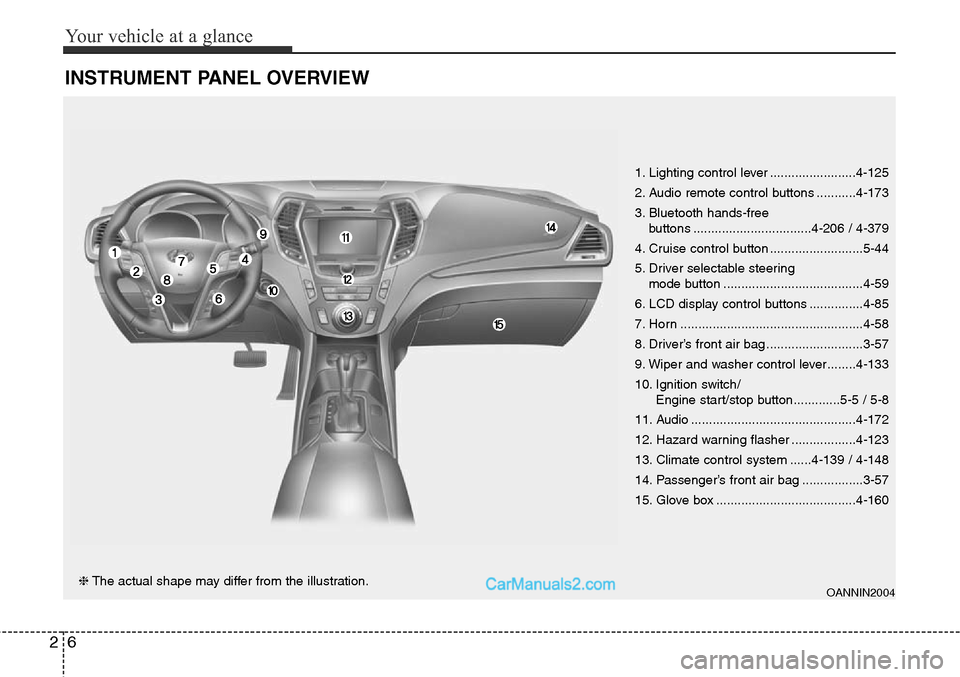
INSTRUMENT PANEL OVERVIEW
OANNIN2004❈The actual shape may differ from the illustration.1. Lighting control lever ........................4-125
2. Audio remote control buttons ...........4-173
3. Bluetooth hands-free
buttons .................................4-206 / 4-379
4. Cruise control button ..........................5-44
5. Driver selectable steering
mode button .......................................4-59
6. LCD display control buttons ...............4-85
7. Horn ...................................................4-58
8. Driver’s front air bag ...........................3-57
9. Wiper and washer control lever........4-133
10. Ignition switch/
Engine start/stop button.............5-5 / 5-8
11. Audio ..............................................4-172
12. Hazard warning flasher ..................4-123
13. Climate control system ......4-139 / 4-148
14. Passenger’s front air bag .................3-57
15. Glove box .......................................4-160
Page 96 of 785
Defroster . . . . . . . . . . . . . . . . . . . . . . . . . . . . . . . . 4-138
• Rear window defroster . . . . . . . . . . . . . . . . . . . . . . . 4-138
• Front wiper deicer . . . . . . . . . . . . . . . . . . . . . . . . . . . 4-138
Manual climate control system . . . . . . . . . . . . . . 4-139
• Heating and air conditioning . . . . . . . . . . . . . . . . . . 4-140
• System operation . . . . . . . . . . . . . . . . . . . . . . . . . . . . 4-145
• Climate control air filter. . . . . . . . . . . . . . . . . . . . . . 4-147
• Refrigerant and compressor lubricant . . . . . . . . . . 4-147
Automatic climate control system . . . . . . . . . . . 4-148
• Automatic heating and air conditioning . . . . . . . . . 4-149
• Manual heating and air conditioning . . . . . . . . . . . 4-150
Windshield defrosting and defogging . . . . . . . . . 4-156
• Manual climate control system . . . . . . . . . . . . . . . . 4-156
• Automatic climate control system . . . . . . . . . . . . . . 4-157
Storage compartment . . . . . . . . . . . . . . . . . . . . . . 4-160
• Center console storage . . . . . . . . . . . . . . . . . . . . . . . 4-160
• Glove box . . . . . . . . . . . . . . . . . . . . . . . . . . . . . . . . . . 4-160
• Multi box . . . . . . . . . . . . . . . . . . . . . . . . . . . . . . . . . . 4-161
• Sunglass holder . . . . . . . . . . . . . . . . . . . . . . . . . . . . . 4-161
• Luggage tray . . . . . . . . . . . . . . . . . . . . . . . . . . . . . . . 4-162
Interior features . . . . . . . . . . . . . . . . . . . . . . . . . . 4-163
• Cup holder . . . . . . . . . . . . . . . . . . . . . . . . . . . . . . . . . 4-163
• Sunvisor . . . . . . . . . . . . . . . . . . . . . . . . . . . . . . . . . . . 4-164
• Power outlet . . . . . . . . . . . . . . . . . . . . . . . . . . . . . . . . 4-164
• Clothes hanger . . . . . . . . . . . . . . . . . . . . . . . . . . . . . . 4-166• Floor mat anchor(s). . . . . . . . . . . . . . . . . . . . . . . . . . 4-166
• Aux, USB and iPod
®port . . . . . . . . . . . . . . . . . . . . . 4-167
• Luggage net (holder) . . . . . . . . . . . . . . . . . . . . . . . . . 4-167
• Cargo security screen . . . . . . . . . . . . . . . . . . . . . . . . 4-168
• Side curtain . . . . . . . . . . . . . . . . . . . . . . . . . . . . . . . . 4-170
Exterior features . . . . . . . . . . . . . . . . . . . . . . . . . . 4-171
• Roof rack . . . . . . . . . . . . . . . . . . . . . . . . . . . . . . . . . . 4-171
Audio system . . . . . . . . . . . . . . . . . . . . . . . . . . . . . 4-172
• Antenna . . . . . . . . . . . . . . . . . . . . . . . . . . . . . . . . . . . 4-172
• Audio remote control . . . . . . . . . . . . . . . . . . . . . . . . 4-173
4
Page 174 of 785
481
Features of your vehicle
NVS®is a registered trademark and
Z-Nav™ is a trademark of the
Gentex Corporation, Zeeland,
Michigan. HomeLink
®is a registered
trademark owned by Johnson
Controls, Incorporated, Milwaukee,
Wisconsin.
Outside rearview mirror
Be sure to adjust mirror angles
before driving.
Your vehicle is equipped with both
left-hand and right-hand outside
rearview mirrors. The mirrors can be
adjusted remotely with the remote
switch. The mirror heads can be fold-
ed back to prevent damage during an
automatic car wash or when passing
in a narrow street.
CAUTION
If the mirror is jammed with ice,
do not adjust the mirror by force.
Use an approved spray de-icer
(not radiator antifreeze) to
release the frozen mechanism or
move the vehicle to a warm
place and allow the ice to melt.
WARNING
Do not adjust or fold the outside
rearview mirrors while the vehi-
cle is moving. This could result in
loss of control, and an accident
which could cause death, seri-
ous injury or property damage.
CAUTION
Do not scrape ice off the mirror
face; this may damage the sur-
face of the glass. If ice should
restrict movement of the mirror,
do not force the mirror for
adjustment. To remove ice, use
a deicer spray, or a sponge or
soft cloth with warm water.
CAUTION - Outside
rearview
mirrors
• The right outside rearview
mirror is convex. Objects seen
in the mirror are closer than
they appear.
• Use your interior rearview mir-
ror or direct observation to
determine the actual distance
of following vehicles when
changing lanes.
Page 175 of 785
Features of your vehicle
82 4
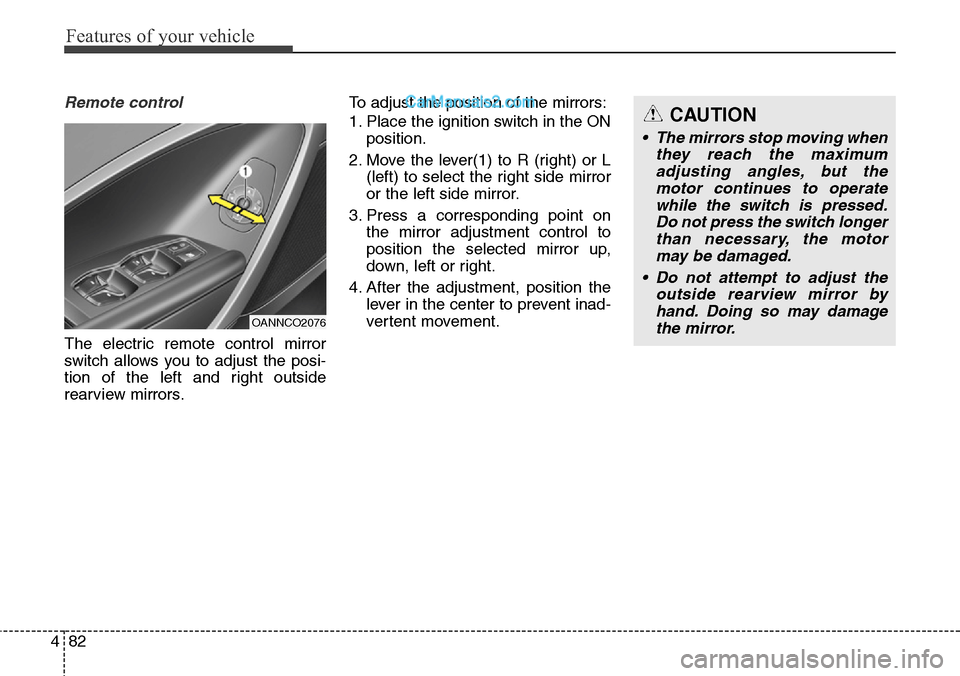
Remote control
The electric remote control mirror
switch allows you to adjust the posi-
tion of the left and right outside
rearview mirrors.To adjust the position of the mirrors:
1. Place the ignition switch in the ON
position.
2. Move the lever(1) to R (right) or L
(left) to select the right side mirror
or the left side mirror.
3. Press a corresponding point on
the mirror adjustment control to
position the selected mirror up,
down, left or right.
4. After the adjustment, position the
lever in the center to prevent inad-
vertent movement.
CAUTION
• The mirrors stop moving when
they reach the maximum
adjusting angles, but the
motor continues to operate
while the switch is pressed.
Do not press the switch longer
than necessary, the motor
may be damaged.
• Do not attempt to adjust the
outside rearview mirror by
hand. Doing so may damage
the mirror.
OANNCO2076
Page 266 of 785
4173
Features of your vehicle
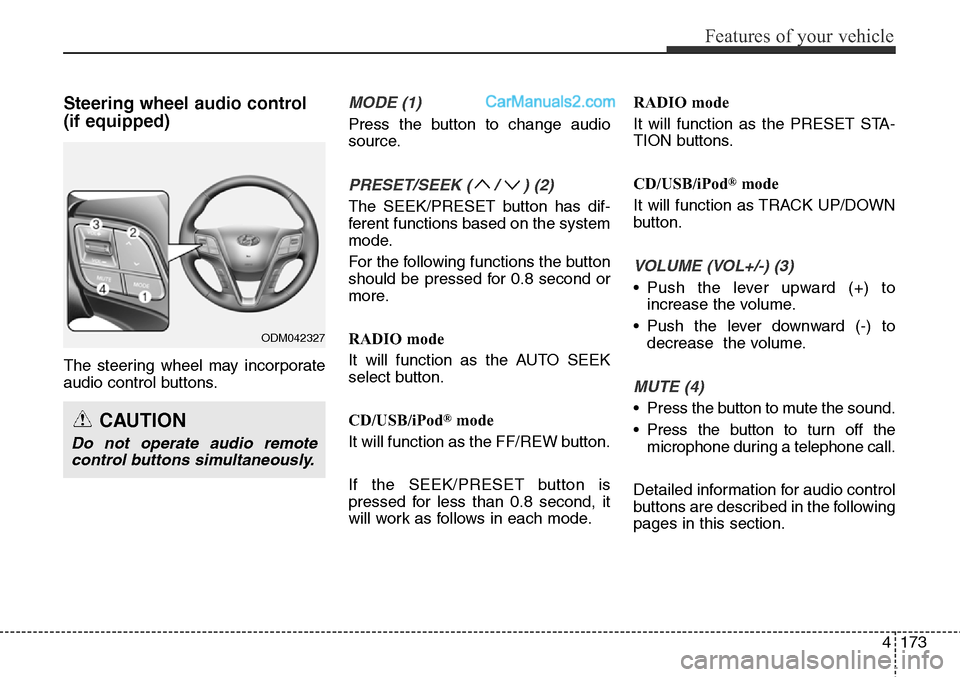
Steering wheel audio control
(if equipped)
The steering wheel may incorporate
audio control buttons.
MODE (1)
Press the button to change audio
source.
PRESET/SEEK ( / ) (2)
The SEEK/PRESET button has dif-
ferent functions based on the system
mode.
For the following functions the button
should be pressed for 0.8 second or
more.
RADIO mode
It will function as the AUTO SEEK
select button.
CD/USB/iPod
®mode
It will function as the FF/REW button.
If the SEEK/PRESET button is
pressed for less than 0.8 second, it
will work as follows in each mode.RADIO mode
It will function as the PRESET STA-
TION buttons.
CD/USB/iPod
®mode
It will function as TRACK UP/DOWN
button.
VOLUME (VOL+/-) (3)
• Push the lever upward (+) to
increase the volume.
• Push the lever downward (-) to
decrease the volume.
MUTE (4)
• Press the button to mute the sound.
• Press the button to turn off the
microphone during a telephone call.
Detailed information for audio control
buttons are described in the following
pages in this section.CAUTION
Do not operate audio remote
control buttons simultaneously.
ODM042327
Page 299 of 785
Features of your vehicle
206 4
PHONE
Before using the Bluetooth®Wireless
Technology phone features
• In order to use
Bluetooth®Wireless
Technology phone, you must first
pair and connect the
Bluetooth®
Wireless Technology mobile phone.
• If the mobile phone is not paired or
connected, it is not possible to
enter Phone mode. Once a phone
is paired or connected, the guid-
ance screen will be displayed.
• If Priority is set upon vehicle igni-
tion(IGN/ACC ON), the
Bluetooth®
Wireless Technology phone will be
automatically connected. Even if
you are outside, the first
Bluetooth®
Wireless Technology phone will be
automatically connected once you
are in the vicinity of the vehicle. If
you do not want automatic
Bluetooth®Wireless Technology
phone connection, set the
Bluetooth®Wireless Technology
power to OFF.
PHONE
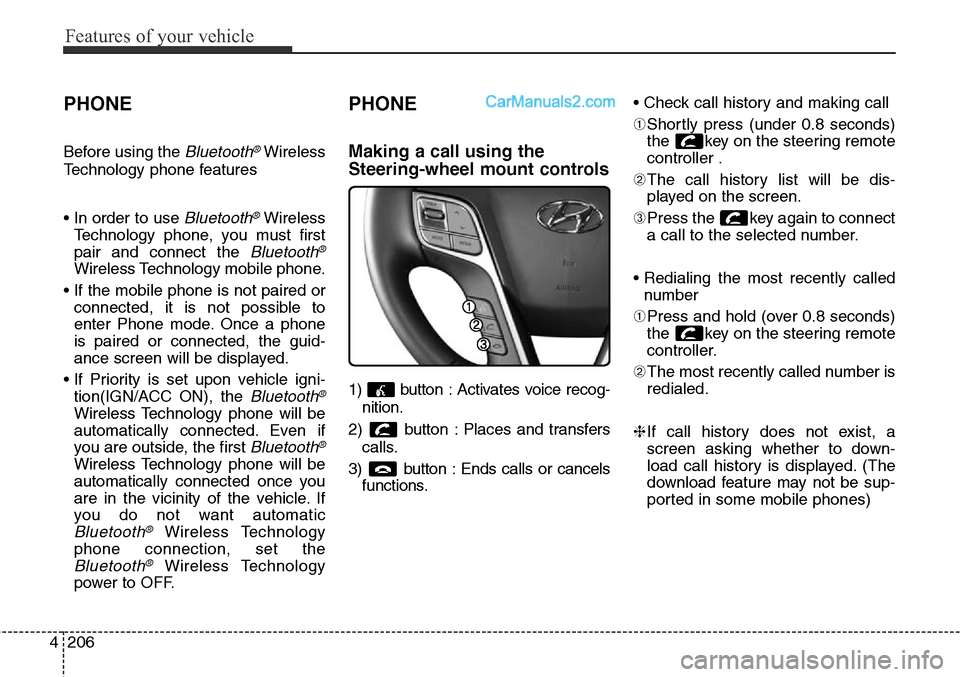
Making a call using the
Steering-wheel mount controls
1) button : Activates voice recog-
nition.
2) button : Places and transfers
calls.
3) button : Ends calls or cancels
functions.• Check call history and making call
➀Shortly press (under 0.8 seconds)
the key on the steering remote
controller .
➁The call history list will be dis-
played on the screen.
➂Press the key again to connect
a call to the selected number.
• Redialing the most recently called
number
➀Press and hold (over 0.8 seconds)
the key on the steering remote
controller.
➁The most recently called number is
redialed.
❈If call history does not exist, a
screen asking whether to down-
load call history is displayed. (The
download feature may not be sup-
ported in some mobile phones)
Page 302 of 785
4209
Features of your vehicle
Pairing a Bluetooth®Wireless
Technology Device
What is Bluetooth®Wireless
Technology Pairing?
Pairing refers to the process of syn-
chronizing your
Bluetooth®Wireless
Technology phone or device with the
car audio system for connection.
Pairing is necessary to connect and
use the
Bluetooth®Wireless
Technology feature.
Pairing Key / Key
on the Steering Remote
Controller
When No Devices have been
Paired
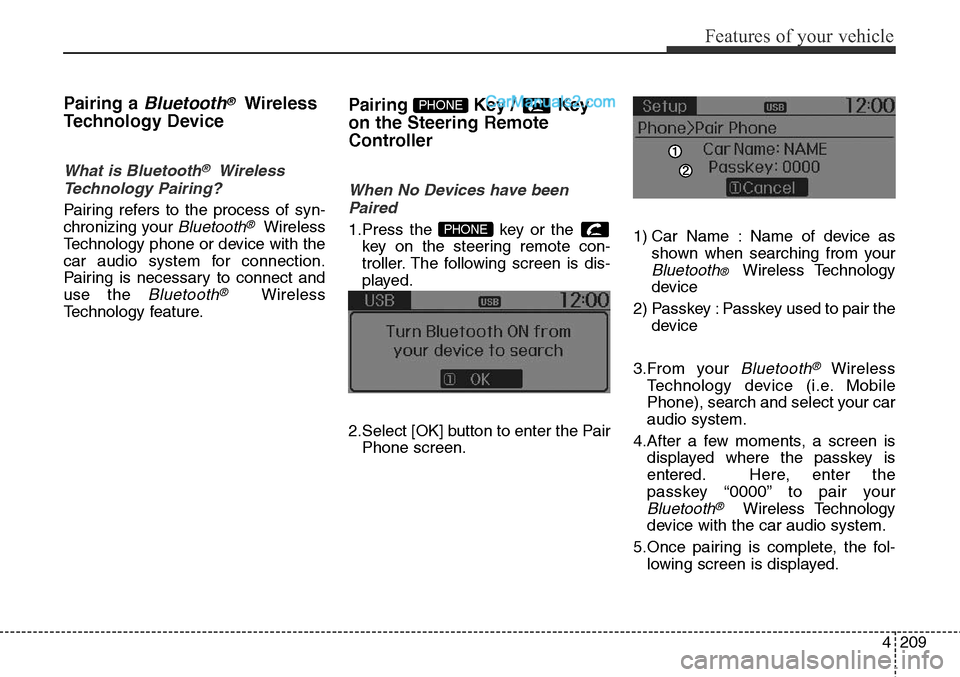
1.Press the key or the
key on the steering remote con-
troller. The following screen is dis-
played.
2.Select [OK] button to enter the Pair
Phone screen.1) Car Name : Name of device as
shown when searching from your
Bluetooth® Wireless Technology
device
2) Passkey : Passkey used to pair the
device
3.From your
Bluetooth®Wireless
Technology device (i.e. Mobile
Phone), search and select your car
audio system.
4.After a few moments, a screen is
displayed where the passkey is
entered. Here, enter the
passkey “0000” to pair your
Bluetooth®Wireless Technology
device with the car audio system.
5.Once pairing is complete, the fol-
lowing screen is displayed.
PHONE
PHONE
Page 313 of 785
![Hyundai Santa Fe Sport 2015 Owners Manual Features of your vehicle
220 4
VOICE RECOGNITION
Using Voice Recognition
Starting Voice Recognition
Shortly press the key on the
steering wheel. Say a command.If prompt feedback is in [ON], then
th Hyundai Santa Fe Sport 2015 Owners Manual Features of your vehicle
220 4
VOICE RECOGNITION
Using Voice Recognition
Starting Voice Recognition
Shortly press the key on the
steering wheel. Say a command.If prompt feedback is in [ON], then
th](/manual-img/35/16759/w960_16759-312.png)
Features of your vehicle
220 4
VOICE RECOGNITION
Using Voice Recognition
Starting Voice Recognition
Shortly press the key on the
steering wheel. Say a command.If prompt feedback is in [ON], then
the system will say “Please say a
command after the beep (BEEP)”
• If prompt feedback is in [OFF]
mode, then the system will only
say “(BEEP)”
• To change Prompt Feedback
[On]/[Off], go to [System]
[Prompt Feedback]
✽NOTICE
For proper recognition, say the com-
mand after the voice instruction and
beep tone.
Contact List Best Practices
1) Do not store single-name entries
(e.g., “Bob”, “Mom”, “Kim”, etc.).
Instead, always use full names
(including first and last names) for
all contacts (e.g., use “Jacob
Stevenson” instead of “Dad”).
2) Do not use abbreviations (i.e., use
“Lieutenant” instead of “Lt.” or
“Sergeant” instead of “Sgt.”).
3) Do not use acronyms (i.e., use
“County Finance Department”
instead of “CFD”).4) Do not use special characters
(e.g., “@”, “hyphen -”, “asterisk *”,
“ampersand &”).
5) If a name is not recognized from
the contact list, change it to a
more descriptive name (e.g., use
“Grandpa Joseph” instead of “Pa
Joe”).
Skipping Prompt Messages
While prompt message is being stat-
ed Shortly press the key on the
steering remote controller
The prompt message is immediately
ended and the beep tone will sound.
After the “beep”, say the voice com-
mand.
Re-starting Voice Recognition
While system waits for a command
Shortly press the key on the
steering remote controller
The command wait state is immedi-
ately ended and the beep tone will
sound. After the “beep”, say the voice
command.
SETUP