2015 Hyundai Santa Fe Sport mirror
[x] Cancel search: mirrorPage 15 of 785
Your vehicle at a glance
2 2
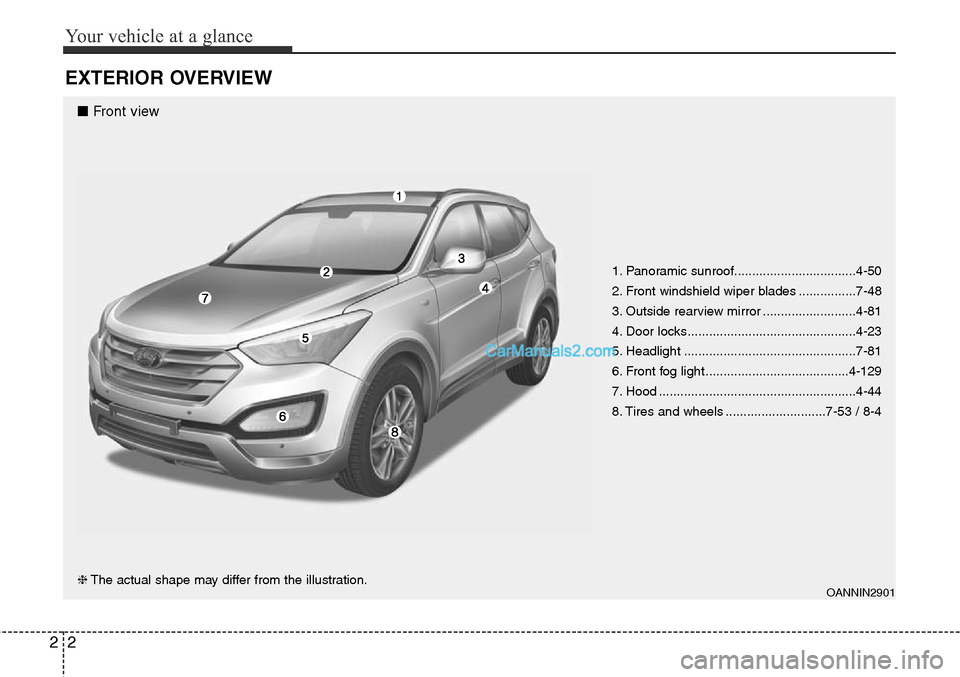
EXTERIOR OVERVIEW
1. Panoramic sunroof..................................4-50
2. Front windshield wiper blades ................7-48
3. Outside rearview mirror ..........................4-81
4. Door locks...............................................4-23
5. Headlight ................................................7-81
6. Front fog light ........................................4-129
7. Hood .......................................................4-44
8. Tires and wheels ............................7-53 / 8-4
OANNIN2901❈The actual shape may differ from the illustration.
■ Front view
Page 17 of 785
Your vehicle at a glance
4 2
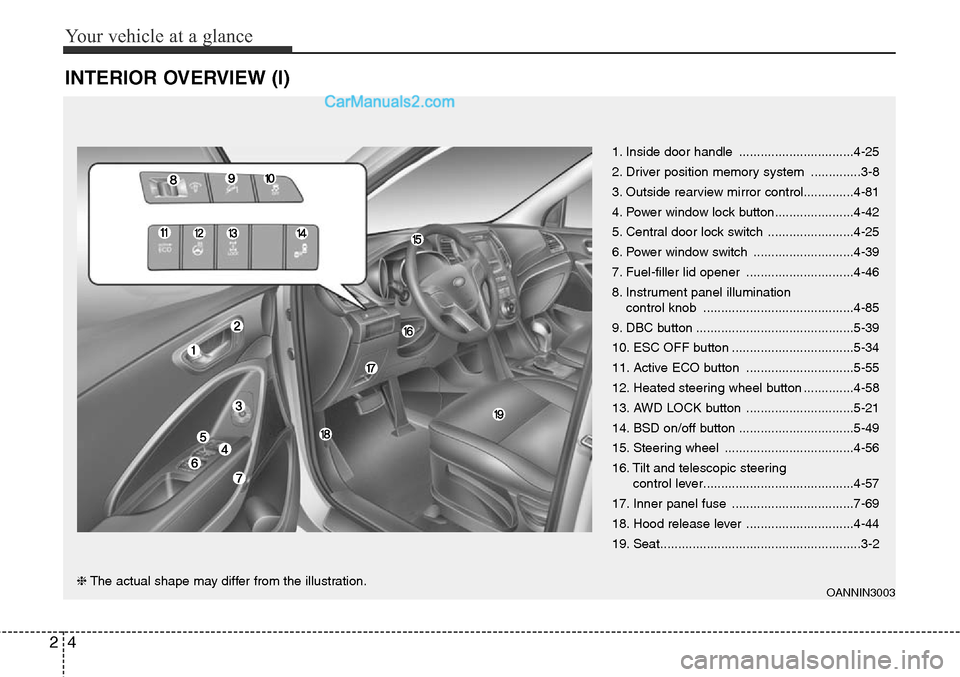
INTERIOR OVERVIEW (I)
1. Inside door handle ................................4-25
2. Driver position memory system ..............3-8
3. Outside rearview mirror control..............4-81
4. Power window lock button......................4-42
5. Central door lock switch ........................4-25
6. Power window switch ............................4-39
7. Fuel-filler lid opener ..............................4-46
8. Instrument panel illumination
control knob ..........................................4-85
9. DBC button ............................................5-39
10. ESC OFF button ..................................5-34
11. Active ECO button ..............................5-55
12. Heated steering wheel button ..............4-58
13. AWD LOCK button ..............................5-21
14. BSD on/off button ................................5-49
15. Steering wheel ....................................4-56
16. Tilt and telescopic steering
control lever..........................................4-57
17. Inner panel fuse ..................................7-69
18. Hood release lever ..............................4-44
19. Seat........................................................3-2
OANNIN3003❈The actual shape may differ from the illustration.
Page 29 of 785
Safety features of your vehicle
8 3
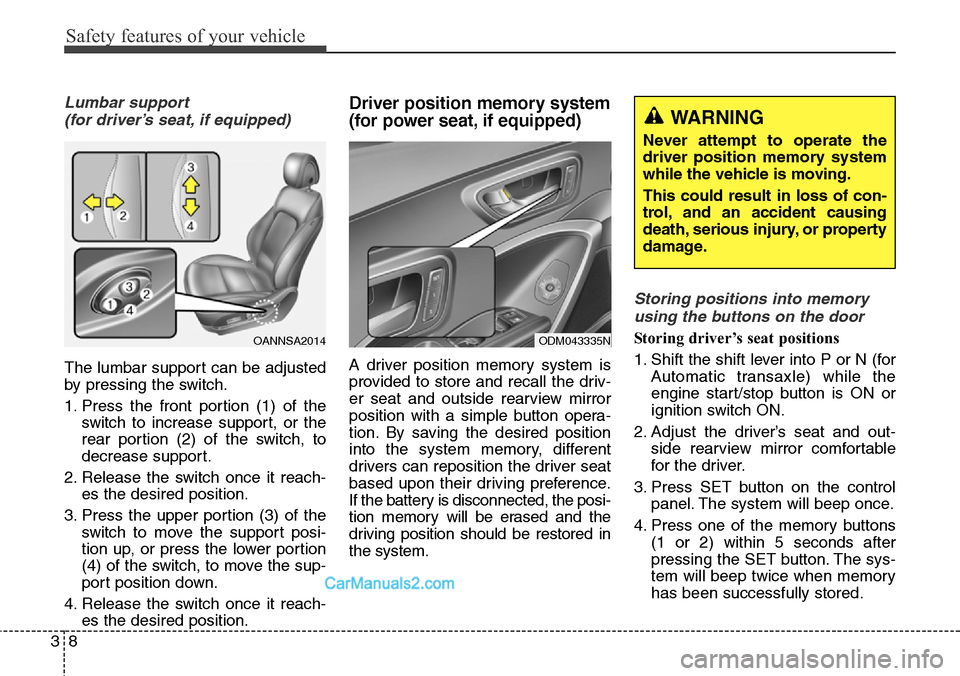
Lumbar support
(for driver’s seat, if equipped)
The lumbar support can be adjusted
by pressing the switch.
1. Press the front portion (1) of the
switch to increase support, or the
rear portion (2) of the switch, to
decrease support.
2. Release the switch once it reach-
es the desired position.
3. Press the upper portion (3) of the
switch to move the support posi-
tion up, or press the lower portion
(4) of the switch, to move the sup-
port position down.
4. Release the switch once it reach-
es the desired position.
Driver position memory system
(for power seat, if equipped)
A driver position memory system is
provided to store and recall the driv-
er seat and outside rearview mirror
position with a simple button opera-
tion. By saving the desired position
into the system memory, different
drivers can reposition the driver seat
based upon their driving preference.
If the battery is disconnected, the posi-
tion memory will be erased and the
driving position should be restored in
the system.
Storing positions into memory
using the buttons on the door
Storing driver’s seat positions
1. Shift the shift lever into P or N (for
Automatic transaxle) while the
engine start/stop button is ON or
ignition switch ON.
2. Adjust the driver’s seat and out-
side rearview mirror comfortable
for the driver.
3. Press SET button on the control
panel. The system will beep once.
4. Press one of the memory buttons
(1 or 2) within 5 seconds after
pressing the SET button. The sys-
tem will beep twice when memory
has been successfully stored.OANNSA2014ODM043335N
WARNING
Never attempt to operate the
driver position memory system
while the vehicle is moving.
This could result in loss of con-
trol, and an accident causing
death, serious injury, or property
damage.
Page 95 of 785
Mirrors . . . . . . . . . . . . . . . . . . . . . . . . . . . . . . . . . . 4-62
• Inside rearview mirror . . . . . . . . . . . . . . . . . . . . . . . . 4-62
• Outside rearview mirror. . . . . . . . . . . . . . . . . . . . . . . 4-81
Instrument cluster . . . . . . . . . . . . . . . . . . . . . . . . . 4-84
• Instrument Cluster Control . . . . . . . . . . . . . . . . . . . . 4-85
• LCD Display Control . . . . . . . . . . . . . . . . . . . . . . . . . 4-85
• Gauges . . . . . . . . . . . . . . . . . . . . . . . . . . . . . . . . . . . . . 4-86
• Transaxle Shift Indicator . . . . . . . . . . . . . . . . . . . . . . 4-89
LCD display . . . . . . . . . . . . . . . . . . . . . . . . . . . . . . 4-90
• LCD Modes . . . . . . . . . . . . . . . . . . . . . . . . . . . . . . . . . 4-90
• Service Mode . . . . . . . . . . . . . . . . . . . . . . . . . . . . . . . . 4-91
• User Settings Mode . . . . . . . . . . . . . . . . . . . . . . . . . . . 4-92
• A/V Mode . . . . . . . . . . . . . . . . . . . . . . . . . . . . . . . . . . . 4-95
• Turn By Turn Mode . . . . . . . . . . . . . . . . . . . . . . . . . . 4-95
• Warning Messages . . . . . . . . . . . . . . . . . . . . . . . . . . . . 4-96
Trip computer . . . . . . . . . . . . . . . . . . . . . . . . . . . . 4-103
• Overview . . . . . . . . . . . . . . . . . . . . . . . . . . . . . . . . . . 4-103
• Trip A/B . . . . . . . . . . . . . . . . . . . . . . . . . . . . . . . . . . . 4-104
• Fuel Economy . . . . . . . . . . . . . . . . . . . . . . . . . . . . . . 4-105
Warning and indicator lights . . . . . . . . . . . . . . . 4-107
• Warning lights . . . . . . . . . . . . . . . . . . . . . . . . . . . . . . 4-107
• Indicator Lights . . . . . . . . . . . . . . . . . . . . . . . . . . . . . 4-114
Rear parking assist system . . . . . . . . . . . . . . . . . 4-118
• Operation . . . . . . . . . . . . . . . . . . . . . . . . . . . . . . . . . . 4-118
• Non-operational conditions . . . . . . . . . . . . . . . . . . . 4-119• Self-diagnosis . . . . . . . . . . . . . . . . . . . . . . . . . . . . . . . 4-121
Rearview camera . . . . . . . . . . . . . . . . . . . . . . . . . 4-122
Hazard warning flasher . . . . . . . . . . . . . . . . . . . . 4-123
Lighting . . . . . . . . . . . . . . . . . . . . . . . . . . . . . . . . . 4-124
• Battery saver function. . . . . . . . . . . . . . . . . . . . . . . . 4-124
• Headlamp delay function . . . . . . . . . . . . . . . . . . . . . 4-124
• Daytime running light . . . . . . . . . . . . . . . . . . . . . . . . 4-125
• Lighting control . . . . . . . . . . . . . . . . . . . . . . . . . . . . . 4-125
• High - beam operation . . . . . . . . . . . . . . . . . . . . . . . 4-127
• Turn signals and lane change signals . . . . . . . . . . . 4-128
• Front fog light . . . . . . . . . . . . . . . . . . . . . . . . . . . . . . 4-129
Wipers and washers . . . . . . . . . . . . . . . . . . . . . . . 4-130
• Windshield wipers (front) . . . . . . . . . . . . . . . . . . . . . 4-130
• Windshield washers (front) . . . . . . . . . . . . . . . . . . . 4-132
• Rear window wiper and washer switch. . . . . . . . . . 4-133
Interior light . . . . . . . . . . . . . . . . . . . . . . . . . . . . . 4-134
• Interior lamp AUTO cut . . . . . . . . . . . . . . . . . . . . . . 4-134
• Map lamp . . . . . . . . . . . . . . . . . . . . . . . . . . . . . . . . . . 4-134
• Room lamp . . . . . . . . . . . . . . . . . . . . . . . . . . . . . . . . . 4-135
• Luggage room lamp . . . . . . . . . . . . . . . . . . . . . . . . . 4-136
• Vanity mirror lamp . . . . . . . . . . . . . . . . . . . . . . . . . . 4-136
Welcome system . . . . . . . . . . . . . . . . . . . . . . . . . . 4-137
• Headlamp welcome . . . . . . . . . . . . . . . . . . . . . . . . . . 4-137
• Interior light. . . . . . . . . . . . . . . . . . . . . . . . . . . . . . . . 4-137
• Puddle lamp and pocket lamp . . . . . . . . . . . . . . . . . 4-137
4
Page 155 of 785
Features of your vehicle
62 4
MIRRORS
Inside rearview mirror
Adjust the rearview mirror so that the
center view through the rear window
is seen. Make this adjustment before
you start driving.
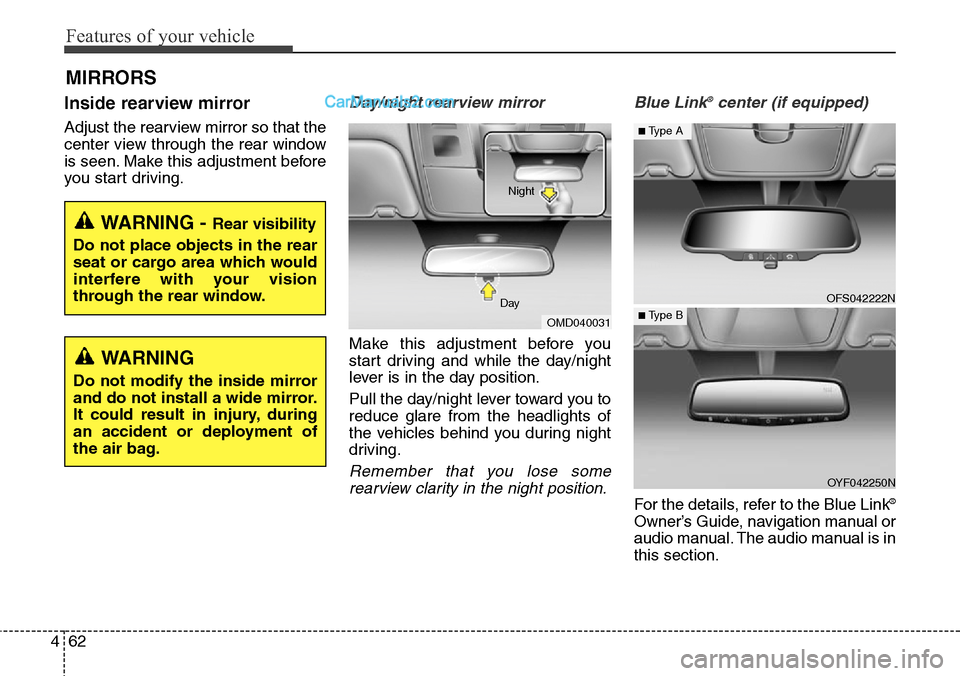
Day/night rearview mirror
Make this adjustment before you
start driving and while the day/night
lever is in the day position.
Pull the day/night lever toward you to
reduce glare from the headlights of
the vehicles behind you during night
driving.
Remember that you lose some
rearview clarity in the night position.Blue Link
®center (if equipped)
For the details, refer to the Blue Link®
Owner’s Guide, navigation manual or
audio manual. The audio manual is in
this section.
WARNING - Rear visibility
Do not place objects in the rear
seat or cargo area which would
interfere with your vision
through the rear window.
OMD040031 DayNight
WARNING
Do not modify the inside mirror
and do not install a wide mirror.
It could result in injury, during
an accident or deployment of
the air bag.
OFS042222N
OYF042250N
■Type A
■ Type B
Page 156 of 785
463
Features of your vehicle
Electric chromic mirror (ECM)
with compass
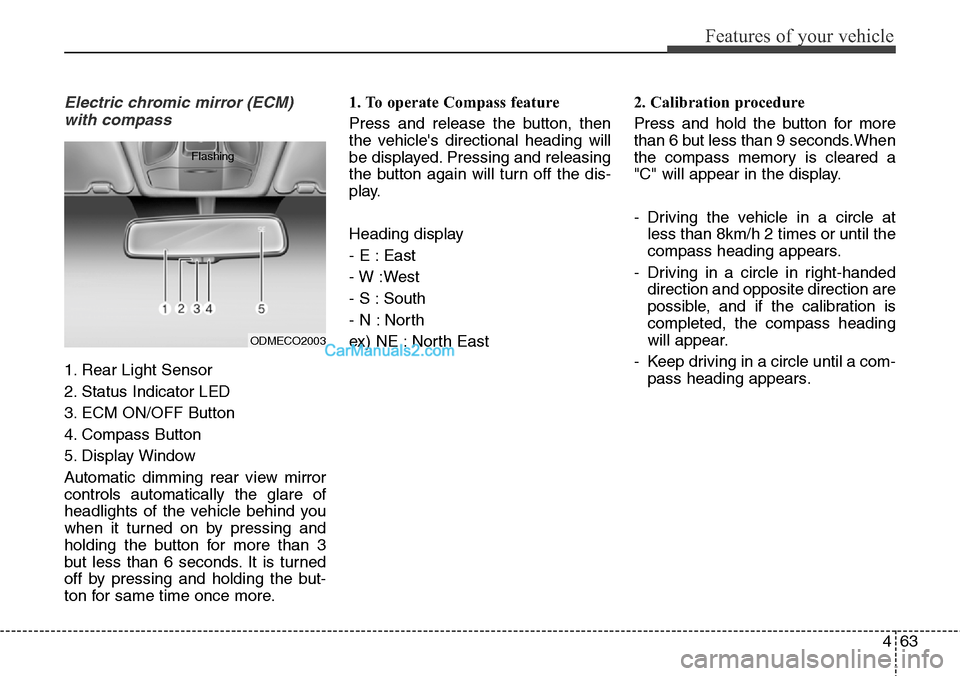
1. Rear Light Sensor
2. Status Indicator LED
3. ECM ON/OFF Button
4. Compass Button
5. Display Window
Automatic dimming rear view mirror
controls automatically the glare of
headlights of the vehicle behind you
when it turned on by pressing and
holding the button for more than 3
but less than 6 seconds. It is turned
off by pressing and holding the but-
ton for same time once more.1. To operate Compass feature
Press and release the button, then
the vehicle's directional heading will
be displayed. Pressing and releasing
the button again will turn off the dis-
play.
Heading display
- E : East
- W :West
- S : South
- N : North
ex) NE : North East2. Calibration procedure
Press and hold the button for more
than 6 but less than 9 seconds.When
the compass memory is cleared a
"C" will appear in the display.
- Driving the vehicle in a circle at
less than 8km/h 2 times or until the
compass heading appears.
- Driving in a circle in right-handed
direction and opposite direction are
possible, and if the calibration is
completed, the compass heading
will appear.
- Keep driving in a circle until a com-
pass heading appears.
ODMECO2003 Flashing
Page 158 of 785
465
Features of your vehicle
4. Changing Mirror Angle setting
(if equipped):
Due to mirror positions being angled
towards the driver, the compass mir-
ror can also compensate for drivers
seated on the Left Hand side of the
vehicle (steering wheel on the LH
side of the vehicle) or Right Hand
side of the vehicle (steering wheel on
the RH side of the vehicle).
To adjust the Left Hand, "L" or Right
Hand, "R", setting:
1. Press and hold the button for more
than 12 seconds.
2. Release then press the button to
toggle between "L" and "R".
✽NOTICE
This procedure also causes the com-
pass to be de-calibrated.
3. To re-calibrate the compass, drive
the vehicle in 2 complete circles at
less than 8km/h (5mph).
CAUTION
1. Do not install the ski
rack,antenna, etc. which are
attached to the vehicle by
means of a magnet.They
affect the operation of the
compass.
2. If the compass deviates from
the correct indication soon
after repeated adjustment, we
recommend that you have the
compass checked at an
authorized HYUNDAI dealer.
3. The compass may not indi-
cate the correct compass
point in tunnels or while driv-
ing up or down a steep hill.
(The compass returns to the
correct compass point when
the vehicle moves to an area
where the geomagnetism is
stabilized.)
(Continued)
(Continued)
4. When cleaning the mirror, use
a paper towel or similar mate-
rial dampened with glass
cleaner. Do not spray glass
cleaner directly on the mirror
as that may cause the liquid
cleaner to enter the mirror
housing.
Page 159 of 785
Features of your vehicle
66 4
Electric chromic mirror (ECM)
with compass and HomeLink®
system (if equipped)
Your vehicle may be equipped with a
Gentex Automatic-Dimming Mirror
with a Z-Nav™ Electronic Compass
Display and an Integrated HomeLink
®
Wireless Control System.
During nighttime driving, this feature
will automatically detect and reduce
rearview mirror glare while the com-
pass indicates the direction the vehi-
cle is pointed. The HomeLink
®
Universal Transceiver allows you to
activate your garage door(s), electric
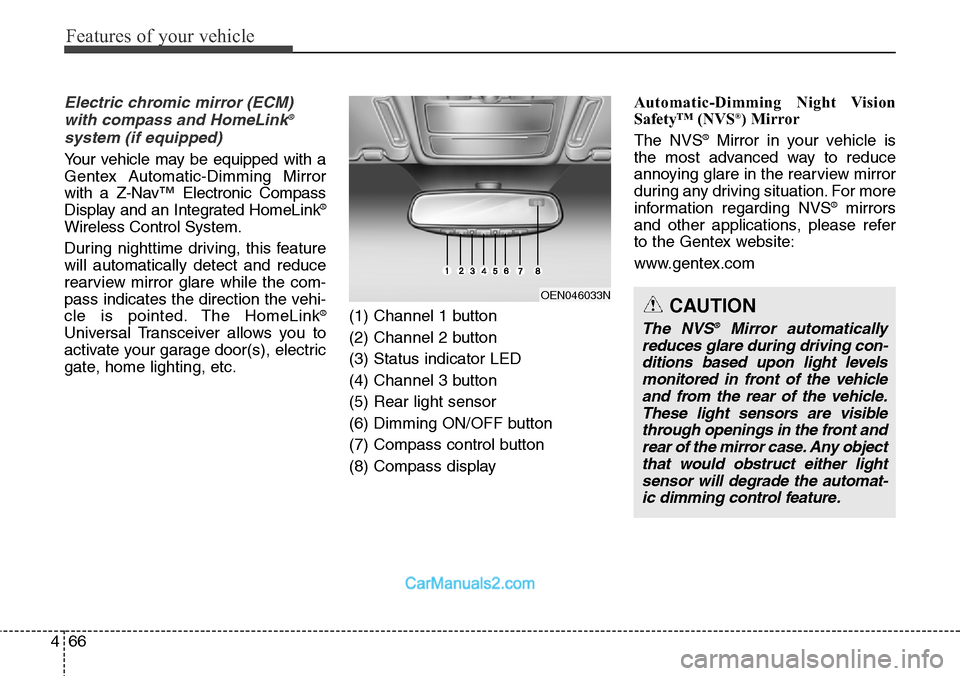
gate, home lighting, etc.(1) Channel 1 button
(2) Channel 2 button
(3) Status indicator LED
(4) Channel 3 button
(5) Rear light sensor
(6) Dimming ON/OFF button
(7) Compass control button
(8) Compass display Automatic-Dimming Night Vision
Safety™ (NVS
®) Mirror
The NVS®Mirror in your vehicle is
the most advanced way to reduce
annoying glare in the rearview mirror
during any driving situation. For more
information regarding NVS
®mirrors
and other applications, please refer
to the Gentex website:
www.gentex.com
OEN046033NCAUTION
The NVS®Mirror automatically
reduces glare during driving con-
ditions based upon light levels
monitored in front of the vehicle
and from the rear of the vehicle.
These light sensors are visible
through openings in the front and
rear of the mirror case. Any object
that would obstruct either light
sensor will degrade the automat-
ic dimming control feature.