Page 20 of 785
27
Your vehicle at a glance
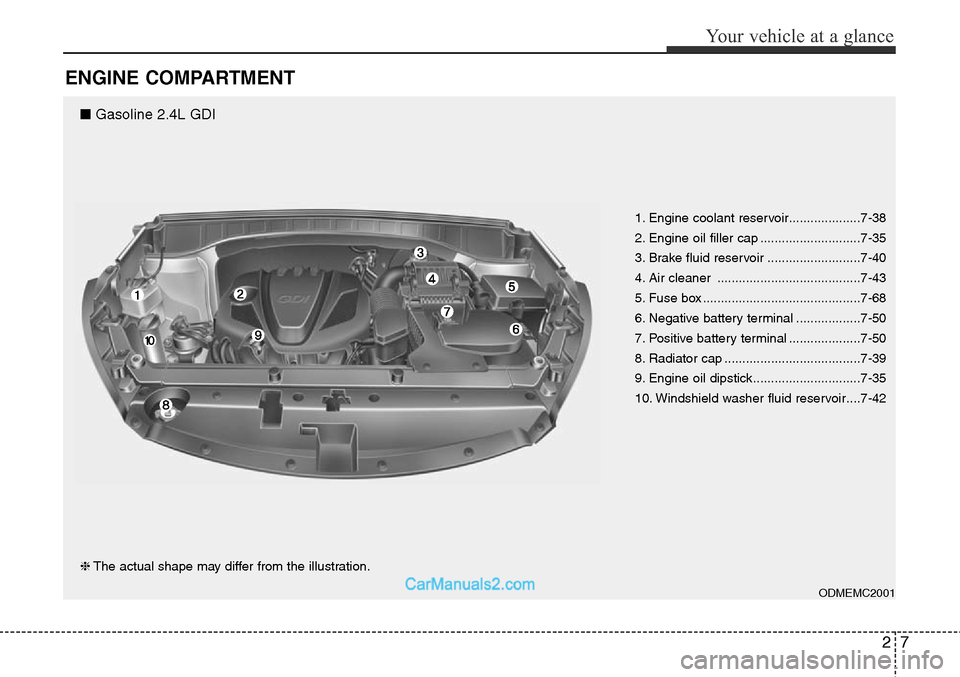
ENGINE COMPARTMENT
ODMEMC2001
❈The actual shape may differ from the illustration.1. Engine coolant reservoir....................7-38
2. Engine oil filler cap ............................7-35
3. Brake fluid reservoir ..........................7-40
4. Air cleaner ........................................7-43
5. Fuse box ............................................7-68
6. Negative battery terminal ..................7-50
7. Positive battery terminal ....................7-50
8. Radiator cap ......................................7-39
9. Engine oil dipstick..............................7-35
10. Windshield washer fluid reservoir....7-42
■ Gasoline 2.4L GDI
Page 21 of 785
Your vehicle at a glance
8 2
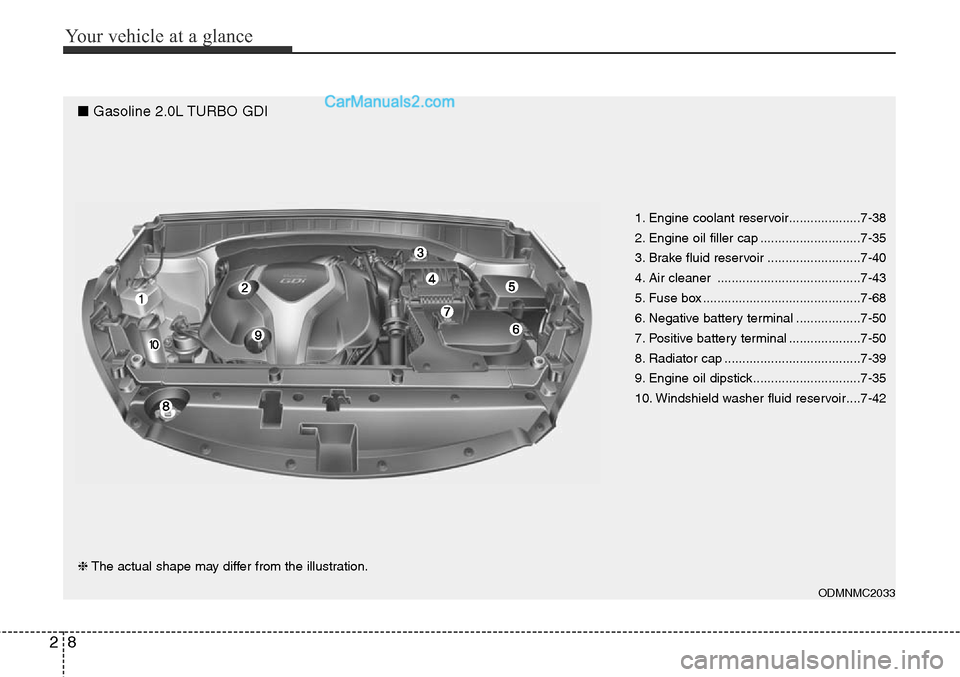
ODMNMC2033
❈The actual shape may differ from the illustration.1. Engine coolant reservoir....................7-38
2. Engine oil filler cap ............................7-35
3. Brake fluid reservoir ..........................7-40
4. Air cleaner ........................................7-43
5. Fuse box ............................................7-68
6. Negative battery terminal ..................7-50
7. Positive battery terminal ....................7-50
8. Radiator cap ......................................7-39
9. Engine oil dipstick..............................7-35
10. Windshield washer fluid reservoir....7-42
■ Gasoline 2.0L TURBO GDI
Page 139 of 785
Features of your vehicle
46 4
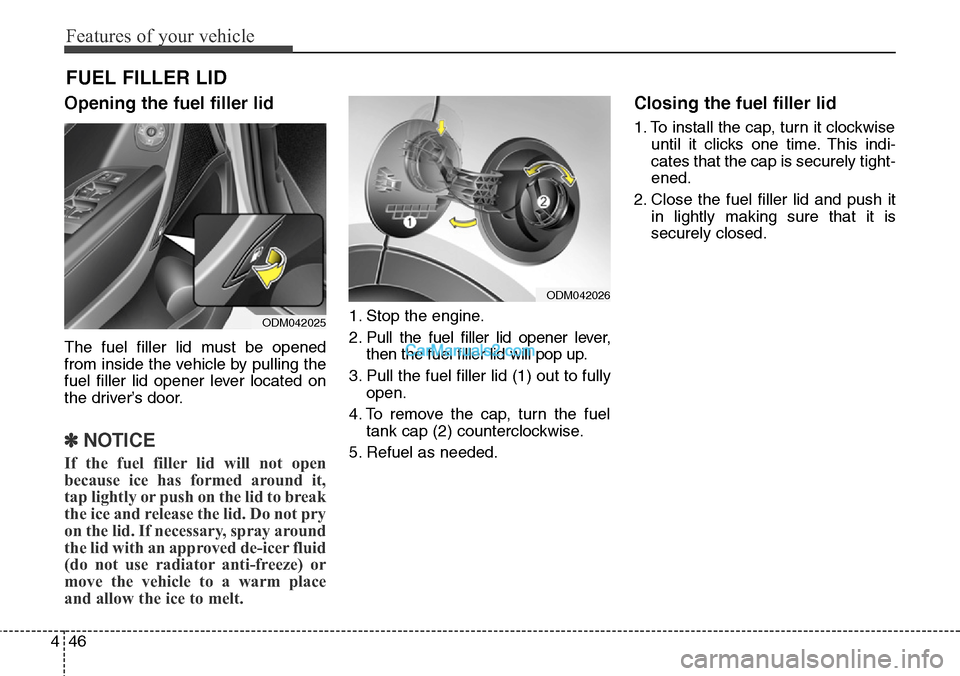
Opening the fuel filler lid
The fuel filler lid must be opened
from inside the vehicle by pulling the
fuel filler lid opener lever located on
the driver’s door.
✽NOTICE
If the fuel filler lid will not open
because ice has formed around it,
tap lightly or push on the lid to break
the ice and release the lid. Do not pry
on the lid. If necessary, spray around
the lid with an approved de-icer fluid
(do not use radiator anti-freeze) or
move the vehicle to a warm place
and allow the ice to melt.
1. Stop the engine.
2. Pull the fuel filler lid opener lever,
then the fuel filler lid will pop up.
3. Pull the fuel filler lid (1) out to fully
open.
4. To remove the cap, turn the fuel
tank cap (2) counterclockwise.
5. Refuel as needed.
Closing the fuel filler lid
1. To install the cap, turn it clockwise
until it clicks one time. This indi-
cates that the cap is securely tight-
ened.
2. Close the fuel filler lid and push it
in lightly making sure that it is
securely closed.
FUEL FILLER LID
ODM042025
ODM042026
Page 174 of 785
481
Features of your vehicle
NVS®is a registered trademark and
Z-Nav™ is a trademark of the
Gentex Corporation, Zeeland,
Michigan. HomeLink
®is a registered
trademark owned by Johnson
Controls, Incorporated, Milwaukee,
Wisconsin.
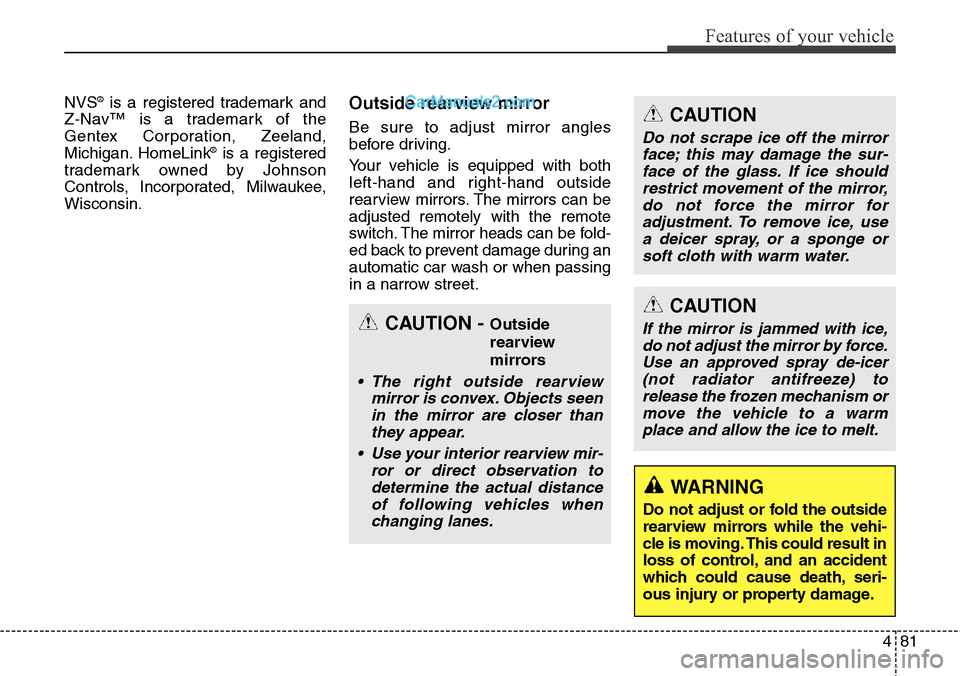
Outside rearview mirror
Be sure to adjust mirror angles
before driving.
Your vehicle is equipped with both
left-hand and right-hand outside
rearview mirrors. The mirrors can be
adjusted remotely with the remote
switch. The mirror heads can be fold-
ed back to prevent damage during an
automatic car wash or when passing
in a narrow street.
CAUTION
If the mirror is jammed with ice,
do not adjust the mirror by force.
Use an approved spray de-icer
(not radiator antifreeze) to
release the frozen mechanism or
move the vehicle to a warm
place and allow the ice to melt.
WARNING
Do not adjust or fold the outside
rearview mirrors while the vehi-
cle is moving. This could result in
loss of control, and an accident
which could cause death, seri-
ous injury or property damage.
CAUTION
Do not scrape ice off the mirror
face; this may damage the sur-
face of the glass. If ice should
restrict movement of the mirror,
do not force the mirror for
adjustment. To remove ice, use
a deicer spray, or a sponge or
soft cloth with warm water.
CAUTION - Outside
rearview
mirrors
• The right outside rearview
mirror is convex. Objects seen
in the mirror are closer than
they appear.
• Use your interior rearview mir-
ror or direct observation to
determine the actual distance
of following vehicles when
changing lanes.
Page 180 of 785
487
Features of your vehicle
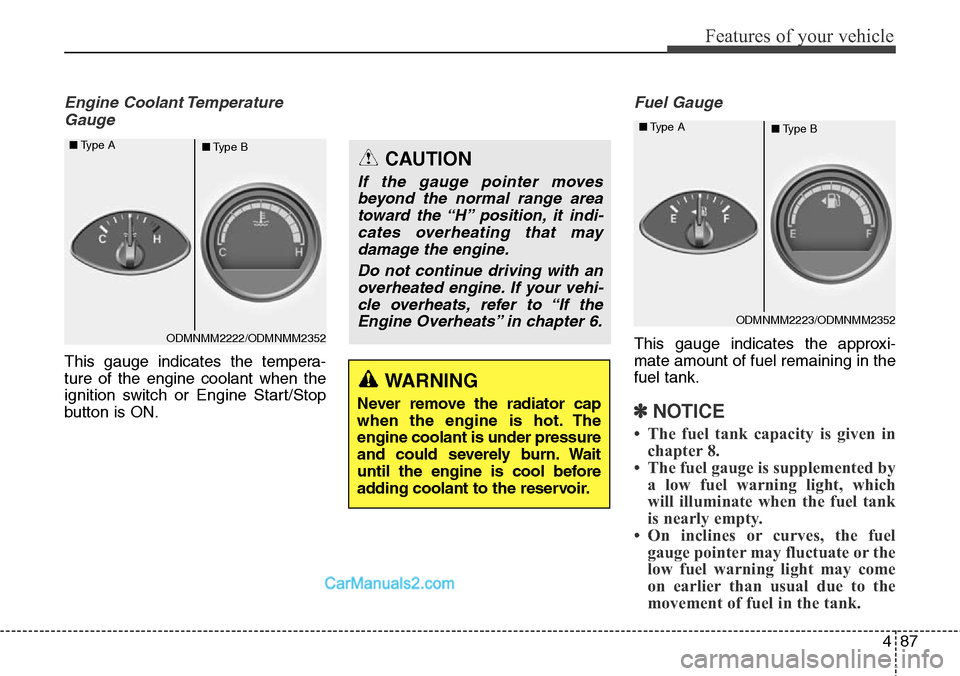
Engine Coolant Temperature
Gauge
This gauge indicates the tempera-
ture of the engine coolant when the
ignition switch or Engine Start/Stop
button is ON.
Fuel Gauge
This gauge indicates the approxi-
mate amount of fuel remaining in the
fuel tank.
✽NOTICE
• The fuel tank capacity is given in
chapter 8.
• The fuel gauge is supplemented by
a low fuel warning light, which
will illuminate when the fuel tank
is nearly empty.
• On inclines or curves, the fuel
gauge pointer may fluctuate or the
low fuel warning light may come
on earlier than usual due to the
movement of fuel in the tank.
WARNING
Never remove the radiator cap
when the engine is hot. The
engine coolant is under pressure
and could severely burn. Wait
until the engine is cool before
adding coolant to the reservoir.
CAUTION
If the gauge pointer moves
beyond the normal range area
toward the “H” position, it indi-
cates overheating that may
damage the engine.
Do not continue driving with an
overheated engine. If your vehi-
cle overheats, refer to “If the
Engine Overheats” in chapter 6.
ODMNMM2222/ODMNMM2352 ■Type A
■Type B
ODMNMM2223/ODMNMM2352 ■Type A
■Type B
Page 659 of 785
What to do in an emergency
8 6
IF THE ENGINE OVERHEATS
If your temperature gauge indicates
overheating, you experience a loss
of power, or hear loud pinging or
knocking, the engine is probably too
hot. If this happens, you should:
1. Pull off the road and stop as soon
as it is safe to do so.
2. Place the shift lever in P and set
the parking brake. If the air condi-
tioning is on, turn it off.
3. If engine coolant is running out
under the car or steam is coming
out from the hood, stop the
engine. Do not open the hood until
the coolant has stopped running
or the steaming has stopped. If
there is no visible loss of engine
coolant and no steam, leave the
engine running and check to be
sure the engine cooling fan is
operating. If the fan is not running,
turn the engine off.4. Check to see if the water pump
drive belt is missing. If it is not
missing, check to see that it is
tight. If the drive belt seems to be
satisfactory, check for coolant
leaking from the radiator, hoses or
under the car. (If the air condition-
ing had been in use, it is normal
for cold water to be draining from it
when you stop.)
5. If the water pump drive belt is bro-
ken or engine coolant is leaking
out, stop the engine immediately
and call the nearest authorized
HYUNDAI dealer for assistance.6. If you cannot find the cause of the
overheating, wait until the engine
temperature has returned to nor-
mal. Then, if coolant has been lost,
carefully add coolant to the reser-
voir to bring the fluid level in the
reservoir up to the halfway mark.
7. Proceed with caution, keeping
alert for further signs of overheat-
ing. If overheating happens again,
call an authorized HYUNDAI deal-
er for assistance.
WARNING
While the engine is running,
keep hair, hands and clothing
away from moving parts such
as the fan and drive belts to pre-
vent injury.
CAUTION
Serious loss of coolant indi-
cates there is a leak in the cool-
ing system and this should be
checked as soon as possible by
an authorized HYUNDAI dealer.
WARNING
Do not remove the radiator cap
when the engine is hot. This
may result in coolant being
blown out of the opening and
cause serious burns.
Page 678 of 785
73
Maintenance
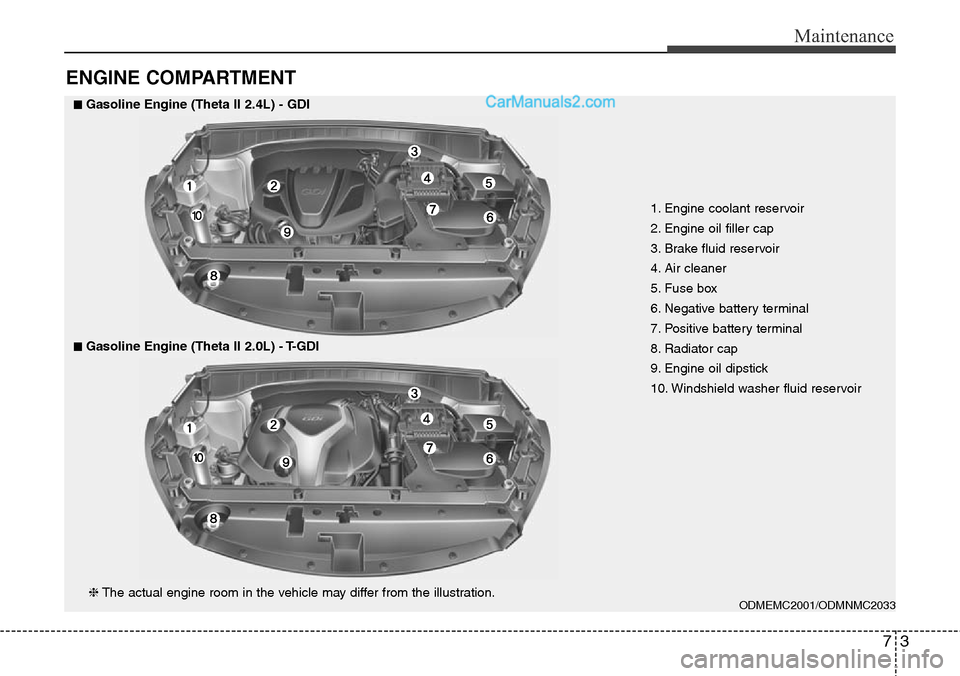
ENGINE COMPARTMENT
1. Engine coolant reservoir
2. Engine oil filler cap
3. Brake fluid reservoir
4. Air cleaner
5. Fuse box
6. Negative battery terminal
7. Positive battery terminal
8. Radiator cap
9. Engine oil dipstick
10. Windshield washer fluid reservoir
ODMEMC2001/ODMNMC2033
■Gasoline Engine (Theta II 2.4L) - GDI
❈The actual engine room in the vehicle may differ from the illustration.
■■Gasoline Engine (Theta II 2.0L) - T-GDI
Page 682 of 785
77
Maintenance
• Check for fluid leaks under your
vehicle (water dripping from the air
conditioning system during or after
use is normal).
At least monthly:
• Check coolant level in the engine
coolant reservoir.
• Check the operation of all exterior
lights, including the stoplights, turn
signals and hazard warning flash-
ers.
• Check the inflation pressures of all
tires including the spare.
At least twice a year
(i.e., every Spring and Fall) :
• Check radiator, heater and air con-
ditioning hoses for leaks or dam-
age.
• Check windshield washer spray
and wiper operation. Clean wiper
blades with clean cloth dampened
with washer fluid.
• Check headlight alignment.
• Check muffler, exhaust pipes,
shields and clamps.
• Check the lap/shoulder belts for
wear and function.
• Check for worn tires and loose
wheel lug nuts.
At least once a year :
• Clean body and door drain holes.
• Lubricate door hinges and checks,
and hood hinges.
• Lubricate door and hood locks and
latches.
• Lubricate door rubber weather-
strips.
• Check the air conditioning system.
• Inspect and lubricate automatic
transaxle linkage and controls.
• Clean battery and terminals.
• Check the brake fluid level.