2015 Hyundai Santa Fe Sport fuses
[x] Cancel search: fusesPage 194 of 785
4101
Features of your vehicle
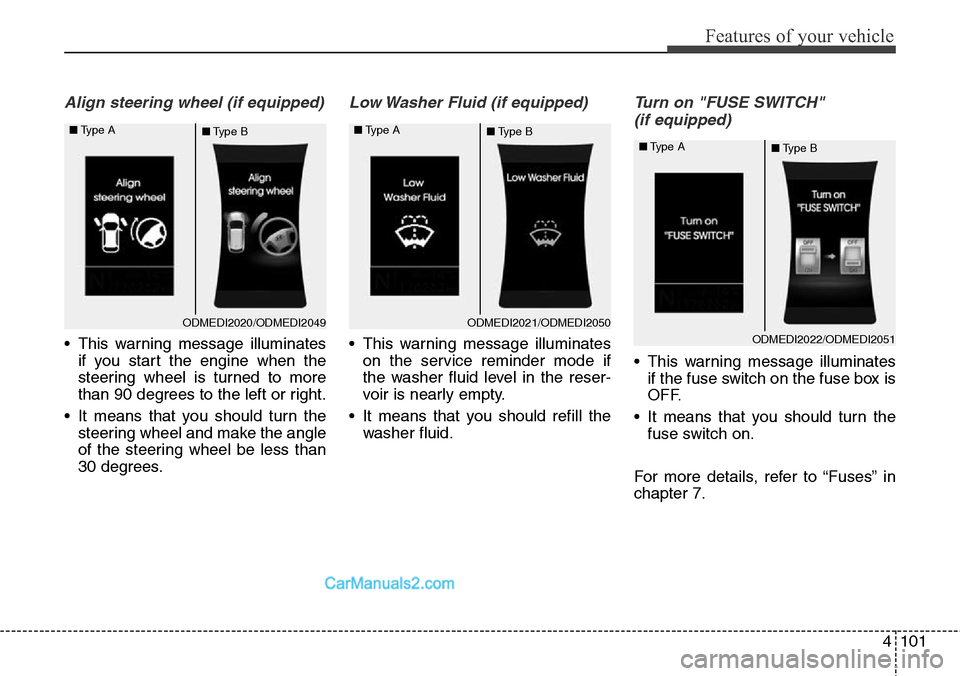
Align steering wheel (if equipped)
• This warning message illuminates
if you start the engine when the
steering wheel is turned to more
than 90 degrees to the left or right.
• It means that you should turn the
steering wheel and make the angle
of the steering wheel be less than
30 degrees.
Low Washer Fluid (if equipped)
• This warning message illuminates
on the service reminder mode if
the washer fluid level in the reser-
voir is nearly empty.
• It means that you should refill the
washer fluid.
Turn on "FUSE SWITCH"
(if equipped)
• This warning message illuminates
if the fuse switch on the fuse box is
OFF.
• It means that you should turn the
fuse switch on.
For more details, refer to “Fuses” in
chapter 7.
ODMEDI2020/ODMEDI2049 ■Type A
■Type BODMEDI2021/ODMEDI2050 ■Type A
■Type B
ODMEDI2022/ODMEDI2051 ■Type A
■Type B
Page 675 of 785
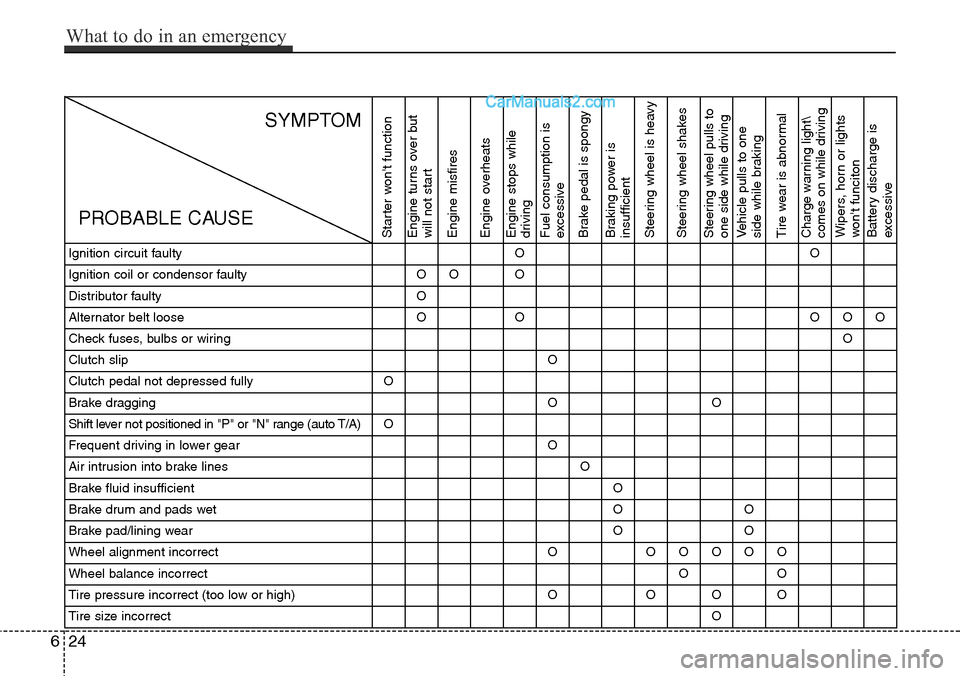
Ignition circuit faultyOO
Ignition coil or condensor faultyOOO
Distributor faultyO
Alternator belt looseOOOOO
Check fuses, bulbs or wiringO
Clutch slipO
Clutch pedal not depressed fullyO
Brake draggingOO
Shift lever not positioned in "P" or "N" range (auto T/A)O
Frequent driving in lower gearO
Air intrusion into brake linesO
Brake fluid insufficientO
Brake drum and pads wetOO
Brake pad/lining wearOO
Wheel alignment incorrectOOOOOO
Wheel balance incorrectOO
Tire pressure incorrect (too low or high)OOOO
Tire size incorrectO
Starter won't function
Engine turns over but
will not start
Engine misfires
Engine overheats
Engine stops while
driving
Fuel consumption is
excessive
Brake pedal is spongy
Braking power is
insufficient
Steering wheel is heavy
Steering wheel shakesSteering wheel pulls to
one side while drivingVehicle pulls to one
side while braking
Tire wear is abnormalCharge warning light\
comes on while drivingWipers, horn or lights
won't funciton
Battery discharge is
excessive
SYMPTOM
PROBABLE CAUSE
624
What to do in an emergency
Page 676 of 785
Maintenance
Engine compartment . . . . . . . . . . . . . . . . . . . . . . . . 7-3
Maintenance services . . . . . . . . . . . . . . . . . . . . . . . . 7-4
• Owner’s responsibility . . . . . . . . . . . . . . . . . . . . . . . . . 7-4
• Owner maintenance precautions . . . . . . . . . . . . . . . . . 7-5
Owner maintenance . . . . . . . . . . . . . . . . . . . . . . . . . 7-6
• Owner maintenance schedule. . . . . . . . . . . . . . . . . . . . 7-6
Scheduled maintenance service. . . . . . . . . . . . . . . . 7-8
Explanation of scheduled maintenance items . . . 7-32
Engine oil. . . . . . . . . . . . . . . . . . . . . . . . . . . . . . . . . 7-35
• Checking the engine oil level . . . . . . . . . . . . . . . . . . . 7-35
• Changing the engine oil and filter . . . . . . . . . . . . . . . 7-36
Engine coolant . . . . . . . . . . . . . . . . . . . . . . . . . . . . 7-37
• Checking the coolant level . . . . . . . . . . . . . . . . . . . . . 7-37
• Changing the coolant . . . . . . . . . . . . . . . . . . . . . . . . . 7-39
Brake fluid . . . . . . . . . . . . . . . . . . . . . . . . . . . . . . . 7-40
• Checking the brake fluid level . . . . . . . . . . . . . . . . . . 7-40
Washer fluid . . . . . . . . . . . . . . . . . . . . . . . . . . . . . . 7-42
• Checking the washer fluid level . . . . . . . . . . . . . . . . . 7-42
Parking brake . . . . . . . . . . . . . . . . . . . . . . . . . . . . . 7-42
• Checking the parking brake. . . . . . . . . . . . . . . . . . . . 7-42
Air cleaner. . . . . . . . . . . . . . . . . . . . . . . . . . . . . . . . 7-43
• Filter replacement . . . . . . . . . . . . . . . . . . . . . . . . . . . . 7-43
Climate control air filter . . . . . . . . . . . . . . . . . . . . 7-45
• Filter inspection . . . . . . . . . . . . . . . . . . . . . . . . . . . . . . 7-45
• Filter replacement . . . . . . . . . . . . . . . . . . . . . . . . . . . . 7-45
Wiper blades . . . . . . . . . . . . . . . . . . . . . . . . . . . . . . 7-47
• Blade inspection . . . . . . . . . . . . . . . . . . . . . . . . . . . . . . 7-47
• Blade replacement . . . . . . . . . . . . . . . . . . . . . . . . . . . . 7-47
Battery . . . . . . . . . . . . . . . . . . . . . . . . . . . . . . . . . . . 7-50
• For best battery service . . . . . . . . . . . . . . . . . . . . . . . 7-50
• Battery recharging . . . . . . . . . . . . . . . . . . . . . . . . . . . 7-51
• Reset items . . . . . . . . . . . . . . . . . . . . . . . . . . . . . . . . . . 7-52
Tires and wheels . . . . . . . . . . . . . . . . . . . . . . . . . . . 7-53
• Tire care . . . . . . . . . . . . . . . . . . . . . . . . . . . . . . . . . . . . 7-53
• Recommended cold tire inflation pressures . . . . . . . 7-53
• Checking tire inflation pressure. . . . . . . . . . . . . . . . . 7-54
• Tire rotation . . . . . . . . . . . . . . . . . . . . . . . . . . . . . . . . . 7-55
• Wheel alignment and tire balance . . . . . . . . . . . . . . . 7-56
• Tire replacement . . . . . . . . . . . . . . . . . . . . . . . . . . . . . 7-57
• Wheel replacement . . . . . . . . . . . . . . . . . . . . . . . . . . . 7-58
• Tire traction . . . . . . . . . . . . . . . . . . . . . . . . . . . . . . . . . 7-58
• Tire maintenance . . . . . . . . . . . . . . . . . . . . . . . . . . . . . 7-59
• Tire sidewall labeling . . . . . . . . . . . . . . . . . . . . . . . . . 7-59
• Low aspect ratio tire . . . . . . . . . . . . . . . . . . . . . . . . . . 7-63
Fuses . . . . . . . . . . . . . . . . . . . . . . . . . . . . . . . . . . . . 7-68
• Fuse/relay panel description. . . . . . . . . . . . . . . . . . . . 7-72
Light bulbs . . . . . . . . . . . . . . . . . . . . . . . . . . . . . . . 7-80
• Front light replacement . . . . . . . . . . . . . . . . . . . . . . . 7-81
• Side repeater light bulb replacement . . . . . . . . . . . . 7-84
• Rear combination light bulb replacement . . . . . . . . 7-85
7
Page 743 of 785
Maintenance
68 7
FUSES
A vehicle’s electrical system is pro-
tected from electrical overload dam-
age by fuses.This vehicle has 2 fuse panels, one
located in the driver’s side panel bol-
ster, the other in the engine compart-
ment near the battery.
If any of your vehicle’s lights, acces-
sories, or controls do not work, check
the appropriate circuit fuse. If a fuse
has blown, the element inside the
fuse will be melted.
If the electrical system does not
work, first check the driver’s side
fuse panel.
Always replace a blown fuse with
one of the same rating.
Before replacing an open fuse, dis-
connect the negative battery cable.
If the replacement fuse blows, this
indicates an electrical problem. Avoid
using the system involved and imme-
diately consult an authorized
HYUNDAI dealer.
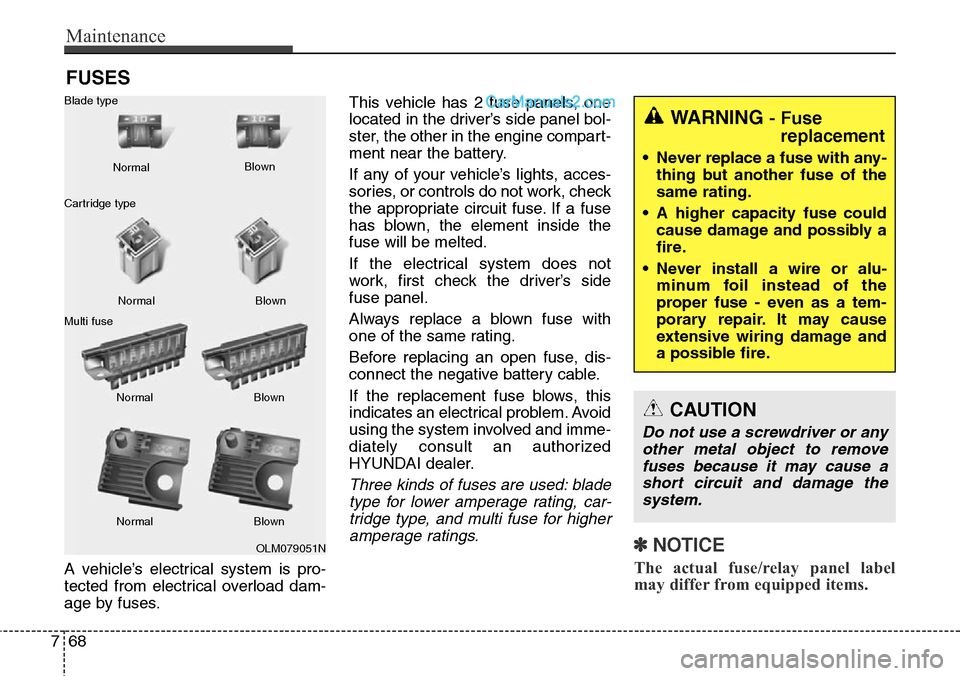
Three kinds of fuses are used: blade
type for lower amperage rating, car-
tridge type, and multi fuse for higher
amperage ratings.
✽NOTICE
The actual fuse/relay panel label
may differ from equipped items.
OLM079051N Normal Normal Blade type
Cartridge type
Multi fuseBlown
Blown
Normal Blown
Normal Blown
WARNING - Fuse
replacement
• Never replace a fuse with any-
thing but another fuse of the
same rating.
• A higher capacity fuse could
cause damage and possibly a
fire.
• Never install a wire or alu-
minum foil instead of the
proper fuse - even as a tem-
porary repair. It may cause
extensive wiring damage and
a possible fire.
CAUTION
Do not use a screwdriver or any
other metal object to remove
fuses because it may cause a
short circuit and damage the
system.
Page 744 of 785
769
Maintenance
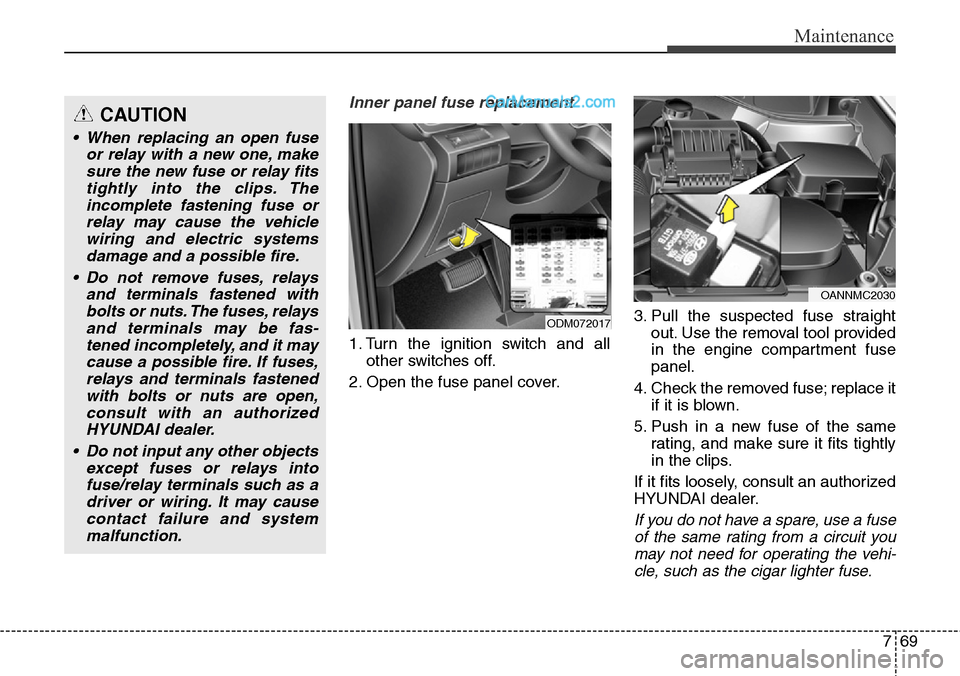
Inner panel fuse replacement
1. Turn the ignition switch and all
other switches off.
2. Open the fuse panel cover.3. Pull the suspected fuse straight
out. Use the removal tool provided
in the engine compartment fuse
panel.
4. Check the removed fuse; replace it
if it is blown.
5. Push in a new fuse of the same
rating, and make sure it fits tightly
in the clips.
If it fits loosely, consult an authorized
HYUNDAI dealer.
If you do not have a spare, use a fuse
of the same rating from a circuit you
may not need for operating the vehi-
cle, such as the cigar lighter fuse.
ODM072017
OANNMC2030
CAUTION
• When replacing an open fuse
or relay with a new one, make
sure the new fuse or relay fits
tightly into the clips. The
incomplete fastening fuse or
relay may cause the vehicle
wiring and electric systems
damage and a possible fire.
• Do not remove fuses, relays
and terminals fastened with
bolts or nuts. The fuses, relays
and terminals may be fas-
tened incompletely, and it may
cause a possible fire. If fuses,
relays and terminals fastened
with bolts or nuts are open,
consult with an authorized
HYUNDAI dealer.
• Do not input any other objects
except fuses or relays into
fuse/relay terminals such as a
driver or wiring. It may cause
contact failure and system
malfunction.
Page 745 of 785
Maintenance
70 7
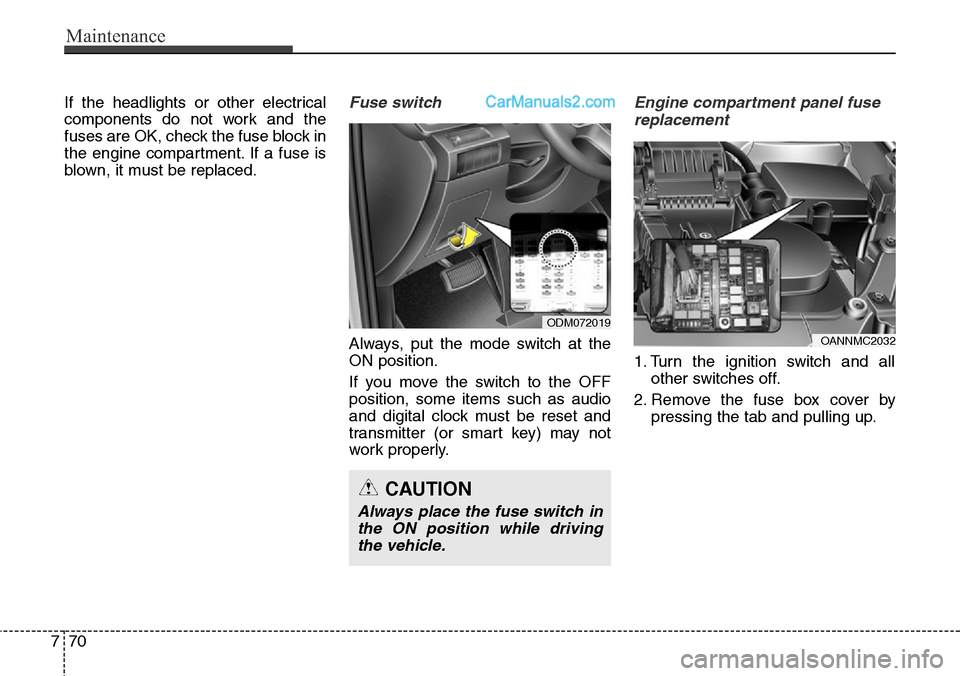
If the headlights or other electrical
components do not work and the
fuses are OK, check the fuse block in
the engine compartment. If a fuse is
blown, it must be replaced.Fuse switch
Always, put the mode switch at the
ON position.
If you move the switch to the OFF
position, some items such as audio
and digital clock must be reset and
transmitter (or smart key) may not
work properly.
Engine compartment panel fuse
replacement
1. Turn the ignition switch and all
other switches off.
2. Remove the fuse box cover by
pressing the tab and pulling up.
ODM072019
CAUTION
Always place the fuse switch in
the ON position while driving
the vehicle.
OANNMC2032