Page 170 of 785

477
Features of your vehicle
Retain the original transmitter of the
RF device you are programming for
use in other vehicles as well as for
future HomeLink
®programming. It is
also suggested that upon the sale of
the vehicle, the programmed
HomeLink
®buttons be erased for
security purposes.Programming HomeLink
®
✽NOTICE
• When programming a garage
door opener, it is advised to park
the vehicle outside of the garage.
• It is recommended that a new bat-
tery be placed in the hand-held
transmitter of the device being pro-
grammed to HomeLink
®for quick-
er training and accurate transmis-
sion of the radio-frequency signal.
• Some vehicles may require the
ignition switch to be turned to the
second (or "accessories") position
for programming and/or opera-
tion of HomeLink.
• In the event that there are still pro-
gramming difficulties or questions
after following the programming
steps listed below, contact
HomeLink
®at: www.homelink.com
or 1-800-355-3515.
WARNING
Before programming HomeLink®
to a garage door opener or gate
operator, make sure that people
and objects are out of the way of
the device to prevent potential
harm or damage. Do not use
HomeLink
®with any garage
door opener that lacks the safe-
ty stop and reverse features
required by U.S. federal safety
standards (this includes any
garage door opener model man-
ufactured before April 1, 1982).
A garage door that cannot
detect an object - signaling the
door to stop and reverse - does
not meet current U.S. federal
safety standards. Using a
garage door opener without
these features increases the
risk of serious injury or death.
Page 172 of 785

479
Features of your vehicle
4. Firmly press, hold for 5 seconds
and release the programmed
HomeLink
®button up to two sepa-
rate times to activate the door. If the
door does not activate, press and
hold the just-trained HomeLink
®but-
ton and observe the indicator light.
• If the indicator light stays on con-
stantly, programming is complete
and your device should activate
when the HomeLink
®button is
pressed and released.
• If the indicator light blinks rapidly
for 2 seconds and then turns to a
constant light, continue with
"Programming" steps 5-7 to com-
plete the programming of a rolling
code equipped device (most com-
monly a garage door opener).
5. At the garage door opener receiv-
er (motor-head unit) in the garage,
locate the "learn" or "smart" but-
ton. This can usually be found
where the hanging antenna wire is
attached to the motor-head unit.6. Firmly press and release the
"learn" or "smart" button. (The
name and color of the button vary
by manufacturer). There are 30
seconds to initiate step 7.
7. Return to the vehicle and firmly
press, hold for 2 seconds and
release the programmed
HomeLink
®button. Repeat the
"press/hold/release" sequence a
second time, and, depending on
the brand of the garage door
opener (or other rolling code
equipped device), repeat this
sequence a third time to complete
the programming process.
HomeLink
®should now activate your
rolling code equipped device.Gate operator & Canadian pro-
gramming
During programming, your handheld
transmitter may automatically stop
transmitting. Continue to press the
Integrated HomeLink
®Wireless
Control System button (note steps 2
through 3 in the Programming portion
of this document) while you press
and re-press ("cycle") your handheld
transmitter every two seconds until
the frequency signal has been
learned. The indicator light will flash
slowly and then rapidly after several
seconds upon successful training.
Operating HomeLink
®
To operate, simply press and release
the programmed HomeLink®button.
Activation will now occur for the
trained device (i.e. garage door
opener, gate operator, security sys-
tem, entry door lock, home/office
lighting, etc.). For convenience, the
hand-held transmitter of the device
may also be used at any time.
Page 195 of 785
Features of your vehicle
102 4
Check fuel cap
• It means that the fuel filler cap is
not tightened securely.
ODMEDI2024/ODMEDI2053 ■Type A
■Type B
Page 206 of 785
4113
Features of your vehicle
Door Ajar Warning Light
This warning light illuminates:
When a door is not closed securely.
Tailgate Open Warning
Light
This warning light illuminates:
When the tailgate is not closed
securely.
All Wheel Drive (AWD)
Warning Light
(if equipped)
This warning light illuminates:
• Once you set the ignition switch or
Engine Start/Stop Button to the ON
position.
- It illuminates for approximately 3
seconds and then goes off.
• When there is a malfunction with
the AWD system.
In this case, have your vehicle
inspected by an authorized
HYUNDAI dealer.
Page 253 of 785
Features of your vehicle
160 4
Center console storage
To open the center console storage,
pull up the lever.
Glove box
The glove box can be locked and
unlocked with the mechanical key (1).
To open the glove box, push the but-
ton (2) and the glove box will auto-
matically open (3). Close the glove
box after use.
STORAGE COMPARTMENTS
WARNING - Flammable
materials
Do not store cigarette lighters,
propane cylinders, or other
flammable/explosive materials
in the vehicle. These items may
catch fire and/or explode if the
vehicle is exposed to hot tem-
peratures for extended periods.
CAUTION
• To avoid possible theft, do not
leave valuables in the storage
compartments.
• Always keep the storage com-
partment covers closed while
driving. Do not attempt to
place so many items in the
storage compartment that the
storage compartment cover
cannot close securely.
ODM042304
ODMECO2033
ODMECO2032
■Type A
■Type B
Page 256 of 785
4 163
Features of your vehicle
INTERIOR FEATURES
Cup holder
Cups or small beverage cans may be
placed in the cup holders.
To use the center cup holder, pull
down the armrest and press the open
button.
WARNING - Hot liquids
• Do not place uncovered cups
of hot liquid in the cup holder
while the vehicle is in motion.
If the hot liquid spills, you may
burn yourself. Such a burn to
the driver could lead to loss of
control of the vehicle.
• To reduce the risk of personal
injury in the event of sudden
stop or collision, do not place
uncovered or unsecured bot-
tles, glasses, cans, etc., in the
cup holder while the vehicle is
in motion.
WARNING
Keep cans or bottles out of
direct sun light and do not put
leave them in a hot vehicle.
The container/contents may
explode.
OANNCO43014
ODM042316
■Front
■Rear (if equipped)
CAUTION
When cleaning spilled liquids,
do not dry the cup holder at
high temperatures. This may
damage the chrome part of the
cup holder.
Page 260 of 785

4167
Features of your vehicle
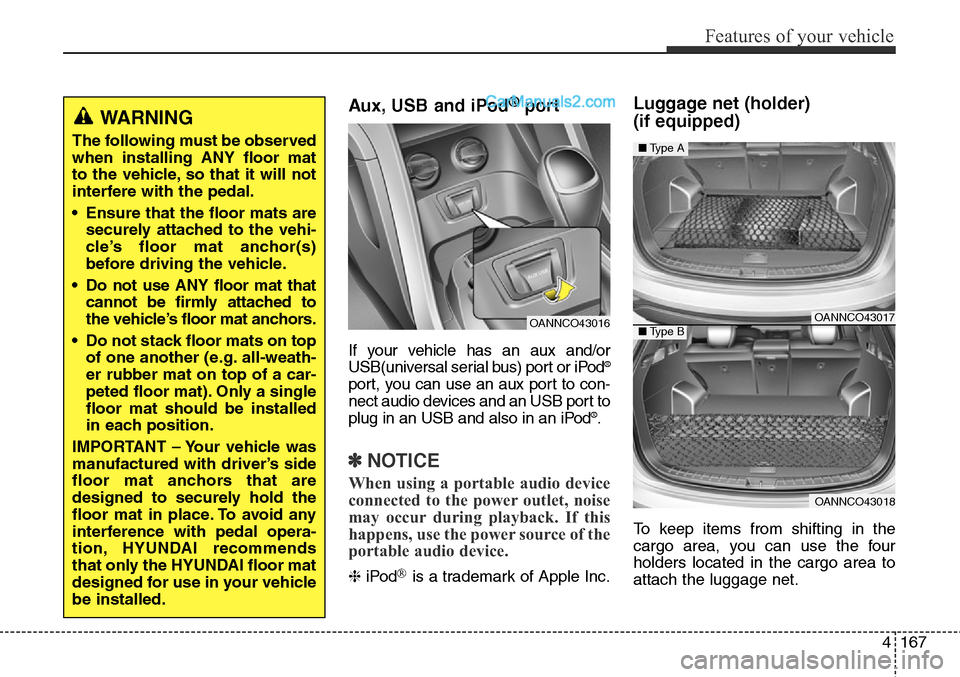
Aux, USB and iPod®port
If your vehicle has an aux and/or
USB(universal serial bus) port or iPod®
port, you can use an aux port to con-
nect audio devices and an USB port to
plug in an USB and also in an iPod
®.
✽NOTICE
When using a portable audio device
connected to the power outlet, noise
may occur during playback. If this
happens, use the power source of the
portable audio device.
❈iPod®is a trademark of Apple Inc.
Luggage net (holder)
(if equipped)
To keep items from shifting in the
cargo area, you can use the four
holders located in the cargo area to
attach the luggage net.
WARNING
The following must be observed
when installing ANY floor mat
to the vehicle, so that it will not
interfere with the pedal.
• Ensure that the floor mats are
securely attached to the vehi-
cle’s floor mat anchor(s)
before driving the vehicle.
• Do not use ANY floor mat that
cannot be firmly attached to
the vehicle’s floor mat anchors.
• Do not stack floor mats on top
of one another (e.g. all-weath-
er rubber mat on top of a car-
peted floor mat). Only a single
floor mat should be installed
in each position.
IMPORTANT – Your vehicle was
manufactured with driver’s side
floor mat anchors that are
designed to securely hold the
floor mat in place. To avoid any
interference with pedal opera-
tion, HYUNDAI recommends
that only the HYUNDAI floor mat
designed for use in your vehicle
be installed.
OANNCO43016OANNCO43017
OANNCO43018
■Type A
■Type B
Page 261 of 785

Features of your vehicle
168 4
If necessary, contact your authorized
HYUNDAI dealer to obtain a luggage
net.
✽NOTICE
Vehicles equipped with a luggage
rail system may use the shackles to
hook the luggage net.
Cargo security screen
(if equipped)
Use the cargo security screen to
hide items stored in the cargo area.
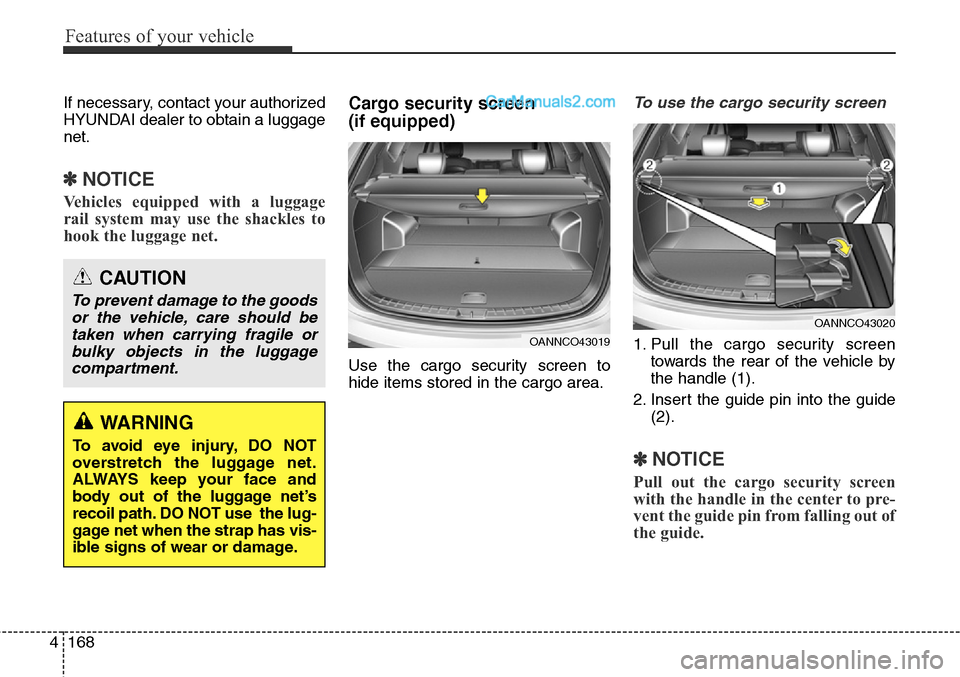
To use the cargo security screen
1. Pull the cargo security screen
towards the rear of the vehicle by
the handle (1).
2. Insert the guide pin into the guide
(2).
✽NOTICE
Pull out the cargo security screen
with the handle in the center to pre-
vent the guide pin from falling out of
the guide.
WARNING
To avoid eye injury, DO NOT
overstretch the luggage net.
ALWAYS keep your face and
body out of the luggage net’s
recoil path. DO NOT use the lug-
gage net when the strap has vis-
ible signs of wear or damage.
CAUTION
To prevent damage to the goods
or the vehicle, care should be
taken when carrying fragile or
bulky objects in the luggage
compartment.
OANNCO43019
OANNCO43020