2015 Hyundai Santa Fe Sport ECU
[x] Cancel search: ECUPage 63 of 785
Safety features of your vehicle
42 3
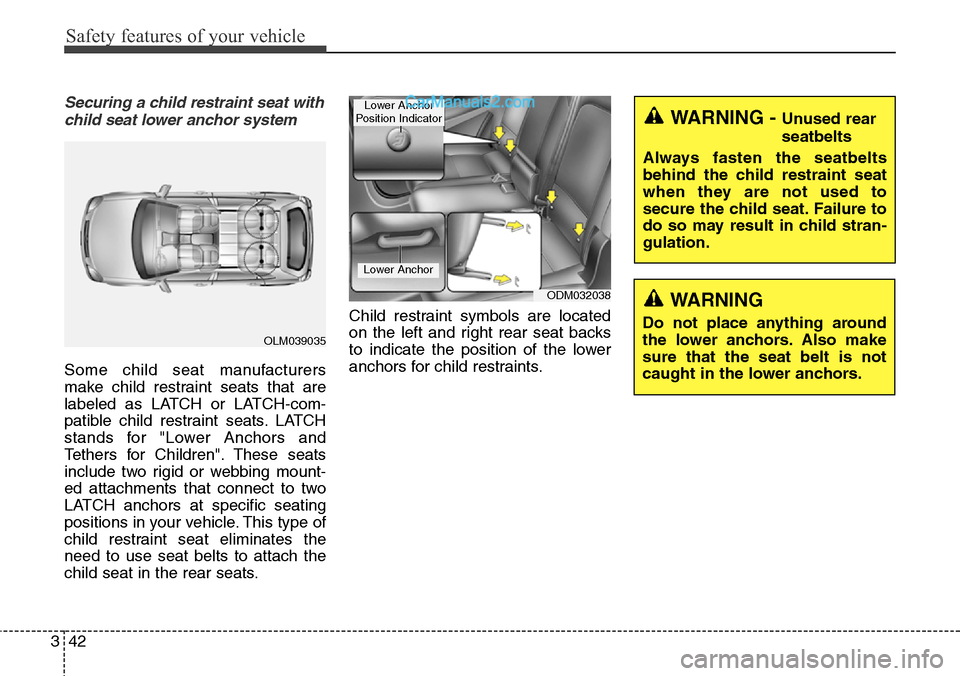
Securing a child restraint seat with
child seat lower anchor system
Some child seat manufacturers
make child restraint seats that are
labeled as LATCH or LATCH-com-
patible child restraint seats. LATCH
stands for "Lower Anchors and
Tethers for Children". These seats
include two rigid or webbing mount-
ed attachments that connect to two
LATCH anchors at specific seating
positions in your vehicle. This type of
child restraint seat eliminates the
need to use seat belts to attach the
child seat in the rear seats.Child restraint symbols are located
on the left and right rear seat backs
to indicate the position of the lower
anchors for child restraints.
OLM039035
WARNING - Unused rear
seatbelts
Always fasten the seatbelts
behind the child restraint seat
when they are not used to
secure the child seat. Failure to
do so may result in child stran-
gulation.
WARNING
Do not place anything around
the lower anchors. Also make
sure that the seat belt is not
caught in the lower anchors.
ODM032038
Lower Anchor
Lower Anchor
Position Indicator
Page 77 of 785
Safety features of your vehicle
56 3
WARNING
• Even though your vehicle is
equipped with the occupant
classification system, never
install a child restraint system
in the front passenger's seat.
A deploying air bag can force-
fully strike a child resulting in
serious injuries or death. Any
child age 12 and under should
ride in the rear seat. Children
too large for child restraints
should use the available
lap/shoulder belts. No matter
what type of crash, children of
all ages are safer when
restrained in the rear seat.
(Continued)
(Continued)
• If the PASS AIR BAG "OFF"
indicator is illuminated when
the front passenger's seat is
occupied by an adult and
he/she sits properly (sitting
upright with the seatback in
an upright position, centered
on the seat cushion with their
seat belt on, legs comfortably
extended and their feet on the
floor), have that person sit in
the rear seat.
• Do not modify or replace the
front passenger seat. Don't
place anything on or attach
anything such as a blanket or
seat heater to the front pas-
senger seat. This can adverse-
ly affect the occupant classifi-
cation system.
• Do not sit on sharp objects
such as tools when occupying
the front passenger seat. This
can adversely affect the occu-
pant classification system.
(Continued)(Continued)
• Do not use accessory seat
covers on the front seats.
• Accident statistics show that
children are safer if they are
restrained in the rear, as
opposed to the front seat. It is
recommended that child
restraints be secured in a rear
seat, including an infant riding
in a rear-facing infant seat, a
child riding in a forward-fac-
ing child seat and an older
child riding in a booster seat.
• Air bags can only be used
once – have an authorized
HYUNDAI dealer replace the
air bag immediately after
deployment.
(Continued)
Page 85 of 785
Safety features of your vehicle
64 3
They are designed to help protect
occupants in certain side impacts
and to help prevent them from eject-
ing out of the vehicle as a result of a
rollover, especially when the seat-
belts are also in use.
• The curtain air bags are designed
to deploy during certain side
impact collisions, depending on the
crash severity, angle, speed and
point of impact.
However, when side deployment
threshold is satisfied at frontim-
pact, curtain air bags may deploy.
• The curtain air bags do not only
deploy on the side of the impact
but also on the opposite side.
• Also, the curtain air bags on both
sides of the vehicle will deploy in
certain rollover situations.
• The curtain air bags are not
designed to deploy in all side
impact or rollover situations.(Continued)
• Do not allow the passengers
to lean their heads or bodies
onto doors, put their arms on
the doors, stretch their arms
out of the window, or place
objects between the doors
and passengers when they are
seated on seats equipped with
side and/or curtain air bags.
• Never try to open or repair any
components of the side cur-
tain air bag system. This
should only be done by an
authorized HYUNDAI dealer.
Failure to follow the above
instructions can result in injury
or death to the vehicle occu-
pants in an accident.WARNING
• In order for side and curtain
air bags to provide the best
protection, front seat occu-
pants and outboard rear occu-
pants should sit in an upright
position with the seat belts
properly fastened.
Importantly, children should
sit in a proper child restraint
system in the rear seat.
• When children are seated in
the rear outboard seats, they
must be seated in the proper
child restraint system. Make
sure to put the child restraint
system as far away from the
door side as possible, and
secure the child restraint sys-
tem in a locked position.
(Continued)
Page 96 of 785
Defroster . . . . . . . . . . . . . . . . . . . . . . . . . . . . . . . . 4-138
• Rear window defroster . . . . . . . . . . . . . . . . . . . . . . . 4-138
• Front wiper deicer . . . . . . . . . . . . . . . . . . . . . . . . . . . 4-138
Manual climate control system . . . . . . . . . . . . . . 4-139
• Heating and air conditioning . . . . . . . . . . . . . . . . . . 4-140
• System operation . . . . . . . . . . . . . . . . . . . . . . . . . . . . 4-145
• Climate control air filter. . . . . . . . . . . . . . . . . . . . . . 4-147
• Refrigerant and compressor lubricant . . . . . . . . . . 4-147
Automatic climate control system . . . . . . . . . . . 4-148
• Automatic heating and air conditioning . . . . . . . . . 4-149
• Manual heating and air conditioning . . . . . . . . . . . 4-150
Windshield defrosting and defogging . . . . . . . . . 4-156
• Manual climate control system . . . . . . . . . . . . . . . . 4-156
• Automatic climate control system . . . . . . . . . . . . . . 4-157
Storage compartment . . . . . . . . . . . . . . . . . . . . . . 4-160
• Center console storage . . . . . . . . . . . . . . . . . . . . . . . 4-160
• Glove box . . . . . . . . . . . . . . . . . . . . . . . . . . . . . . . . . . 4-160
• Multi box . . . . . . . . . . . . . . . . . . . . . . . . . . . . . . . . . . 4-161
• Sunglass holder . . . . . . . . . . . . . . . . . . . . . . . . . . . . . 4-161
• Luggage tray . . . . . . . . . . . . . . . . . . . . . . . . . . . . . . . 4-162
Interior features . . . . . . . . . . . . . . . . . . . . . . . . . . 4-163
• Cup holder . . . . . . . . . . . . . . . . . . . . . . . . . . . . . . . . . 4-163
• Sunvisor . . . . . . . . . . . . . . . . . . . . . . . . . . . . . . . . . . . 4-164
• Power outlet . . . . . . . . . . . . . . . . . . . . . . . . . . . . . . . . 4-164
• Clothes hanger . . . . . . . . . . . . . . . . . . . . . . . . . . . . . . 4-166• Floor mat anchor(s). . . . . . . . . . . . . . . . . . . . . . . . . . 4-166
• Aux, USB and iPod
®port . . . . . . . . . . . . . . . . . . . . . 4-167
• Luggage net (holder) . . . . . . . . . . . . . . . . . . . . . . . . . 4-167
• Cargo security screen . . . . . . . . . . . . . . . . . . . . . . . . 4-168
• Side curtain . . . . . . . . . . . . . . . . . . . . . . . . . . . . . . . . 4-170
Exterior features . . . . . . . . . . . . . . . . . . . . . . . . . . 4-171
• Roof rack . . . . . . . . . . . . . . . . . . . . . . . . . . . . . . . . . . 4-171
Audio system . . . . . . . . . . . . . . . . . . . . . . . . . . . . . 4-172
• Antenna . . . . . . . . . . . . . . . . . . . . . . . . . . . . . . . . . . . 4-172
• Audio remote control . . . . . . . . . . . . . . . . . . . . . . . . 4-173
4
Page 103 of 785
Features of your vehicle
10 4
1. To activate the password, turn the
ignition key "ON" and "OFF"
according to the digit numbers.
The immobilizer indicator will blink
along with the operation of the
ignition key. For example, turn the
ignition key once for digit number
"1", and twice for "2", and so on.
For the digit number "0", you must
cycle the ignition key 10 times.
2. Wait for 3~10 seconds.
3. You may set the remaining number
of digits by following steps 1 and 2.
4. If all of the four password digits
have been successfully entered,
turn the ignition key "ON" and
check that the immobilizer indica-
tor illuminates. From this time, you
have to start your engine within 30
seconds. If you try to start your
engine after 30 seconds, your
engine will not start.✽NOTICE
If the engine stalls while driving in
the "limp home" mode, you can
start your engine within 3 seconds
without re-entering the password.
If the immobilizer indicator blinks for
five seconds, you must re-enter the
password (steps 1~4).
After performing the limp home acti-
vation procedure, consult with your
authorized HYUNDAI dealer as soon
as possible.
CAUTION
• If the password is entered
incorrectly three consecutive
times, wait for about one hour
to perform the limp home acti-
vation procedure again.
• If you cannot start your engine
using the limp home activa-
tion procedure, have your
vehicle towed by an author-
ized HYUNDAI dealer.
Page 116 of 785
423
Features of your vehicle
DOOR LOCKS
Operating door locks from
outside the vehicle
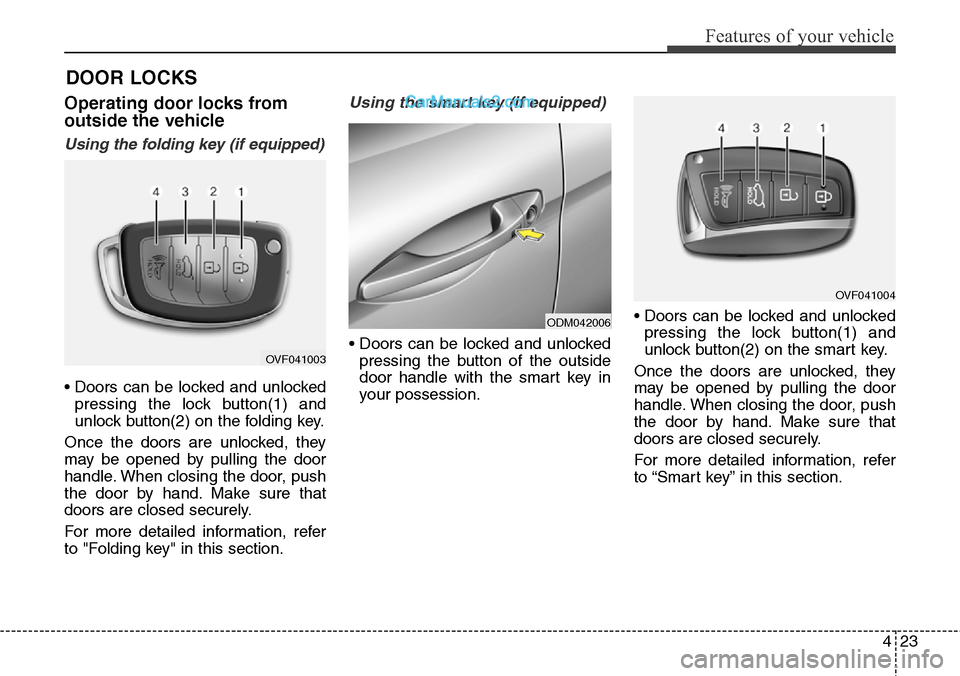
Using the folding key (if equipped)
• Doors can be locked and unlocked
pressing the lock button(1) and
unlock button(2) on the folding key.
Once the doors are unlocked, they
may be opened by pulling the door
handle. When closing the door, push
the door by hand. Make sure that
doors are closed securely.
For more detailed information, refer
to "Folding key" in this section.
Using the smart key (if equipped)
• Doors can be locked and unlocked
pressing the button of the outside
door handle with the smart key in
your possession.• Doors can be locked and unlocked
pressing the lock button(1) and
unlock button(2) on the smart key.
Once the doors are unlocked, they
may be opened by pulling the door
handle. When closing the door, push
the door by hand. Make sure that
doors are closed securely.
For more detailed information, refer
to “Smart key” in this section.OVF041003
ODM042006
OVF041004
Page 117 of 785
Features of your vehicle
24 4
Using the mechanical key in an
emergency situation
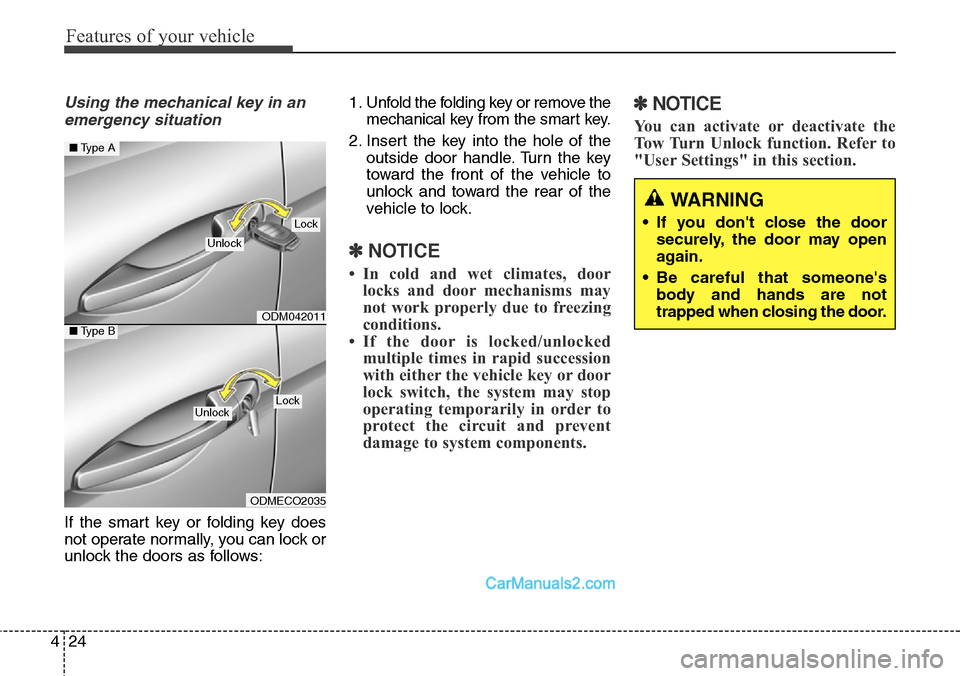
If the smart key or folding key does
not operate normally, you can lock or
unlock the doors as follows:1. Unfold the folding key or remove the
mechanical key from the smart key.
2. Insert the key into the hole of the
outside door handle. Turn the key
toward the front of the vehicle to
unlock and toward the rear of the
vehicle to lock.
✽NOTICE
• In cold and wet climates, door
locks and door mechanisms may
not work properly due to freezing
conditions.
• If the door is locked/unlocked
multiple times in rapid succession
with either the vehicle key or door
lock switch, the system may stop
operating temporarily in order to
protect the circuit and prevent
damage to system components.
✽NOTICE
You can activate or deactivate the
Tow Turn Unlock function. Refer to
"User Settings" in this section.
WARNING
• If you don't close the door
securely, the door may open
again.
• Be careful that someone's
body and hands are not
trapped when closing the door.
ODM042011
ODMECO2035
■Type A
■Type B
Lock
Unlock
LockUnlock
Page 122 of 785
429
Features of your vehicle
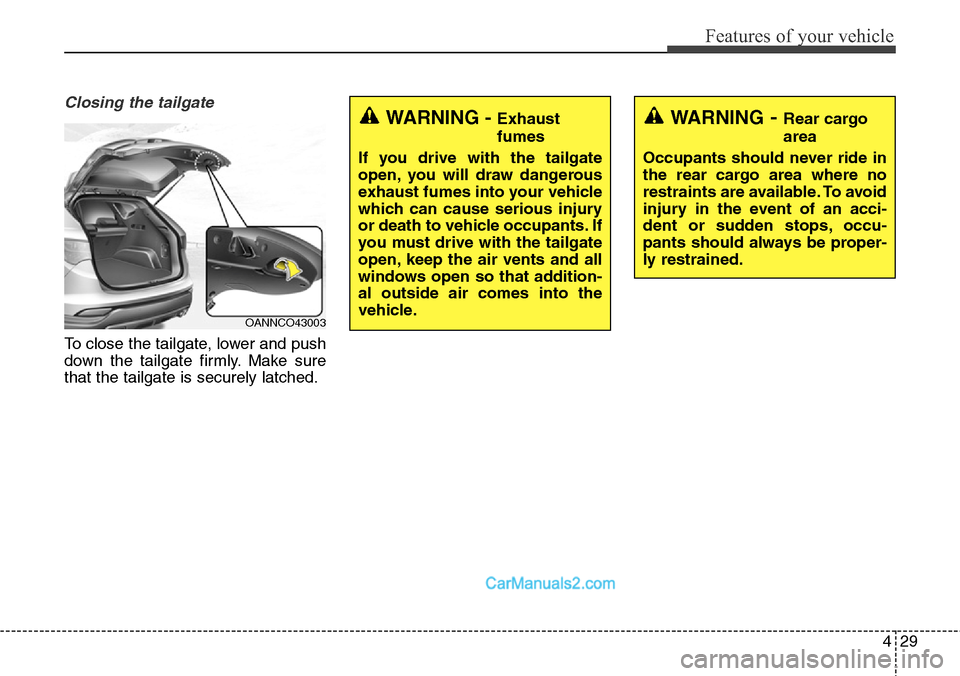
Closing the tailgate
To close the tailgate, lower and push
down the tailgate firmly. Make sure
that the tailgate is securely latched.
WARNING- Rear cargo
area
Occupants should never ride in
the rear cargo area where no
restraints are available. To avoid
injury in the event of an acci-
dent or sudden stops, occu-
pants should always be proper-
ly restrained.WARNING - Exhaust
fumes
If you drive with the tailgate
open, you will draw dangerous
exhaust fumes into your vehicle
which can cause serious injury
or death to vehicle occupants. If
you must drive with the tailgate
open, keep the air vents and all
windows open so that addition-
al outside air comes into the
vehicle.
OANNCO43003