2015 FORD TRANSIT tow
[x] Cancel search: towPage 136 of 461

AUTOMATIC TRANSMISSION
WARNINGS
Always set the parking brake fully
and make sure you shift the gearshift
lever to park (P). Switch the ignition
off and remove the key whenever you leave
your vehicle. Do not apply the brake pedal and
accelerator pedal simultaneously.
Applying both pedals simultaneously
for more than three seconds will limit
engine rpm, which may result in difficulty
maintaining speed in traffic and could lead
to serious injury. Understanding the Gearshift Lever
Positions of the Automatic
Transmission
Tow/Haul button
T/H
ParkP
Reverse
R
Neutral
N
Drive
D
Manual shifting
M Manual upshift
+
Manual downshift
-
Tow/Haul (T/H) (If Equipped)
Tow/Haul delays transmission upshift to
reduce the frequency of transmission
shifting.
The system provides engine braking in all
forward gears when the gearshift lever is
in drive (D). Engine braking helps you to
slow and control your vehicle when
descending a grade.
Depending on trailer load and driving
conditions, the transmission may
downshift when descending a grade.
Downshifting will depend on the amount
of vehicle braking applied.
Switching Tow/Haul On and Off To switch tow/haul on, press the
T/H button. The tow haul
indicator lamp will illuminate in
the instrument cluster.
1. Shift the gearshift lever to drive (D).
2. Press the button. The instrument cluster will display the indicator lamp.
3. Press the button again to switch the system off. The transmission will return
to normal drive (D) mode.
Park (P) WARNINGS
Do not shift the gearshift lever to
park (P) when your vehicle is moving.
This can cause damage to the
transmission not covered by the vehicle
warranty, and can result in a crash or
serious injury.
133 Transit (TTH) Canada/United States of America, enUSA, Edition date: 03/2014 TransmissionE175317 E161509
Page 139 of 461

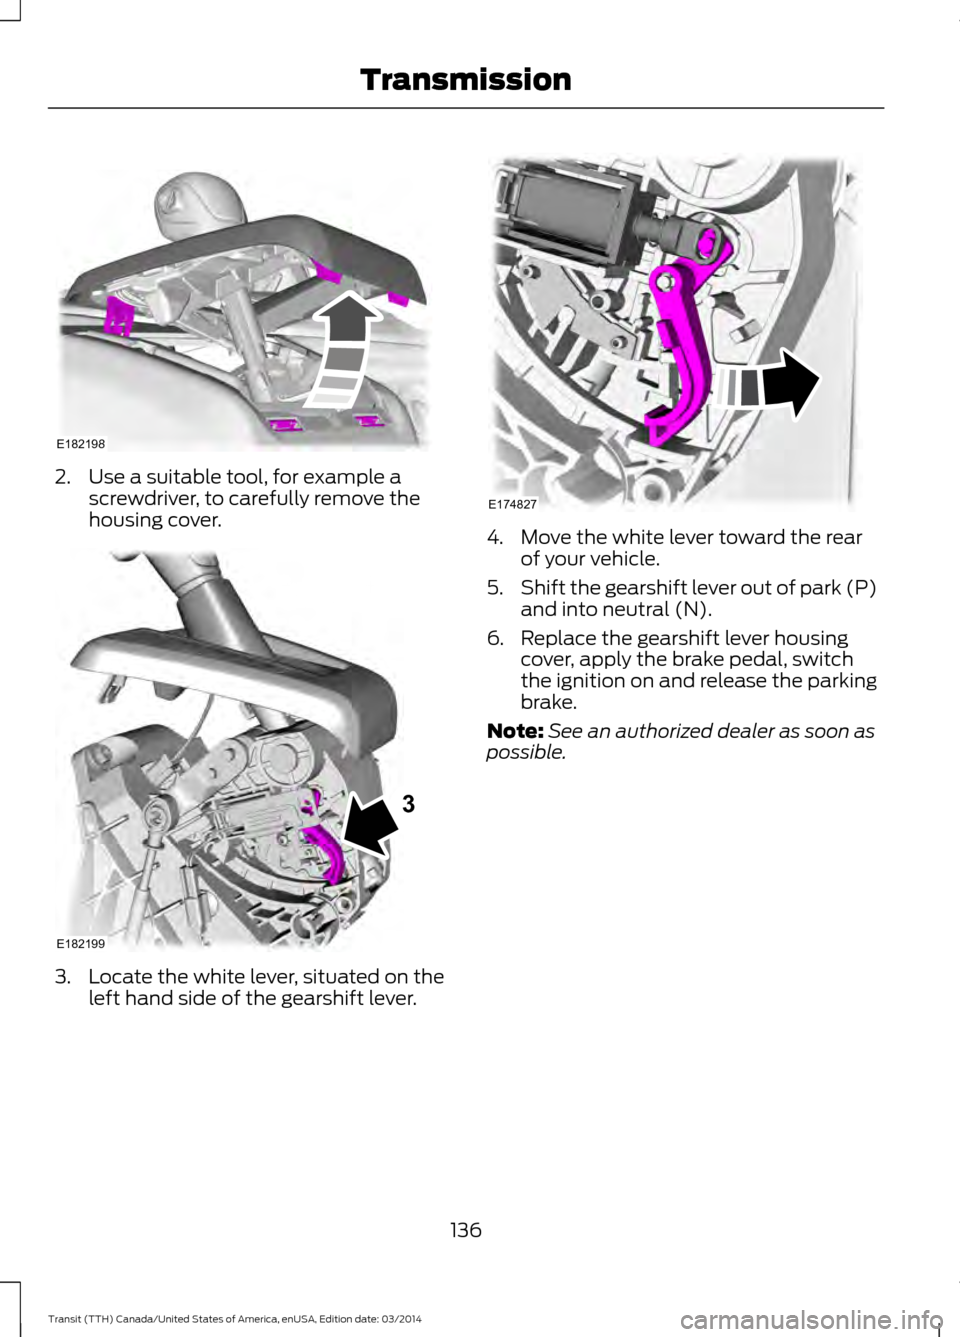
2. Use a suitable tool, for example a
screwdriver, to carefully remove the
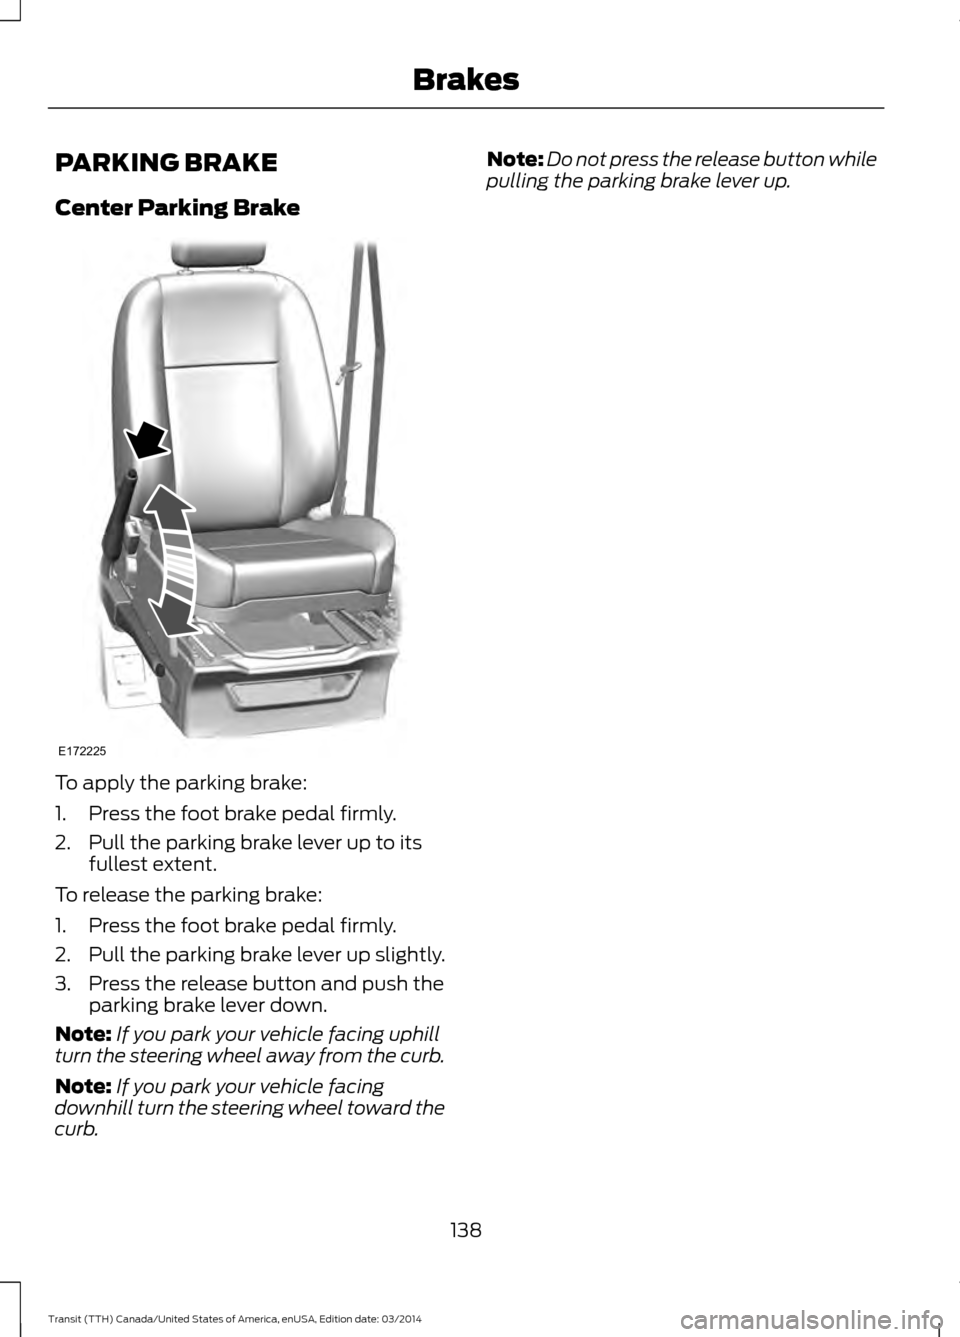
housing cover. 3. Locate the white lever, situated on the
left hand side of the gearshift lever. 4. Move the white lever toward the rear
of your vehicle.
5. Shift the gearshift lever out of park (P)
and into neutral (N).
6. Replace the gearshift lever housing cover, apply the brake pedal, switch
the ignition on and release the parking
brake.
Note: See an authorized dealer as soon as
possible.
136 Transit (TTH) Canada/United States of America, enUSA, Edition date: 03/2014 TransmissionE182198 E182199
3 E174827
Page 140 of 461

GENERAL INFORMATION
Note:
Occasional brake noise is normal. If
a metal-to-metal, continuous grinding or
continuous squeal sound is present, the
brake linings may be worn-out. Have the
system checked by an authorized dealer. If
your vehicle has continuous vibration or
shudder in the steering wheel while braking,
have it checked by an authorized dealer.
Note: Brake dust may accumulate on the
wheels, even under normal driving
conditions. Some dust is inevitable as the
brakes wear and does not contribute to
brake noise. See Cleaning the Alloy
Wheels (page 230). See
Warning Lamps and
Indicators (page 75).
Wet brakes result in reduced braking
efficiency. Gently press the brake pedal a
few times when driving from a car wash or
standing water to dry the brakes.
Brake Over Accelerator
In the event the accelerator pedal
becomes stuck or entrapped, apply steady
and firm pressure to the brake pedal to
slow the vehicle and reduce engine power.
If you experience this condition, apply the
brakes and bring your vehicle to a safe
stop. Move the gearshift lever to park (P),
switch the engine off and apply the parking
brake. Inspect the accelerator pedal for
any interference. If none are found and the
condition persists, have your vehicle towed
to the nearest authorized dealer.
Brake Assist
Brake assist detects when you brake
rapidly by measuring the rate at which you
press the brake pedal. It provides
maximum braking efficiency as long as you
press the pedal, and can reduce stopping
distances in critical situations. Anti-lock Brake System
This system helps you maintain steering
control during emergency stops by keeping
the brakes from locking. This lamp momentarily
illuminates when you turn the
ignition on. If the light does not
illuminate during start up, remains on or
flashes, the system may be disabled. Have
the system checked by an authorized
dealer. If the system is disabled, normal
braking is still effective. If the
brake warning lamp illuminates
when you release the parking brake, have
the system checked by an authorized
dealer.
HINTS ON DRIVING WITH
ANTI-LOCK BRAKES
Note: When the system is operating, the
brake pedal will pulse and may travel
further. Maintain pressure on the brake
pedal. You may also hear a noise from the
system. This is normal.
The anti-lock braking system will not
eliminate the risks when:
• You drive too closely to the vehicle in
front of you.
• Your vehicle is hydroplaning.
• You take corners too fast.
• The road surface is poor.
137 Transit (TTH) Canada/United States of America, enUSA, Edition date: 03/2014 Brakes
Page 141 of 461

PARKING BRAKE
Center Parking Brake
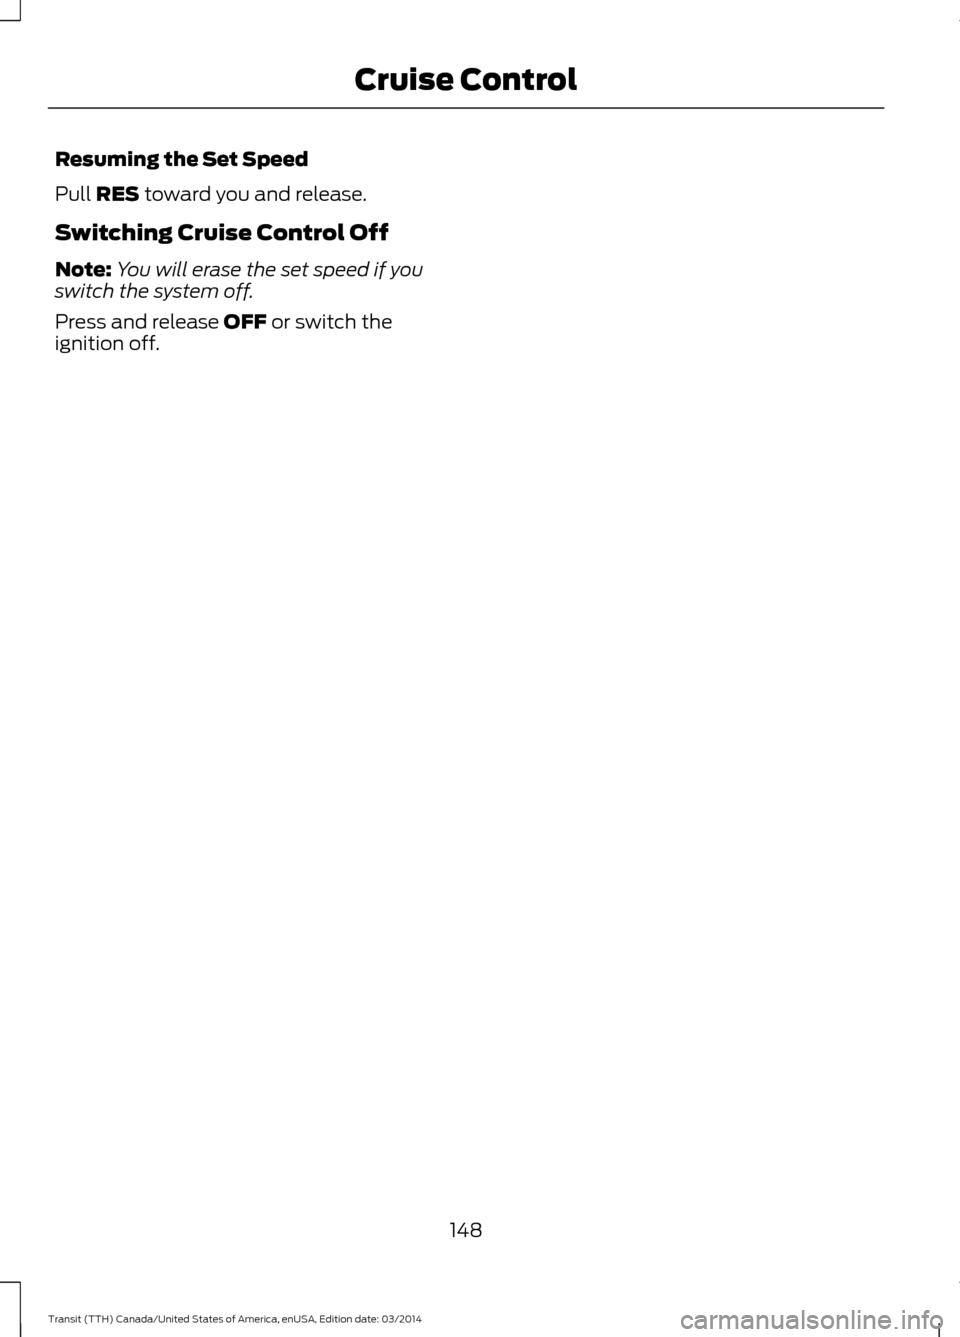
To apply the parking brake:
1. Press the foot brake pedal firmly.
2. Pull the parking brake lever up to its
fullest extent.
To release the parking brake:
1. Press the foot brake pedal firmly.
2. Pull the parking brake lever up slightly.
3. Press the release button and push the parking brake lever down.
Note: If you park your vehicle facing uphill
turn the steering wheel away from the curb.
Note: If you park your vehicle facing
downhill turn the steering wheel toward the
curb. Note:
Do not press the release button while
pulling the parking brake lever up.
138 Transit (TTH) Canada/United States of America, enUSA, Edition date: 03/2014 BrakesE172225
Page 146 of 461

PRINCIPLE OF OPERATION
WARNINGS
The system does not relieve you of
your responsibility to drive with due
care and attention.
If your vehicles has a non-Ford
approved trailer tow module the
system may not correctly detect
objects. The sensors may not detect objects
in heavy rain or other conditions that
cause disruptive reflections.
The sensors may not detect objects
with surfaces that absorb ultrasonic
waves.
The system does not detect objects
that are moving away from your
vehicle. They will only be detected
shortly after they start to move toward
your vehicle. Take particular care when reversing
with a tow ball arm or a rear fitted
accessory. For example, a bicycle
carrier. The rear parking aid will only
indicate the approximate distance from
the rear bumper to an object. If you use a high pressure spray to
wash your vehicle, only spray the
sensors briefly from a distance not
less than eight inches (20 centimeters). Note:
If your vehicle has a tow ball arm,
switch the system off when you connect
trailer lamps (or lighting boards) to the
13-pin socket through a Ford approved
trailer tow module.
Note: Keep the sensors free from dirt, ice
or snow. Do not clean with sharp objects.
Note: The system may emit false alerts if
it detects a signal using the same frequency
as the sensors or if your vehicle is fully
loaded. Note:
The outer sensors may detect the
side walls of a garage. If the distance
between the outer sensors and the side wall
remains constant for three seconds, the
alert will turn off. As you continue the inner
sensors will detect objects directly behind
your vehicle.
PARKING AID WARNINGS
The parking aid system can only
assist you to detect objects when
your vehicle is moving at parking
speeds. To help avoid personal injury you
must take care when using the parking aid
system. Traffic control systems, inclement
weather, air brakes, external motors
and fans may affect the correct
operation of the sensing system.This may
cause reduced performance or false alerts. The system may not detect small or
moving objects, particularly those
close to the ground.
The system warns you of objects that are
within the detection zone of the bumper
areas. When you switch the ignition on,
the system automatically turns on. The
system becomes active when you shift into
reverse (R) and the speed of your vehicle
is 10 mph (16 km/h) or less.
143 Transit (TTH) Canada/United States of America, enUSA, Edition date: 03/2014 Parking Aids
Page 147 of 461

Rear detection zone: Up to 72 in
(183 cm) from the rear bumper.
A
Note: Accessories that block the detection
zone of the system may create false alerts.
Note: Keep the sensors free from snow, ice
and large accumulations of dirt.
Note: If your vehicle sustains damage
leaving the sensors misaligned, this will
cause inaccurate measurements or false
alerts.
A tone will sound in the following manner
when objects are near the rear bumper:
• Objects detected by the rear sensors
produce a low-pitched tone.
• An alert will only sound for three
seconds if an object is further than 10 in
(25 cm) from the side of your vehicle. The system detects objects when you shift
into reverse (R) and:
•
Your vehicle is moving toward a
stationary object at a speed of
3 mph
(5 km/h) or less.
• Your vehicle is stationary but an object
is approaching your vehicle at a speed
of
3 mph (5 km/h) or less.
• Your vehicle is moving at a speed of
3 mph (5 km/h)
or less, and an object
is approaching your vehicle at a speed
of
3 mph (5 km/h) or less.
Note: The rate of the tone increases as your
vehicle moves closer to an object.
When the parking aid system sounds a
tone, the audio system may reduce the set
volume. When the warning ends, the audio
system returns to the previously set
volume.
Note: Volume reduction is not a standard
feature of all audio systems.
Switching the Parking Aid System
Off Press the button to switch the system off.
The system remains off until you switch
the ignition off. The button is located on
the instrument panel.
REAR VIEW CAMERA
WARNINGS
Objects in the display are closer than
they appear.
144 Transit (TTH) Canada/United States of America, enUSA, Edition date: 03/2014 Parking AidsE130178 E177143
Page 150 of 461

PRINCIPLE OF OPERATION
WARNING
The system does not relieve you of
your responsibility to drive with due
care and attention.
Cruise control allows you to control your
speed using the switches on the steering
wheel. You can use cruise control when
you exceed approximately 20 mph (30
km/h).
USING CRUISE CONTROL
WARNINGS
Do not use cruise control in heavy
traffic, on winding roads or when the
road surface is slippery. This could
result in loss of vehicle control, serious
injury or death. When you are going downhill, your
vehicle speed may increase above
the set speed. The system will not
apply the brakes. Change down a gear to
assist the system in maintaining the set
speed. Failure to do so could result in loss
of vehicle control, serious injury or death. Note:
Cruise control will disengage if your
vehicle speed decreases more than 10 mph
(16 km/h) below your set speed while
driving uphill. The cruise controls are located on the
steering wheel.
Switching Cruise Control On
Press and release ON.
The indicator will display in the
instrument cluster.
Setting a Speed
1. Accelerate to the desired speed.
2. Press and release SET+.
3. Take your foot off the accelerator pedal.
Changing the Set Speed
• Press and hold SET+ or SET-. Release
the control when you reach the desired
speed.
• Press and release SET+ or SET-. The
set speed will change in approximately
1 mph (2 km/h) increments.
• Press the accelerator or brake pedal
until you reach the desired speed. Press
and release SET+.
Canceling the Set Speed
Pull CAN toward you and release, or tap
the brake pedal. The set speed will not be
erased.
147 Transit (TTH) Canada/United States of America, enUSA, Edition date: 03/2014 Cruise ControlE142437 E71340
Page 151 of 461

Resuming the Set Speed
Pull RES toward you and release.
Switching Cruise Control Off
Note: You will erase the set speed if you
switch the system off.
Press and release OFF or switch the
ignition off.
148Transit (TTH) Canada/United States of America, enUSA, Edition date: 03/2014 Cruise Control