2015 FORD POLICE INTERCEPTOR SEDAN oil
[x] Cancel search: oilPage 229 of 401
Refer to yourscheduled maintenance informationfor scheduled
intervals for fluid checks and changes. Your transmission does not
consume fluid. However, the fluid level should be checked if the
transmission is not working properly, (i.e., if the transmission slips or
shifts slowly) or if you notice some sign of fluid leakage.
Do not use supplemental transmission fluid additives, treatments or
cleaning agents. The use of these materials may affect transmission
operation and result in damage to internal transmission components.
BRAKE FLUID CHECK
Fluid levels between the MIN and MAX lines are within the normal
operating range; there is no need to add fluid. If the fluid levels are
outside of the normal operating range, the performance of the system
could be compromised; seek service from your authorized dealer
immediately.
Note:Police pursuits, involving hard braking, result in high temperatures
in the brake system - including the brake fluid. Over time, repeated
exposure to high brake temperatures can degrade brake fluid, potentially
reducing its boiling point. A lower boiling point could cause long brake
pedal travel and a loss of braking confidence during subsequent pursuit
driving. Ford recommends that police fleets replace the brake fluid at
every brake pad service interval according to the service procedure.
Brake fluid should be replaced on vehicles involved in high speed
pursuits with heavy brake usage.
POWER STEERING FLUID CHECK
Your vehicle is equipped with an electric power steering (EPS) system.
There is no fluid reservoir to check or fill. For additional information on
the electric power steering (EPS) system, Refer toDriving Aids.
FUEL FILTER
Your vehicle is equipped with a lifetime fuel filter that is integrated with
the fuel tank. Regular maintenance or replacement is not needed.
WASHER FLUID CHECK
WARNING:If you operate your vehicle in temperatures below
40°F (5°C), use washer fluid with antifreeze protection. Failure
to use washer fluid with antifreeze protection in cold weather could
result in impaired windshield vision and increase the risk of injury or
accident.
228Maintenance
2015 Police(pol)
Owners Guide gf, 2nd Printing, April 2015
USA(fus)
Page 238 of 401
CHANGING A BULB
Lamp Assembly Condensation
Exterior lamps are vented to accommodate normal changes in pressure.
Condensation can be a natural by-product of this design. When moist air
enters the lamp assembly through the vents, there is a possibility that
condensation can occur when the temperature is cold. When normal
condensation occurs, a thin film of mist can form on the interior of the
lens. The thin mist eventually clears and exits through the vents during
normal operation. Clearing time may take as long as 48 hours under dry
weather conditions.
These are examples of acceptable condensation:
•Presence of thin mist (no streaks, drip marks or droplets).
•Fine mist covers less than 50% of the lens.
These are examples of unacceptable moisture (usually caused by a lamp
water leak):
•Water puddle inside the lamp.
•Large water droplets, drip marks or streaks present on the interior of
the lens.
Take your vehicle to a dealer for service if any of the above conditions of
unacceptable moisture are present.
Replacing headlamp bulbs
WARNING:Handle a halogen headlamp bulb carefully and keep
out of children’s reach. Grasp the bulb only by its plastic base
and do not touch the glass. The oil from your hand could cause the
bulb to break the next time the headlamps are operated.
Note:If the bulb is accidentally touched, it should be cleaned with
rubbing alcohol before being used.
Maintenance237
2015 Police(pol)
Owners Guide gf, 2nd Printing, April 2015
USA(fus)
Page 245 of 401
Replacing turn/backup lamp bulbs (Utility)
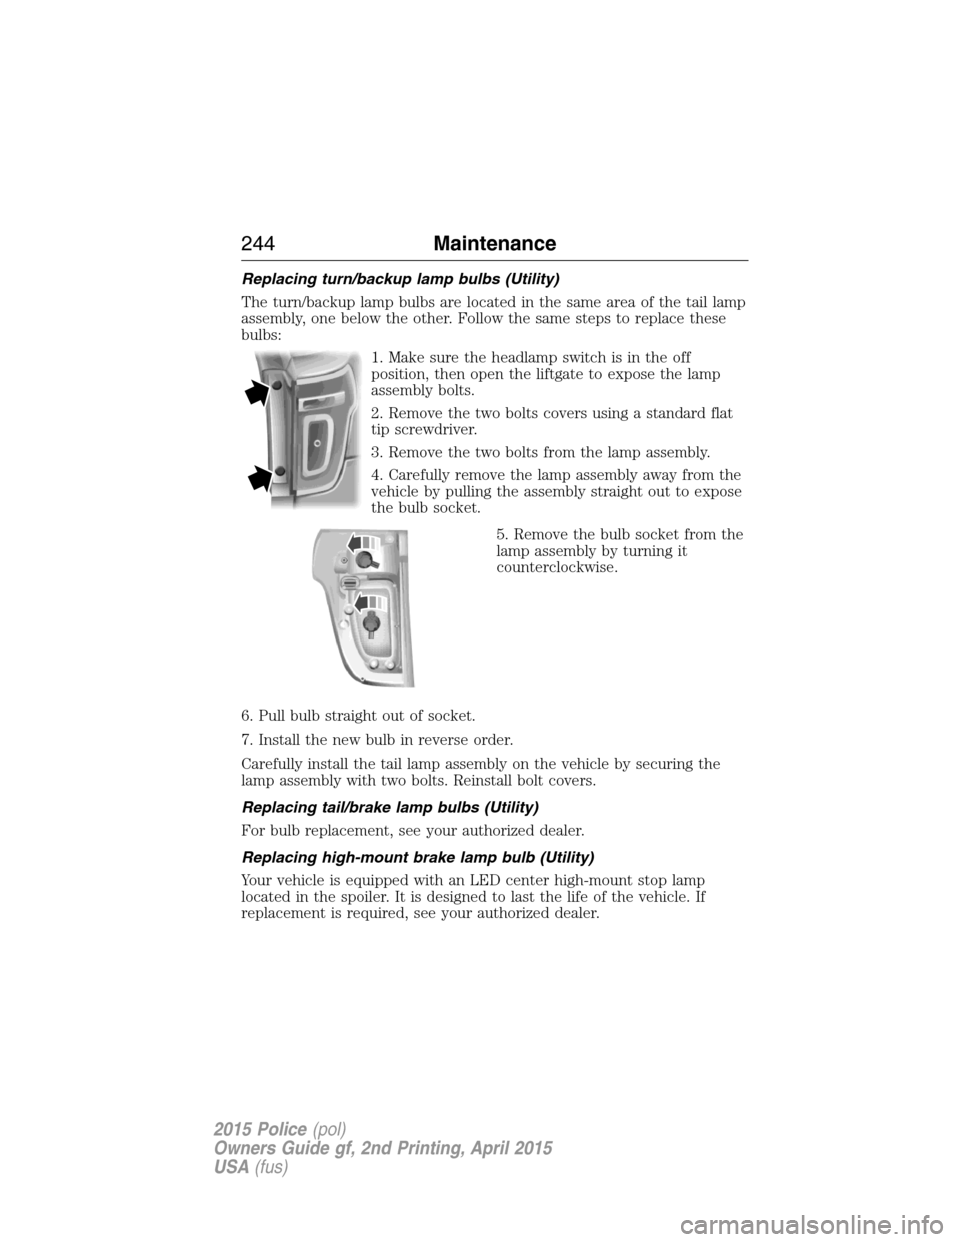
The turn/backup lamp bulbs are located in the same area of the tail lamp
assembly, one below the other. Follow the same steps to replace these
bulbs:
1. Make sure the headlamp switch is in the off
position, then open the liftgate to expose the lamp
assembly bolts.
2. Remove the two bolts covers using a standard flat
tip screwdriver.
3. Remove the two bolts from the lamp assembly.
4. Carefully remove the lamp assembly away from the
vehicle by pulling the assembly straight out to expose
the bulb socket.
5. Remove the bulb socket from the
lamp assembly by turning it
counterclockwise.
6. Pull bulb straight out of socket.
7. Install the new bulb in reverse order.
Carefully install the tail lamp assembly on the vehicle by securing the
lamp assembly with two bolts. Reinstall bolt covers.
Replacing tail/brake lamp bulbs (Utility)
For bulb replacement, see your authorized dealer.
Replacing high-mount brake lamp bulb (Utility)
Your vehicle is equipped with an LED center high-mount stop lamp
located in the spoiler. It is designed to last the life of the vehicle. If
replacement is required, see your authorized dealer.
244Maintenance
2015 Police(pol)
Owners Guide gf, 2nd Printing, April 2015
USA(fus)
Page 252 of 401
When washing:
•
Take care when using a power washer to clean the engine. The
high-pressure fluid could penetrate the sealed parts and cause damage.
•Do not spray a hot engine with cold water to avoid cracking the
engine block or other engine components.
•Spray Motorcraft Engine Shampoo and Degreaser on all parts that
require cleaning and pressure rinse clean. In Canada, use Motorcraft
Engine Shampoo.
•Never wash or rinse the engine while it is hot or running; water in the
running engine may cause internal damage.
•Never wash or rinse any ignition coil, spark plug wire or spark plug
well, or the area in and around these locations.
•Cover the battery, power distribution box, and air filter assembly to
prevent water damage when cleaning the engine.
CLEANING THE WINDOWS AND WIPER BLADES
The windows and wiper blades should be cleaned regularly. If the wipers
do not wipe properly, substances on the vehicle’s glass or the wiper blades
may cause squeaking or chatter noise from the blades, and streaking and
smearing of the windshield. To clean these items, follow these tips:
•The windows may be cleaned with a non-abrasive cleaner such as
Motorcraft® Ultra-Clear Spray Glass Cleaner (U.S.) or Motorcraft
Premium Glass Cleaner (Canada).
•The wiper blades can be cleaned with isopropyl (rubbing) alcohol or
Motorcraft Premium Windshield Washer Concentrates in the U.S., or
Motorcraft Premium Quality Windshield Washer Fluid in Canada.
Replace your wiper blades when they appear worn or do not function
properly.
•Do not use abrasive materials, as they may cause scratches.
•Do not use fuel, kerosene, or paint thinner to clean any parts.
If you cannot remove those streaks after cleaning with the glass cleaner or
if the wipers chatter and move in a jerky motion, clean the outer surface of
the windshield and the wiper blades using a sponge or soft cloth with a
neutral detergent or mild-abrasive cleaning solution. After cleaning, rinse
the windshield and wiper blades with clean water. The windshield is clean
if beads do not form when you rinse the windshield with water.
Note:Do not use sharp objects, such as a razor blade, to clean the
inside of the rear window or to remove decals, as it may cause damage
to the rear window defroster’s heated grid lines.
Vehicle Care251
2015 Police(pol)
Owners Guide gf, 2nd Printing, April 2015
USA(fus)
Page 254 of 401

Clean the instrument panel and cluster lens with a clean, damp, white,
cotton cloth, then use a clean and dry, white, cotton cloth to dry these
areas.
•Avoid cleaners or polishes that increase the gloss of the upper portion
of the instrument panel. The dull finish in this area helps protect the
driver from undesirable windshield reflection.
•
Be certain to wash or wipe your hands clean if you have been in contact
with certain products, such as insect repellent and suntan lotion, in
order to avoid possible damage to the interior painted surfaces.
•Do not use household or glass cleaners as these may damage the
finish of the instrument panel, interior trim and cluster lens.
•Do not allow air fresheners and hand sanitizers to spill on interior
surfaces. If a spill occurs, wipe off immediately. Damage may not be
covered by your warranty.
If a staining liquid like coffee or juice has been spilled on the instrument
panel or on interior trim surfaces, clean as follows:
1. Wipe up spilled liquid using a clean, white, cotton cloth.
2. Use Motorcraft Premium Leather and Vinyl Cleaner or a commercially
available leather cleaning product for automotive interiors. Test any
cleaner or stain remover on an inconspicuous area.
3. Alternatively, wipe the surface with a damp, clean, white, cotton cloth
and a mild soap and water solution. Dry the area with a clean, soft cloth.
4. If necessary, apply more soap and water solution or cleaning product
to a clean, white, cotton cloth and press the cloth onto the soiled area.
Allow this to set at room temperature for 30 minutes.
5. Remove the soaked cloth, then with a clean, damp cloth, use a rubbing
motion for 60 seconds on the soiled area.
6. Following this, wipe area dry with a clean, white, cotton cloth.
CLEANING LEATHER SEATS (IF EQUIPPED)
Note:Follow the same procedure as cleaning leather seats for cleaning
leather instrument panels and leather interior trim surfaces.
For routine cleaning, wipe the surface with a soft, damp cloth and a mild
soap and water solution. Dry the area with a clean, soft cloth.
For cleaning and removing spots and stains such as dye transfer, use
Motorcraft Premium Leather and Vinyl Cleaner or a commercially
available leather cleaning product for automotive interiors.
Vehicle Care253
2015 Police(pol)
Owners Guide gf, 2nd Printing, April 2015
USA(fus)
Page 255 of 401
Note:Test any cleaner or stain remover on an inconspicuous area.
You should:
•Remove dust and loose dirt with a vacuum cleaner.
•Clean and treat spills and stains as soon as possible.
Do not use the following products as these may damage the leather:
•Oil and petroleum or silicone-based leather conditioners.
•Household cleaners.
•Alcohol solutions.
•Solvents or cleaners intended specifically for rubber, vinyl and
plastics.Motorcraft
Note:Do not use Motorcraft Premium Leather and Vinyl Cleaner ZC-56
on Lincoln Black Label, Presidential or Reserve Leathers because it can
damage these and other semi-aniline leather seating fabrics. It can also
damage surrounding microfiber accent surfaces. To clean Lincoln Black
Label, Presidential or Reserve Leather, first vacuum the seats to remove
loose dirt. Then wipe the leather with a clean soft cloth dampened with
lukewarm water and a mild soap. Wipe the leather again with a slightly
damp cloth to remove soap residue, and dry with a soft cloth. To
maintain the leather’s resiliency, it should be cleaned whenever soiled.
CLEANING THE ALLOY WHEELS
Note:Do not use chrome cleaner, metal cleaner or polish on wheels and
wheel covers.
A clearcoat paint finish coats aluminum wheels and wheel covers. In
order to maintain their condition:
•Clean weekly with Motorcraft Wheel and Tire Cleaner. Use a sponge to
remove heavy deposits of dirt and brake dust accumulation. Rinse
thoroughly with a strong stream of water when you have completed
the cleaning process.
•To remove tar and grease, use Motorcraft Bug and Tar Remover.
•Never apply any cleaning chemical to hot or warm wheel rims or
covers.
•Some automatic car washes may cause damage to the finish on your
wheel rims or covers.
•Industrial-strength (heavy-duty) cleaners, or cleaning chemicals, in
combination with brush agitation to remove brake dust and dirt, could
wear away the clearcoat finish over time.
254Vehicle Care
2015 Police(pol)
Owners Guide gf, 2nd Printing, April 2015
USA(fus)
Page 256 of 401

•Do not use hydrofluoric acid-based or high caustic-based wheel
cleaners, steel wool, fuels or strong household detergent.
•If you intend on parking your vehicle for an extended period after
cleaning the wheels with a wheel cleaner, drive your vehicle for a few
minutes before doing so. This reduces the risk of increased corrosion
of the brake discs.
VEHICLE STORAGE
If you plan on storing your vehicle for an extended period of time
(30 days or more), read the following maintenance recommendations to
make sure your vehicle stays in good operating condition.
All motor vehicles and their components were engineered and tested for
reliable, regular driving. Long-term storage under various conditions may
lead to component degradation or failure unless specific precautions are
taken to preserve the components.
General
•Store all vehicles in a dry, ventilated place.
•Protect from sunlight, if possible.
•If vehicles are stored outside, they require regular maintenance to
protect against rust and damage.
Body
•Wash vehicle thoroughly to remove dirt, grease, oil, tar or mud from
exterior surfaces, rear-wheel housing and underside of front fenders.
•Periodically wash vehicles stored in exposed locations.
•Touch up raw or primed metal to prevent rust.
•Cover chrome and stainless steel parts with a thick coat of auto wax
to prevent discoloration. Re-wax as necessary when the vehicle is
washed.
•Lubricate hood latch, all door latches and trunk lid hinges with a light
grade oil.
•Cover interior trim to prevent fading.
•Keep all rubber parts free from oil and solvents.
Vehicle Care255
2015 Police(pol)
Owners Guide gf, 2nd Printing, April 2015
USA(fus)
Page 257 of 401
Engine
•The engine oil and filter should be changed prior to storage, as used
engine oil contains contaminates that may cause engine damage.
•Start the engine every 15 days. Run at fast idle with the climate
controls set to defrost until it reaches normal operating temperature.
•With your foot on the brake, shift through all the gears while the
engine is running.
Fuel system
•Fill the fuel tank with high-quality fuel until the first automatic shutoff
of the fuel pump nozzle.
Cooling system
•Protect against freezing temperatures.
•When removing vehicle from storage, check coolant fluid level.
Confirm there are no cooling system leaks, and fluid is at the
recommended level.
Battery
•Check and recharge as necessary. Keep connections clean.
•If storing your vehicle for more than 30 days without recharging the
battery, it may be advisable to disconnect the battery cables to ensure
battery charge is maintained for quick starting.
Note:If battery cables are disconnected, it will be necessary to reset
memory features.
Brakes
•Make sure brakes and parking brake are fully released.
Tires
•Maintain recommended air pressure.
Miscellaneous
•Make sure all linkages, cables, levers and pins under vehicle are
covered with grease to prevent rust.
•Move vehicles at least 25 feet (8 meters) every 15 days to lubricate
working parts and prevent corrosion.
256Vehicle Care
2015 Police(pol)
Owners Guide gf, 2nd Printing, April 2015
USA(fus)