2015 FORD POLICE INTERCEPTOR SEDAN horn
[x] Cancel search: hornPage 47 of 401
WARNING:If the airbag has deployed, the airbag will not
function again and must be replaced immediately. If the airbag is
not replaced, the unrepaired area will increase the risk of injury in a
crash.
The airbags are a supplemental restraint system and are designed to
work with the safety belts to help protect the driver and right front
passenger from certain upper body injuries. Airbags do not inflate slowly;
there is a risk of injury from a deploying airbag.
Note:You will hear a loud bang and see a cloud of harmless powdery
residue if an airbag deploys. This is normal.
The airbags inflate and deflate rapidly upon activation. After airbag
deployment, it is normal to notice a smoke-like, powdery residue or smell
the burnt propellant. This may consist of cornstarch, talcum powder (to
lubricate the bag) or sodium compounds (for example, baking soda) that
result from the combustion process that inflates the airbag. Small
amounts of sodium hydroxide may be present which may irritate the skin
and eyes, but none of the residue is toxic.
While the system is designed to help reduce serious injuries, contact
with a deploying airbag may also cause abrasions or swelling. Temporary
hearing loss is also a possibility as a result of the noise associated with a
deploying airbag. Because airbags must inflate rapidly and with
considerable force, there is the risk of death or serious injuries, such as
fractures, facial and eye injuries or internal injuries, particularly to
occupants who are not properly restrained or are otherwise out of
position at the time of airbag deployment. Thus, it is extremely
important that occupants be properly restrained as far away from the
airbag module as possible while maintaining vehicle control.
Routine maintenance of the airbags is not required.
SOS POST-CRASH ALERT SYSTEM™
The system flashes the direction indicator lamps and the horn sounds
(intermittently) in the event of a serious impact that deploys an airbag
equipped on your vehicle.
The horn and lamps turn off when:
•You press the hazard button.
•You press the panic button (if equipped) on the remote entry
transmitter.
•Your vehicle runs out of power.
46Supplementary Restraints System
2015 Police(pol)
Owners Guide gf, 2nd Printing, April 2015
USA(fus)
Page 66 of 401

How to Reprogram Your Remote Entry Transmitters
You must have all remote entry transmitters (maximum of four) available
before beginning this procedure.Note:Do not press the brake pedal at
any time during this procedure. If the brake pedal is pressed at any time
during this procedure, programming mode will be exited and the entire
procedure must be repeated.
Note:Ensure the brake pedal is not pressed during this sequence.
To reprogram the remote entry transmitters:
1. Make sure your vehicle is electronically unlocked.
2. Put the key in the ignition.
3. Cycle eight times rapidly (within 10 seconds) between the off and on
positions.Note:The eighth turn must end in the on position.
4. The doors will lock, then unlock, to confirm that the programming
mode has been activated.
5. Within 20 seconds press any button on the remote entry transmitter.
Note:If more than 20 seconds have passed you will need to start the
procedure over again.
6. The doors will lock, then unlock, to confirm that this remote entry
transmitter has been programmed.
7. Repeat Step 5 to program each additional remote entry transmitter.
8. Turn the ignition to the off position after you have finished
programming all of the remote entry transmitters.Note:After
20 seconds, you will automatically exit the programming mode.
9. The doors will lock, then unlock, to confirm that the programming
mode has been exited.
Car Finder
Note:This feature will not work with the Dark Car feature.
Press the button twice within three seconds. The horn will
sound and the turn signals will flash. We recommend you use
this method to locate your vehicle, rather than using the panic
alarm.
Keys and Remote Control65
2015 Police(pol)
Owners Guide gf, 2nd Printing, April 2015
USA(fus)
Page 69 of 401
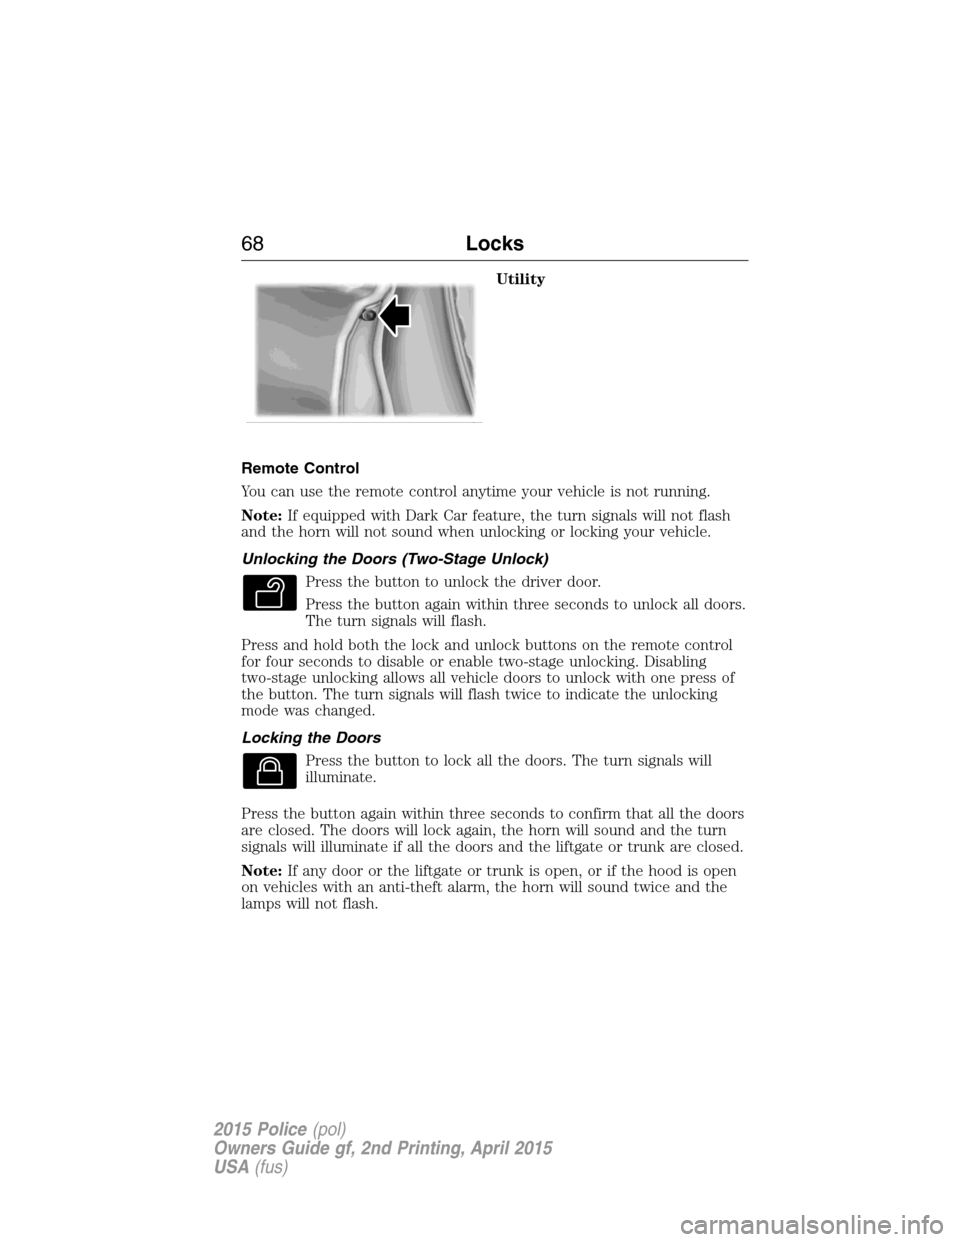
Utility
Remote Control
You can use the remote control anytime your vehicle is not running.
Note:If equipped with Dark Car feature, the turn signals will not flash
and the horn will not sound when unlocking or locking your vehicle.
Unlocking the Doors (Two-Stage Unlock)
Press the button to unlock the driver door.
Press the button again within three seconds to unlock all doors.
The turn signals will flash.
Press and hold both the lock and unlock buttons on the remote control
for four seconds to disable or enable two-stage unlocking. Disabling
two-stage unlocking allows all vehicle doors to unlock with one press of
the button. The turn signals will flash twice to indicate the unlocking
mode was changed.
Locking the Doors
Press the button to lock all the doors. The turn signals will
illuminate.
Press the button again within three seconds to confirm that all the doors
are closed. The doors will lock again, the horn will sound and the turn
signals will illuminate if all the doors and the liftgate or trunk are closed.
Note:If any door or the liftgate or trunk is open, or if the hood is open
on vehicles with an anti-theft alarm, the horn will sound twice and the
lamps will not flash.
68Locks
2015 Police(pol)
Owners Guide gf, 2nd Printing, April 2015
USA(fus)
Page 74 of 401
ANTI-THEFT ALARM (IF EQUIPPED)
The system will warn you of an unauthorized entry to your vehicle.
The park and turn lamps flash and the horn sounds if unauthorized entry
is attempted while the alarm is armed. It triggers immediately if the
luggage compartment or the hood opens, and after a 12-second delay if
any door opens.
Take all remote controls to an authorized dealer if there is any potential
alarm problem with your vehicle.
Arming the Alarm
The alarm is ready to arm when there is not a key in the ignition. Press
the door lock button and close the door to arm the alarm.
Disarming the Alarm
Disarm the alarm by any of the following actions:
•Unlock the doors or luggage compartment with the remote control.
•Switch the ignition on or start your vehicle.
•Use a key in the driver door to unlock your vehicle, and then switch
the ignition on within 12 seconds.
Note:The system will not disarm by unlocking the door with the key.
Security73
2015 Police(pol)
Owners Guide gf, 2nd Printing, April 2015
USA(fus)
Page 185 of 401
![FORD POLICE INTERCEPTOR SEDAN 2015 1.G Owners Manual •Carry unnecessary weight (approximately 1 mpg [0.4 km/L] is lost for
every 400 pounds [180 kilograms] of weight carried).
•Add particular accessories to your vehicle (e.g.; bug deflectors,
rollba FORD POLICE INTERCEPTOR SEDAN 2015 1.G Owners Manual •Carry unnecessary weight (approximately 1 mpg [0.4 km/L] is lost for
every 400 pounds [180 kilograms] of weight carried).
•Add particular accessories to your vehicle (e.g.; bug deflectors,
rollba](/manual-img/11/5317/w960_5317-184.png)
•Carry unnecessary weight (approximately 1 mpg [0.4 km/L] is lost for
every 400 pounds [180 kilograms] of weight carried).
•Add particular accessories to your vehicle (e.g.; bug deflectors,
rollbars or light bars, running boards, ski racks).
•Drive with the wheels out of alignment.
DRIVING THROUGH WATER
WARNING:Do not drive through flowing or deep water as you
may lose control of your vehicle.
Note:Driving through standing water can cause vehicle damage.
Note:Engine damage can occur if water enters the air filter.
Before driving through standing water, check the depth. Never drive
through water that is higher than the bottom of the front rocker area of
your vehicle.
When driving through standing
water, drive very slowly and do not
stop your vehicle. Your brake
performance and traction may be
limited. After driving through water
and as soon as it is safe to do so:
•Lightly press the brake pedal to
dry the brakes and to check that
they work.
•Check that the horn works.
•Check that the exterior lights work.
•Turn the steering wheel to check that the steering power assist works.
184Driving Hints
2015 Police(pol)
Owners Guide gf, 2nd Printing, April 2015
USA(fus)
Page 208 of 401
Fuse or relay
numberFuse amp
ratingProtected components
8 10A Not used (spare)
9 10A SYNC, Displays, Electronic finish
panel, Radio frequency
transceiver module (Sedan)
10 10A Run accessory relay
11 10A Cluster (Utility)
12 15A Backlighting LED, Interior
lighting, Backlighting feed
13 15A Right rear stop/turn, Right turn
(Sedan), Right rear police
fuse/relay box
14 15A Left rear stop/turn, Left turn
(Sedan), Left rear police
fuse/relay box
15 15A Stop lamp, Backup lamp,
High-mounted stop lamp (Utility)
16 10A Right front low beam
17 10A Left front low beam
18 10A Brake shift interlock, Powertrain
control module wake-up
19 20A Police B+ #8 access circuit center
console, 14-way B+ feed #2
20 20A All lock motor relay, Driver lock
motor relay
21 10A Not used (spare)
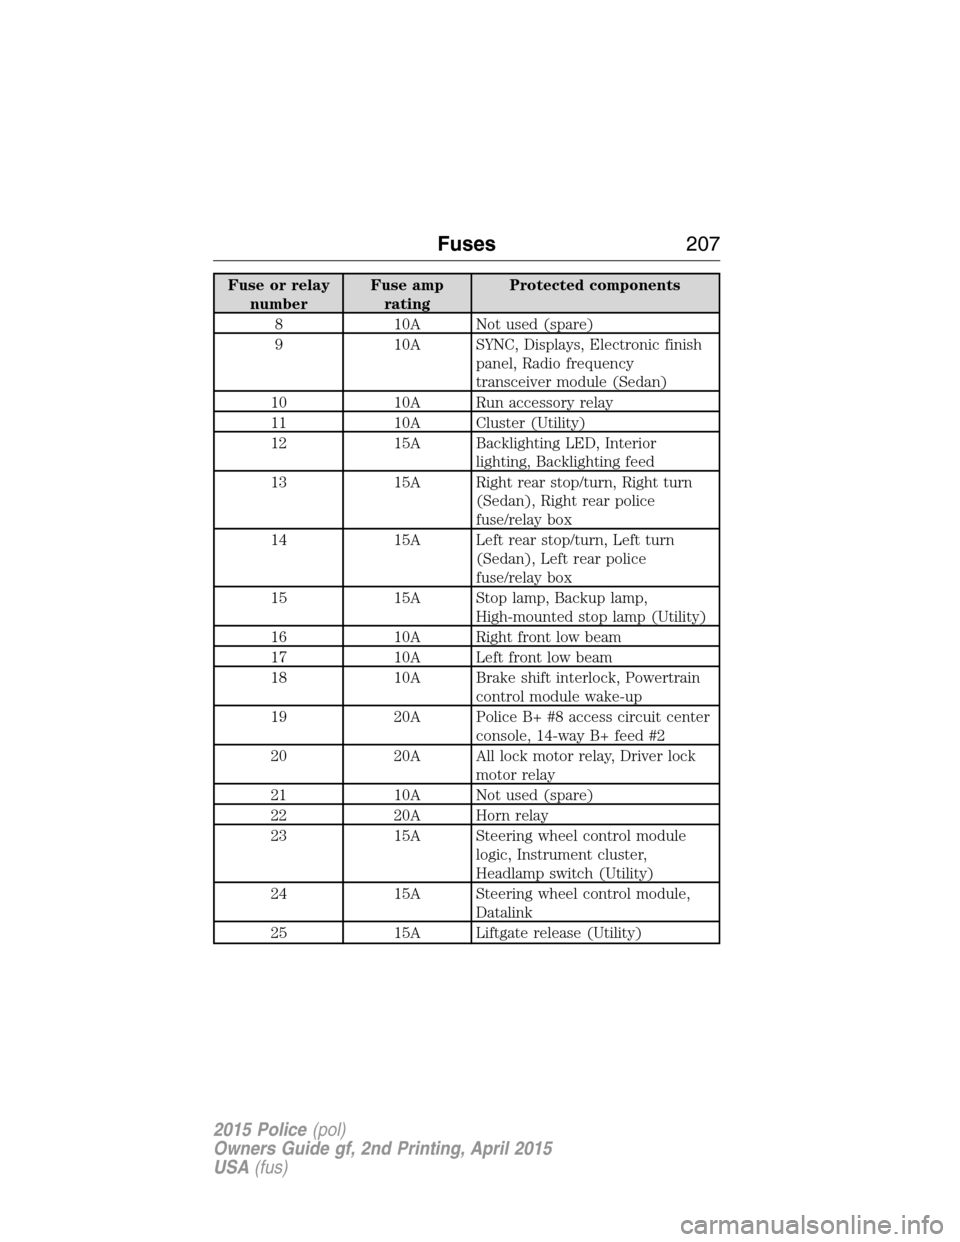
22 20A Horn relay
23 15A Steering wheel control module
logic, Instrument cluster,
Headlamp switch (Utility)
24 15A Steering wheel control module,
Datalink
25 15A Liftgate release (Utility)
Fuses207
2015 Police(pol)
Owners Guide gf, 2nd Printing, April 2015
USA(fus)
Page 282 of 401
System sensor training procedure
Note:To reduce the chances of interference from another vehicle,
system training should be performed at least three feet (one meter)
away from another Ford Motor Company vehicle undergoing the system
training procedure at the same time.
Note:Do not wait more than two minutes between resetting each tire
sensor or the system will time-out and the entire procedure will have to
be repeated on all four wheels.
A double horn chirp indicates the need to repeat the procedure.
System training procedure
Note:It is recommended that you read the entire procedure before
attempting.
Note:To enter the training mode, Steps 1–6 must be completed within
60 seconds.
1. Place the ignition in the off position and keep the key in the ignition.
2. Press and release the brake pedal.
3. Cycle the ignition from off to on three times ending in the on position
- Do not start the engine.
4. Press and hold the brake pedal for two seconds, then release.
5. Turn the ignition to off - Do not remove the key.
6. Cycle the ignition from off to on three times ending in on - Do not
start the engine.
If the training mode has been entered successfully, the horn will sound
once, the system indicator will flash, and the information display will
show TRAIN LF TIRE.
If after repeated attempts to enter the training mode, the horn does not
sound, the system indicator does not flash, and the information display
does not show TRAIN LF TIRE, seek service from your authorized
dealer.
Wheels and Tires281
2015 Police(pol)
Owners Guide gf, 2nd Printing, April 2015
USA(fus)
Page 283 of 401
Training procedure
Note:It may take up to six seconds to activate a tire pressure sensor.
During this time, the tool must remain in place at the valve stem.
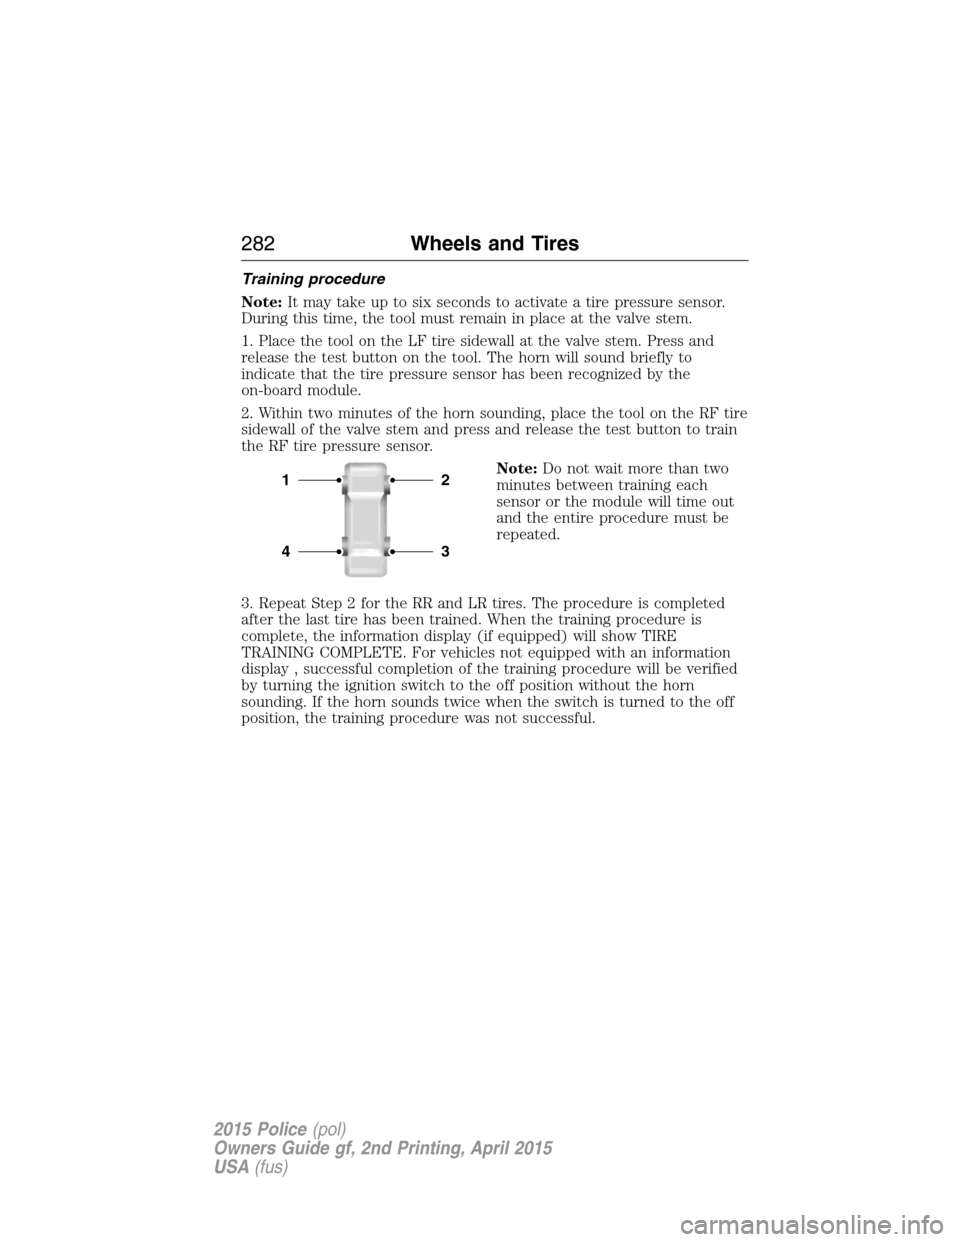
1. Place the tool on the LF tire sidewall at the valve stem. Press and
release the test button on the tool. The horn will sound briefly to
indicate that the tire pressure sensor has been recognized by the
on-board module.
2. Within two minutes of the horn sounding, place the tool on the RF tire
sidewall of the valve stem and press and release the test button to train
the RF tire pressure sensor.
Note:Do not wait more than two
minutes between training each
sensor or the module will time out
and the entire procedure must be
repeated.
3. Repeat Step 2 for the RR and LR tires. The procedure is completed
after the last tire has been trained. When the training procedure is
complete, the information display (if equipped) will show TIRE
TRAINING COMPLETE. For vehicles not equipped with an information
display , successful completion of the training procedure will be verified
by turning the ignition switch to the off position without the horn
sounding. If the horn sounds twice when the switch is turned to the off
position, the training procedure was not successful.
21
43
282Wheels and Tires
2015 Police(pol)
Owners Guide gf, 2nd Printing, April 2015
USA(fus)