2015 FORD F250 SUPER DUTY ignition
[x] Cancel search: ignitionPage 135 of 470
GENERAL INFORMATION
WARNINGS
Extended idling at high enginespeeds can produce very hightemperatures in the engine andexhaust system, creating the risk of fire orother damage.
Do not park, idle or drive your vehicleon dry grass or other dry groundcover. The emission system heats upthe engine compartment and exhaustsystem, creating the risk of fire.
Do not start the engine in a closedgarage or in other enclosed areas.Exhaust fumes can be toxic. Alwaysopen the garage door before you start theengine.
If you smell exhaust fumes insideyour vehicle, have your vehiclechecked by your authorized dealerimmediately. Do not drive your vehicle ifyou smell exhaust fumes.
If you disconnect the battery, your vehiclemay exhibit some unusual drivingcharacteristics for approximately 5 miles(8 kilometers) after you reconnect it. Thisis because the engine management systemmust realign itself with the engine. You candisregard any unusual drivingcharacteristics during this period.
The powertrain control system meets allCanadian interference-causing equipmentstandard requirements regulating theimpulse electrical field or radio noise.
When you start the engine, avoid pressingthe accelerator pedal before and duringoperation. Only use the accelerator pedalwhen you have difficulty starting theengine.
If your vehicle is operated in a heavy snowstorm or blowing snow conditions, theengine air induction may become partiallyclogged with snow and ice. If this occurs,the engine may experience a significantreduction in power output. At the earliestopportunity, clear all the snow and iceaway from the air induction inlet.
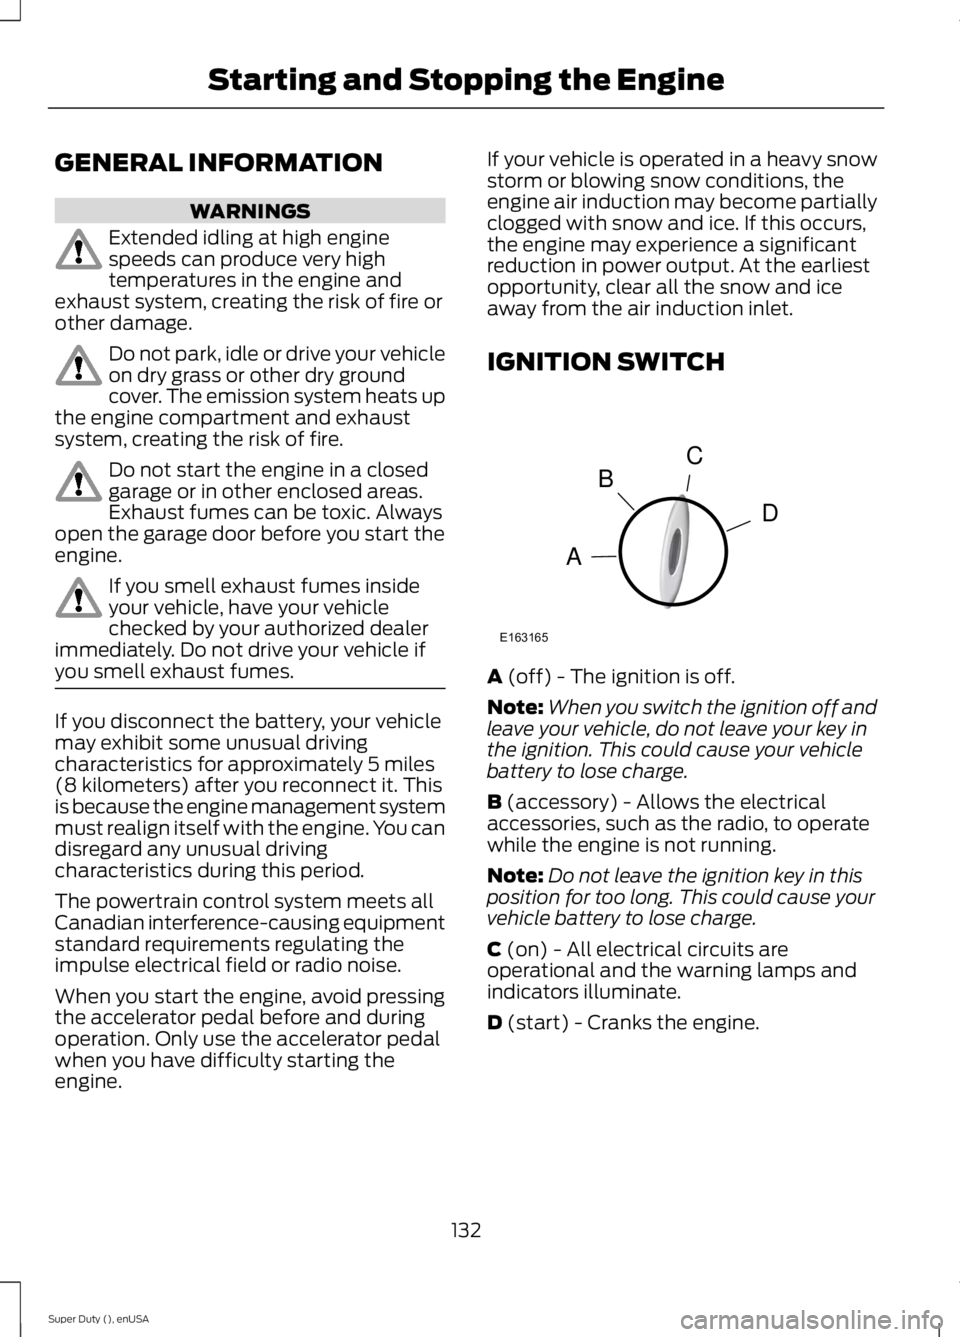
IGNITION SWITCH
A (off) - The ignition is off.
Note:When you switch the ignition off andleave your vehicle, do not leave your key inthe ignition. This could cause your vehiclebattery to lose charge.
B (accessory) - Allows the electricalaccessories, such as the radio, to operatewhile the engine is not running.
Note:Do not leave the ignition key in thisposition for too long. This could cause yourvehicle battery to lose charge.
C (on) - All electrical circuits areoperational and the warning lamps andindicators illuminate.
D (start) - Cranks the engine.
132
Super Duty (), enUSA
Starting and Stopping the EngineC
D
B
A
E163165
Page 136 of 470
STARTING A GASOLINE
ENGINE
When you start the engine, the idle speedincreases, this helps to warm up theengine. If the engine idle speed does notslow down automatically, have yourvehicle checked by an authorized dealer.
Before starting the engine check thefollowing:
•Make sure all occupants have fastenedtheir safety belts.
•Make sure the headlamps andelectrical accessories are off.
•Make sure the parking brake is on.
•Move the transmission selector leverto position P.
•Turn the ignition key to the on position.
Note:Do not touch the accelerator pedal.
1. Fully press the brake pedal.
2. Turn the key to the start position tostart the engine. Release the key whenthe engine starts.
Note:The engine may continue crankingfor up to 15 seconds or until it starts.
Note:If you cannot start the engine on thefirst try, wait for a short period and try again.
Failure to Start
If you cannot start the engine after threeattempts, wait 10 seconds and follow thisprocedure:
1. Fully press the brake pedal.
2. Fully press the accelerator pedal andhold it there.
3. Start the engine.
Stopping the Engine When YourVehicle is Stationary
1. Move the transmission selector leverto position P.
2. Turn the key to the off position.
3. Apply the parking brake.
Stopping the Engine When YourVehicle is Moving
WARNING
Switching off the engine when thevehicle is still moving will result in aloss of brake and steering assistance.The steering will not lock, but higher effortwill be required. When the ignition isswitched off, some electrical circuits,warning lamps and indicators may also beoff.
1. Move the transmission selector leverto position N and use the brakes tobring your vehicle to a safe stop.
2. When your vehicle has stopped, movethe transmission selector lever toposition P and turn the key to the offposition.
3. Apply the parking brake.
Cold Weather Starting (FlexibleFuel Vehicles Only)
The starting characteristics of all gradesof E85 ethanol make it unsuitable for usewhen ambient temperatures fall below0°F (-18°C). Consult your fuel distributorfor the availability of winter grade ethanol.As the outside temperature approachesfreezing, ethanol fuel distributors shouldsupply winter grade ethanol (same as withunleaded gasoline). If summer gradeethanol is used in cold weather conditions,0°F to 32°F (-18°C to 0°C), you mayexperience increased cranking times, roughidle or hesitation until the engine haswarmed up.
You may experience a decrease in peakperformance when the engine is cold whenoperating on E85 ethanol.
133
Super Duty (), enUSA
Starting and Stopping the Engine
Page 141 of 470
We recommend regular unleaded gasolinewith a pump (R+M)/2 octane rating of 87.Some stations offer fuels posted as regularwith an octane rating below 87, particularlyin high altitude areas. We do notrecommend fuels with an octane ratingbelow 87.
Do not be concerned if your enginesometimes knocks lightly. However, if itknocks heavily under most drivingconditions while you are using fuel with therecommended octane rating, see yourauthorized dealer to prevent any enginedamage.
RUNNING OUT OF FUEL
Avoid running out of fuel because thissituation may have an adverse effect onpowertrain components.
If you have run out of fuel:
•You may need to cycle the ignition fromoff to on several times after refuelingto allow the fuel system to pump thefuel from the tank to the engine. Onrestarting, cranking time will take a fewseconds longer than normal. Withkeyless ignition, just start the engine.Crank time will be longer than usual.
•Normally, adding 1 gallon (3.8 liters) offuel is enough to restart the engine. Ifthe vehicle is out of fuel and on a steepgrade, more than 1 gallon (3.8 liters)may be required.
•The service engine soon indicator maycome on. For more information on theservice engine soon indicator, SeeWarning Lamps and Indicators(page 77).
Refilling With a Portable FuelContainer
WARNINGS
The fuel system may be underpressure. If the fuel filler cap isventing vapor or if you hear a hissingsound, wait until it stops before completelyremoving the fuel filler cap. Otherwise, fuelmay spray out and cause personal injury.
Do not try to pry open or push openthe fuel system with foreign objects.This could damage the fuel systemand its seal and cause personal injury toyou or others.
Use the following directions when fillingfrom a portable fuel container:
1.Remove the fuel cap from the fuel fillerpipe by rotating it counter clockwise.
2. Slowly insert the portable fuelcontainer into the fuel filler opening.
3. Fill the vehicle with fuel from theportable fuel container.
4. 4. When done, remove the portablefuel container nozzle and reinstall fuelcap. Insert fuel cap into fuel filleropening and turn clockwise until a clickis heard.
REFUELING
WARNINGS
Fuel vapor burns violently and a fuelfire can cause severe injuries.
Read and follow all the instructionson the pump island.
Turn off your engine when you arerefueling.
Do not smoke if you are near fuel orrefueling your vehicle.
138
Super Duty (), enUSA
Fuel and Refueling
Page 143 of 470
FUEL CONSUMPTION
Empty reserve is the amount of fuelremaining in the tank after the fuel gaugeindicates empty. The amount of usablefuel in the empty reserve varies and shouldnot be relied upon to increase driving range.
•The usable capacity of the fuel tank isthe amount of fuel that can be addedinto the tank after the gauge indicatesempty
•The advertised capacity is the total fueltank size. See Capacities andSpecifications (page 301). It is thecombined usable capacity plus theempty reserve.
•Due to the empty reserve, you may notbe able to refuel the full amount of theadvertised capacity of the fuel tankeven when the fuel gauge reads empty.
Filling the Tank
For consistent results when filling the fueltank:
•Turn the ignition off before fueling; aninaccurate reading results if the engineis left running.
•Use the same fill rate(low-medium-high) each time the tankis filled.
•Allow no more than two automaticclick-offs when filling.
Results are most accurate when the fillingmethod is consistent.
Calculating Fuel Economy
Do not measure fuel economy during thefirst 1000 miles (1600 kilometers) ofdriving (this is your engine’s break-inperiod); a more accurate measurement isobtained after 2000 miles - 3000 miles(3200 kilometers - 4800 kilometers). Also,fuel expense, frequency of fill ups or fuelgauge readings are not accurate ways tomeasure fuel economy.
1.Fill the fuel tank completely and recordthe initial odometer reading.
2. Each time you fill the tank, record theamount of fuel added.
3.After at least 3 to 5 tank fill ups, fill thefuel tank and record the currentodometer reading.
4. Subtract your initial odometer readingfrom the current odometer reading.
5. Calculate fuel economy by dividingmiles traveled by gallons used (ForMetric: Multiply liters used by 100, thendivide by kilometers traveled).
Keep a record for at least 1 month andrecord the type of driving (city or highway).This provides an accurate estimate of thevehicle’s fuel economy under currentdriving conditions. Additionally, keepingrecords during summer and winter showhow temperature impacts fuel economy.In general, lower temperatures mean lowerfuel economy.
Conditions
•Heavily loading a vehicle or towing atrailer may reduce fuel economy at anyspeed.
•Carrying unnecessary weight mayreduce fuel economy (approximately1 mpg [0.4 km/L] is lost for every 400pounds [180 kilograms] of weightcarried).
140
Super Duty (), enUSA
Fuel and Refueling
Page 144 of 470
•Adding certain accessories to yourvehicle (for example bug deflectors,rollbars/light bars, running boards, skiracks) may reduce fuel economy.
•Using fuel blended with alcohol maylower fuel economy.
•Fuel economy may decrease with lowertemperatures during the first 8–10miles (12–16 kilometers) of driving.
•Driving on flat terrain offers improvedfuel economy as compared to drivingon hilly terrain.
•Transmissions give their best fueleconomy when operated in the topcruise gear and with steady pressureon the gas pedal.
•Close windows for high speed driving.
EMISSION CONTROL SYSTEM
WARNINGS
Do not park, idle, or drive your vehiclein dry grass or other dry ground cover.The emission system heats up theengine compartment and exhaust system,which can start a fire.
Exhaust leaks may result in entry ofharmful and potentially lethal fumesinto the passenger compartment. Ifyou smell exhaust fumes inside yourvehicle, have your dealer inspect yourvehicle immediately. Do not drive if yousmell exhaust fumes.
Your vehicle is equipped with variousemission control components and acatalytic converter that will enable yourvehicle to comply with applicable exhaustemission standards. To make sure that thecatalytic converter and other emissioncontrol components continue to workproperly:
•Use only the specified fuel listed.
•Avoid running out of fuel.
•Do not turn off the ignition while yourvehicle is moving, especially at highspeeds.
•Have the items listed in scheduledmaintenance information performedaccording to the specified schedule.
The scheduled maintenance items listedin scheduled maintenance information areessential to the life and performance ofyour vehicle and to its emissions system.
If you use parts other than Ford, Motorcraftor Ford-authorized parts for maintenancereplacements, or for service ofcomponents affecting emission control,such non-Ford parts should be theequivalent to genuine Ford Motor Companyparts in performance and durability.
Illumination of the service engine soonindicator, charging system warning light orthe temperature warning light, fluid leaks,strange odors, smoke or loss of enginepower could indicate that the emissioncontrol system is not working properly.
An improperly operating or damagedexhaust system may allow exhaust toenter the vehicle. Have a damaged orimproperly operating exhaust systeminspected and repaired immediately.
Do not make any unauthorized changes toyour vehicle or engine. By law, vehicleowners and anyone who manufactures,repairs, services, sells, leases, tradesvehicles, or supervises a fleet of vehiclesare not permitted to intentionally removean emission control device or prevent itfrom working. Information about yourvehicle’s emission system is on the VehicleEmission Control Information Decallocated on or near the engine. This decalalso lists engine displacement
Please consult your warranty informationfor complete details.
141
Super Duty (), enUSA
Fuel and Refueling
Page 145 of 470
On-Board Diagnostics (OBD-II)
Your vehicle is equipped with an on-boarddiagnostics system (OBD-II) that monitorsthe engine’s emission control system. Thissystem protects the environment byensuring that your vehicle continues tomeet government emission standards. TheOBD-II system also assists your authorizeddealer in properly servicing your vehicle.
When the service engine soonindicator illuminates, the OBD-IIsystem has detected amalfunction. Temporary malfunctions maycause the service engine soon indicator toilluminate.
Examples of temporary malfunctions are:
•the vehicle has run out of fuel—theengine may misfire or run poorly
•poor fuel quality or water in thefuel—the engine may misfire or runpoorly
•the fuel fill inlet may not have beenproperly closed See Refueling (page138).
•driving through deep water—theelectrical system may be wet.
You can correct these temporarymalfunctions by filling the fuel tank withgood quality fuel, properly closing the fuelfill inlet or letting the electrical system dryout. After three driving cycles without theseor any other temporary malfunctionspresent, the service engine soon indicatorshould stay off the next time you start theengine. A driving cycle consists of a coldengine startup followed by mixedcity/highway driving. No additional vehicleservice is required.
If the service engine soon indicator remainson, have your vehicle serviced at the firstavailable opportunity. Although somemalfunctions detected by the OBD-II maynot have symptoms that are apparent,continued driving with the service enginesoon indicator on can result in increasedemissions, lower fuel economy, reducedengine and transmission smoothness, andlead to more costly repairs.
Readiness forInspection/Maintenance (I/M)Testing
Some state/provincial and localgovernments may haveInspection/Maintenance (I/M) programsto inspect the emission control equipmenton your vehicle. Failure to pass thisinspection could prevent you from gettinga vehicle registration.
If the service engine soonindicator is on or the bulb doesnot work, you may need to havethe vehicle serviced. See On-BoardDiagnostics (OBD-II).
Your vehicle may not pass the I/M test ifthe service engine soon indicator is on ornot working properly (bulb is burned out),or if the OBD-II system has determinedthat some of the emission control systemshave not been properly checked. In thiscase, your vehicle is not ready for I/Mtesting.
If the vehicle’s engine or transmission hasjust been serviced, or the battery hasrecently run down or been replaced, theOBD-II system may indicate that thevehicle is not ready for I/M testing. Todetermine if the vehicle is ready for I/Mtesting, turn the ignition key to the onposition for 15 seconds without cranking
142
Super Duty (), enUSA
Fuel and Refueling
Page 147 of 470

AUTOMATIC TRANSMISSION
WARNING
Always set the parking brake fullyand make sure the gearshift islatched in P (Park). Turn the ignitionto the off position and remove the keywhenever you leave your vehicle.
Understanding the Shift Positionsof the 5–Speed AutomaticTransmission (If Equipped)
Putting your vehicle in or out of gear:
1. Fully press down the brake pedal.
2. Move the gearshift lever into thedesired gear.
3. Come to a complete stop.
4. Move the gearshift lever and securelylatch it in P (Park)
P (Park)
This position locks the transmission andprevents the rear wheels from turning.
R (Reverse)
With the gearshift lever in R (Reverse), thevehicle will move backward. Always cometo a complete stop before shifting into andout of R (Reverse).
N (Neutral)
With the gearshift lever in N (Neutral), thevehicle can be started and is free to roll.Hold the brake pedal down while in thisposition.
D (Overdrive) with tow/haul off
D (Overdrive) with tow/haul off is thenormal driving position for the best fueleconomy. The overdrive function allowsautomatic upshifts and downshifts throughgears one through five.
D (Overdrive) with tow/haul on
The tow/haul feature improvestransmission operation when towing atrailer or a heavy load. All transmissiongear ranges are available when usingtow/haul.
To activate tow/haul, press thebutton on the end of thegearshift lever. The TOW HAULindicator light will illuminate in theinstrument cluster.
Tow/haul delays upshifts to reducefrequency of transmission shifting.Tow/haul also provides engine braking inall forward gears when the transmission isin the D (Overdrive) position; this enginebraking will slow the vehicle and assist thedriver in controlling the vehicle whendescending a grade. Depending on drivingconditions and load conditions, the
144
Super Duty (), enUSA
TransmissionE161511
P R N D 3 2 1 E163182 E161509
Page 152 of 470
WARNINGS
When doing this procedure, you willbe taking the vehicle out of parkwhich means the vehicle can rollfreely. To avoid unwanted vehiclemovement, always fully set the parkingbrake prior to doing this procedure. Usewheel chocks if appropriate.
If the parking brake is fully released,but the brake warning lamp remainsilluminated, the brakes may not beworking properly. See your authorizeddealer.
Your vehicle is equipped with a brake-shiftinterlock feature that prevents thegearshift lever from being moved from P(Park) when the ignition is in the 3 (on)position and the brake pedal is not pressed.
If you cannot move the gearshift lever outof P (Park) position with the ignition in the4 (on) position and the brake pedalpressed, a malfunction may have occurred.It is possible that a fuse has blown or thevehicle’s brake lamps are not operatingproperly. See Fuse Specification Chart(page 223).
If the fuse is not blown and the brakelamps are working properly, the followingprocedure will allow you to move thegearshift lever from P (Park):
1. Apply the parking brake. Turn theignition key to 1 (off), then remove thekey.
2. Move the steering column to the fulldown and full rearward position(toward the driver’s seat).
3. Remove the gearshift lever boot.
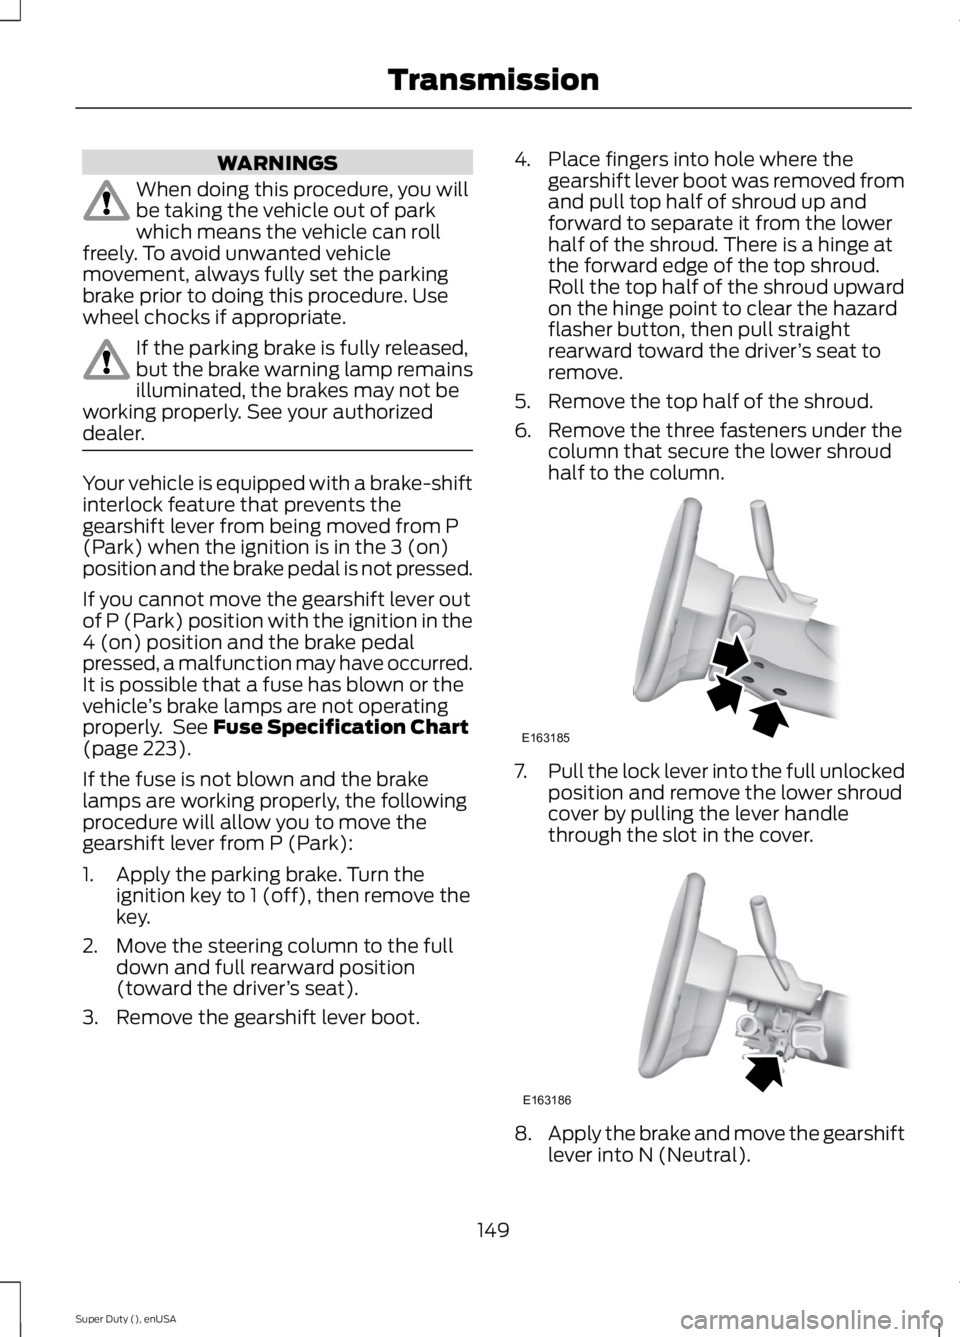
4. Place fingers into hole where thegearshift lever boot was removed fromand pull top half of shroud up andforward to separate it from the lowerhalf of the shroud. There is a hinge atthe forward edge of the top shroud.Roll the top half of the shroud upwardon the hinge point to clear the hazardflasher button, then pull straightrearward toward the driver’s seat toremove.
5. Remove the top half of the shroud.
6. Remove the three fasteners under thecolumn that secure the lower shroudhalf to the column.
7.Pull the lock lever into the full unlockedposition and remove the lower shroudcover by pulling the lever handlethrough the slot in the cover.
8.Apply the brake and move the gearshiftlever into N (Neutral).
149
Super Duty (), enUSA
TransmissionE163185 E163186