2015 FORD F250 SUPER DUTY park shifting
[x] Cancel search: park shiftingPage 147 of 470

AUTOMATIC TRANSMISSION
WARNING
Always set the parking brake fullyand make sure the gearshift islatched in P (Park). Turn the ignitionto the off position and remove the keywhenever you leave your vehicle.
Understanding the Shift Positionsof the 5–Speed AutomaticTransmission (If Equipped)
Putting your vehicle in or out of gear:
1. Fully press down the brake pedal.
2. Move the gearshift lever into thedesired gear.
3. Come to a complete stop.
4. Move the gearshift lever and securelylatch it in P (Park)
P (Park)
This position locks the transmission andprevents the rear wheels from turning.
R (Reverse)
With the gearshift lever in R (Reverse), thevehicle will move backward. Always cometo a complete stop before shifting into andout of R (Reverse).
N (Neutral)
With the gearshift lever in N (Neutral), thevehicle can be started and is free to roll.Hold the brake pedal down while in thisposition.
D (Overdrive) with tow/haul off
D (Overdrive) with tow/haul off is thenormal driving position for the best fueleconomy. The overdrive function allowsautomatic upshifts and downshifts throughgears one through five.
D (Overdrive) with tow/haul on
The tow/haul feature improvestransmission operation when towing atrailer or a heavy load. All transmissiongear ranges are available when usingtow/haul.
To activate tow/haul, press thebutton on the end of thegearshift lever. The TOW HAULindicator light will illuminate in theinstrument cluster.
Tow/haul delays upshifts to reducefrequency of transmission shifting.Tow/haul also provides engine braking inall forward gears when the transmission isin the D (Overdrive) position; this enginebraking will slow the vehicle and assist thedriver in controlling the vehicle whendescending a grade. Depending on drivingconditions and load conditions, the
144
Super Duty (), enUSA
TransmissionE161511
P R N D 3 2 1 E163182 E161509
Page 156 of 470

Shifting between system modes
Note:Do not perform these operations ifthe rear wheels are slipping.
Note:Some noise may be heard as the 4x4system shifts or engages. This is normal. Inorder to reduce engagement noise, it isrecommended that all shifts be performedat speeds below 3 mph (5 km/h).
Note:The vehicle should not be driven in4X4 High with the hub locks disengaged asthis condition may damage driveline systemcomponents.
Engage the locking hubs by rotating thehub lock control from FREE to LOCK, thenmove the transfer case lever from 2H(2WD) to 4H (4x4 High) at a stop or avehicle speed below 3 mph (5 km/h).
Move the transfer case lever from 4H (4x4High) to 2H (2WD) at a stop or a vehiclespeed below 3 mph (5 km/h), thendisengage the locking hubs (optional) byrotating the hub lock control from LOCKto FREE.
For proper operation, make sure that bothindicator arrows on the hub are aligned,and that both hubs are set to either FREEor LOCK.
Shifting to/from 4L (4x4 Low)
1. Bring the vehicle to a stop or a speedbelow 3 mph (5 km/h).
2. Place the transmission in N (Neutral).
3. Move the transfer case shift leverthrough N (Neutral) directly to thedesired position.
4. If the transfer case does not, or onlypartially moves to the desired position,perform a shift with the transmissionin N (Neutral) and the vehicle rolling ata speed below 3 mph (5 km/h).
5.If shifting to 2H (2WD) with the vehicleat a complete stop, disengage thelocking hubs (optional) by rotating thehub lock control from LOCK to FREE.
Using the N (Neutral) position
WARNING
Do not leave the vehicle unattendedwith the transfer case in the N(Neutral) position. Always set theparking brake fully and turn off the ignitionwhen leaving the vehicle.
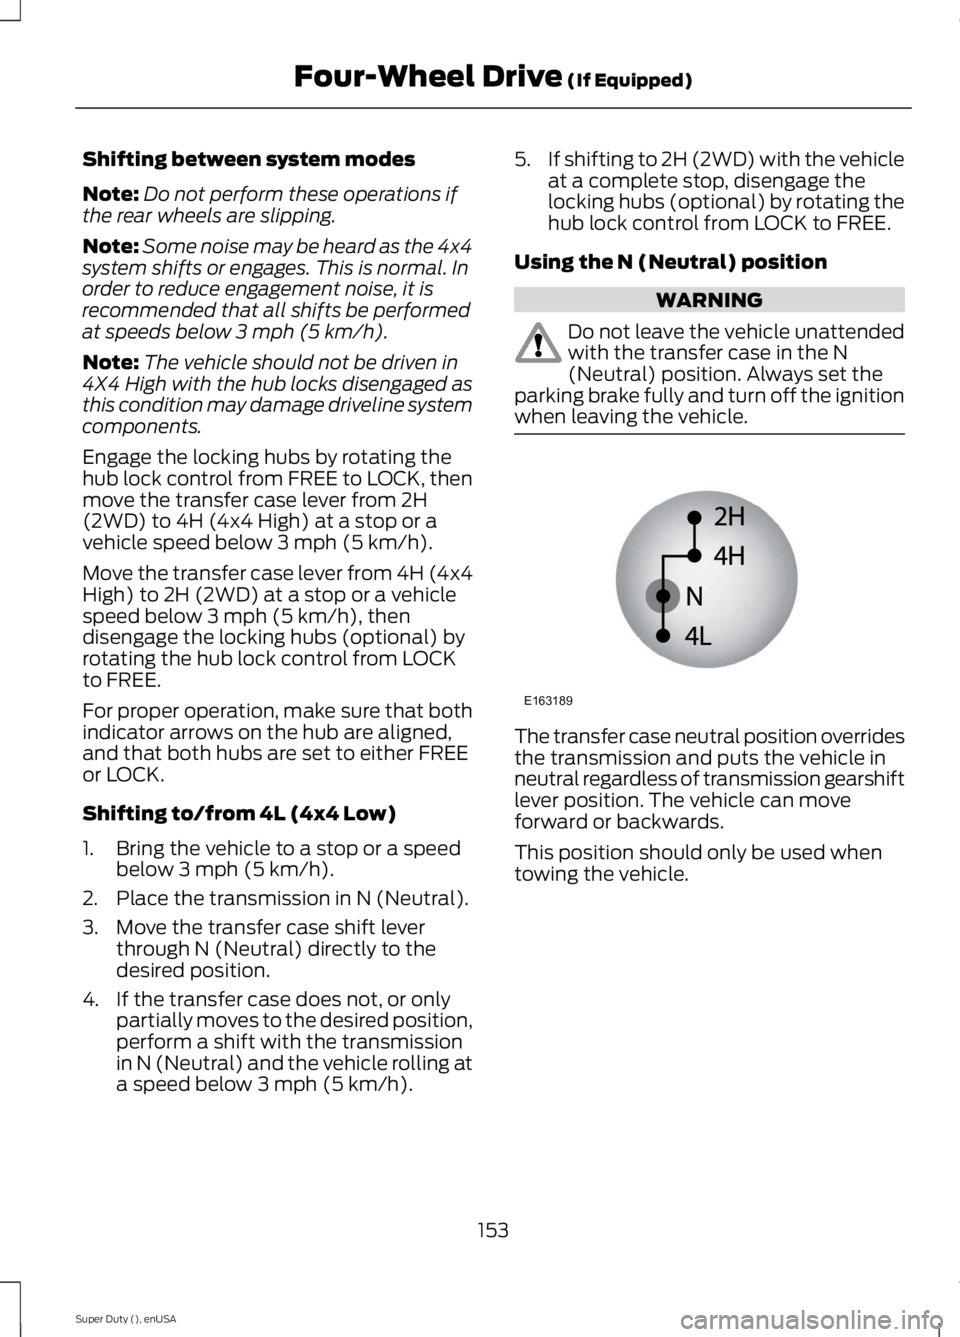
The transfer case neutral position overridesthe transmission and puts the vehicle inneutral regardless of transmission gearshiftlever position. The vehicle can moveforward or backwards.
This position should only be used whentowing the vehicle.
153
Super Duty (), enUSA
Four-Wheel Drive (If Equipped)E163189
Page 161 of 470

If your vehicle has anti-lock brakes, applythe brakes steadily. Do not pump thebrakes.
Driving on Snow and Ice
WARNING
If you are driving in slipperyconditions that require tire chains orcables, then it is critical that you drivecautiously. Keep speeds down, allow forlonger stopping distances and avoidaggressive steering to reduce the chancesof a loss of vehicle control which can leadto serious injury or death. If the rear end ofyour vehicle slides while cornering, steer inthe direction of the slide until you regaincontrol of your vehicle.
Note:Excessive tire slippage can causetransmission damage.
Four-wheel drive vehicles have advantagesover two-wheel drive vehicles in snow andice but can skid like any other vehicle.Should you start to slide while driving onsnowy or icy roads, turn the steering wheelin the direction of the slide until you regaincontrol.
Avoid sudden applications of power andquick changes of direction on snow andice. Apply the accelerator slowly andsteadily when starting from a full stop.
Avoid sudden braking. Although afour-wheel drive vehicle may acceleratebetter than a two-wheel drive vehicle insnow and ice, it will not stop any faster asbraking occurs at all four wheels. Do notbecome overconfident as to roadconditions.
Make sure you allow sufficient distancebetween you and other vehicles forstopping. Drive slower than usual andconsider using one of the lower gears. Inemergency stopping situations, apply thebrake steadily. Do not pump the brakepedal. See Hints on Driving WithAnti-Lock Brakes (page 162).
If Your Vehicle Gets Stuck In Mud orSnow
WARNING
Do not spin the wheels at over 35mph (56 km/h). The tires may failand injure a passenger or bystander.
If your vehicle gets stuck in mud or snow,it may be rocked out by shifting betweenforward and reverse gears, stoppingbetween shifts in a steady pattern. Presslightly on the accelerator in each gear.
Note:Do not rock your vehicle if the engineis not at normal operating temperature,damage to the transmission may occur.
Note:Do not rock your vehicle for morethan a minute, damage to the transmissionand tires may occur or the engine mayoverheat.
Parking
WARNINGS
If the parking brake is fully released,but the brake warning lamp remainsilluminated, the brakes may not beworking properly. See your authorizeddealer.
Always set the parking brake fullyand make sure the gearshift islatched in P (Park). Turn the ignitionto the off position and remove the keywhenever you leave your vehicle.
158
Super Duty (), enUSA
Four-Wheel Drive (If Equipped)
Page 178 of 470

Fixed guideline: Yellow zoneD
Fixed guideline: Red zoneE
Rear bumperF
Fixed guidelines are always shown in thedisplay, but the active guidelines onlydisplay when the steering wheel is turned.To use active guidelines, turn the steeringwheel to point the guidelines toward anintended path. If the steering wheelposition is changed while reversing, thevehicle might deviate from the originalintended path.
The active guidelines fade in and outdepending on the steering wheel position.The active guidelines are not shown whenthe steering wheel position is straight.
Always use caution while reversing.Objects in the red zone are closest to yourvehicle and objects in the green zone arefarther away. Objects are getting closer toyour vehicle as they move from the greenzone to the yellow or red zones. Use theside view mirrors and rear view mirror toget better coverage on both sides and rearof your vehicle.
Enhanced Park Aids
Note:Enhanced park aids is only availablewhen the transmission is in reverse (R).
Note:The reverse sensing system is noteffective at speeds above 3 mph (5 km/h)and may not detect certain angular ormoving objects.
The system uses red, yellow and greenhighlights which appear on top of the videoimage when an object is detected by thereverse sensing system. The alert highlightsthe closest object detected. The reversesensing alert can be disabled and if visualpark aid alert is enabled, highlighted areasare still displayed.
Selectable settings for this feature are ONand OFF.
Manual Zoom
WARNING
When manual zoom is on, the fullarea behind your vehicle is notshown. Be aware of yoursurroundings when using the manual zoomfeature.
Note:Manual zoom is only available whenthe transmission is in reverse (R).
Note:When manual zoom is enabled, onlythe centerline is shown.
This feature allows you to get a closer viewof an object behind your vehicle (forexample, a trailer). The zoomed imagekeeps the bumper in the image to providea reference. The zoom is only active whilethe transmission is in reverse (R). Whenthe transmission is shifted out of reverse(R), the feature automatically turns offand must be reset when it is used again.
Selectable settings for this feature is OFF,Level 1, Level 2 and Level 3. The selectedlevel will appear between the buttons (forexample, Level 1) The default setting forthe manual zoom is OFF.
Rear Camera Delay
When shifting the transmission out ofreverse (R) and into any gear other thanpark (P), the camera image remains in thedisplay until your vehicle speed reaches 5mph (8 km/h). This occurs when the rearcamera delay feature is on or until a radiobutton is selected.
Selectable settings for this feature are ONand OFF. The default setting for the rearcamera delay is ON.
175
Super Duty (), enUSA
Parking Aids
Page 207 of 470

•When stopped in congested orheavy traffic during hotweather, place the gearshift inposition P to aid engine andtransmission cooling and tohelp A/C performance.
•Turn off the speed control withheavy loads or in hilly terrain.The speed control may turn offautomatically when you aretowing on long, steep grades.
•Shift to a lower gear whendriving down a long or steephill. Do not apply the brakescontinuously, as they mayoverheat and become lesseffective.
•If your transmission is equippedwith a Grade Assist orTow/Haul feature, use thisfeature when towing. Thisprovides engine braking andhelps eliminate excessivetransmission shifting foroptimum fuel economy andtransmission cooling.
•If your vehicle is equipped withAdvanceTrac with RSC, thissystem may turn on duringtypical cornering maneuverswith a heavily loaded trailer.This is normal. Turning thecorner at a slower speed whiletowing may reduce thistendency.
•If you are towing a trailerfrequently in hot weather, hillyconditions, at the grosscombined weight rating (or anycombination of these factors),consider refilling your rear axlewith synthetic gear lubricant (ifthe axle is not already filledwith it). See Capacities andSpecifications (page 301).
•Allow more distance forstopping with a trailerattached. Anticipate stops andbrake gradually.
•Avoid parking on a grade.However, if you must park on agrade:
1. Turn the steering wheel topoint your vehicle tires awayfrom traffic flow.
2.Set your vehicle parking brake.
3.Place the automatictransmission in position P.
4.Place wheel chocks in frontand back of the trailer wheels.(Chocks not included withvehicle.)
Your vehicle may be equippedwith a temporary or conventionalspare tire. A "temporary" spare tireis different in size (diameter orwidth), tread-type (All-Season orAll Terrain) or is from a differentmanufacturer than the road tireson your vehicle. Consultinformation on the tire label orSafety Compliance label forlimitations when using.
204
Super Duty (), enUSA
Towing