2015 FORD F250 SUPER DUTY fuel
[x] Cancel search: fuelPage 155 of 470
•provides 4x4 High engagement anddisengagement while the vehicle ismoving.
•is operated by a rotary control locatedon the instrument panel that allowsyou select 4x2, 4x4 High or 4x4 Lowoperation.
•uses auto-manual hub locks that canbe engaged and disengagedautomatically based on the 4x4 modeselected.
•will increase fuel economy when usedin the recommended AUTO lock mode.
4WD Indicator Lights
Note:When a 4X4 system fault is present,the system will typically remain in whichever4X4 mode was selected prior to the faultcondition occurring. It will not default to 4X2in all circumstances. When this warning isdisplayed, have your vehicle serviced by anauthorized dealer.
4X2
Momentarily illuminates when2H is selected.
4X4 HIGH
Continuously illuminates when4H is selected.
4X4 LOW
Continuously illuminates when4L is selected.
CHECK 4X4
Displays when a 4X4 fault ispresent.
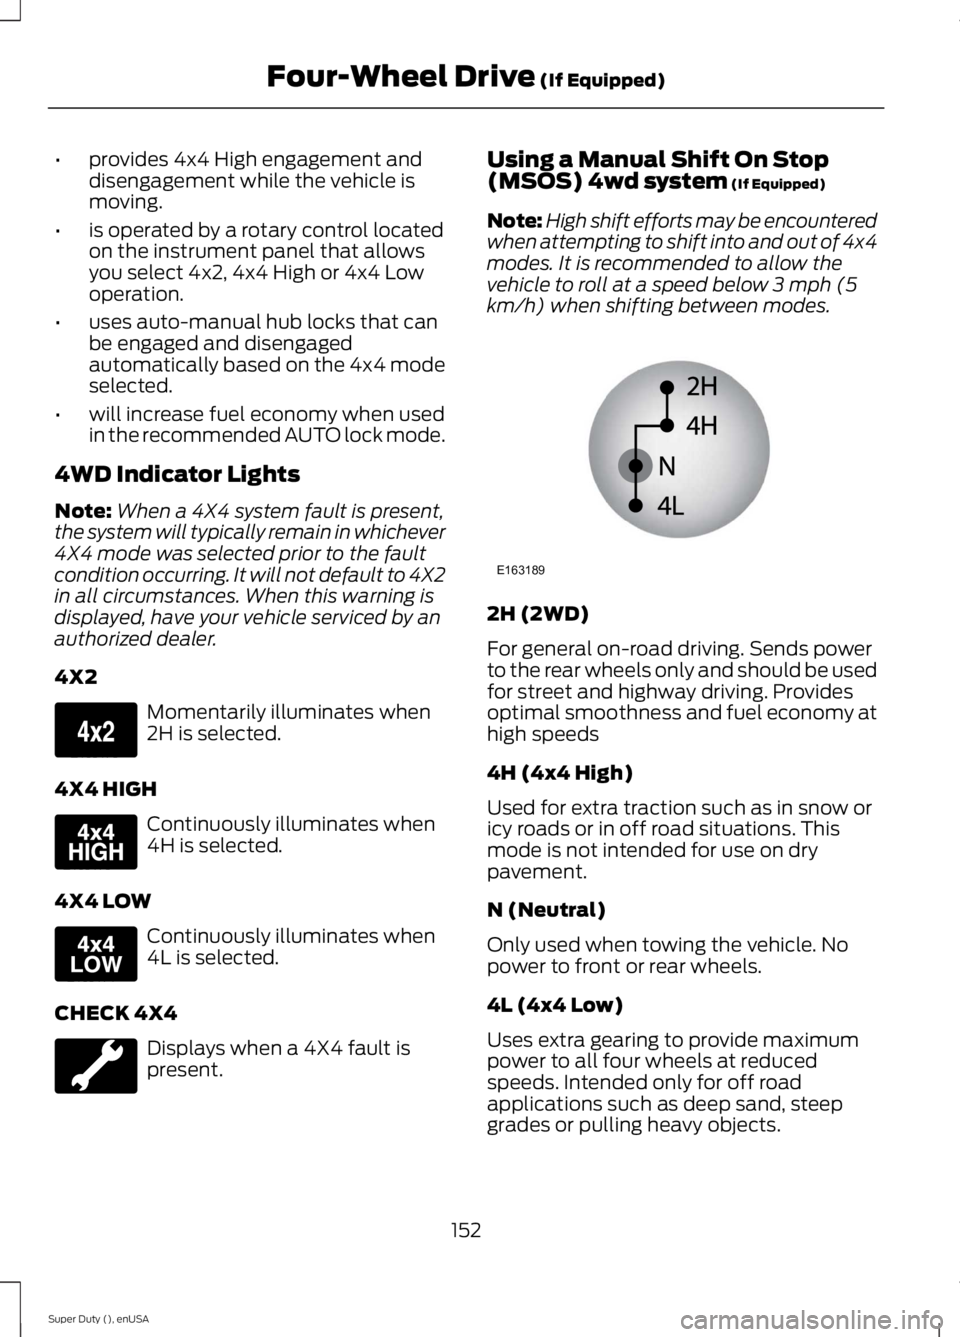
Using a Manual Shift On Stop(MSOS) 4wd system (If Equipped)
Note:High shift efforts may be encounteredwhen attempting to shift into and out of 4x4modes. It is recommended to allow thevehicle to roll at a speed below 3 mph (5km/h) when shifting between modes.
2H (2WD)
For general on-road driving. Sends powerto the rear wheels only and should be usedfor street and highway driving. Providesoptimal smoothness and fuel economy athigh speeds
4H (4x4 High)
Used for extra traction such as in snow oricy roads or in off road situations. Thismode is not intended for use on drypavement.
N (Neutral)
Only used when towing the vehicle. Nopower to front or rear wheels.
4L (4x4 Low)
Uses extra gearing to provide maximumpower to all four wheels at reducedspeeds. Intended only for off roadapplications such as deep sand, steepgrades or pulling heavy objects.
152
Super Duty (), enUSA
Four-Wheel Drive (If Equipped)E163173 E163175 E163174 E163189
Page 157 of 470
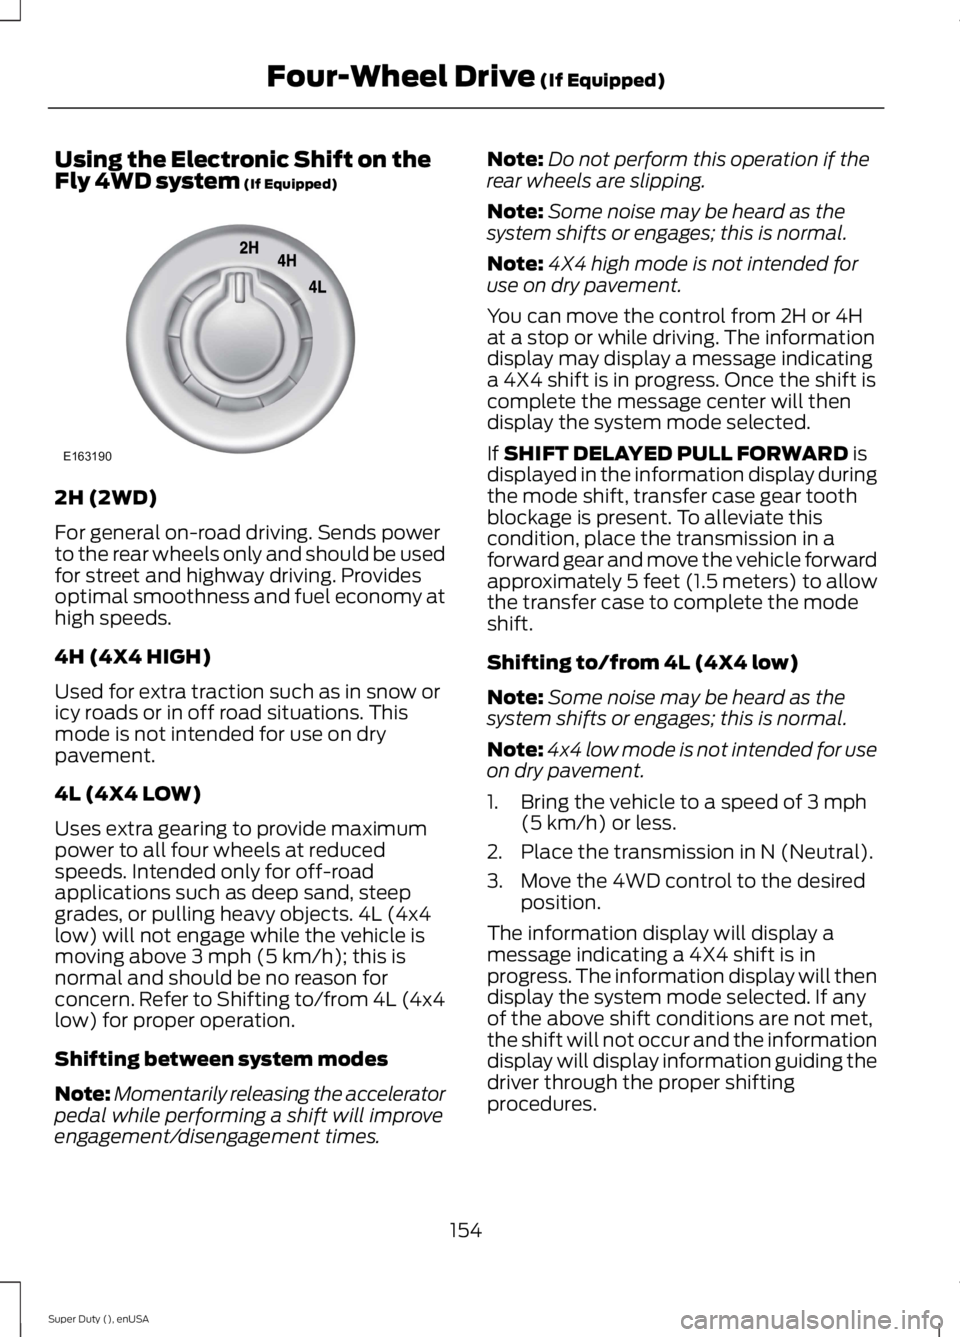
Using the Electronic Shift on theFly 4WD system (If Equipped)
2H (2WD)
For general on-road driving. Sends powerto the rear wheels only and should be usedfor street and highway driving. Providesoptimal smoothness and fuel economy athigh speeds.
4H (4X4 HIGH)
Used for extra traction such as in snow oricy roads or in off road situations. Thismode is not intended for use on drypavement.
4L (4X4 LOW)
Uses extra gearing to provide maximumpower to all four wheels at reducedspeeds. Intended only for off-roadapplications such as deep sand, steepgrades, or pulling heavy objects. 4L (4x4low) will not engage while the vehicle ismoving above 3 mph (5 km/h); this isnormal and should be no reason forconcern. Refer to Shifting to/from 4L (4x4low) for proper operation.
Shifting between system modes
Note:Momentarily releasing the acceleratorpedal while performing a shift will improveengagement/disengagement times.
Note:Do not perform this operation if therear wheels are slipping.
Note:Some noise may be heard as thesystem shifts or engages; this is normal.
Note:4X4 high mode is not intended foruse on dry pavement.
You can move the control from 2H or 4Hat a stop or while driving. The informationdisplay may display a message indicatinga 4X4 shift is in progress. Once the shift iscomplete the message center will thendisplay the system mode selected.
If SHIFT DELAYED PULL FORWARD isdisplayed in the information display duringthe mode shift, transfer case gear toothblockage is present. To alleviate thiscondition, place the transmission in aforward gear and move the vehicle forwardapproximately 5 feet (1.5 meters) to allowthe transfer case to complete the modeshift.
Shifting to/from 4L (4X4 low)
Note:Some noise may be heard as thesystem shifts or engages; this is normal.
Note:4x4 low mode is not intended for useon dry pavement.
1. Bring the vehicle to a speed of 3 mph(5 km/h) or less.
2. Place the transmission in N (Neutral).
3. Move the 4WD control to the desiredposition.
The information display will display amessage indicating a 4X4 shift is inprogress. The information display will thendisplay the system mode selected. If anyof the above shift conditions are not met,the shift will not occur and the informationdisplay will display information guiding thedriver through the proper shiftingprocedures.
154
Super Duty (), enUSA
Four-Wheel Drive (If Equipped)E163190
Page 181 of 470
LOAD LIMIT
Vehicle Loading - with andwithout a Trailer
This section will guide you in theproper loading of your vehicle,trailer or both, to keep your loadedvehicle weight within its designrating capability, with or withouta trailer. Properly loading yourvehicle will provide maximumreturn of vehicle designperformance. Before loading yourvehicle, familiarize yourself with
the following terms fordetermining your vehicle’s weightratings, with or without a trailer,from the vehicle’s Tire Label orSafety Compliance CertificationLabel:
Base Curb Weight - is the weightof the vehicle including a full tankof fuel and all standardequipment. It does not includepassengers, cargo, or optionalequipment.
Vehicle Curb Weight - is theweight of your new vehicle whenyou picked it up from yourauthorized dealer plus anyaftermarket equipment.
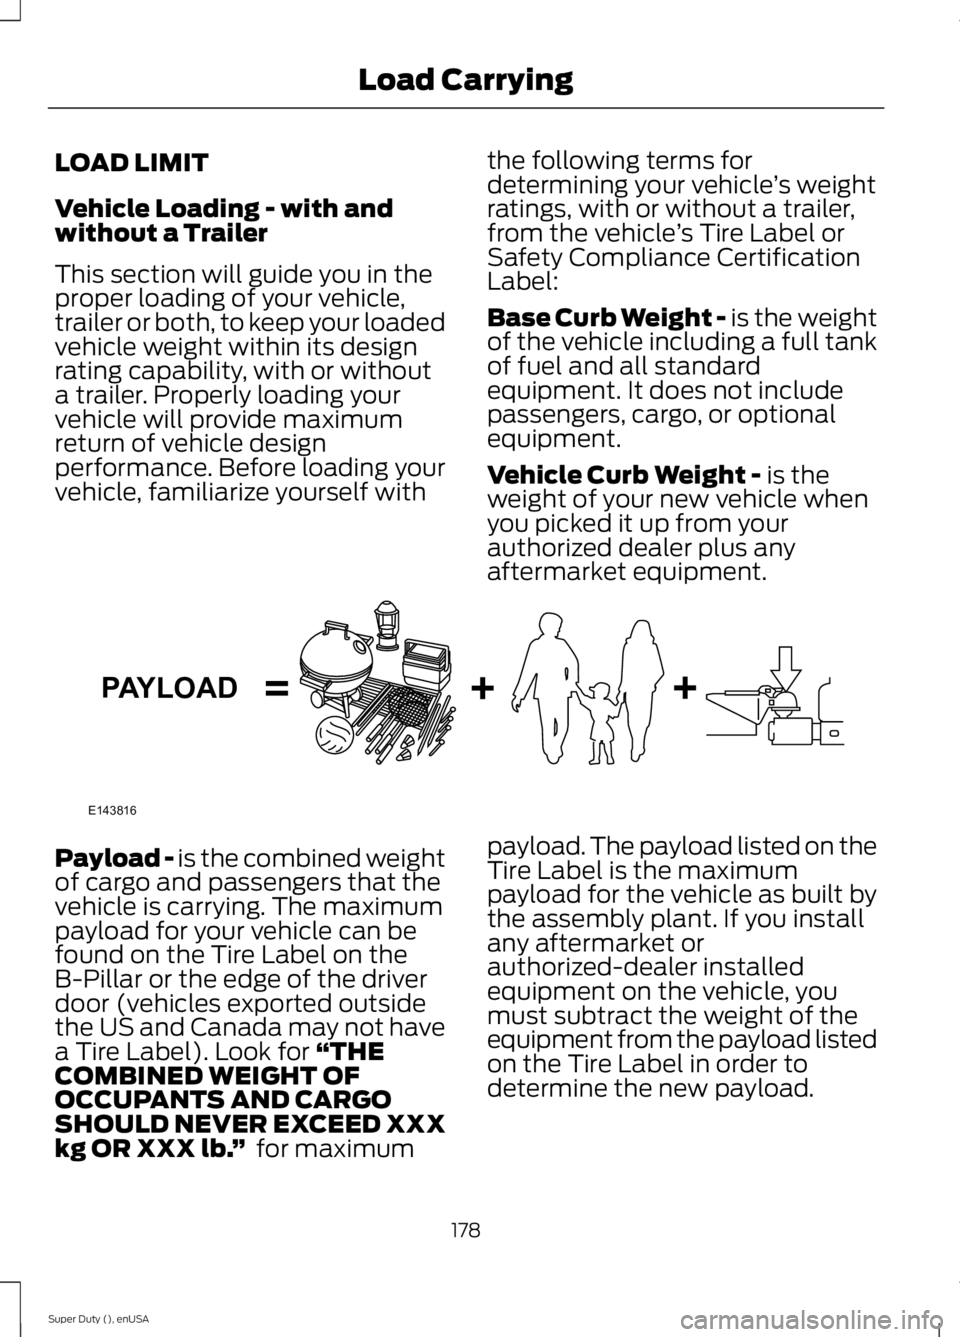
Payload - is the combined weightof cargo and passengers that thevehicle is carrying. The maximumpayload for your vehicle can befound on the Tire Label on theB-Pillar or the edge of the driverdoor (vehicles exported outsidethe US and Canada may not havea Tire Label). Look for “THECOMBINED WEIGHT OFOCCUPANTS AND CARGOSHOULD NEVER EXCEED XXXkg OR XXX lb.” for maximum
payload. The payload listed on theTire Label is the maximumpayload for the vehicle as built bythe assembly plant. If you installany aftermarket orauthorized-dealer installedequipment on the vehicle, youmust subtract the weight of theequipment from the payload listedon the Tire Label in order todetermine the new payload.
178
Super Duty (), enUSA
Load CarryingE143816PAYLOAD
Page 193 of 470
TRAILER SWAY CONTROL (IF
EQUIPPED)
WARNING
Turning off trailer sway controlincreases the risk of loss of vehiclecontrol, serious injury or death. Forddoes not recommend disabling this featureexcept in situations where speed reductionmay be detrimental (such as hill climbing),the driver has significant trailer towingexperience, and can control trailer swayand maintain safe operation.
Note:This feature does not prevent trailersway, but reduces it once it begins.
Note:This feature cannot stop all trailersfrom swaying.
Note:In some cases, if vehicle speed is toohigh, the system may activate multipletimes, gradually reducing vehicle speed.
This feature applies your vehicle brakes atindividual wheels and, if necessary, reducesengine power. If the trailer begins to sway,the stability control light flashes and themessage TRAILER SWAY REDUCESPEED appears in the information display.The first thing to do is slow your vehicledown, then pull safely to the side of theroad and check for proper tongue load andtrailer load distribution. See LoadCarrying (page 178).
RECOMMENDED TOWING
WEIGHTS
Note:Do not exceed a trailerweight of 5000 pounds (2268kilograms) when towing with, orby, bumper only.
Note:Make sure to take intoconsideration trailer frontal area.Do not exceed 60 feet2 (5.6
meters2) trailer frontal area.
Note:Exceeding this limitationmay significantly reduce theperformance of your towingvehicle. Selecting a trailer with alow aerodynamic drag and roundedfront design helps optimizeperformance and fuel economy.
Note:For high altitude operation,reduce the gross combined weightby 2% per 1000 feet (300 meters)starting at the 1000 foot (300meter) elevation point.
Note:Certain states requireelectric trailer brakes for trailersover a specified weight. Be sure tocheck state regulations for thisspecified weight. The maximumtrailer weights listed may be limitedto this specified weight, as yourvehicle's electrical system may notinclude the wiring connectorneeded to use electric trailerbrakes.
Your vehicle may tow a class I, II,III and IV trailer or fifth-wheeltrailer provided the maximumtrailer weight is less than or equalto the maximum trailer weightlisted for your vehicleconfiguration on the followingchart.
190
Super Duty (), enUSA
Towing
Page 198 of 470
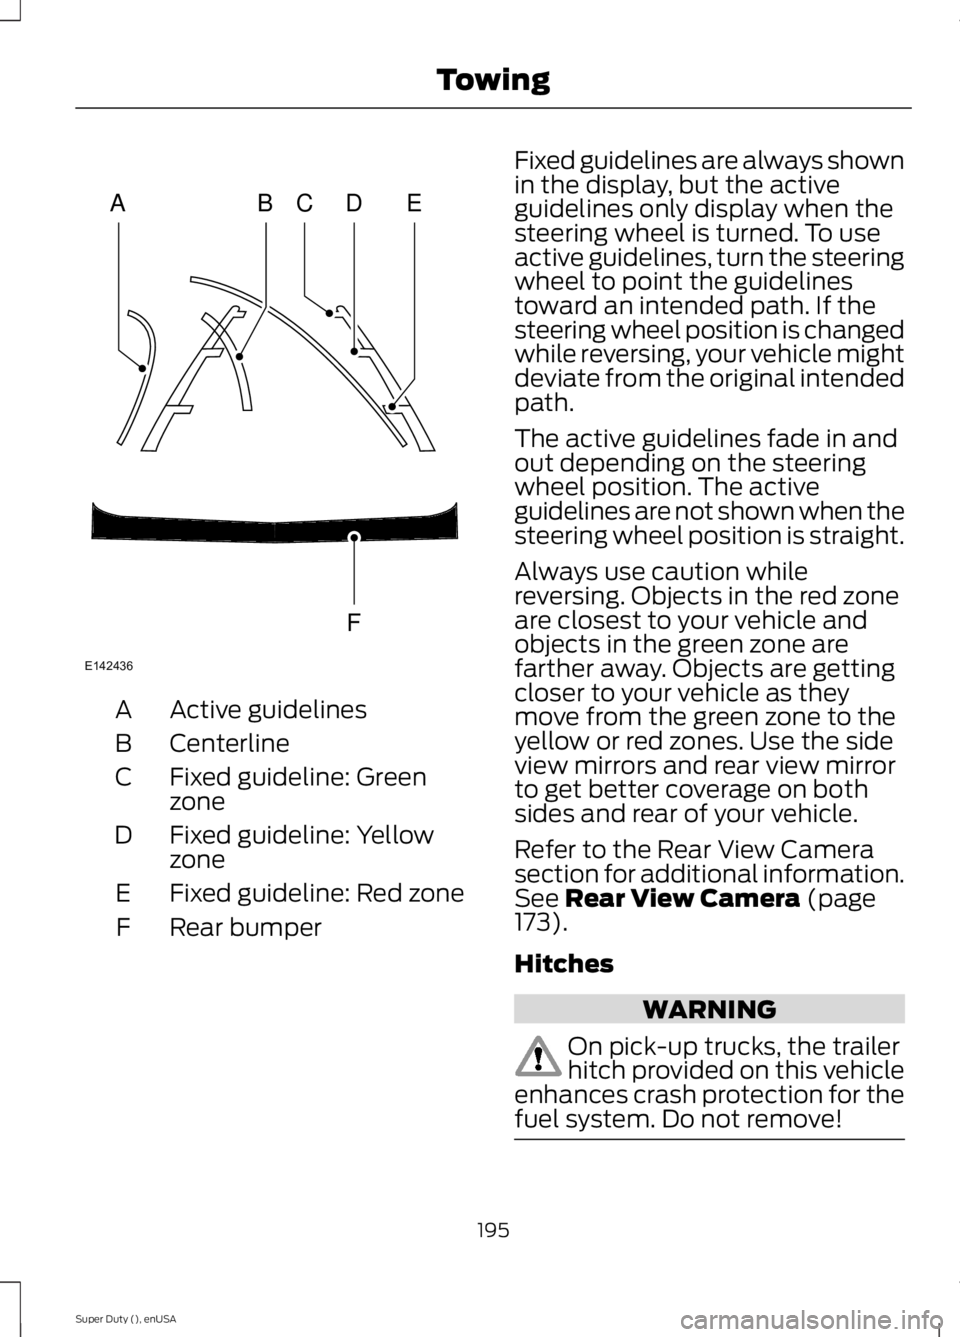
Active guidelinesA
CenterlineB
Fixed guideline: GreenzoneC
Fixed guideline: YellowzoneD
Fixed guideline: Red zoneE
Rear bumperF
Fixed guidelines are always shownin the display, but the activeguidelines only display when thesteering wheel is turned. To useactive guidelines, turn the steeringwheel to point the guidelinestoward an intended path. If thesteering wheel position is changedwhile reversing, your vehicle mightdeviate from the original intendedpath.
The active guidelines fade in andout depending on the steeringwheel position. The activeguidelines are not shown when thesteering wheel position is straight.
Always use caution whilereversing. Objects in the red zoneare closest to your vehicle andobjects in the green zone arefarther away. Objects are gettingcloser to your vehicle as theymove from the green zone to theyellow or red zones. Use the sideview mirrors and rear view mirrorto get better coverage on bothsides and rear of your vehicle.
Refer to the Rear View Camerasection for additional information.See Rear View Camera (page173).
Hitches
WARNING
On pick-up trucks, the trailerhitch provided on this vehicleenhances crash protection for thefuel system. Do not remove!
195
Super Duty (), enUSA
TowingABCD
F
E
E142436
Page 207 of 470
•When stopped in congested orheavy traffic during hotweather, place the gearshift inposition P to aid engine andtransmission cooling and tohelp A/C performance.
•Turn off the speed control withheavy loads or in hilly terrain.The speed control may turn offautomatically when you aretowing on long, steep grades.
•Shift to a lower gear whendriving down a long or steephill. Do not apply the brakescontinuously, as they mayoverheat and become lesseffective.
•If your transmission is equippedwith a Grade Assist orTow/Haul feature, use thisfeature when towing. Thisprovides engine braking andhelps eliminate excessivetransmission shifting foroptimum fuel economy andtransmission cooling.
•If your vehicle is equipped withAdvanceTrac with RSC, thissystem may turn on duringtypical cornering maneuverswith a heavily loaded trailer.This is normal. Turning thecorner at a slower speed whiletowing may reduce thistendency.
•If you are towing a trailerfrequently in hot weather, hillyconditions, at the grosscombined weight rating (or anycombination of these factors),consider refilling your rear axlewith synthetic gear lubricant (ifthe axle is not already filledwith it). See Capacities andSpecifications (page 301).
•Allow more distance forstopping with a trailerattached. Anticipate stops andbrake gradually.
•Avoid parking on a grade.However, if you must park on agrade:
1. Turn the steering wheel topoint your vehicle tires awayfrom traffic flow.
2.Set your vehicle parking brake.
3.Place the automatictransmission in position P.
4.Place wheel chocks in frontand back of the trailer wheels.(Chocks not included withvehicle.)
Your vehicle may be equippedwith a temporary or conventionalspare tire. A "temporary" spare tireis different in size (diameter orwidth), tread-type (All-Season orAll Terrain) or is from a differentmanufacturer than the road tireson your vehicle. Consultinformation on the tire label orSafety Compliance label forlimitations when using.
204
Super Duty (), enUSA
Towing
Page 211 of 470
BREAKING-IN
You need to break in new tires forapproximately 300 miles (480kilometers). During this time, your vehiclemay exhibit some unusual drivingcharacteristics.
Avoid driving too fast during the first 1000miles (1600 kilometers). Vary your speedfrequently and change up through thegears early. Do not labor the engine.
Do not tow during the first 1000 miles(1600 kilometers).
ECONOMICAL DRIVING
Your fuel economy is affected by severalthings, such as how you drive, theconditions you drive under, and how youmaintain your vehicle.
You may improve your fuel economy bykeeping these things in mind:
•Accelerate and slow down in a smooth,moderate fashion.
•Drive at steady speeds withoutstopping.
•Anticipate stops; slowing down mayeliminate the need to stop.
•Combine errands and minimizestop-and-go driving.
•Close the windows for high-speeddriving.
•Drive at reasonable speeds (travelingat 55 mph [88 km/h] uses 15% lessfuel than traveling at 65 mph [105km/h]).
•Keep the tires properly inflated and useonly the recommended size.
•Use the recommended engine oil.
•Perform all regularly scheduledmaintenance.
Avoid these actions; they reduce your fueleconomy:
•Sudden accelerations or hardaccelerations.
•Revving the engine before turning it off.
•Idle for periods longer than one minute.
•Warm up your vehicle on coldmornings.
•Use the air conditioner or frontdefroster.
•Use the speed control in hilly terrain.
•Rest your foot on the brake pedal whiledriving.
•Drive a heavily loaded vehicle or tow atrailer.
•Carry unnecessary weight(approximately 1 mpg [0.4 km/L] islost for every 400 lb [180 kilogram] ofweight carried).
•Driving with the wheels out ofalignment.
Conditions
•Heavily loading a vehicle or towing atrailer may reduce fuel economy at anyspeed.
•Adding certain accessories to yourvehicle (for example bug deflectors,rollbars, light bars, running boards, skiracks or luggage racks) may reducefuel economy.
•To maximize the fuel economy, drivewith the tonneau cover installed (ifequipped).
•Using fuel blended with alcohol maylower fuel economy.
•Fuel economy may decrease with lowertemperatures during the first 8–10miles (12–16 kilometers) of driving.
•Driving on flat terrain offers improvedfuel economy as compared to drivingon hilly terrain.
208
Super Duty (), enUSA
Driving Hints
Page 212 of 470
•Transmissions give their best fueleconomy when operated in the topcruise gear and with steady pressureon the gas pedal.
•Four-wheel-drive operation (ifequipped) is less fuel efficient thantwo-wheel-drive operation.
•Close the windows for high-speeddriving.
DRIVING THROUGH WATER
Note:Driving through deep water abovethe recommended levels can cause vehicledamage.
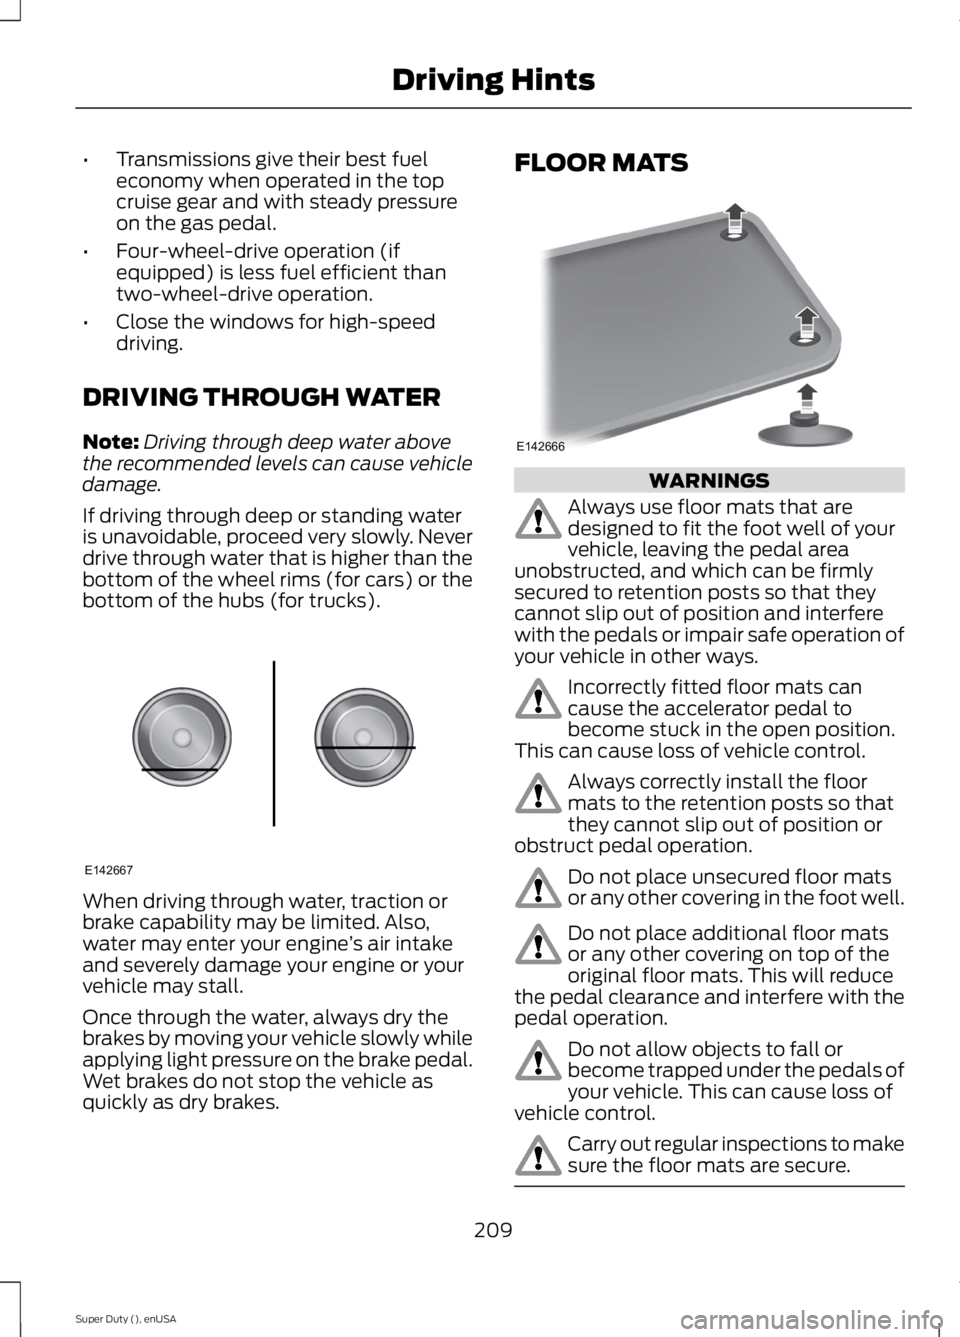
If driving through deep or standing wateris unavoidable, proceed very slowly. Neverdrive through water that is higher than thebottom of the wheel rims (for cars) or thebottom of the hubs (for trucks).
When driving through water, traction orbrake capability may be limited. Also,water may enter your engine’s air intakeand severely damage your engine or yourvehicle may stall.
Once through the water, always dry thebrakes by moving your vehicle slowly whileapplying light pressure on the brake pedal.Wet brakes do not stop the vehicle asquickly as dry brakes.
FLOOR MATS
WARNINGS
Always use floor mats that aredesigned to fit the foot well of yourvehicle, leaving the pedal areaunobstructed, and which can be firmlysecured to retention posts so that theycannot slip out of position and interferewith the pedals or impair safe operation ofyour vehicle in other ways.
Incorrectly fitted floor mats cancause the accelerator pedal tobecome stuck in the open position.This can cause loss of vehicle control.
Always correctly install the floormats to the retention posts so thatthey cannot slip out of position orobstruct pedal operation.
Do not place unsecured floor matsor any other covering in the foot well.
Do not place additional floor matsor any other covering on top of theoriginal floor mats. This will reducethe pedal clearance and interfere with thepedal operation.
Do not allow objects to fall orbecome trapped under the pedals ofyour vehicle. This can cause loss ofvehicle control.
Carry out regular inspections to makesure the floor mats are secure.
209
Super Duty (), enUSA
Driving HintsE142667 E142666