2015 FORD F250 SUPER DUTY steering
[x] Cancel search: steeringPage 179 of 470
PRINCIPLE OF OPERATION
Cruise control lets you maintain a setspeed without keeping your foot on theaccelerator pedal. You can use cruisecontrol when your vehicle speed is greaterthan 20 mph (30 km/h).
USING CRUISE CONTROL
WARNINGS
Do not use cruise control in heavytraffic, on winding roads or when theroad surface is slippery. This couldresult in loss of vehicle control, seriousinjury or death.
When you are going downhill, yourvehicle speed may increase abovethe set speed. The system will notapply the brakes. Change down a gear toassist the system in maintaining the setspeed. Failure to do so could result in lossof vehicle control, serious injury or death.
Note:Cruise control will disengage if thevehicle speed decreases more than 10 mph(16 km/h) below your set speed whiledriving uphill.
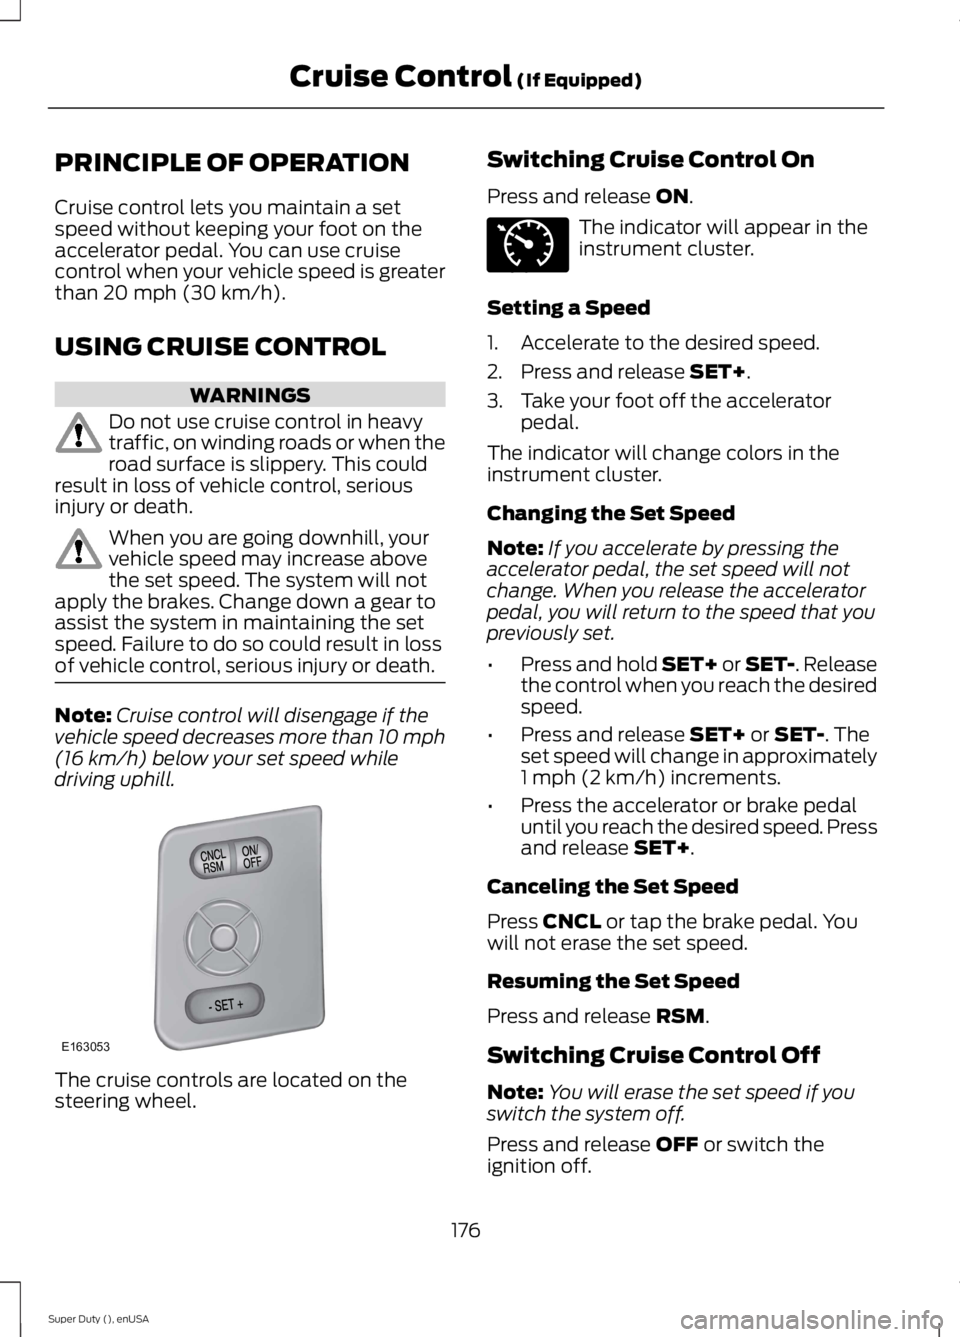
The cruise controls are located on thesteering wheel.
Switching Cruise Control On
Press and release ON.
The indicator will appear in theinstrument cluster.
Setting a Speed
1. Accelerate to the desired speed.
2. Press and release SET+.
3. Take your foot off the acceleratorpedal.
The indicator will change colors in theinstrument cluster.
Changing the Set Speed
Note:If you accelerate by pressing theaccelerator pedal, the set speed will notchange. When you release the acceleratorpedal, you will return to the speed that youpreviously set.
•Press and hold SET+ or SET-. Releasethe control when you reach the desiredspeed.
•Press and release SET+ or SET-. Theset speed will change in approximately1 mph (2 km/h) increments.
•Press the accelerator or brake pedaluntil you reach the desired speed. Pressand release SET+.
Canceling the Set Speed
Press CNCL or tap the brake pedal. Youwill not erase the set speed.
Resuming the Set Speed
Press and release RSM.
Switching Cruise Control Off
Note:You will erase the set speed if youswitch the system off.
Press and release OFF or switch theignition off.
176
Super Duty (), enUSA
Cruise Control (If Equipped)E163053 E71340
Page 180 of 470
STEERING
To help prevent damage to the powersteering system:
•Never hold the steering wheel at itsfurthest turning points (until it stops)for more than three to five secondswhen the engine is running.
•Do not operate the vehicle with a lowpower steering pump fluid level (belowthe MIN mark on the reservoir).
•Some noise is normal during operation.If excessive, check for low powersteering pump fluid level beforeseeking service by your dealer.
•Heavy or uneven efforts may be causedby low power steering fluid. Check forlow power steering pump fluid levelbefore seeking service by your dealer.
•Do not fill the power steering pumpreservoir above the MAX mark on thereservoir, as this may result in leaksfrom the reservoir.
If the power steering system breaks down(or if the engine is turned off), you cansteer the vehicle manually, but it takesmore effort.
If the steering wanders or pulls, check for:
•an improperly inflated tire
•uneven tire wear
•loose or worn suspension components
•loose or worn steering components
•improper vehicle alignment
If any steering components are serviced orreplaced, install new fasteners (many arecoated with thread adhesive or haveprevailing torque features which may notbe re-used). Never re-use a bolt or nut.Torque fasteners to specifications.
A high crown in the road or high crosswindsmay also make the steering seem towander or pull.
177
Super Duty (), enUSA
Driving Aids
Page 197 of 470
•Service your vehicle morefrequently if you tow a trailer.See your scheduledmaintenance information.
•If you use a rental trailer, followthe instructions the rentalagency gives you.
See Load limits in the LoadCarrying chapter for loadspecification terms found on thetire label and Safety Compliancelabel and instructions oncalculating your vehicle's load.
Remember to account for thetrailer tongue weight as part ofyour vehicle load when calculatingthe total vehicle weight.
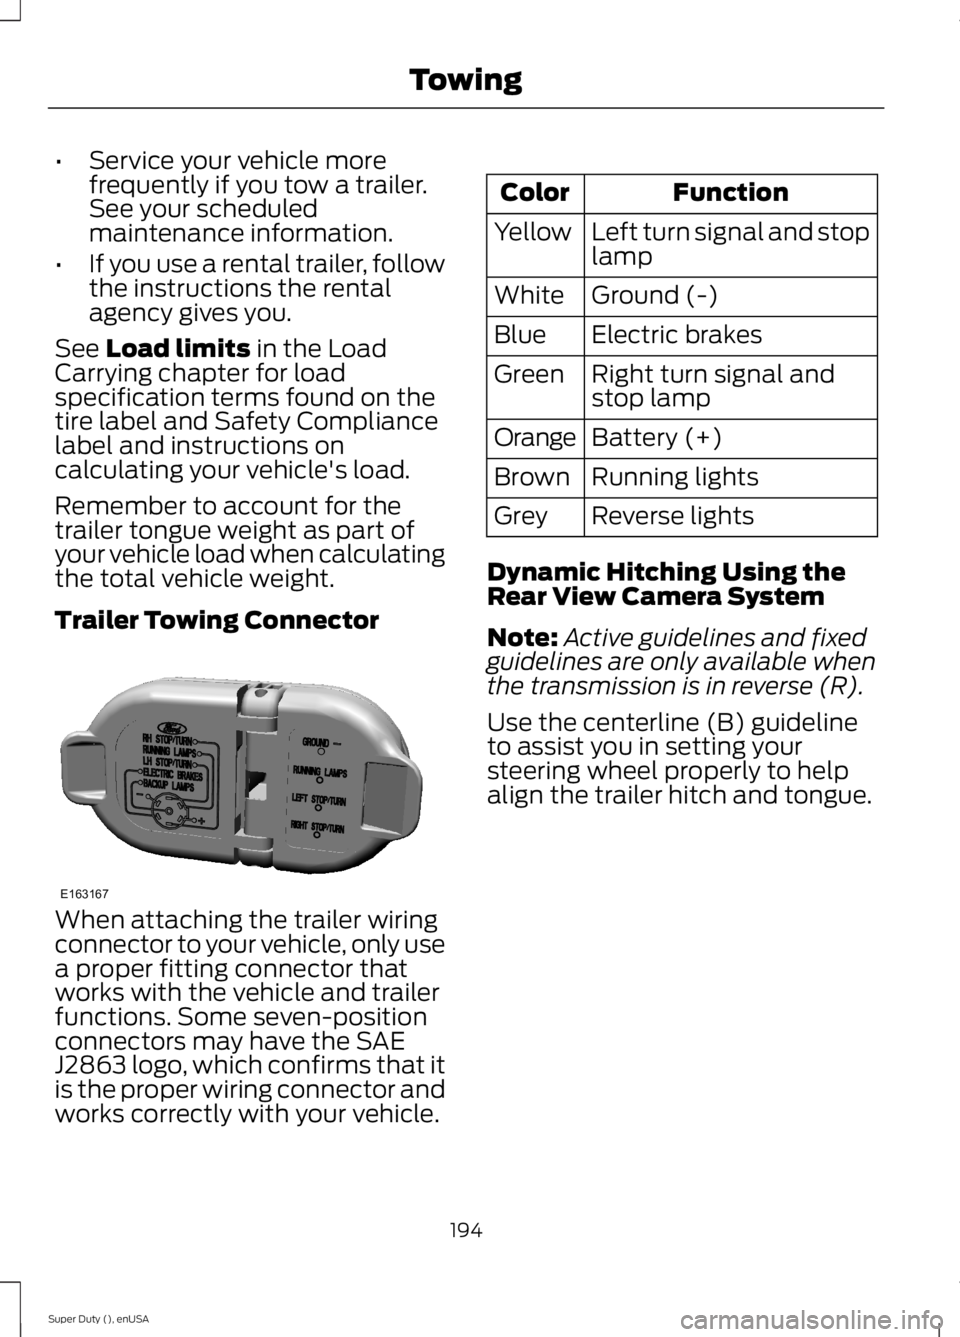
Trailer Towing Connector
When attaching the trailer wiringconnector to your vehicle, only usea proper fitting connector thatworks with the vehicle and trailerfunctions. Some seven-positionconnectors may have the SAEJ2863 logo, which confirms that itis the proper wiring connector andworks correctly with your vehicle.
FunctionColor
Left turn signal and stoplampYellow
Ground (-)White
Electric brakesBlue
Right turn signal andstop lampGreen
Battery (+)Orange
Running lightsBrown
Reverse lightsGrey
Dynamic Hitching Using theRear View Camera System
Note:Active guidelines and fixedguidelines are only available whenthe transmission is in reverse (R).
Use the centerline (B) guidelineto assist you in setting yoursteering wheel properly to helpalign the trailer hitch and tongue.
194
Super Duty (), enUSA
TowingE163167
Page 198 of 470
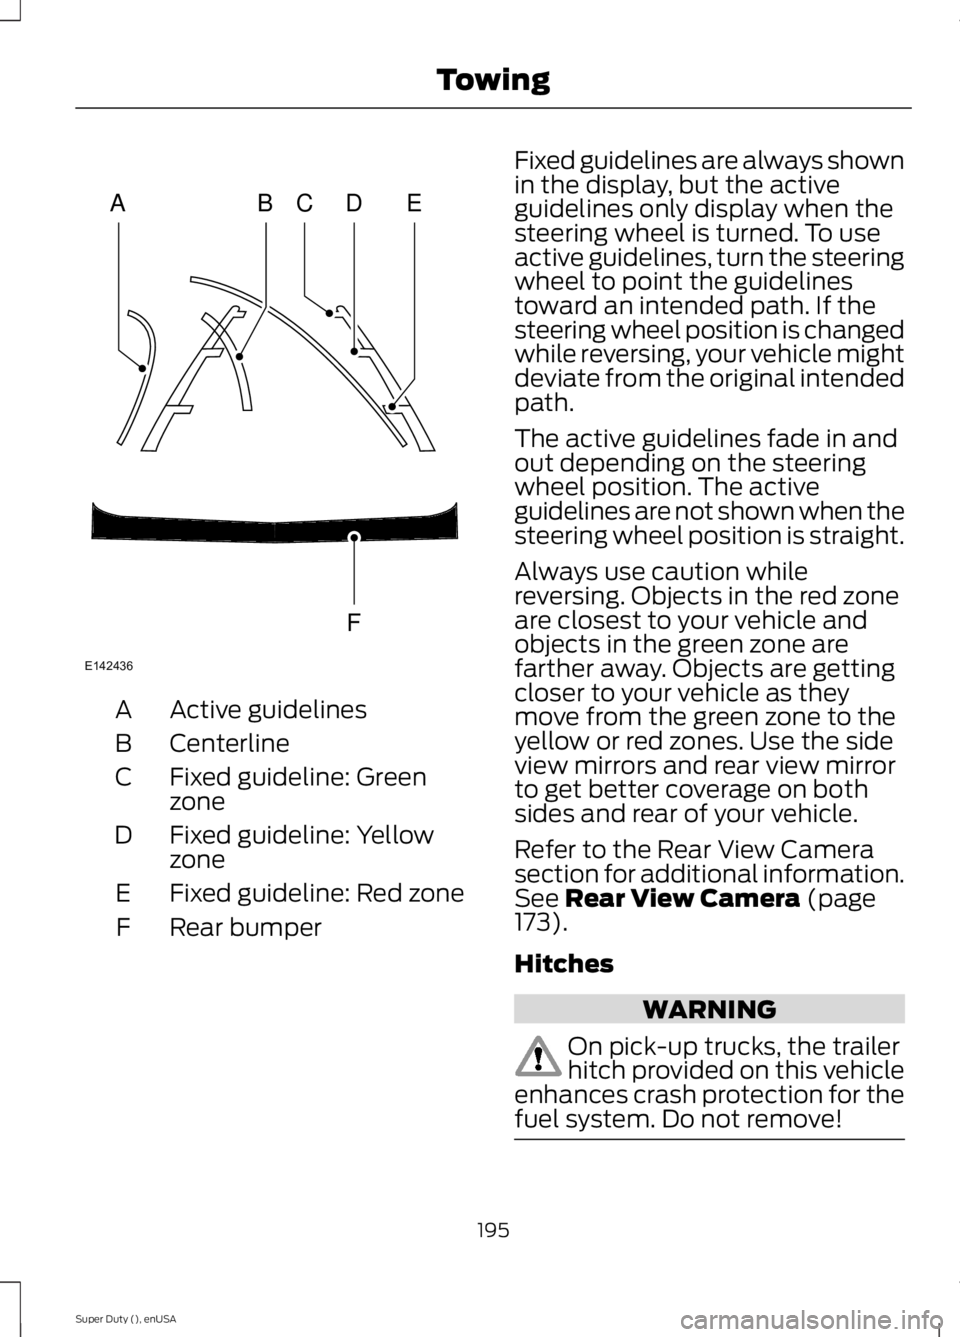
Active guidelinesA
CenterlineB
Fixed guideline: GreenzoneC
Fixed guideline: YellowzoneD
Fixed guideline: Red zoneE
Rear bumperF
Fixed guidelines are always shownin the display, but the activeguidelines only display when thesteering wheel is turned. To useactive guidelines, turn the steeringwheel to point the guidelinestoward an intended path. If thesteering wheel position is changedwhile reversing, your vehicle mightdeviate from the original intendedpath.
The active guidelines fade in andout depending on the steeringwheel position. The activeguidelines are not shown when thesteering wheel position is straight.
Always use caution whilereversing. Objects in the red zoneare closest to your vehicle andobjects in the green zone arefarther away. Objects are gettingcloser to your vehicle as theymove from the green zone to theyellow or red zones. Use the sideview mirrors and rear view mirrorto get better coverage on bothsides and rear of your vehicle.
Refer to the Rear View Camerasection for additional information.See Rear View Camera (page173).
Hitches
WARNING
On pick-up trucks, the trailerhitch provided on this vehicleenhances crash protection for thefuel system. Do not remove!
195
Super Duty (), enUSA
TowingABCD
F
E
E142436
Page 207 of 470
•When stopped in congested orheavy traffic during hotweather, place the gearshift inposition P to aid engine andtransmission cooling and tohelp A/C performance.
•Turn off the speed control withheavy loads or in hilly terrain.The speed control may turn offautomatically when you aretowing on long, steep grades.
•Shift to a lower gear whendriving down a long or steephill. Do not apply the brakescontinuously, as they mayoverheat and become lesseffective.
•If your transmission is equippedwith a Grade Assist orTow/Haul feature, use thisfeature when towing. Thisprovides engine braking andhelps eliminate excessivetransmission shifting foroptimum fuel economy andtransmission cooling.
•If your vehicle is equipped withAdvanceTrac with RSC, thissystem may turn on duringtypical cornering maneuverswith a heavily loaded trailer.This is normal. Turning thecorner at a slower speed whiletowing may reduce thistendency.
•If you are towing a trailerfrequently in hot weather, hillyconditions, at the grosscombined weight rating (or anycombination of these factors),consider refilling your rear axlewith synthetic gear lubricant (ifthe axle is not already filledwith it). See Capacities andSpecifications (page 301).
•Allow more distance forstopping with a trailerattached. Anticipate stops andbrake gradually.
•Avoid parking on a grade.However, if you must park on agrade:
1. Turn the steering wheel topoint your vehicle tires awayfrom traffic flow.
2.Set your vehicle parking brake.
3.Place the automatictransmission in position P.
4.Place wheel chocks in frontand back of the trailer wheels.(Chocks not included withvehicle.)
Your vehicle may be equippedwith a temporary or conventionalspare tire. A "temporary" spare tireis different in size (diameter orwidth), tread-type (All-Season orAll Terrain) or is from a differentmanufacturer than the road tireson your vehicle. Consultinformation on the tire label orSafety Compliance label forlimitations when using.
204
Super Duty (), enUSA
Towing
Page 213 of 470
To install the floor mats, position the floormat eyelet over the retention post andpress down to lock in position.
Remove in reverse order.
SNOWPLOWING
Ford recommends that the Super DutyF-Series used for snow removal includethe snowplow package option.
Installing the Snowplow
Weight limits and guidelines for selectingand installing the snowplow are in the FordTruck Body Builders Layout Book,snowplow section, found atwww.fleet.ford.com/truckbbas. A typicalinstallation affects the following:
•Certification to government safety lawssuch as occupant protection and airbagdeployment, braking, and lighting. Lookfor an Alterer’s Label on the vehiclefrom the snowplow installer certifyingthat the installation meets allapplicable Federal Motor VehicleSafety Standards (FMVSS).
•The Total Accessory Reserve Capacity(TARC) is on the lower right side of thevehicle’s Safety ComplianceCertification Label. This applies toFord-completed vehicles of 10,000pounds (4,536 kilograms) GVWR orless. This is the weight ofpermanently-attached auxiliaryequipment, such as snowplowframe-mounting hardware, that canbe added to the vehicle and satisfyFord compliance certification toFMVSS. Exceeding this weight mayrequire the auxiliary equipment installeradditional safety certificationresponsibility. The Front AccessoryReserve Capacity (FARC) is forcustomer convenience.
•Rear ballast weight behind the rearaxle may be required to preventexceeding the FGAWR, and providefront-to-rear weight balance for properbraking and steering.
•Front wheel toe may requirere-adjustment to prevent prematureuneven tire wear. Specifications are inthe Ford Workshop Manual.
•Headlight aim may requirere-adjustment.
•The tire air pressures recommendedfor general driving are on the vehicle’sSafety Certification Label. Themaximum cold inflation pressure forthe tire and associated load rating ison the tire sidewall. Tire air pressuremay require re-adjustment within thesepressure limits to accommodate theadditional weight of the snowplowinstallation.
•Federal and some local regulationsrequire additional exterior lamps forsnowplow-equipped vehicles. Consultyour authorized dealer for additionalinformation.
Operating the Vehicle with theSnowplow Attached
Note:Do not use your vehicle for snowremoval until you have driven at least 500miles (800 kilometers).
Ford recommends vehicle speed does notexceed 44.7 mph (72 km/h) whensnowplowing.
The attached snowplow blade restrictsairflow to the radiator, and may cause theengine to run at a higher temperature:Attention to engine temperature isespecially important when outsidetemperatures are above freezing. Anglethe blade to maximize airflow to theradiator and monitor engine temperatureto determine whether a left or right angleprovides the best performance.
210
Super Duty (), enUSA
Driving Hints
Page 216 of 470
HAZARD WARNING FLASHERS
Note:The hazard warning flashers willoperate when the ignition is in any positionor if the key is not in the ignition. If usedwhen the engine is not running, the batterywill lose charge. As a result, there may beinsufficient power to restart your engine.
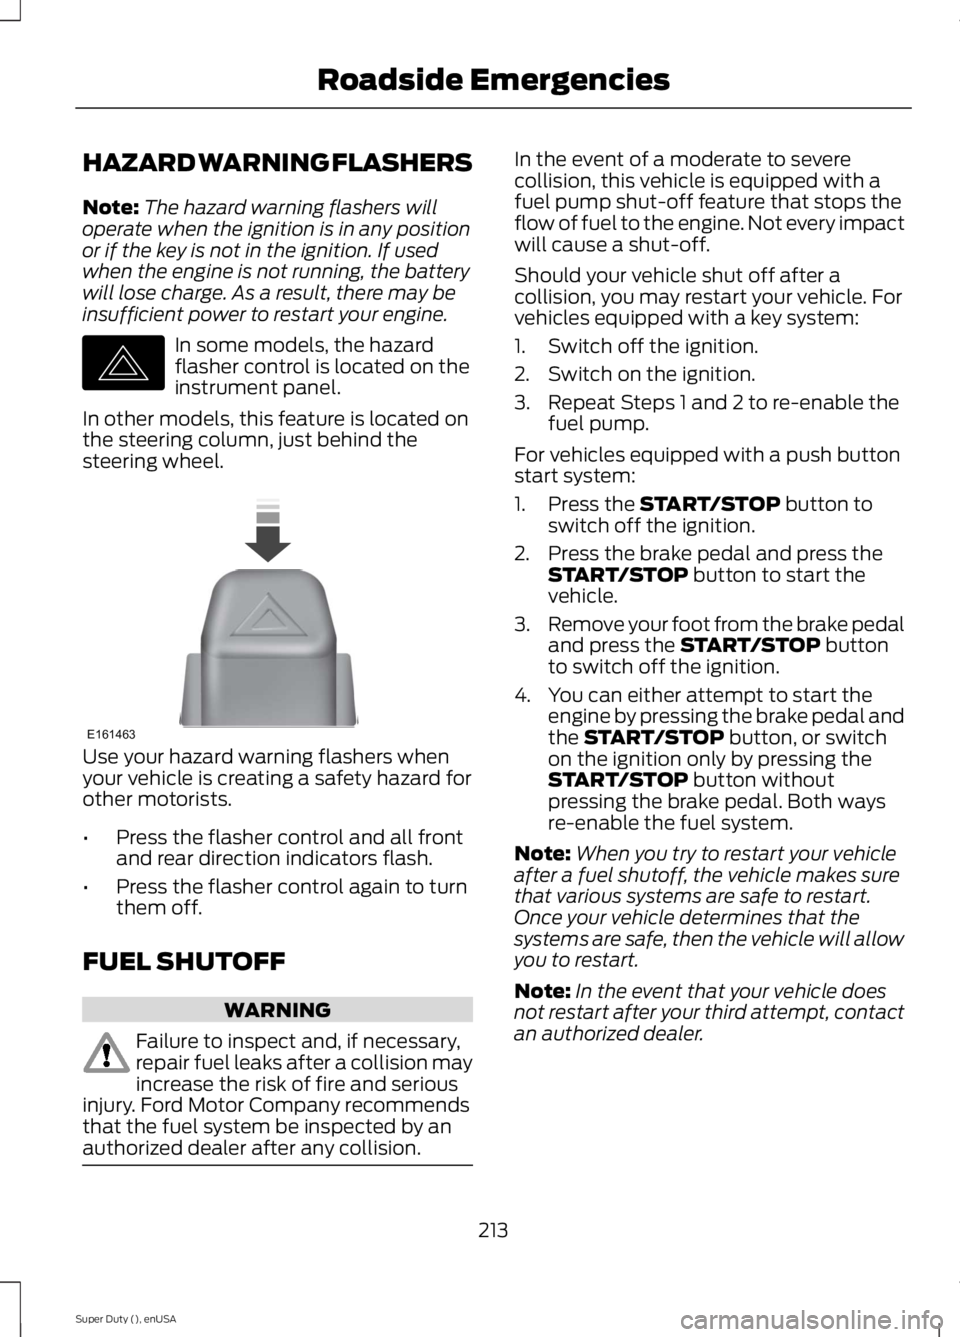
In some models, the hazardflasher control is located on theinstrument panel.
In other models, this feature is located onthe steering column, just behind thesteering wheel.
Use your hazard warning flashers whenyour vehicle is creating a safety hazard forother motorists.
•Press the flasher control and all frontand rear direction indicators flash.
•Press the flasher control again to turnthem off.
FUEL SHUTOFF
WARNING
Failure to inspect and, if necessary,repair fuel leaks after a collision mayincrease the risk of fire and seriousinjury. Ford Motor Company recommendsthat the fuel system be inspected by anauthorized dealer after any collision.
In the event of a moderate to severecollision, this vehicle is equipped with afuel pump shut-off feature that stops theflow of fuel to the engine. Not every impactwill cause a shut-off.
Should your vehicle shut off after acollision, you may restart your vehicle. Forvehicles equipped with a key system:
1. Switch off the ignition.
2. Switch on the ignition.
3. Repeat Steps 1 and 2 to re-enable thefuel pump.
For vehicles equipped with a push buttonstart system:
1. Press the START/STOP button toswitch off the ignition.
2. Press the brake pedal and press theSTART/STOP button to start thevehicle.
3.Remove your foot from the brake pedaland press the START/STOP buttonto switch off the ignition.
4. You can either attempt to start theengine by pressing the brake pedal andthe START/STOP button, or switchon the ignition only by pressing theSTART/STOP button withoutpressing the brake pedal. Both waysre-enable the fuel system.
Note:When you try to restart your vehicleafter a fuel shutoff, the vehicle makes surethat various systems are safe to restart.Once your vehicle determines that thesystems are safe, then the vehicle will allowyou to restart.
Note:In the event that your vehicle doesnot restart after your third attempt, contactan authorized dealer.
213
Super Duty (), enUSA
Roadside EmergenciesE142663 E161463
Page 232 of 470
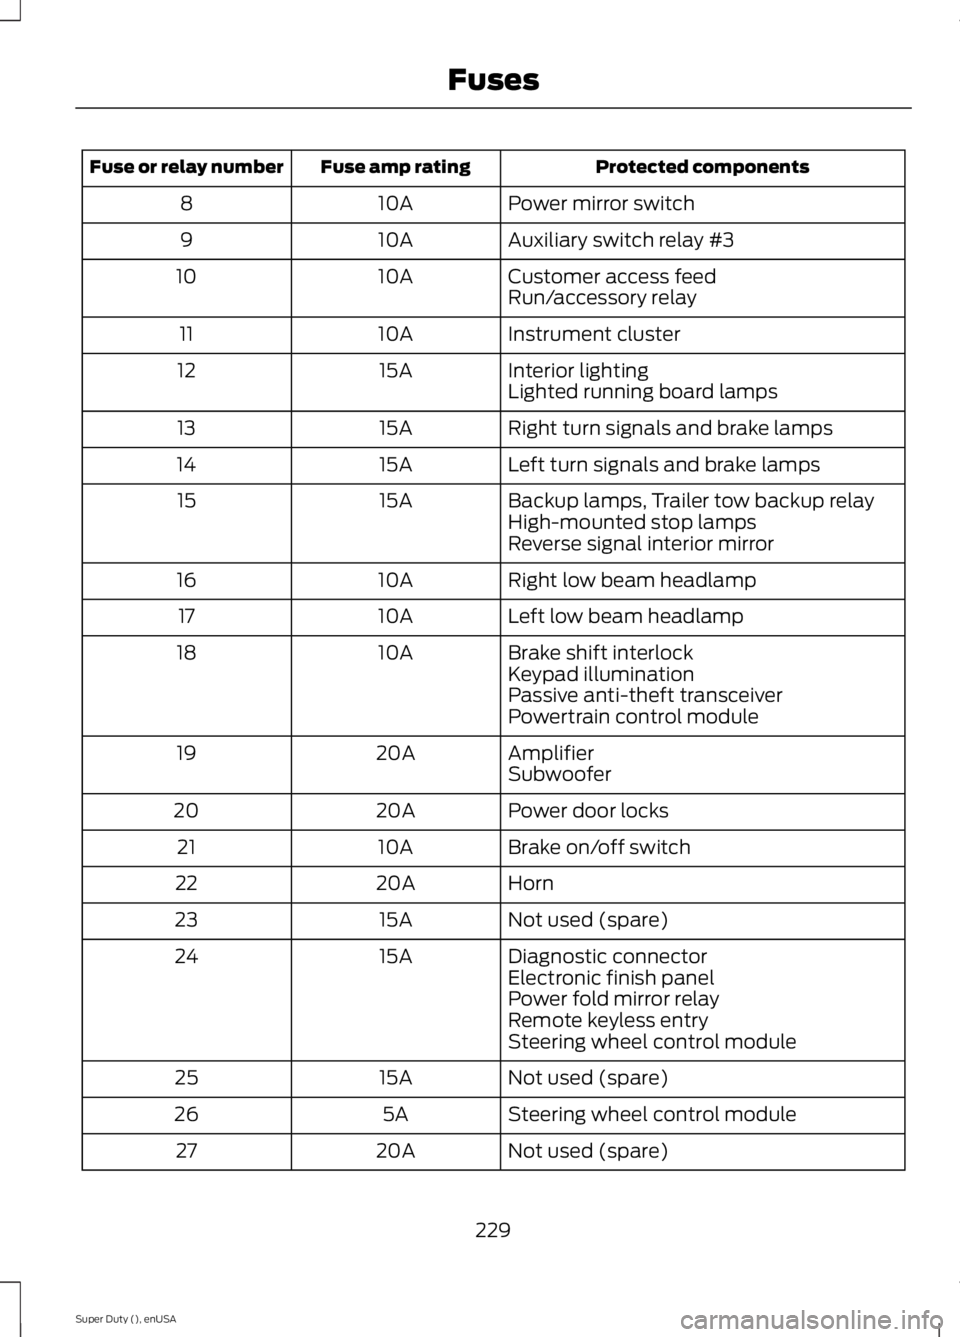
Protected componentsFuse amp ratingFuse or relay number
Power mirror switch10A8
Auxiliary switch relay #310A9
Customer access feed10A10Run/accessory relay
Instrument cluster10A11
Interior lighting15A12Lighted running board lamps
Right turn signals and brake lamps15A13
Left turn signals and brake lamps15A14
Backup lamps, Trailer tow backup relay15A15High-mounted stop lampsReverse signal interior mirror
Right low beam headlamp10A16
Left low beam headlamp10A17
Brake shift interlock10A18Keypad illuminationPassive anti-theft transceiverPowertrain control module
Amplifier20A19Subwoofer
Power door locks20A20
Brake on/off switch10A21
Horn20A22
Not used (spare)15A23
Diagnostic connector15A24Electronic finish panelPower fold mirror relayRemote keyless entrySteering wheel control module
Not used (spare)15A25
Steering wheel control module5A26
Not used (spare)20A27
229
Super Duty (), enUSA
Fuses