Page 257 of 470

CHANGING THE ENGINE AIR
FILTER
WARNINGS
To reduce the risk of vehicle damageand personal burn injuries, do notstart your engine with the air cleanerremoved and do not remove it while theengine is running.
Note:Failure to use the correct air filterelement may result in severe enginedamage. The customer warranty may bevoid for any damage to the engine if thecorrect air filter element is not used.
When changing the air filter element, useonly the air filter element listed. SeeCapacities and Specifications (page301).
Change the air filter element at the properinterval. See Scheduled Maintenance(page 440).
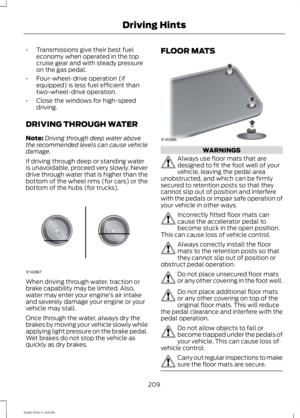
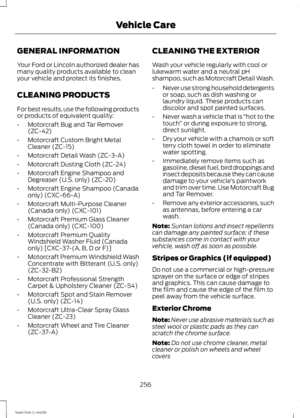
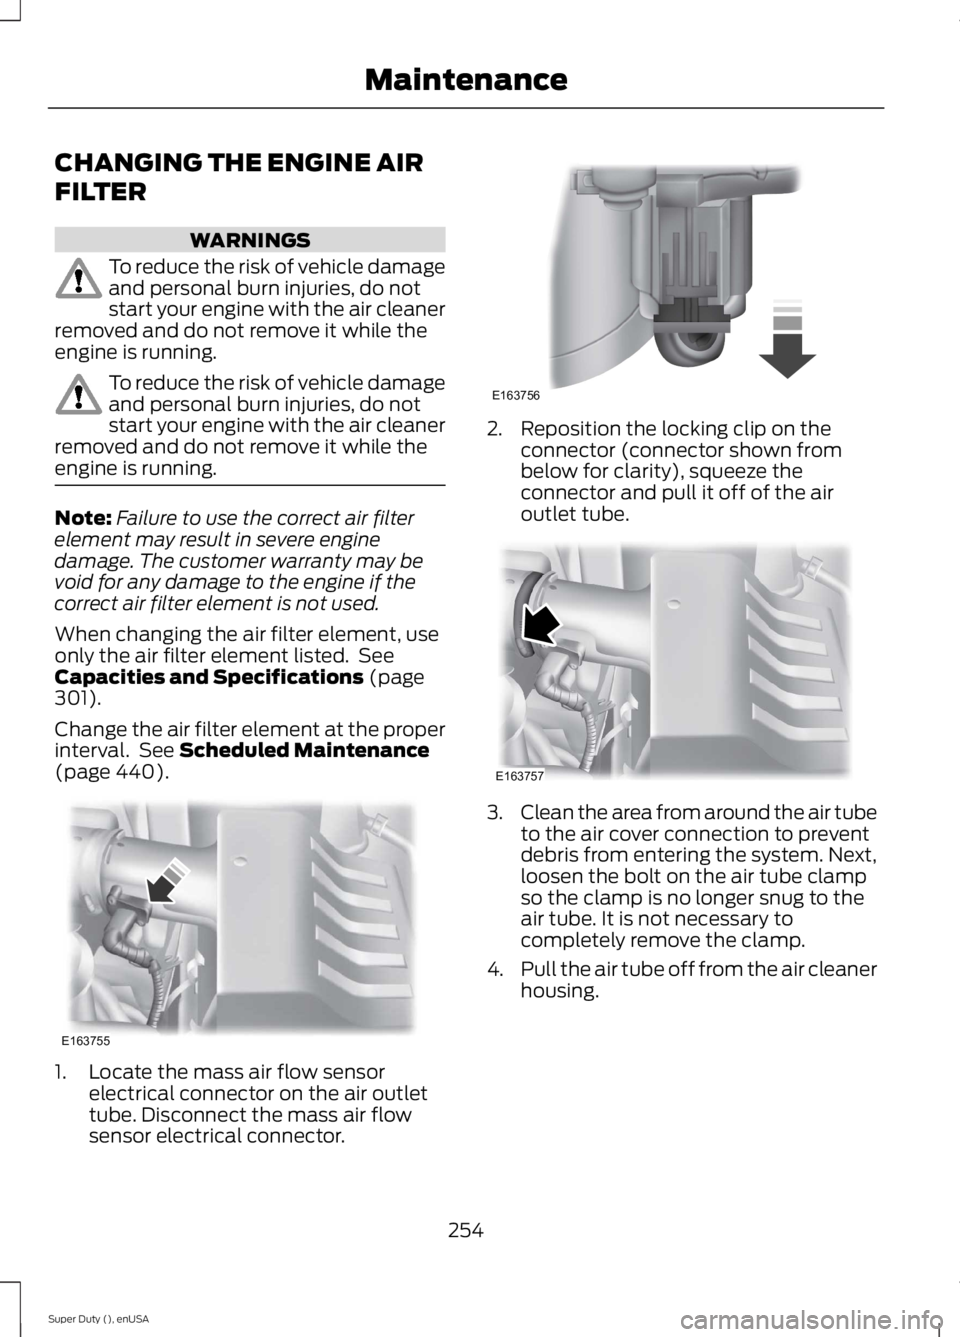
1. Locate the mass air flow sensorelectrical connector on the air outlettube. Disconnect the mass air flowsensor electrical connector.
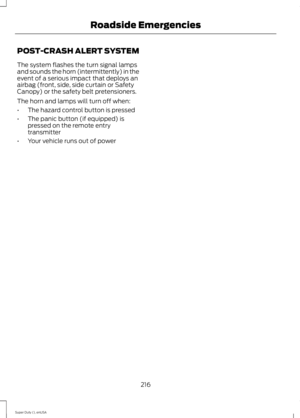
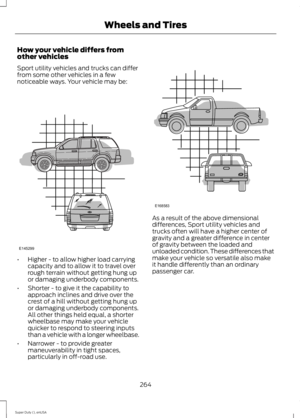
2. Reposition the locking clip on theconnector (connector shown frombelow for clarity), squeeze theconnector and pull it off of the airoutlet tube.
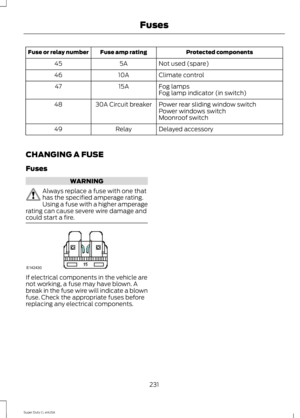
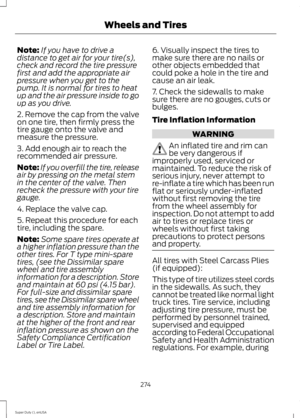
3.Clean the area from around the air tubeto the air cover connection to preventdebris from entering the system. Next,loosen the bolt on the air tube clampso the clamp is no longer snug to theair tube. It is not necessary tocompletely remove the clamp.
4.Pull the air tube off from the air cleanerhousing.
254
Super Duty (), enUSA
MaintenanceE163755 E163756 E163757
Page 258 of 470
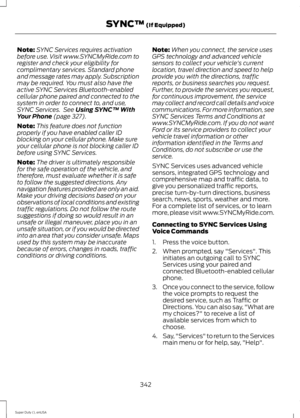
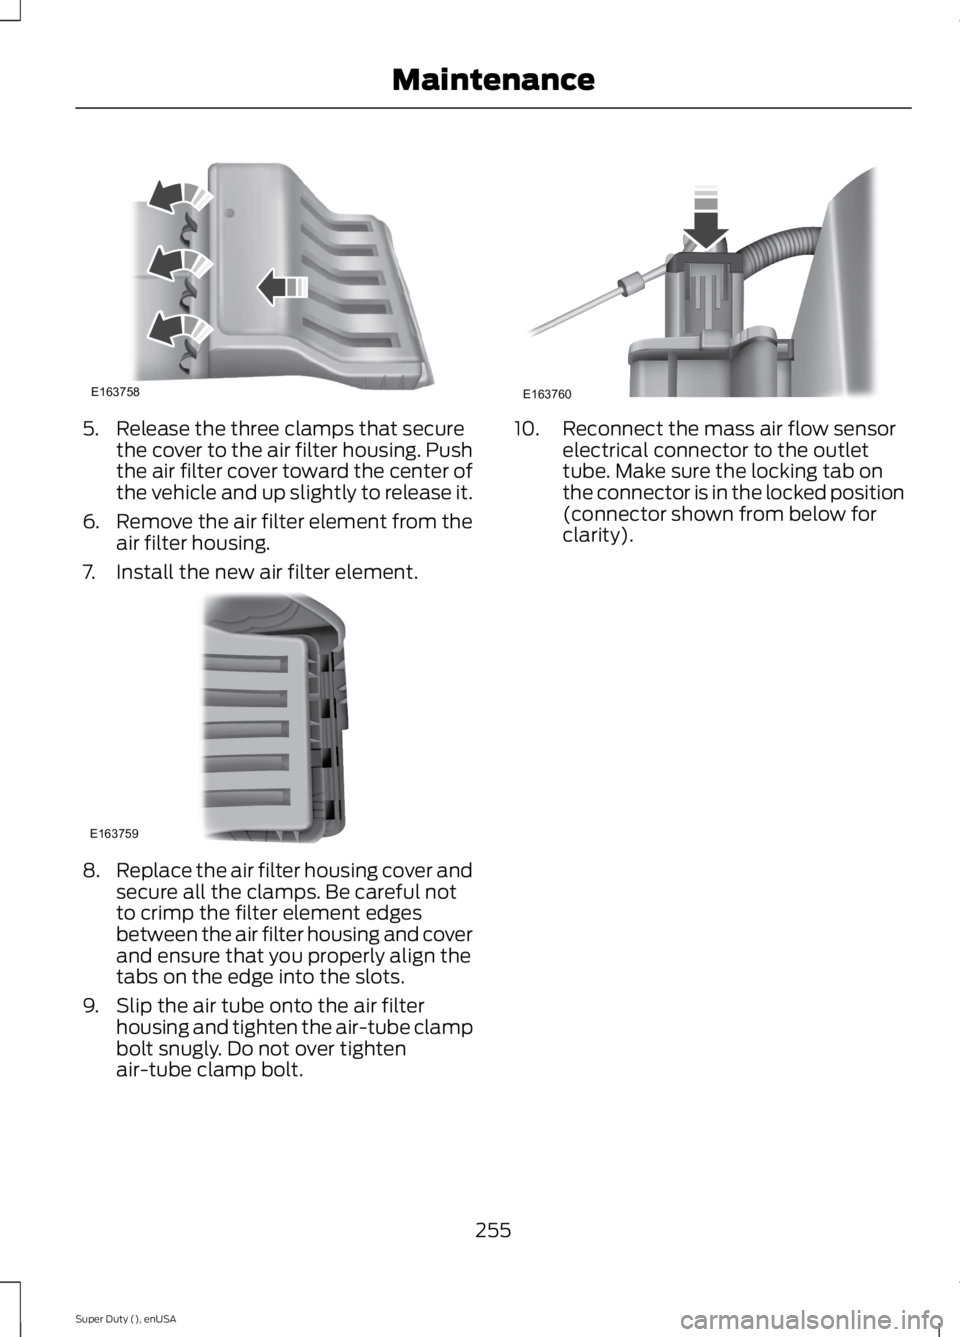
5. Release the three clamps that securethe cover to the air filter housing. Pushthe air filter cover toward the center ofthe vehicle and up slightly to release it.
6.Remove the air filter element from theair filter housing.
7. Install the new air filter element.
8.Replace the air filter housing cover andsecure all the clamps. Be careful notto crimp the filter element edgesbetween the air filter housing and coverand ensure that you properly align thetabs on the edge into the slots.
9. Slip the air tube onto the air filterhousing and tighten the air-tube clampbolt snugly. Do not over tightenair-tube clamp bolt.
10. Reconnect the mass air flow sensorelectrical connector to the outlettube. Make sure the locking tab onthe connector is in the locked position(connector shown from below forclarity).
255
Super Duty (), enUSA
MaintenanceE163758 E163759 E163760
Page 259 of 470

GENERAL INFORMATION
Your Ford or Lincoln authorized dealer hasmany quality products available to cleanyour vehicle and protect its finishes.
CLEANING PRODUCTS
For best results, use the following productsor products of equivalent quality:
•Motorcraft Bug and Tar Remover(ZC-42)
•Motorcraft Custom Bright MetalCleaner (ZC-15)
•Motorcraft Detail Wash (ZC-3-A)
•Motorcraft Dusting Cloth (ZC-24)
•Motorcraft Engine Shampoo andDegreaser (U.S. only) (ZC-20)
•Motorcraft Engine Shampoo (Canadaonly) (CXC-66-A)
•Motorcraft Multi-Purpose Cleaner(Canada only) (CXC-101)
•Motorcraft Premium Glass Cleaner(Canada only) (CXC-100)
•Motorcraft Premium QualityWindshield Washer Fluid (Canadaonly) [CXC-37-(A, B, D or F)]
•Motorcraft Premium Windshield WashConcentrate with Bitterant (U.S. only)(ZC-32-B2)
•Motorcraft Professional StrengthCarpet & Upholstery Cleaner (ZC-54)
•Motorcraft Spot and Stain Remover(U.S. only) (ZC-14)
•Motorcraft Ultra-Clear Spray GlassCleaner (ZC-23)
•Motorcraft Wheel and Tire Cleaner(ZC-37-A)
CLEANING THE EXTERIOR
Wash your vehicle regularly with cool orlukewarm water and a neutral pHshampoo, such as Motorcraft Detail Wash.
•Never use strong household detergentsor soap, such as dish washing orlaundry liquid. These products candiscolor and spot painted surfaces.
•Never wash a vehicle that is “hot to thetouch” or during exposure to strong,direct sunlight.
•Dry your vehicle with a chamois or softterry cloth towel in order to eliminatewater spotting.
•Immediately remove items such asgasoline, diesel fuel, bird droppings andinsect deposits because they can causedamage to your vehicle’s paintworkand trim over time. Use Motorcraft Bugand Tar Remover.
•Remove any exterior accessories, suchas antennas, before entering a carwash.
Note:Suntan lotions and insect repellentscan damage any painted surface; if thesesubstances come in contact with yourvehicle, wash off as soon as possible.
Stripes or Graphics (if equipped)
Do not use a commercial or high-pressuresprayer on the surface or edge of stripesand graphics. This can cause damage tothe film and cause the edge of the film topeel away from the vehicle surface.
Exterior Chrome
Note:Never use abrasive materials such assteel wool or plastic pads as they canscratch the chrome surface.
Note:Do not use chrome cleaner, metalcleaner or polish on wheels and wheelcovers
256
Super Duty (), enUSA
Vehicle Care
Page 260 of 470

•Wash your vehicle first, using cool orlukewarm water and a neutral pHshampoo, such as Motorcraft DetailWash.
•Use Motorcraft Custom Bright MetalCleaner. Apply the product as youwould a wax to clean bumpers andother chrome parts; allow the cleanerto dry for a few minutes, then wipe offthe haze with a clean, dry rag.
•Do not apply cleaning product to hotsurfaces and do not leave cleaningproduct on chrome surfaces longerthan the time recommended.
•Using other non-recommendedcleaners can result in severe andpermanent cosmetic damage.
Underbody
Flush the complete underside of yourvehicle frequently. Keep body and doordrain holes free from packed dirt.
Cleaning Plastic Exterior Parts
Use only approved products to cleanplastic parts
•For routine cleaning, use MotorcraftDetail Wash.
•If tar or grease spots are present, useMotorcraft Bug and Tar Remover.
WAXING
Regular waxing is necessary to protect yourcar's paint from the elements. Werecommend that you wash and wax thepainted surface once or twice a year.
When washing and waxing, park yourvehicle in a shaded area out of directsunlight. Always wash your vehicle beforeapplying wax.
•Use a quality wax that does not containabrasives.
•Follow the manufacturer’s instructionsto apply and remove the wax.
•Apply a small amount of wax in aback-and-forth motion, not in circles.
•Do not allow wax to come in contactwith any non-body (low-gloss black)colored trim. The wax will discolor orstain the parts over time.
•Roof racks.
•Bumpers.
•Grained door handles.
•Side moldings.
•Mirror housings.
•Windshield cowl area.
•Do not apply wax to glass areas.
•After waxing, your car's paint shouldfeel smooth, and be free of streaks andsmudges.
CLEANING THE ENGINE
Engines are more efficient when they areclean because grease and dirt buildup keepthe engine warmer than normal.
When washing:
•Take care when using a power washerto clean the engine. The high-pressurefluid could penetrate the sealed partsand cause damage.
•Do not spray a hot engine with coldwater to avoid cracking the engineblock or other engine components.
•Spray Motorcraft Engine Shampoo andDegreaser on all parts that requirecleaning and pressure rinse clean. InCanada, use Motorcraft EngineShampoo.
•Never wash or rinse the engine while itis hot or running; water in the runningengine may cause internal damage.
257
Super Duty (), enUSA
Vehicle Care
Page 261 of 470

•Never wash or rinse any ignition coil,spark plug wire or spark plug well, orthe area in and around these locations.
•Cover the battery, power distributionbox, and air filter assembly to preventwater damage when cleaning theengine.
CLEANING THE WINDOWS AND
WIPER BLADES
Car wash chemicals and environmentalfallout can result in windshield and wiperblade contamination. Dirty windshield andwipers will result in poor windshield wiperoperation. Keep the windshield and wiperblades clean to maintain windshield wiperperformance.
To clean the windshield and wiper blades:
•Clean the windshield with anon-abrasive glass cleaner.
•For windshields contaminated withtree sap, chemicals, wax or bugs, cleanthe entire windshield using steel wool(no greater than 0000 grade) in acircular motion and rinse with water.
•Clean the wiper blades with isopropylrubbing alcohol or windshield washerfluid.
Note: Do not use razor blades or othersharp objects to clean or remove decalsfrom the inside of the heated rear window.The vehicle warranty does not coverdamage caused to the heated rear windowgrid lines.
CLEANING THE INTERIOR
WARNINGS
Do not use cleaning solvents, bleachor dye on the vehicle’s safety belts,as these actions may weaken thebelt webbing.
WARNINGS
On vehicles equipped withseat-mounted airbags, do not usechemical solvents or strongdetergents. Such products couldcontaminate the side airbag system andaffect performance of the side airbag in acollision.
For fabric, carpets, cloth seats, safety beltsand seats equipped with side airbags:
•Remove dust and loose dirt with avacuum cleaner.
•Remove light stains and soil withMotorcraft Professional StrengthCarpet & Upholstery Cleaner.
•If grease or tar is present on thematerial, spot-clean the area first withMotorcraft Spot and Stain Remover. InCanada, use Motorcraft Multi-PurposeCleaner.
•If a ring forms on the fabric after spotcleaning, clean the entire areaimmediately (but do not oversaturate)or the ring will set.
•Do not use household cleaningproducts or glass cleaners, which canstain and discolor the fabric and affectthe flame retardant abilities of the seatmaterials.
CLEANING THE INSTRUMENT
PANEL AND INSTRUMENT
CLUSTER LENS
WARNING
Do not use chemical solvents orstrong detergents when cleaning thesteering wheel or instrument panelto avoid contamination of the airbagsystem.
258
Super Duty (), enUSA
Vehicle Care
Page 262 of 470

Clean the instrument panel and clusterlens with a clean, damp, white cottoncloth, then use a clean and dry whitecotton cloth to dry these areas.
•Avoid cleaners or polishes that increasethe gloss of the upper portion of theinstrument panel. The dull finish in thisarea helps protect you fromundesirable windshield reflection.
•Be certain to wash or wipe your handsclean if you have been in contact withcertain products such as insectrepellent and suntan lotion in order toavoid possible damage to the interiorpainted surfaces.
•Do not use household or glass cleanersas these may damage the finish of theinstrument panel, interior trim andcluster lens.
•Do not allow air fresheners and handsanitizers to spill onto interior surfaces.If a spill occurs, wipe off immediately.Damage may not be covered by yourwarranty.
If a staining liquid like coffee or juice hasbeen spilled on the instrument panel or oninterior trim surfaces, clean as follows:
1. Wipe up spilled liquid using a clean,white, cotton cloth.
2. Wipe the surface with a damp, clean,white cotton cloth. For more thoroughcleaning, use a mild soap and watersolution. If the spot cannot becompletely cleaned by this method,the area may be cleaned using acommercially available cleaningproduct designed for automotiveinteriors.
3. If necessary, apply more soap andwater solution or cleaning product toa clean, white, cotton cloth and pressthe cloth onto the soiled area. Allowthis to set at room temperature for 30minutes.
4.Remove the soaked cloth and if it is notsoiled badly, use this cloth to clean thearea by using a rubbing motion for 60seconds.
5. Following this, wipe area dry with aclean, white, cotton cloth.
CLEANING LEATHER SEATS (IF
EQUIPPED)
WITHOUT THE KING RANCHEDITION
For routine cleaning, wipe the surface witha soft, damp cloth. For more thoroughcleaning, wipe the surface with a mild soapand water solution. Dry the area with a softcloth.
If you cannot completely clean the leatherusing a mild soap and water solution, youcan try a commercially available leathercleaning product designed for automotiveinteriors.
Note:To check for compatibility, first testany cleaner or stain remover on aninconspicuous part of the leather.
You should:
•remove dust and loose dirt with avacuum cleaner
•clean spills and stains as quickly aspossible
•Check for compatibility, first test anycleaner or stain remover on aninconspicuous part of the leather.
Do not use the following products as thesemay damage the leather:
•oil/petroleum-based leatherconditioners
•household cleaners
259
Super Duty (), enUSA
Vehicle Care
Page 263 of 470

•alcohol solutions
•solvents or cleaners intendedspecifically for rubber, vinyl andplastics.
WITH THE KING RANCH EDITION
Your vehicle is equipped with seatingcovered in premium, top-grain leatherwhich is extremely durable, but stillrequires special care and maintenance inorder to preserve longevity and comfort.
Regular cleaning and conditioning willmaintain the appearance of the leather.
Cleaning
For dirt, use a vacuum cleaner then use aclean, damp cloth or soft brush.
For routine cleaning, wipe the surface witha soft, damp cloth. For more thoroughcleaning, wipe the surface with a mild soapand water solution.
•Clean spills as quickly as possible.
•Test any cleaner or stain remover onan inconspicuous part of the leather ascleaners may darken the leather.
•Do not spill coffee, ketchup, mustard,orange juice or oil-based products onthe leather as they may permanentlystain the leather.
•Do not use household cleaningproducts, alcohol solutions, solventsor cleaners intended for rubber, vinylor plastics.
Scratches
Natural Markings - Because the leather inthe seat comes from genuine steer hides,there will be evidence of naturallyoccurring markings, such as small scars.These markings give character to theseating covers and considered to be proofof a genuine leather product.
In order to lessen the appearance ofcertain scratches and other wear marks,apply conditioner on the affected areafollowing the same instructions as in theConditioning section.
Conditioning
Bottles of King Ranch Leather Conditionerare available at the King Ranch SaddleShop. Visit the website atwww.krsaddleshop.com, or telephone (inthe United States) 1–800–282–KING(5464). If you are unable to obtain KingRanch Leather Conditioner, use anotherpremium leather conditioner.
•Clean the surfaces using the stepsoutlined in the Cleaning section.
•Make sure the leather is dry then applya nickel-sized amount of conditionerto a clean, dry cloth.
•Rub the conditioner into the leatheruntil it disappears. Allow theconditioner to dry, then repeat theprocess for the entire interior. If a filmappears, wipe it off with a dry, cleancloth.
REPAIRING MINOR PAINT
DAMAGE
Your authorized dealer has touch-up paintto match your vehicle’s color. Take yourcolor code (printed on a sticker in thedriver’s door jamb) to your authorizeddealer to ensure you get the correct color.
•Remove particles such as birddroppings, tree sap, insect deposits, tarspots, road salt and industrial falloutbefore repairing paint chips.
•Always read the instructions beforeusing the products.
260
Super Duty (), enUSA
Vehicle Care
Page 264 of 470

CLEANING THE ALLOY
WHEELS (IF EQUIPPED)
Note:Do not apply a cleaning chemical towarm or hot wheel rims and covers.
Note:Some automatic car washes maycause damage to the finish on your wheelrims and covers.
Note:Industrial-strength or heavy-dutycleaners in combination with brush agitationto remove brake dust and dirt, could wearaway the clear coat finish over a period time.
Note:Do not use hydrofluoric acid-basedor high caustic-based wheel cleaners, steelwool, fuels or strong household detergents.
Note:If you intend parking your vehicle foran extended period after cleaning thewheels with a wheel cleaner, drive yourvehicle for a few minutes before doing so.This will reduce the risk of increasedcorrosion of the brake discs.
Alloy wheels and wheel covers are coatedwith a clear coat paint finish. To maintaintheir condition we recommend that you:
•Clean the wheels weekly usingMotorcraft Wheel and Tire Cleaner.Apply using manufacturer'sinstructions.
•Use a sponge to remove heavydeposits of dirt and brake dustaccumulation.
•Rinse thoroughly with a strong streamof water when you have completed thecleaning process.
•To remove tar and grease, useMotorcraft Bug and Tar Remover.
VEHICLE STORAGE
If you plan on storing your vehicle for anextended period of time (30 days or more),read the following maintenancerecommendations to make sure yourvehicle stays in good operating condition.
All motor vehicles and their componentswere engineered and tested for reliable,regular driving. Long term storage undervarious conditions may lead to componentdegradation or failure unless specificprecautions are taken to preserve thecomponents.
General
•Store all vehicles in a dry, ventilatedplace.
•Protect from sunlight, if possible.
•If vehicles are stored outside, theyrequire regular maintenance to protectagainst rust and damage.
Body
•Wash your vehicle thoroughly toremove dirt, grease, oil, tar or mud fromexterior surfaces, rear-wheel housingand underside of front fenders.
•Periodically wash your vehicle storedin exposed locations.
•Touch-up exposed or primed metal toprevent rust.
•Cover chrome and stainless steel partswith a thick coat of auto wax to preventdiscoloration. Re-wax as necessarywhen your vehicle is washed.
•Lubricate all hood, door and trunk lidhinges, and latches with a light gradeoil.
•Cover interior trim to prevent fading.
•Keep all rubber parts free from oil andsolvents.
261
Super Duty (), enUSA
Vehicle Care