2015 FORD F250 SUPER DUTY instrument panel
[x] Cancel search: instrument panelPage 109 of 470
HINTS ON CONTROLLING THE
INTERIOR CLIMATE
General Hints
Note:Prolonged use of recirculated air maycause the windows to fog up.
Note:You may feel a small amount of airfrom the footwell air vents regardless of theair distribution setting.
Note:To reduce humidity build-up insideyour vehicle, do not drive with the systemswitched off or with recirculated air alwaysswitched on.
Note:Do not place objects under the frontseats as this may interfere with the airflowto the rear seats.
Note:Remove any snow, ice or leaves fromthe air intake area at the base of thewindshield.
Note:To improve the time to reach comfortin hot weather, drive with the windowsslightly open for 2-3 minutes after start-upor until your vehicle airs out.
Manual Climate Control
Note:To reduce fogging of the windshieldduring humid weather, adjust the airdistribution control to the windshield airvents position.
Automatic Climate Control
Note:Adjusting the settings when yourvehicle interior is extremely hot or cold isnot necessary. The system automaticallyadjusts to heat or cool the cabin to yourselected temperature as quickly as possible.For the system to function efficiently, theinstrument panel and side air vents shouldbe fully open.
Note:If you select AUTO during coldoutside temperatures, the system directsairflow to the windshield and side windowvents. In addition, the fan may run at aslower speed until the engine warms up.
Note:If you select AUTO during hot outsidetemperatures, or when the inside of thevehicle is hot, the system automatically usesrecirculated air to maximize interior cooling.When the interior reaches the selectedtemperature, the system automaticallyswitches to using outside air.
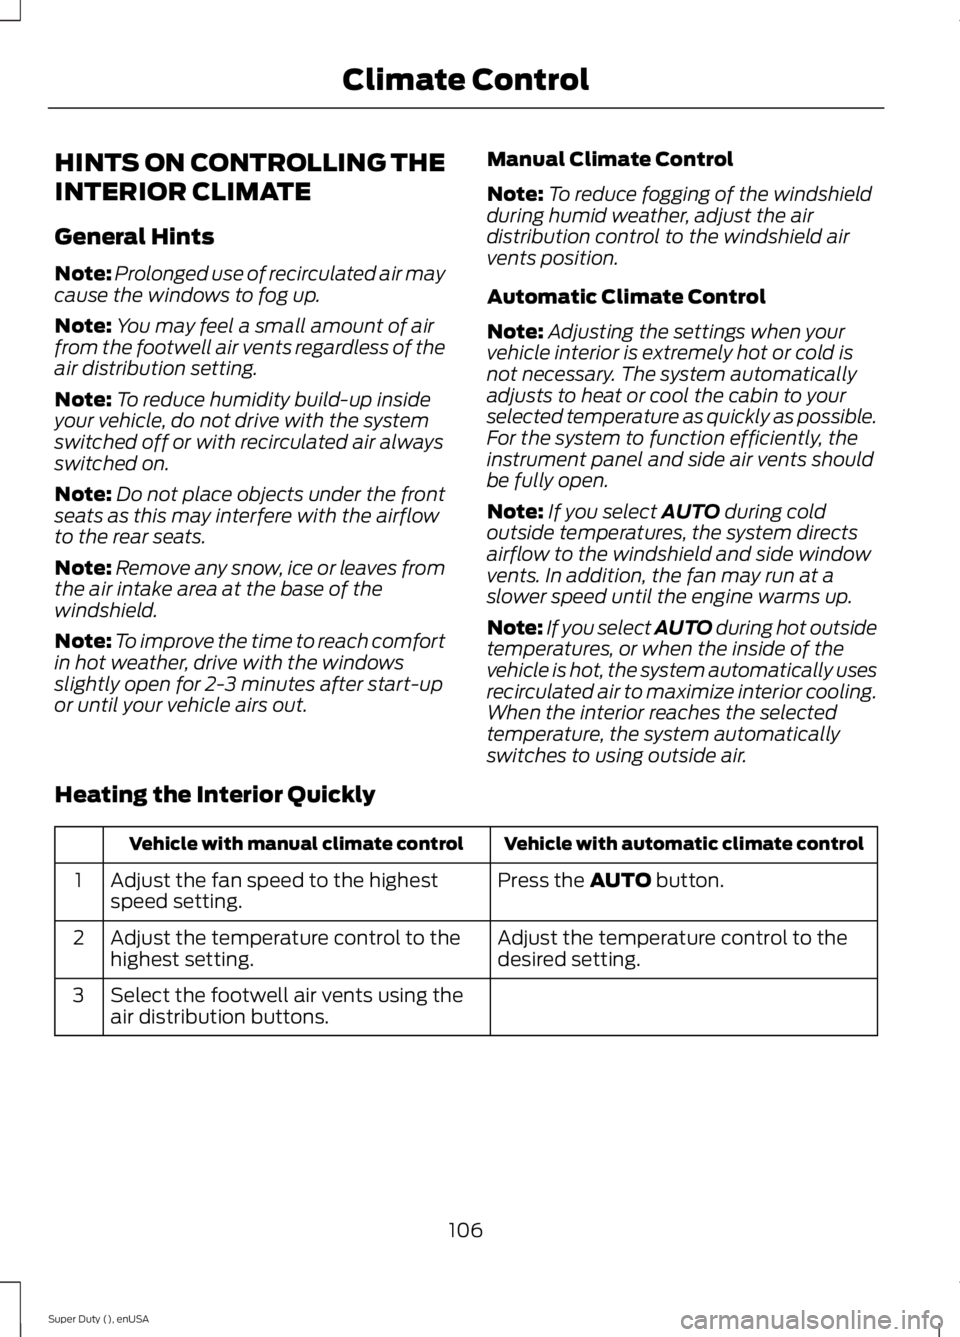
Heating the Interior Quickly
Vehicle with automatic climate controlVehicle with manual climate control
Press the AUTO button.Adjust the fan speed to the highestspeed setting.1
Adjust the temperature control to thedesired setting.Adjust the temperature control to thehighest setting.2
Select the footwell air vents using theair distribution buttons.3
106
Super Duty (), enUSA
Climate Control
Page 110 of 470
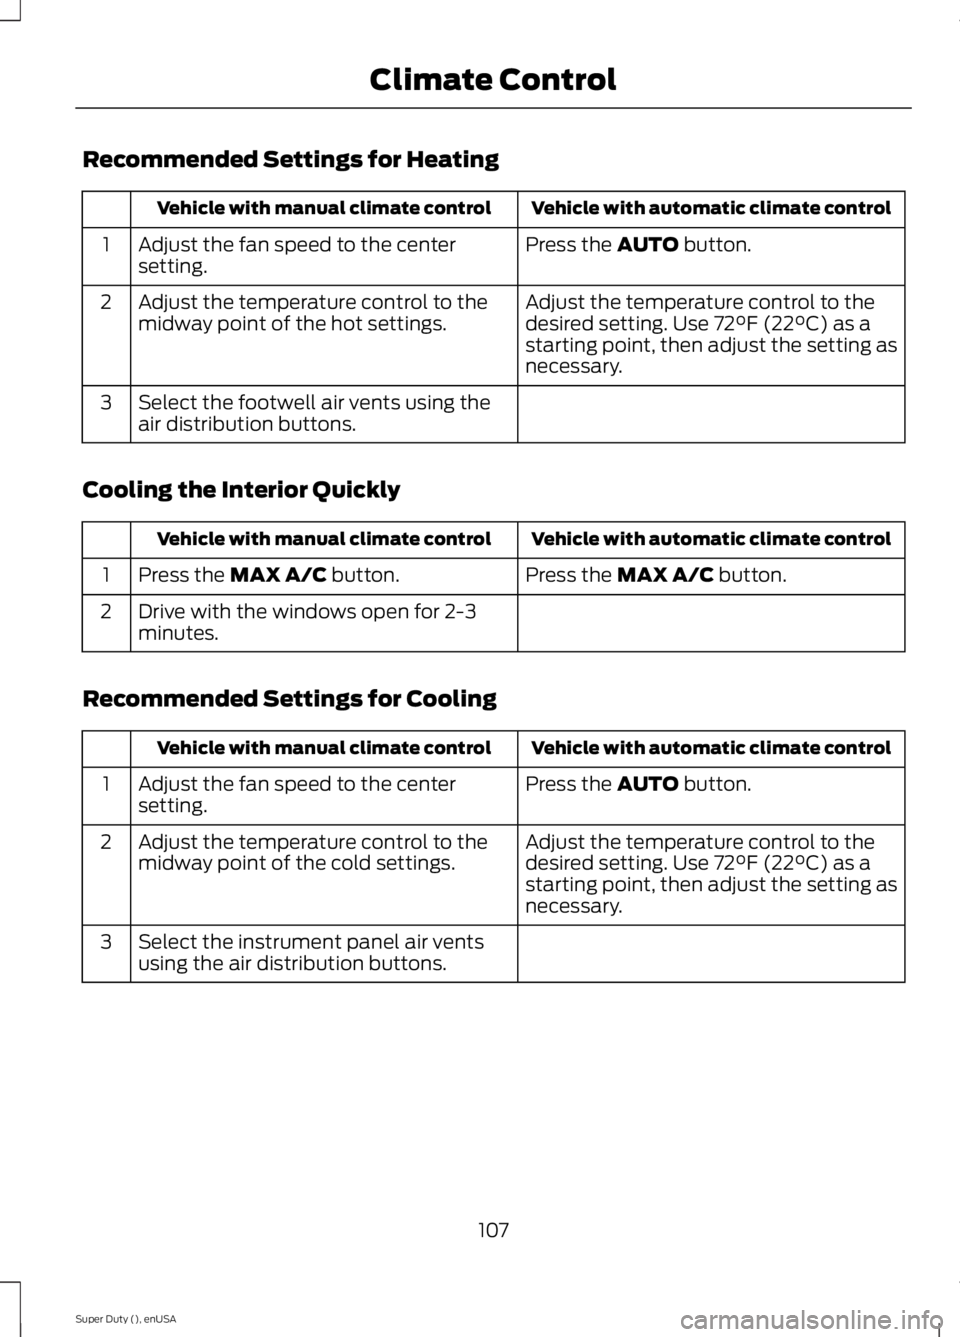
Recommended Settings for Heating
Vehicle with automatic climate controlVehicle with manual climate control
Press the AUTO button.Adjust the fan speed to the centersetting.1
Adjust the temperature control to thedesired setting. Use 72°F (22°C) as astarting point, then adjust the setting asnecessary.
Adjust the temperature control to themidway point of the hot settings.2
Select the footwell air vents using theair distribution buttons.3
Cooling the Interior Quickly
Vehicle with automatic climate controlVehicle with manual climate control
Press the MAX A/C button.Press the MAX A/C button.1
Drive with the windows open for 2-3minutes.2
Recommended Settings for Cooling
Vehicle with automatic climate controlVehicle with manual climate control
Press the AUTO button.Adjust the fan speed to the centersetting.1
Adjust the temperature control to thedesired setting. Use 72°F (22°C) as astarting point, then adjust the setting asnecessary.
Adjust the temperature control to themidway point of the cold settings.2
Select the instrument panel air ventsusing the air distribution buttons.3
107
Super Duty (), enUSA
Climate Control
Page 111 of 470
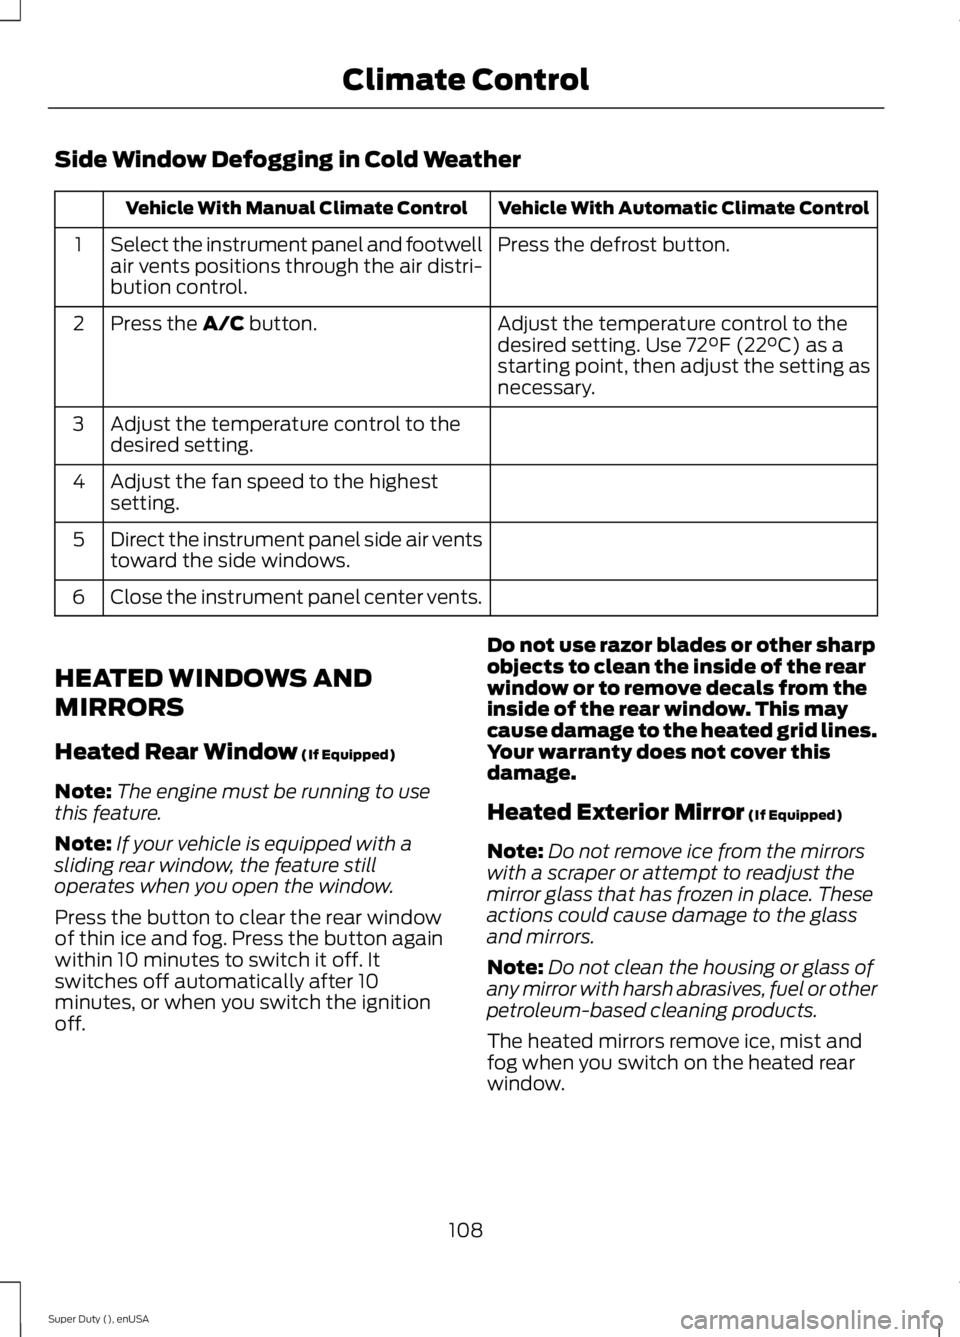
Side Window Defogging in Cold Weather
Vehicle With Automatic Climate ControlVehicle With Manual Climate Control
Press the defrost button.Select the instrument panel and footwellair vents positions through the air distri-bution control.
1
Adjust the temperature control to thedesired setting. Use 72°F (22°C) as astarting point, then adjust the setting asnecessary.
Press the A/C button.2
Adjust the temperature control to thedesired setting.3
Adjust the fan speed to the highestsetting.4
Direct the instrument panel side air ventstoward the side windows.5
Close the instrument panel center vents.6
HEATED WINDOWS AND
MIRRORS
Heated Rear Window (If Equipped)
Note:The engine must be running to usethis feature.
Note:If your vehicle is equipped with asliding rear window, the feature stilloperates when you open the window.
Press the button to clear the rear windowof thin ice and fog. Press the button againwithin 10 minutes to switch it off. Itswitches off automatically after 10minutes, or when you switch the ignitionoff.
Do not use razor blades or other sharpobjects to clean the inside of the rearwindow or to remove decals from theinside of the rear window. This maycause damage to the heated grid lines.Your warranty does not cover thisdamage.
Heated Exterior Mirror (If Equipped)
Note:Do not remove ice from the mirrorswith a scraper or attempt to readjust themirror glass that has frozen in place. Theseactions could cause damage to the glassand mirrors.
Note:Do not clean the housing or glass ofany mirror with harsh abrasives, fuel or otherpetroleum-based cleaning products.
The heated mirrors remove ice, mist andfog when you switch on the heated rearwindow.
108
Super Duty (), enUSA
Climate Control
Page 132 of 470
12 Volt DC Power Point
WARNING
Do not plug optional electricalaccessories into the cigar lightersocket (if equipped). Improper useof the lighter can cause damage notcovered by your warranty, and can resultin fire or serious injury.
Note:If used when the engine is notrunning, the battery will discharge. Theremay be insufficient power to restart yourengine.
Note:Do not insert objects other than anaccessory plug into the power point. Thiswill damage the outlet and blow the fuse.
Note:Do not hang any type of accessory oraccessory bracket from the plug.
Note:Do not use the power point over thevehicle capacity of 12 volt DC 180 watts ora fuse may blow.
Note:Do not use the power point foroperating a cigar lighter element.
Note:Improper use of the power point cancause damage not covered by yourwarranty.
Note:Always keep the power point capsclosed when not in use.
Run the engine for full capacity use of thepower point. To prevent the battery frombeing discharged:
•do not use the power point longer thannecessary when the engine is notrunning
•do not leave devices plugged inovernight or when the vehicle is parkedfor extended periods.
Locations
Power points may be found:
•On the instrument panel (twolocations).
•Inside the center console.
•On the rear of the center console.
•Inside the front under-seat storagecompartment (if equipped).
•Inside the rear under-seat storagecompartment (if equipped).
110 Volt AC Power Points (If Equipped)
WARNING
Do not keep electrical devicesplugged in the power points whenthe devices are not in use. Do not useany extension cord with the 110 volt ACpower points, since it will defeat the safetyprotection design. Do not use a singlepower point to power multiple devices. Itmay cause the power point to exceed the150 watt load limit and overload, resultingin fire or serious injury.
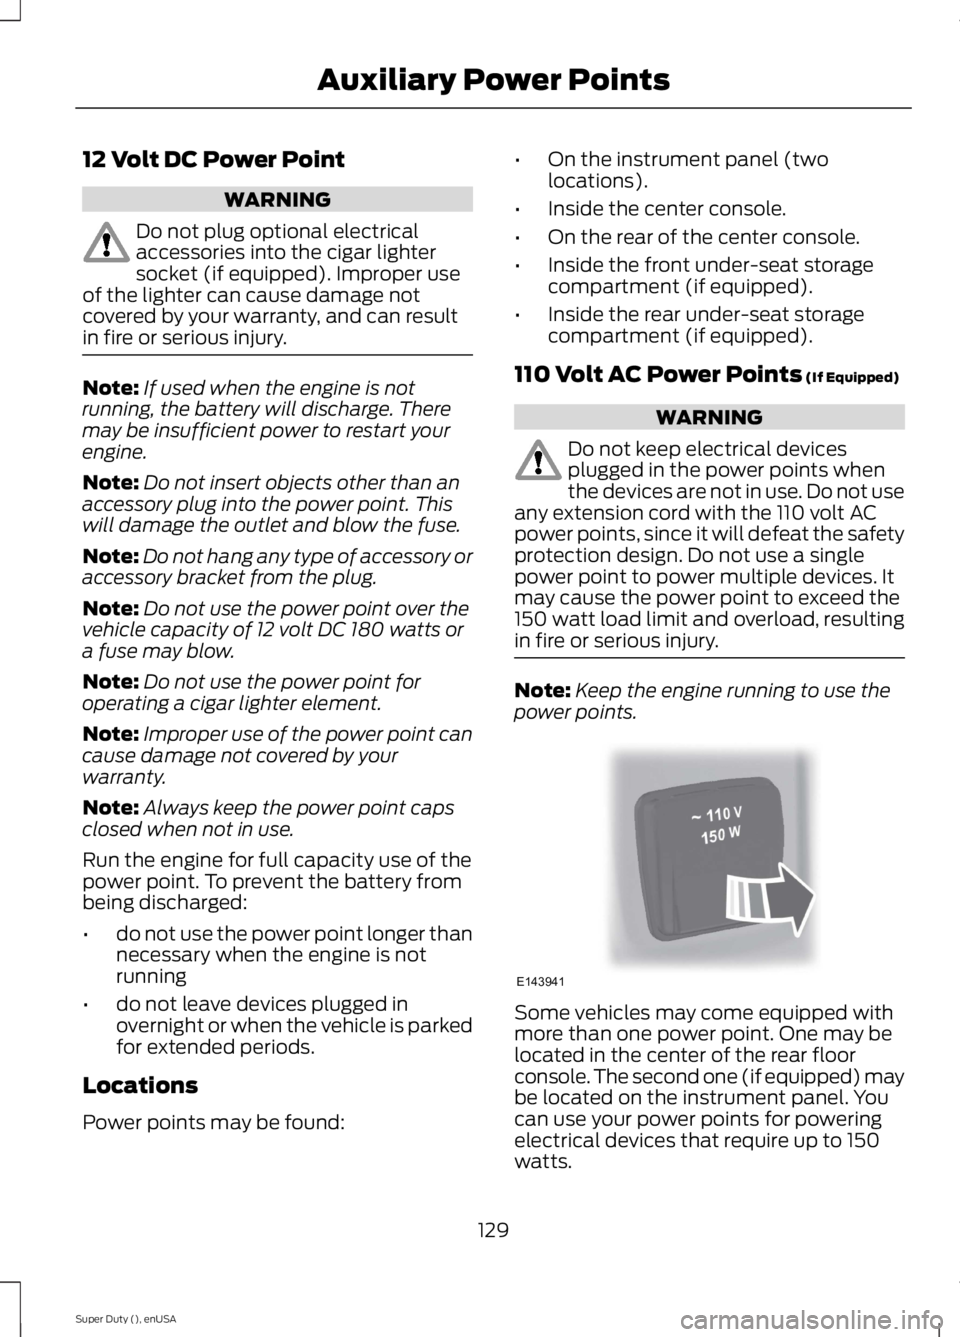
Note:Keep the engine running to use thepower points.
Some vehicles may come equipped withmore than one power point. One may belocated in the center of the rear floorconsole. The second one (if equipped) maybe located on the instrument panel. Youcan use your power points for poweringelectrical devices that require up to 150watts.
129
Super Duty (), enUSA
Auxiliary Power PointsE143941
Page 155 of 470
•provides 4x4 High engagement anddisengagement while the vehicle ismoving.
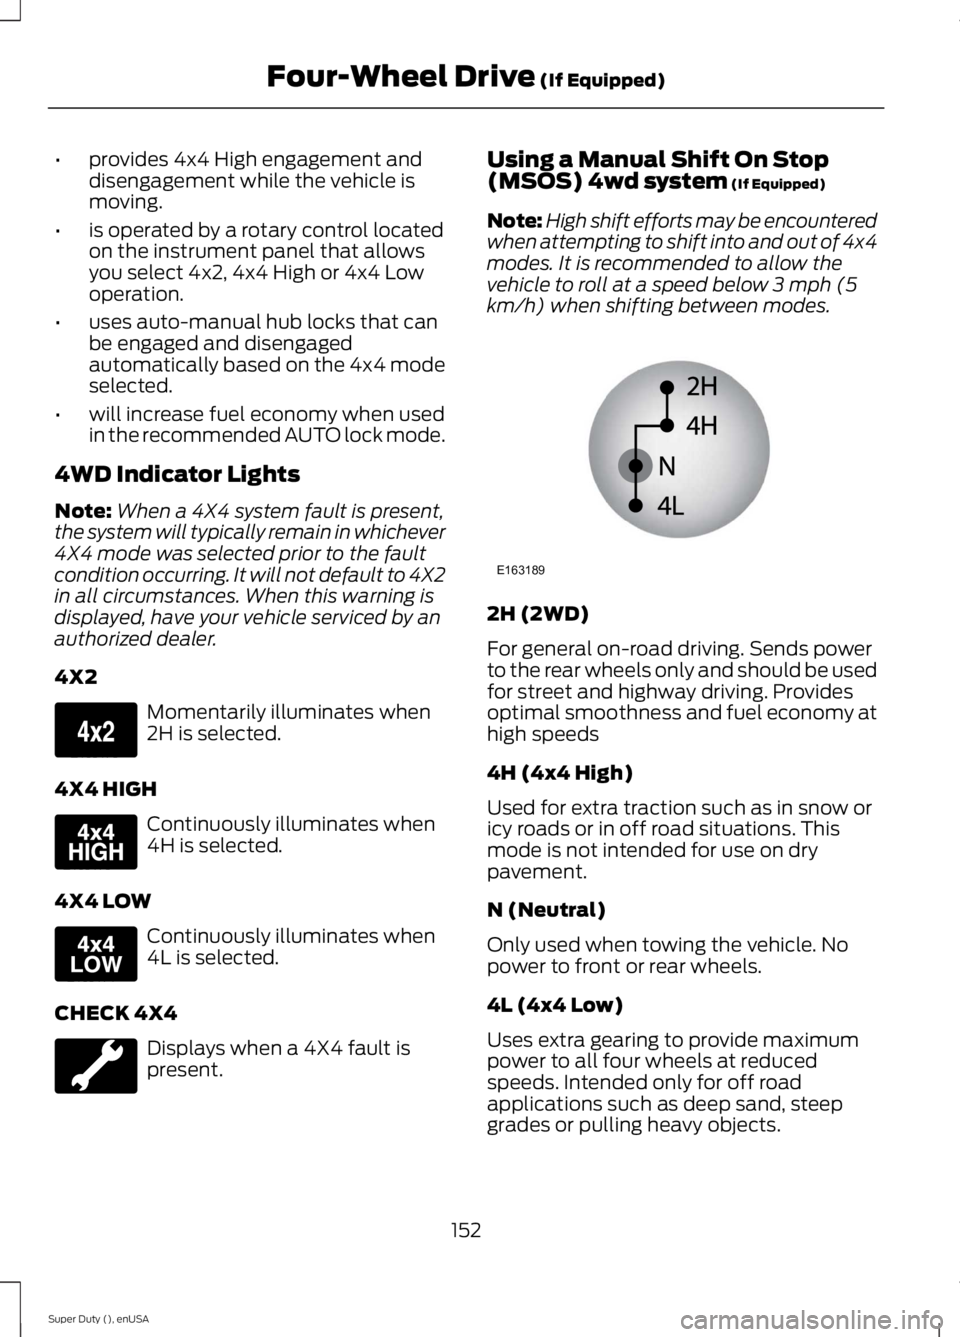
•is operated by a rotary control locatedon the instrument panel that allowsyou select 4x2, 4x4 High or 4x4 Lowoperation.
•uses auto-manual hub locks that canbe engaged and disengagedautomatically based on the 4x4 modeselected.
•will increase fuel economy when usedin the recommended AUTO lock mode.
4WD Indicator Lights
Note:When a 4X4 system fault is present,the system will typically remain in whichever4X4 mode was selected prior to the faultcondition occurring. It will not default to 4X2in all circumstances. When this warning isdisplayed, have your vehicle serviced by anauthorized dealer.
4X2
Momentarily illuminates when2H is selected.
4X4 HIGH
Continuously illuminates when4H is selected.
4X4 LOW
Continuously illuminates when4L is selected.
CHECK 4X4
Displays when a 4X4 fault ispresent.
Using a Manual Shift On Stop(MSOS) 4wd system (If Equipped)
Note:High shift efforts may be encounteredwhen attempting to shift into and out of 4x4modes. It is recommended to allow thevehicle to roll at a speed below 3 mph (5km/h) when shifting between modes.
2H (2WD)
For general on-road driving. Sends powerto the rear wheels only and should be usedfor street and highway driving. Providesoptimal smoothness and fuel economy athigh speeds
4H (4x4 High)
Used for extra traction such as in snow oricy roads or in off road situations. Thismode is not intended for use on drypavement.
N (Neutral)
Only used when towing the vehicle. Nopower to front or rear wheels.
4L (4x4 Low)
Uses extra gearing to provide maximumpower to all four wheels at reducedspeeds. Intended only for off roadapplications such as deep sand, steepgrades or pulling heavy objects.
152
Super Duty (), enUSA
Four-Wheel Drive (If Equipped)E163173 E163175 E163174 E163189
Page 166 of 470

PARKING BRAKE
WARNING
Always set the parking brake fullyand make sure the transmissionselector lever is placed in position P.Failure to set the parking brake and engagepark could result in vehicle roll-away,property damage or bodily injury. Turn theignition to the lock position and removethe key whenever you leave your vehicle.
Apply the parking brake whenever yourvehicle is parked. Press the pedaldownward to set the parking brake. Thebrake warning lamp in the instrumentcluster will illuminate and remainsilluminated until the parking brake isreleased.
To release, pull the brake release leverlocated at the lower left side of theinstrument panel.
If you are parking your vehicle on a gradeor with a trailer, press and hold the brakepedal down, then set the parking brake.There may be a little vehicle movement asthe parking brake sets to hold the vehicle'sweight. This is normal and should be noreason for concern. If needed, press andhold the service brake pedal down, thentry reapplying the parking brake. Chock thewheels if required. If the parking brakecannot hold the weight of the vehicle, theparking brake may need to be serviced orthe vehicle may be overloaded.
HILL START ASSIST
WARNINGS
The system does not replace theparking brake. When you leave yourvehicle, always apply the parkingbrake and put the transmission in park (P).
WARNINGS
You must remain in your vehicle onceyou have activated the system.
During all times, you are responsiblefor controlling your vehicle,supervising the system andintervening, if required.
If the engine is revved excessively, orif a malfunction is detected, thesystem will be deactivated.
The system makes it easier to pull awaywhen your vehicle is on a slope without theneed to use the parking brake.
When the system is active, your vehicle willremain stationary on the slope for two tothree seconds after you release the brakepedal. This allows you time to move yourfoot from the brake to the acceleratorpedal. The brakes are releasedautomatically once the engine hasdeveloped sufficient drive to prevent yourvehicle from rolling down the slope. Thisis an advantage when pulling away on aslope, (for example from a car park ramp,traffic lights or when reversing uphill intoa parking space).
The system will activate automatically onany slope that will cause significant vehiclerollback.
Using Hill Start Assist
1. Press the brake pedal to bring yourvehicle to a complete standstill. Keepthe brake pedal pressed.
2. If the sensors detect that your vehicleis on a slope, the system will activateautomatically.
3. When you remove your foot from thebrake pedal, your vehicle will remainon the slope without rolling away forabout two or three seconds. This holdtime will automatically be extended ifyou are in the process of driving off.
163
Super Duty (), enUSA
Brakes
Page 168 of 470

PRINCIPLE OF OPERATION
The traction control system helps avoiddrive wheel spin and loss of traction.
If your vehicle begins to slide, the systemapplies the brakes to individual wheelsand, when needed, reduces engine powerat the same time. If the wheels spin whenaccelerating on slippery or loose surfaces,the system reduces engine power in orderto increase traction.
USING TRACTION CONTROL
(Dual rear wheel vehicles only)
In certain situations (for example, stuck insnow or mud), it may be beneficial to turnthe traction control system off. This allowsthe wheels to spin with full engine power.
Turn the traction control system off bypressing the stability control buttonlocated on the instrument panel.
If you cannot turn the system off, see theMyKey chapter for more information.
Placing your vehicle into four-wheel drivemode automatically disables tractioncontrol. Traction control operation willresume when you place your vehicle backinto two-wheel drive mode.
Engine only traction control(Dual rear wheel vehicles only)
Traction control systemStability control OFFindicatorButton functions
EnabledNot illuminatedDefault at start-up
DisabledIlluminatedButton pressed momentarily
EnabledNot illuminatedButton pressed again afterdeactivation
DisabledIlluminatedTransfer case switched to4WD*
*Engaging 4WD automatically disables the traction control system.
165
Super Duty (), enUSA
Traction ControlE162724
Page 171 of 470
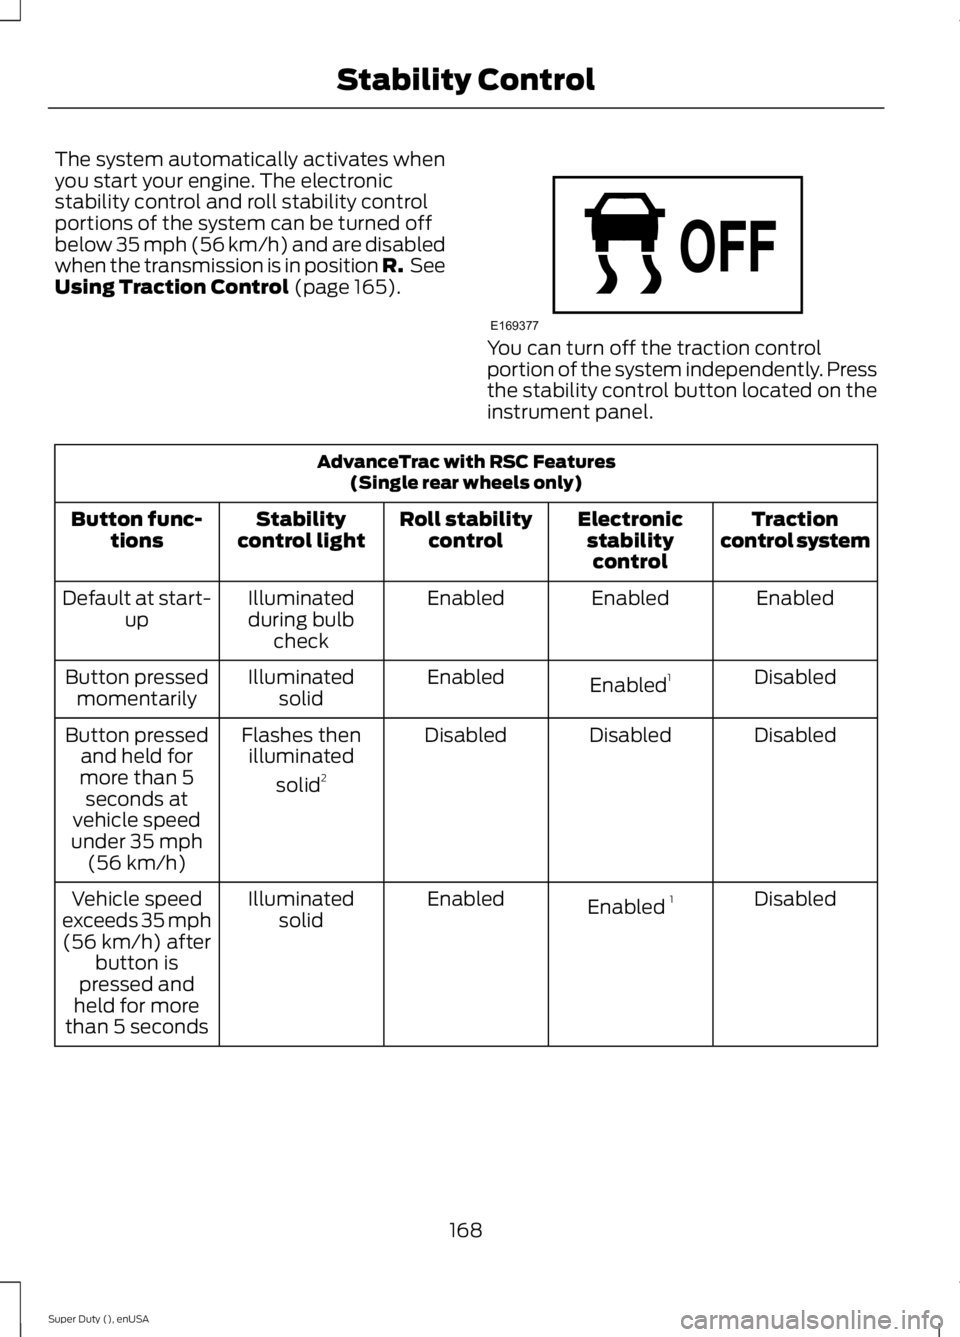
The system automatically activates whenyou start your engine. The electronicstability control and roll stability controlportions of the system can be turned offbelow 35 mph (56 km/h) and are disabledwhen the transmission is in position R. SeeUsing Traction Control (page 165).
You can turn off the traction controlportion of the system independently. Pressthe stability control button located on theinstrument panel.
AdvanceTrac with RSC Features(Single rear wheels only)
Tractioncontrol systemElectronicstabilitycontrol
Roll stabilitycontrolStabilitycontrol lightButton func-tions
EnabledEnabledEnabledIlluminatedduring bulbcheck
Default at start-up
DisabledEnabled1EnabledIlluminatedsolidButton pressedmomentarily
DisabledDisabledDisabledFlashes thenilluminated
solid2
Button pressedand held formore than 5seconds atvehicle speedunder 35 mph(56 km/h)
DisabledEnabled 1EnabledIlluminatedsolidVehicle speedexceeds 35 mph(56 km/h) afterbutton ispressed andheld for morethan 5 seconds
168
Super Duty (), enUSA
Stability ControlE169377